![]()
Nature POWER 53120 High Performance Solar Kit – Off Grid User Manual
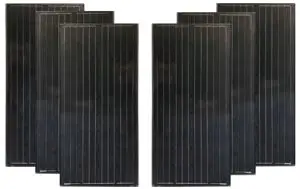
* Actual product appearance can vary depending on solar cells and materials used
![]() WARNING: Read carefully and understand all assembly and operation instructions before operating. Failure to follow the safety rules and other basic safety precautions may result in serious personal injury.
WARNING: Read carefully and understand all assembly and operation instructions before operating. Failure to follow the safety rules and other basic safety precautions may result in serious personal injury.
SAVE THESE INSTRUCTIONS
Important Safety Information
Thank you for choosing a Nature Power Product. Save the receipt and these instructions. It is important that you read the entire manual to become familiar with this product before you begin using it.
This product is designed for certain applications only. the distributor cannot be responsible for issues arising from modification. We strongly recommend this product not be modified and/or used for any application other than that for which it was designed. If you have any question relative to a particular application, Do not use the product until you have first contacted the distributor to determine if it can or should be performed on the product. For technical question please call 1800-588-0590
WARNING
- Read and understand all instructions. Failure to follow all instructions may result in serious injury or property damage.
- The warnings, cautions, and instructions in this manual cannot cover all possible conditions or situations that could occur. Exercise common sense and caution when using this tool. Always be aware of the environment and ensure that the tool is used in a safe and responsible manner.
- Do not allow persons to operate or assemble the product until they have read this manual and have developed a thorough understanding of how it works.
- Do not modify this product in any way. Unauthorized modification may impair the function and / or safety and could affect the life of the product.
- There are specific applications for which the product was designed. Use the right tool for the job.
- DO NOT attempt to force small equipment to do the work of larger industrial equipment. There are certain applications for which this equipment was designed. It will be a safer experience and do the job better at the capacity for which it was intended.
- DO NOT use this equipment for a purpose for which it was not intended. Industrial or commercial applications must follow OSHA requirements.
 WARNING
 - This product can expose you to chemicals, including Di (2-ethylhexyl) phthalate (DEHP) which is known to the State of California to cause cancer, birth defects or other reproductive harm. For more information, go to www.p65warnings.ca.gov
Cautions
- Never touch the end of output cables with your bare hands when the modules are irradiated. Handle wires with rubber-gloved hands to avoid electric shock.
- Do not wear metallic jewelry when working on electrical equipment
- Product should be Installed and maintained by qualified personnel.
- Do not drop tool or other item on the glass of the solar module.
- Do not scratch the back film of the solar panel.
- Avoid exposing solar panels to partial sunlight or shadows. Partial sunlight can cause hot spots on the panel.
- Do not pour chemicals on module when cleaning.
- Keep module away from children.
Precautions when working with batteries
- Never smoke or allow a spark or flame near the batteries.
- Batteries generate hydrogen and oxygen during charging resulting in evolution of explosive gas mixture. Care should be taken to ventilate the battery area and follow the battery manufacturer’s recommendations.
- Batteries contain vary corrosive diluted sulphuric acid as electrolyte. Precautions should be taken to prevent contact with skin, ayes or clothing.
- Use caution to reduce the risk of dropping a metal tool on the battery. It could spark or short circuit the battery or other electrical parts and could cause an explosion.
- Remove metal items like rings, bracelets and watches when working with batteries. The batteries can produce a short circuit current high enough to weld a ring or the like to metal and thus cause a severe bum.
- If you need to remove a battery, always remove the ground terminal from the battery first. make sure that all the accessories are off so that you do not cause a spark.
- Use properly insulated tools only when making battery connections.
Precautions when working with solar panelsWith the incidence of sunlight or other light sources on all solar panels, a voltage appears at the output terminals of the solar panel turning it into a source of electricity. To avoid a shock hazard make sure the solar panel is covered with an opaque (dark) material such as paper/cloth during the Installation. Do not make contact with the terminals when the panel Is exposed to sunlight or other light sources.
Precautions when working with Charge ControllersIf two or more solar panels are connected in series/parallel make sure that the sum of the short circuit current ratings of all panel strings does not exceed 80% of the charge controller’s current rating.
Specification
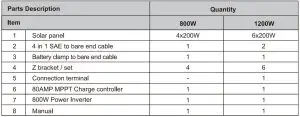
Parts List
Installing Instructions
Selecting the correct battery
Nature Power does not offer batteries. However, please choose a 12 Volt rechargeable battery. Do not attempt to recharge non-rechargeable batteries. 6 Volt battery configurations may also be used if connected in series (Negative to Positive). You may choose a Sealed Lead Acid battery, a Gel-Cell or a Deep Cycle 12 Volt battery. Batteries come in all different sizes, please converse with your battery dealer for more information on which type of battery you should use for your system. Note your solar panel amperage rating when selecting your battery size.
Location of solar module
Please locate your solar module in a position where it can absorb direct sunlight on the solar panel, and generally free from cover and shade. To capture the most sunlight in a day Solar Modules should be facing 20 degrees South if you are in the Northern hemisphere and 20 degrees North if you are in the Southern hemisphere. The Solar Module can become very hot, please keep out of reach of children. Do not place heavy objects on Solar Module.
Out put power testing
You may use a voltage meter or a digital multi-meter to measure the voltage of your Solar Module before connecting to the battery. Voltage can range between 15-22 volts; Testing will ensure correct charging operation. Testing equipment not included.
Mounting the Solar Panel
Mounting the solar panels that is free from shade and located in an area that receives maximum sunlight daily. In the Northern Hemisphere. The best direction to face solar panels is south. However, using your judgment in figuring out which location gets the most sun, would be helpful. For maximum solar power absorption throughout the day, a tilt-mounting is recommended.
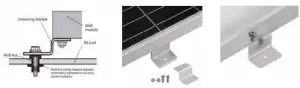
The solar panels can be permanently installed level using the Z-brackets. Measure the distance between the mounting site and the battery location. The charge controller should be mounted in close proximity to the battery bank (within 5 feet). Refer to the DC electrical wire guide to choose an appropriate gauge wire for the length of the wire.
If you choose to mount your Solar Panel on your RV, be sure you solidly mount your panels to the roof. If you have a rubber roof over thin plywood you may want to use molly fasteners to get a better grip. If you have a fiberglass roof, drill some pilot holes through the fiberglass to reach plywood below. This will prevent cracking or damaging the fiberglass. If your RV is equipped with a metal roof you must mount the solar panel to the joists supporting the roof.
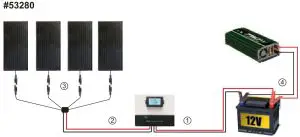
Solar System Connecting Instructions
Step1: Connect the charge controller to battery with SAE-battery clamp cable, Parallel connections; Positive to Positive and Negative to Negative.
Step2: 4 in 1 SAE-bare end cable serious connect using connection terminal (parts #5).
Step3: Connect 4 in 1 SAE-bare end cable with charge controller.
Step 4: Connect 3 solar panels with each 4 in 1 SAE cable.
Noted: Please connect same quantity panels to each 4 in 1 cable, otherwise the solar battery will not have maximum output.
Step5: Connect the power inverter to battery by “bare end – battery clamp” cable which included as inverter’s accessories.
*Please refer to charge controller and power inverter manual for operation.
Step1: Connect the charge controller to battery with SAE-battery clamp cable, Parallel connections; Positive to Positive and Negative to Negative.
Step2: Connect 4 in 1 SAE-bare end cable with charge controller.
Step3: Connect solar panels with the 4 in 1 SAE cable.
Step 4: Connect the power inverter to battery by “bare end – battery clamp” cable which included as the inverter accessories.
*Please refer to charge controller and power inverter manual for operation.
Multiple Batteries Connection
You may need to connect multiple 12V batteries to store more power. The connection methods are series and parallel as shown. When the batteries are connected in series, the system voltage increases. If two 12V batteries are connected in series, the system is 24V, and if three batteries are connected in series, the system is 36V. Please note that the system voltage cannot exceed 48V, which is required by the charge controller.
Solar Panels weekly power Chart
Weekly Power Chart
All run times/ratings are estimates only and may vary depending on your location, time of day, time of year and are based on 7 Hours of full sunlight per day.

Connecting Additional Solar Panels
Go to www.naturepowerproducts.com or call us 1-800-588-0590 to upgrade your system to 1600 watts or higher power.
Trouble Shooting
Battery are not charging.
Check your controller and battery first of all, make sure it’s a workable 12V battery, battery voltage should not lower than 11V(12V battery) / 22V(24V battery).
Faulty connections The wires should always be tight and insulated. Poor wiring may cause loose connections, corrosion and oxidation of the wires. Voltage levels at various parts of your connection can be checked by a multimeter to help you find out the points at which low voltage problems start. Do not connect the solar power to the controller during the solar power voltage check.
Solar panel faults This condition is not common as most of the solar panels are able to sustain harsh weather conditions and last for a long period of time. Checking on your solar panels is also advised as the last resort. The main defects a solar panel may experience are: Delamination, junction box faults (increased resistance in the junction boxes due to exposure to moisture).
Low power output from Solar panel / Battery charging slow.
Shading Shading should always be avoided at all times. Shading causes massive loss of power output and solar panels need high exposure to sun light so as to produce high power outputs. One should always make sure that there are no tree branches blocking the solar panels from direct sunlight. Dust and debris also causes shading. Solar panels should always be cleaned to
FAQ
- Will this solar panel work with a 24V/36V/48V battery?
This charge controller are suitable for 24V/36V/48V system.
- How do solar system work?
The panel’s photovoltaic cells convert the energy in sunlight to electricity, the electricity is then stored in the battery and an inverter will allow you to plug in appliances, there is 4 major components needed to set up your solar off grid system. Solar panels, charge controller to control the charge to the battery bank, a battery for power storage and an inverter to transfer DC power from the battery to an AC power.
- Do I need battery to store Power?
Yes, 1 or multiple batteries are needed to store the power from the solar panel, the inverter will also connect to the battery.
- What size battery can I use?
The amount of battery storage you need is based on your energy usage. Energy usage is measured in Watts or kilowatt hours over a period of time. You can use any size battery, best used with Deep Cycle batteries.
- Can you connect this to the breaker box in the house?
No, this is an off grid only solar kit, you can not connect to the breaker box.
- How to use a charge controller?
Charge controllers are required for installations of solar systems arrays that are rated 12 Watts and higher. Charge Controllers help to protect the battery(s) and solar panel(s) from harmful reverse currents, battery over charging and high wattage surges, addition protections are found on larger charge controllers. Nature Power Products offers charge controllers from 8Amp-80Amp. One Charge Controller can regulate multiple solar panels.
- How should my solar panels be positioned in order to produce the most power?
In the Northern Hemisphere, The best direction to face solar panels is south. However, using your judgment in figuring out which location gets the most sun, would be helpful.
- Solar panels need to be in direct sun to work?
No, although solar panels produce the highest wattage output in direct sunlight, they will still produce power on cloudy days.
- Will I need solar maintenance?
Solar panels generally require very little maintenance. They are very durable but should always be cleaned to prevent dust and debris particles from causing shading on the solar panels. batteries might need to be changed every few years.
- How long does installation take?
This is a very basic setup plug and play, however, installing the panel to a flat surface might require able bodies with a little bit of know how’s.
- On what roof materials can solar be installed?
Solar panels can be installed on any roof material that can take the weight of the panel. properly mounted solar panel system is essential, as a an improperly mounted solar panel can cause leaks or other roof issues
Limited Warranty
Nature Power warrants our products to the original purchaser that this product is free from defects in materials and workmanship for the period of 1 year from date of purchase, 25 year warranted to generate up to 80% of rated power from date of purchase. In the case of product defect, contact Nature Power customer service to receive trouble shooting. If defective part or unit should be returned, a Return Authorization Number must be issued by Nature Power and the defective part or unit should be returned to the authorized location at the purchasers’ expense. A dated proof of purchase is required to receive warranty service. Once received at authorized location and defect proves to be the result of defective material and workmanship, the defective part or unit will be replaced at warrantors’ option and returned to the original purchaser at warrantors’ expense. No refunds will be granted by the warrantor, in the event of buyer’s remorse please contact your point of purchase within and in adherence to their return policy. Refunds are granted at the retailers’ discretions.
![]()
Please contact Nature Power Products to acquire more information:
1-800-588-0590
 report this ad
[xyz-ips snippet=”download-snippet”]