![]()
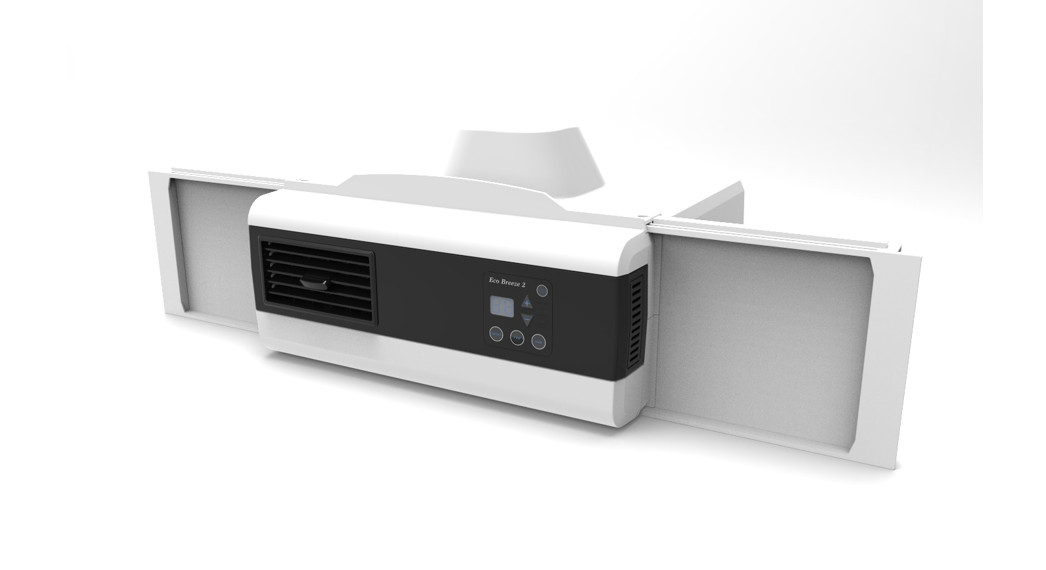
EcoBreeze 2.1Important Instructions – Installation and OperatingManual

A product by Nature’s Cooling Solutions®When spring, summer, and fall tend to be warm during the day and cooler in the evenings and nighttime, use EcoBreeze 2.1 to cool your home naturally with healthy filtered air. Designed to run as a stand-alone fan or complementing airconditioning systems. It constantly monitors inside and outside temperature and humidity. In the automatic mode will only bring in air when it will help to cool the indoor space.
For Additional Help:Installing EcoBreeze 2 video: NaturesCoolingSolutions.com on EcoBreeze 2 tab Set up and Customization of EcoBreeze 2 video: NaturesCoolingSolutions.com on EcoBreeze 2 tabCall us at 877-565-1457 or email us at [email protected]
Mother Nature provides the cool fresh air, we provide the technology!EcoBreeze 2.1 Window FanModels: EB2-H08, EB2-H13, EB2-VR08, EB2-VR13, EB2-VL08, EB2-VL13,This fan is for residential use only. It is not intended to be used in commercial, industrial or agricultural settings.
 READ AND SAVE THESE INSTRUCTIONS
READ CAREFULLY BEFORE ATTEMPTING TO ASSEMBLE, INSTALL, OPERATE, OR MAINTAIN THE PRODUCT.PROTECT YOURSELF AND OTHERS BY OBSERVING ALL SAFETY INFORMATION. FAILURE TO COMPLY WITH INSTRUCTIONS COULD RESULT IN PERSONAL INJURY AND/OR PROPERTY DAMAGE. KEEP INSTRUCTIONS FORFUTURE REFERENCE.
Important Safety Instructions
DANGER, ELECTRICAL, SHOCK, FIRE
GENERAL SAFETY INFORMATIONRead all instructions before using this fan.
- Make certain the power source conforms to the electrical requirement of the fan.
- Make sure the room is equipped with a working smoke detector.
- Use this fan only as described in this manual. Any other use not recommended by the manufacturer may cause fire, electrical shock, or injury to persons.
- To reduce the risk of personal injury and electric shock, the fan should not be played with or placed where small children can reach it. Close supervision is necessary when any appliance is used by or near children or disabled people.
- Unplug the power cord before installing, servicing, or moving the fan.
 DO NOT DEPEND ON THE ON/OFF SWITCH AS THE SOLE MEANS OF DISCONNECTING POWER WHEN SERVICING OR MOVING THE FAN.
 - This fan must NOT be used in potentially dangerous locations such as flammable, explosive, chemical-laden atmospheres. To protect against electrical shock do not immerse the unit, plug, or cord in water or spray liquids.
- This appliance has a polarized plug (one blade is wider than the other). To reduce the risk of electrical shock, this plug is intended to fit in a polarized outlet only one way. Match the wide blade of the plug to the wide slot.Fully insert. If the plug does not fit in the outlet contact a qualified electrician. Do not attempt to defeat this safety feature.
- This product employs overload protection (fuse). A blown fuse indicates an overload or short-circuits situation.If the fuse blows, unplug the product from the outlet. To replace the fuse open the fuse cover, remove the fuse and replace it with a new fuse(follow product marking for proper fuse rating) and check the product. If the replacement fuse blows, a short-circuit may be present and the product should be discarded or returned to an authorized service facility for examination and/or repair.This plug is a safety feature. It contains a safety device (fuse) that should not be removed. Discard the product if the attachment plug is damaged. To reduce the risk of fire, electric shock, and personal injury, DO NOT remove, replace, repair, or tamper with the originally supplied plug. If the fan does not function properly, it may be due to the safety device incorporated in this plug. If the plug warning label is missing or damaged, call (877) 5651457 Monday through Friday 8 am -5 pm central.
- Where possible, avoid the use of extension cords because an extension cord may overheat and cause a fire. If you must use an extension cord, minimize the risk of overheating by using the shortest cord possible and ensuring it is UL listed. NEVER use a single extension cord to operate more than one fan. DO NOT plug the fan into any other cord-connected device such as a power strip, core reel, surge protector, multiple outlet adapters or outlet type air fresheners. The use of such devices may create a fire hazard.
- NEVER operate any fan with a damaged cord or plug or after the fan malfunctions, has been dropped or damaged in any manner.
- NEVER insert or allow fingers or foreign objects to enter any ventilation opening as it may cause electrical shock or fire, or damage the fan. To reduce the risk of fire, DO NOT block or tamper with the fan in any manner while it is in operation.
- Locate the power cord so the fan or other objects are not resting on it. Do not run the cord under carpeting.Do not cover the cord with throw rugs, runners, or similar coverings. Do not route the cord under furniture or appliances. Arrange the cord away from traffic areas and where it will not be tripped over.
- NEVER locate a fan where it may fall into a bathtub or other water container. NEVER use fan where flammable liquids are stored.
- DO NOT attempt to repair or adjust any electrical or mechanical functions on this unit. Doing so will void your warranty. The inside of this contains no user-serviceable parts. All servicing should be performed by qualified personnel only.
- This fan is not suitable for use in agricultural facilities including areas where livestock, poultry or other animals are confined. Please refer to the National Electrical Code (NEC) Article 547-7 (2008), or applicable state or local codes or standards relating to electrical requirements for Agricultural Buildings. THIS FAN DOES NOT
- MEET THE REQUIREMENTS OF NEC ARTICLE 547-7 (2008).
- This fan is not suitable for use in hazardous locations. Please refer to the National Electric Code (NEC) Article 500 or applicable state or local codes or standards relating to electrical requirements for Hazardous locations.THIS FAN DOES NOT MEET THE REQUIREMENTS OF NEC ARTICLE 500(2008).
 DO NOT DEPEND ON THE ON/OFF SWITCH AS THE SOLE MEANS OF DISCONNECTING POWER WHEN SERVICING OR MOVING THE FAN.
Parts List
Insulating Weatherstrip
(1) 52” weatherstrip 1” x 0.5” for bottom and sides of the unit(1) 42” weatherstrip for the top of the unit(1) 34” Center Sash 2 ply insulation(1) Wire tie (6”)Double-sided glue dots and support adhesive
Support BracketSide ExtendersDouble-hung window unit – 2 slider extenders and 2 insulated foam panels (7” x 9”)Vertical window unit – 1 slider extender, 1 insulated panel (7” x 9”), and 3 insulated slot extender
Tools RequiredScissorsPhillips head screwdriver
Installation instructions – Double-hung windowRemove the window screenThis fan will extend beyond the window screen. Remove the window screen. The unit will be sealed in the installation process. The unit also has a filter that will block insects and bugs so a screen is not necessary with this unit.
 Install the bottom and side weatherstripPlace 4 blue squares on the bottom window sill where EcoBreeze 2.1 will be placed. Cut the 52” weatherstrip to the window width. Attach the weatherstrip to the bottom window sill. Place 2 glue squares on each side of the window. Cut 2 pieces from the 52” weatherstrip the height of the unit and install the weatherstrip.
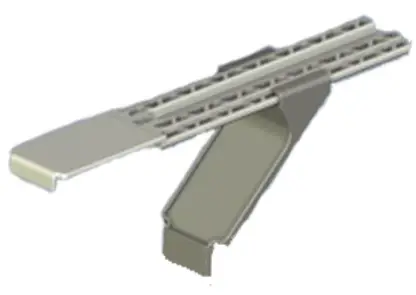
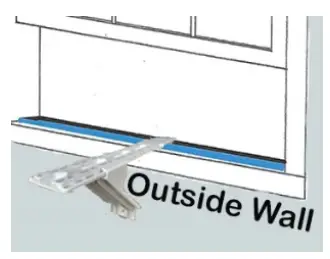
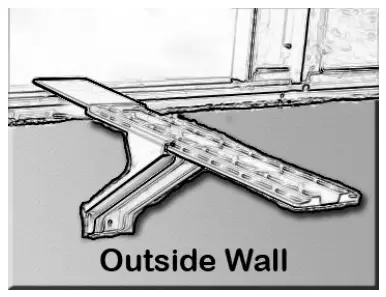
Install the support bracketInstall the support bracket. Place it in the center of the window and snug it up until it is approximately level. Remove from the window. Install one wide glue adhesive on the vertical windowsill face and the other on the vertical outside wall face. Place the bracket in the window and press it in place. Screws (user-provided) may be used to secure the bracket to the sill and outside wall.
Install the extenders
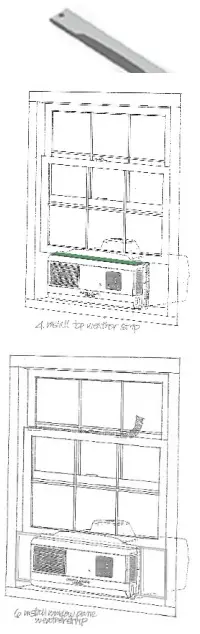
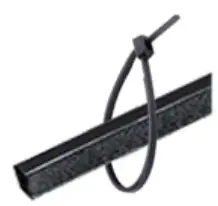
Remove the 2 end screws from the window bracket. Loosen the center screw. Insert the extenders into the window bracket and secure them with the 2 end screws. Tighten the middle screw. Note: for windows that are between 20” and 22” use only one extender.Install EcoBreeze 2.1 in the windowPlace EcoBreeze 2.1 so it is centered in the window. Slide the extenders to the window frame and into the window channel.Install the extender foam panelsMeasure the opening in the extender. With scissors cut the foam insulation panel approximately 1/8” larger for a snug fit. Slide foam in the slot.Install the top weatherstripPlace 2 blue squares on the top of the unit and 2 on the end of the extenders.Cut the 42” weatherstrip to the window width. Attach the weatherstrip to the unit.Close the windowClose the window so the window frame is between the window bracket and the motor dome. For a secure installation, a window lock can be purchased at home centers or hardware stores and installed on the window.Install the center sash insulationCut the center sash insulation to the window width. Loop wire tie around insulation for easy removal. Insert it in the gap between the top windowpane and the lower window frame with the stiff insulation facing indoors. For some windows with a narrow opening, the insulation may need to be smaller. Cut the insulation along the width on the softer insulation side using scissors and install.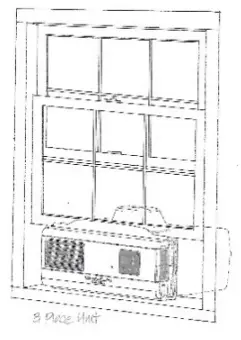
Enjoy Nature’s summer cooling!
Installation instructions – Slider windowRemove the window screenThis fan will extend beyond the window screen. Remove the window screen. The unit will be sealed in the installation process. The unit also has a filter that will block insects and bugs so a screen is not necessary with this unit.Install the bottom, and side weatherstripPlace 2 blue squares on the bottom window side where EcoBreeze 2.1 will be placed. Cut the 52” weatherstrip to the window width. Attach the weatherstrip to the bottom window sill. Place 4 glue squares on the frame side of the window. Cut a piece from the 52” weatherstrip the height of the window and install the weatherstrip on the frame side of the window.Install the support bracketInstall the support bracket. Place it in the center of the window and snug it up until it is approximately level. Remove from the window. Install one wide glue adhesive on the vertical window sill face and the other on the vertical outside wall faces. Place the bracket in the window and press it in place. Screws (user-provided) may be used to secure the bracket to the sill and outside wall.
 Install the extenderRemove the upper screw from the window bracket. Loosen the center screw. Insert the extender into the window bracket with the open slot on the top. Secure with the 2 end screws. Tighten the middle screw.
Install the window side weatherstripPlace 4 blue squares on the window where EcoBreeze 2.1 will be placed. Cut the 42” weatherstrip to the window height. Attach the weatherstrip to the window.Install EcoBreeze 2.1 in the windowPlace EcoBreeze 2.1 on the windowsill. Close the window so the window frame is between the window bracket and the motor dome. Slide the extender to the top of the window frame and into the window channel. Add the 3” extenders as required based on the height of the window.
 Install the extender foam panel. Measure the opening in the adjustable extender. With scissors cut the foam insulation panel approximately 1/8” larger for a snug fit. Slide foam in the slot. Close the window.
Install the center sash insulationCut the center sash insulation to the window height. Loop wire tie around insulation for easy removal. Insert it in the gap between the top window pane and the lower window frame with the stiff insulation facing indoors. For some windows with a narrow opening, the insulation may need to be smaller. Cut the insulation on the softer insulation using scissors. Operating InstructionsEcoBreeze2 controls are designed to optimize the efficiency of cooling with outside air
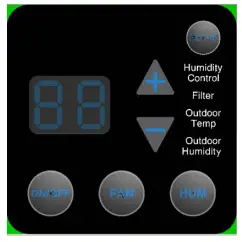
- On/off button
- Manual fan button
- Humidity control button
- + Temperature Increase button
- – Temperature decrease button
- Set up button
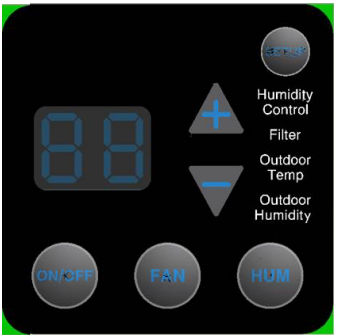
PowerPlug the unit into a 120-volt outlet. Press the on/off button to turn the unit on and off.Set desired indoor temperatureUse the +/- to raise or lower the desired indoor temperature set point. The display will show the set point temperaturewhen it is being changed and then show the room temperature. A lower setpoint will increase the use of outside air and can precool the home delaying the need for air conditioning.Set humidity on/offEcoBreeze 2.1 has a humidity control feature that increases energy efficiency and comfort when the unit is being used with air conditioning. When the control is on, the unit continuously monitors indoor and outdoor humidity and will not bring in outside air that is more humid than the indoor air. When the control is on the display light on the control panel will illuminate. When air conditioning has not been used the control can be turned off and the display light will turn off.Please note EcoBreeze 2.1 measures dew point, not relative humidity. A light indicates outside air is too humid to use.Select the fan modeThis is for manual operation. Press the fan button to toggle through the fan modes. Speeds 1- low to speed 5- highAuto modeThe room temperature will display in this mode. In the auto mode, the controls will determine when cooling is needed and available based on the set point. The fan will also automatically adjust the fan speed for maximum energy efficiency. It will gradually increase the speed as the outdoor temperature drops and then decrease it as it nears the set point.Manual speed modeThe fan will run continuously on this setting. Press the fan button to toggle through 5 speeds, from low to turbo speed.Then one more press will go back to auto mode.Change the filterThe filter should be changed regularly to maximize cleaning effectiveness. The filter reminder can be adjusted based on the conditions in the area. If the filter is clogged go to the setup and reduce the hours between filter changes. If the filter is clean increase the hours between filter changes. The filter drawer is at the bottom of the unit. It may be opened with the handle on the bottom or the two-finger tabs on the side of the unit. Slide the drawer completely out of the unit. Slide the cover back to access the filter. Remove the existing filter and replace it with a new filter. The filter dimensions are a nominal 12” x 12” x 1” and may be purchased from Nature’s Cooling Solutions. The filter has a direction indicator for the airflow direction. The filter should be installed so the airflow goes toward the top of the filter drawer. Replace the filter drawer for operation.Set up and customization
EcoBreeze 2.1 can be customized for different conditions or user preferences.The standard settings for EcoBreeze 2.1 are:Fan Speed – 6 for 225 square foot roomDisplay Light setting – HighFilter change – 500 hoursTemperature scale – FahrenheitThe settings can be changed by pressing the setting button. It will revert back to the run operation when it does not sense any additional input for 10 seconds.The first press of a button – Displays thousands and hundreds of hours of fan run timeA second press of a set button – Displays tens and single-digit hours of fan run time. The unit only has 2 positions on the display so combining the first and second display would give lifetime run hours. I.e. 01, 95 would be 0195 hours of fan run time. This will provide information on actual hours of a natural cooling that the fan is providing. (Like a car odometer)A third press of the set button – Displays the outdoor temperatureFourth press of the set button – Displays the indoor humidity dew point temperatureFifth press of the set button – Displays the outdoor humidity dew point temperatureSixth press of the set button – Customize the Maximum fan speed for the auto mode. The settings are 1-10. Press + or – to raise or lower the maximum speed. A larger room will require a higher setting. Suggested settings are as follows:6 – 225 square foot room9 – 300 square foot roomSeventh press – Customize display light level1 – dim2 – Medium3 – Full
Eighth press of a set button – displays the hours remaining until the filter needs to be changed. Press +/- to reset to the maximum hoursNinth press of the set button – Filter change. Customize the hour of run time between filter changes. The hours are the display times 10. A display of 50 represents a set of hours. This is preset at 500 hours. For an area with a high level of outdoor pollution decrease the hours between changes. For areas with a low level of outdoor pollution increase the hours. Press + or – to raise or lower the hours.Tenth press of the set button – Select temperature scale. Press + or – to toggle between Fahrenheit or Centigrade.
| 1st | Hours of run time – thousands & hundreds |
| 2nd | Hours of run time – tens and single digits |
| 3rd | Outdoor Temperature |
| 4th | Indoor dew point |
| 5th | Outdoor dew point |
| Push set | Display | Change +/- |
| 6th | Maximum fan speed | 1 low, 10 high |
| 7th | Light level | 1 dim, 3 bright |
| 8th | Filter Hours Remaining | reset to max |
| 9th | Max Filter hours (x10) | 10 to 100 |
| 10th | Temperature scale | F or C |
Troubleshooting
EcoBreeze 2.1 not runningIn auto mode, EcoBreeze 2.1 will stay on or off for a minimum of 3 minutes.Confirm setpoint is less than the indoor temperature.If the outdoor temp is illuminated outdoor temperature is greater than the indoor temperature and the fan will not run.Airflow decreasesIf air flow decreases check the filter. If it is dirty change the filter and adjust the filter reminder lower.
If outdoor humidity is illuminated outdoor dew point is greater than the indoor dew point so the fan will not bring in the humid air. This only works when the humidity lock is on.Check temperature and humidity readings.Indoor temperature is displayed when no changes are being made. The rest of the values can be displayed by pressing the settings button.First press – displays the hours remaining until the filter needs to be changed. Press +/- to reset to the maximum hoursSecond press – Displays the outdoor temperatureThird press – Displays the indoor humidity dew point temperatureFourth press – Displays the outdoor humidity dew point temperature
1 Year Limited Warranty
Nature’s Cooling Solutions (NCS) warrants that for a period of one year from the date of purchase, this product will be free from defects in material and workmanship. NCS, at its option, will repair or replace this product or any component of the product found to be defective during the warranty period. Replacement will be made with a new or remanufactured product or component. If the product is no longer available, replacement may be made with a similar product of equal or greater value. This is your exclusive warranty. Do NOT attempt to repair or adjust any electrical or mechanical functions on this product. Doing so will void this warranty.This warranty is valid for the original retail purchaser from the date of initial retail purchase and is not transferable. Keep the original sales receipt. Proof of purchase is required to obtain warranty performance. This warranty does not cover normal wear of parts or damage resulting from any of the following: negligent use or misuse of the product, use on improper voltage or current, use contrary to the operating instructions, disassembly, repair, or alteration by anyone other than NCS or an authorized NCS service center. Further, the warranty does not cover Acts of God, such as fire, flood, hurricanes, and tornadoes. What are the limits on NCS’s Liability? NCS shall not be liable for any incidental or consequential damages caused by the breach of any express, implied, or statutory warranty or condition. Except to the extent prohibited by applicable law, any implied warranty or condition of merchantability or fitness for a particular purpose is limited in duration to the duration of the above warranty. NCS disclaims all other warranties, conditions or representations, express, implied, statutory, or otherwise. JCS shall not be liable for any damages of any kind resulting from the purchase, use or misuse of, or inability to use the product including incidental, special, consequential, or similar damages or loss of profits, or for any breach of contract, fundamental or otherwise, or for any claim brought against the purchaser by any other party. Some provinces, states or jurisdictions do not allow the exclusion or limitation of incidental or consequential damages or limitations on how long an implied warranty lasts, so the above limitations or exclusion may not apply to you. This warranty gives you specific legal rights, and you may also have other rights that vary from province to province, state to state, or jurisdiction to jurisdiction. How to Obtain Warranty Service in the U.S.A. If you have any questions regarding this warranty or would like to obtain warranty service, please call 1-877-565-1457 or direct your correspondences to ATTN: Nature’s Cooling Solutions, Customer Service, 4881 N Calle Bujia, Tucson, AZ 85718.
Revised March 2020
 report this ad
877-565-1457
References
[xyz-ips snippet=”download-snippet”]