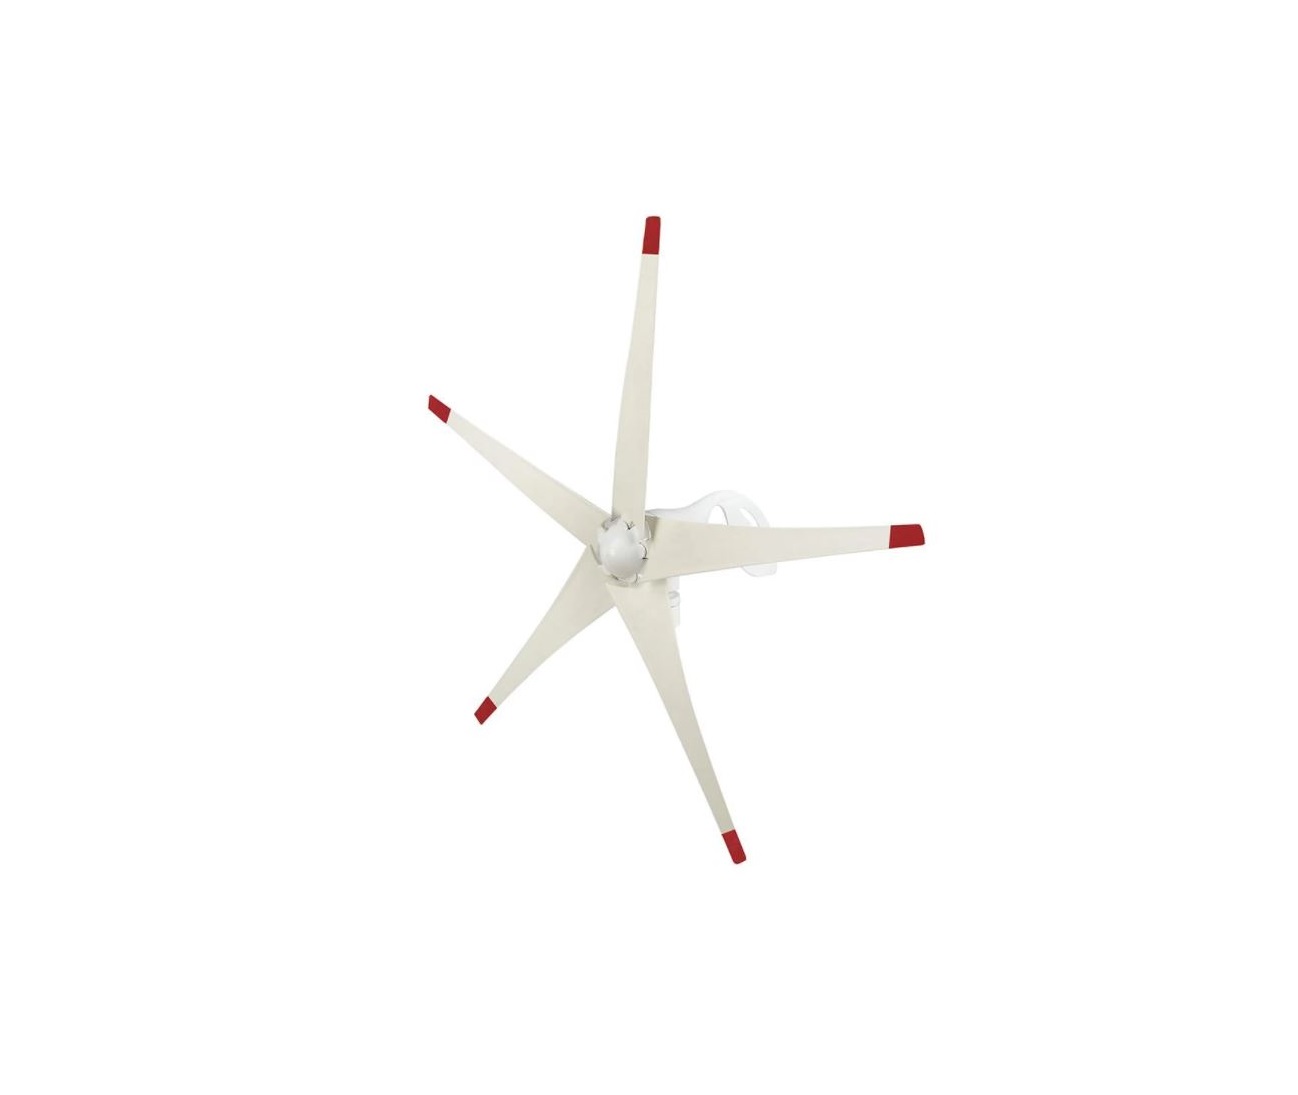
NATURE S Wind Turbine
WelcomeCongratulations on the purchase of your new Nature’s Wind Turbine, a state-of-art wind turbine that recharges your Nature’s Generator through the wind. Please read these instructions thoroughly prior to installation, then store this manual in a safe place for future reference. If at any time you are unclear about this product or require additional assistance, please do not hesitate to contact our Customer Support line at 805-383-0003 or email us at [email protected].
Important Safety Instructions
- Read these instructions.
- Keep these instructions.
- Take note of all warnings.
- Follow all instructions.
- Place this manual in a safe place for future reference.
- Only use attachments/accessories specified by the manufacturer.
- Refer all servicing to qualified service personnel. Servicing is required when Nature’s Wind Turbine has been damaged in any way, such as cord or plug is damaged or Nature’s Wind Turbine has been dropped.
- Wait until a calm day to install the Nature’s Wind Turbine.
- Avoid the sharp edges on the blades.
- Readjust and tighten the screws and bolts as needed after installation.
- Your Nature’s Wind Turbine must be installed in accordance with this manual along with local and national building codes. Incorrect installation may void the warranty.
- Your Nature’s Wind Turbine blades spin at a potentially dangerous speed. Never approach the turbine in motion.
WarningMechanical HazardThe rotating blades present the most serious mechanical hazard. The tip of the rotating blades may be moving at a speed over 300 miles per hour. The blades are almost invisible and may cause serious injuries. You should NOT install the turbine where anyone could come in touch with the rotating blades.
Electrical HazardNature’s Wind Turbine generates electricity and thus the inherent personal injury from electricity exists. Be always cautious when connecting cables and connect to Nature’s Generator.
Replacement partsWhen replacement parts are required, make sure that the service technician uses replacement parts specified by the manufacturer that have the same characteristics as the original part. Unauthorized substitutions may result in fire, electric shock, personal injury, or other hazards.
Safety checkAfter completing any service or repair to this device, ask the service technician to perform routine safety checks to determine that your Nature’s Wind Turbine is in the correct operating condition.
ServicingThese servicing instructions are for use by qualified service personnel only. To reduce the risk of electric shock, do not perform any servicing other than that contained in the operating instructions unless you are qualified to do so.
CautionDamage requiring serviceStop using the Nature’s Wind Turbine and refer servicing to qualified service personnel under the following conditions:• If your Nature’s Wind Turbine has been dropped or damaged in any way.• When your Nature’s Generator exhibits a distinct change in performance.
End of life directivesYour Nature’s Wind Turbine may contain materials that are regulated for environmental reasons. Your Nature’s Wind Turbine also contains materials that can be recycled and reused. To help protect the environment, contact your local authorities for information about disposal or recycling and about finding a recycler in your area before you dispose of your Nature’s Wind Turbine.
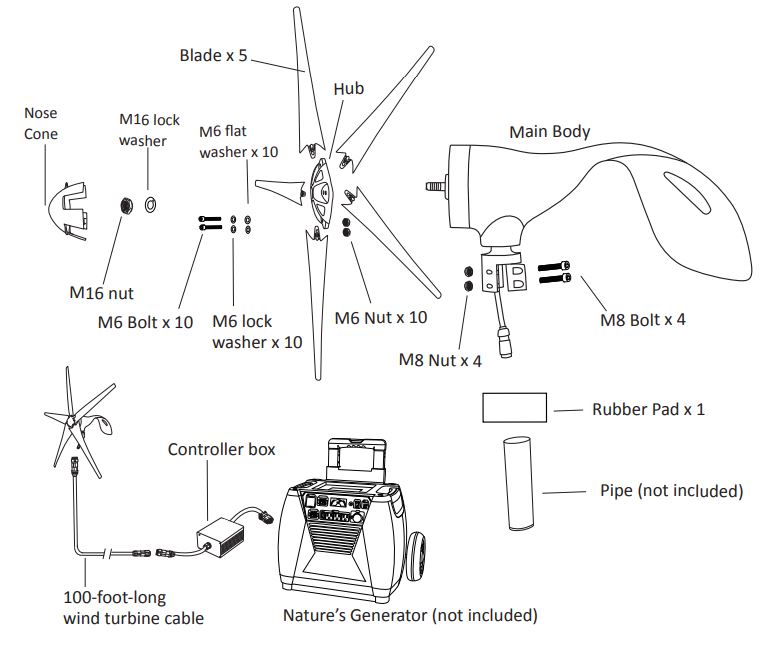
Unpack Your Nature’s Wind Turbine
1. Nature’s Wind Turbine main body 2. Hub
![]() 3. Nose cone
3. Nose cone![]() 4. Blades x 5
4. Blades x 5 5. 100-foot-long wind turbine cable
 6. Controller box
 7. This user manual
![]() 8. Accessory bag that includes.
8. Accessory bag that includes.
Get to Know Your Nature’s Wind Turbine
Complete Electrical SystemYour Nature’s Wind Turbine comes with a 100-foot long wind turbine cable and controller box. It is a complete electrical system to recharge your Nature’s Generator.
Built-in ProtectionsYour Nature’s Wind Turbine controller box has built-in overcurrent protection and over-voltage protection that prevent possible damage to your Nature’s Generator.
GroundingEvery wind turbine and turbine tower need to be grounded at the tower base. Grounding the tower at its base may help prevent shocks to persons touching the tower due to lightning or electrical faults. Please take the time to review the National Electrical Code (NEC) and local building and zoning regulations for complete requirements. Your Nature’s Wind Turbine has a grounding cable included for this purpose.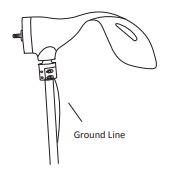 ExpandabilityYour Nature’s Wind Turbine can be connected to another Nature’s Wind Turbine to double the charging speed by using a dual controller box. Please visit www.naturesgenerator.com or contact the Customer Support line at 805-383-0003 or email us at [email protected].
Using Your Nature’s Wind TurbineHow to choose the locationThe wind speed has dramatic effects on your Nature’s Wind Turbine. The location shall be carefully considered to achieve the optimal performance of your Nature’s Wind Turbine, prior to the mounting of your Nature’s Wind Turbine. Each installation is unique and often a compromise among the surrounding environment, the distance between your Nature’s Wind Turbine and your Nature’s Generator, zoning requirements, budget and etc.
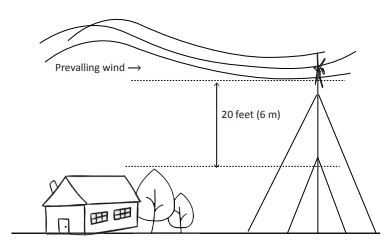
In general terms, the higher your Nature’s Wind Turbine can be mounted, the greater the airflow will be and thus the better power production will be. However, towers are expensive and can easily exceed the cost of the turbine. The minimum recommended tower height is 20ft to 30ft above nearby obstructions as shown below. The obstructions create turbulence which reduces the efficiency of the wind turbine may accelerate the wear and tear of your Nature’s Wind Turbine.
Safety must be the primary concern when selecting the mounting location. Install your Nature’s Wind Turbine so there is no possibility of accidental contact with rotating blades even if it requires installing the wind turbine in a less than ideal location. Safety has precedence over efficiency.
How to choose the towerYour Nature’s Generator is designed to mount on nominal 1.5-inch schedule 40 steel tubing or piping. The outside diameter of the tubing or piping shall be around 1.875 inches to 1.900 inches. The steel tubing or piping should be available through your local hardware store. Under no circumstances should the plastic pipes be used to construct a tower. Towers must be capable of withstanding 160 pounds of load in the horizontal direction at the wind turbine.
How to Install your Nature’s Wind TurbineCaution: Choose a calm day and have someone available to help during the installation process.Caution: The blade’s edges are sharp. Please handle carefully.Caution: Do not assemble the blades before the body is mounted on the pipe or tower.Caution: Do not connect your Nature’s Wind Turbine with Nature’s Generator until all installation has been completed.
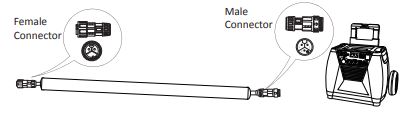
Step 1: Run the wind turbine cable through the pipe and drag the connector close to Nature’s Generator. The female connector shall be close to your Nature’s Wind Turbine and the male connector shall be close to your Nature’s Generator.
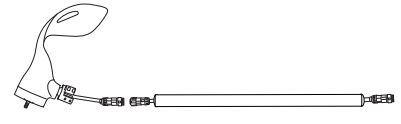
Step 2: Connect the wind turbine cable and your Nature’s Wind Turbine by pushing and twisting the connectors.
Step 3: The rubber gasket that is stored inside of the yaw and the included rubber pad help to prevent the yaw from contacting the pipe directly. The rubber gasket and rubber pad will assist in reducing the transmission of noise and vibration down the pipe. Slide the yaw shaft all the way down over the top of the pipe and be careful not to pinch the cable. There may be some slight variances of the thickness or size of the pipe from different makers or models. Please adjust the size of the rubber pad as needed. Step 4: Firmly tighten the yaw clamp bolts with the 6mm hex key. Be sure that your Nature’s Wind Turbine is securely attached to the pipe.
 Step 5: Place one of the blades on one of the hub sockets. Place a lock washer and then a flat washer on the bolt and then insert the bolt through the blade ad the socket. Place a nut on the other side of the socket and tighten the bolt with the 5mm hex key. Repeat this process on all five blades. Make sure the lock washer and flat washer are placed in the right order. The blades will become loose if it is not installed properly.

Step 6: Slide the blade assembly onto the rotor shaft and place the lock washer and lock nut on the shaft.

Step 7: Insert the 8mm hex key into the rotor shaft. Hold the blade assembly and tighten the M16 nut by turning the 8mm hex key counterclockwise. If needed, please use the extender (not included) to extend the 8mm hex key to tighten the lock nut. Finally, spin the blades slowly to be sure they turn freely and the hub does move in along the rotor shaft.
Step 8: Place the nose cone over the centerline of the blade assembly and snap the nose cone into place.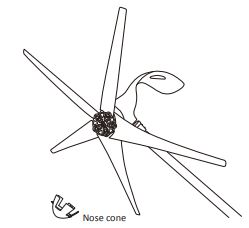
Step 9: Carefully raise the tower and secure the base and/or cables.
How to connect your Nature’s Wind Turbine to your Nature’s GeneratorStep 1: Connect the wind turbine cable to the round connector from one side of the controller box by pushing and twisting the connectors Step 2: Connector the square connector from the other side of the controller box to your Nature’s Generator “WIND INPUT” port.
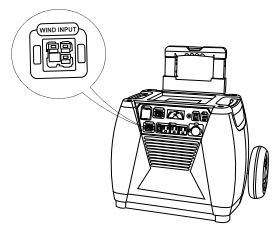
Step 3: When your Nature’s Wind Turbine spins at a certain speed, you will see the whole display on your Nature’s Generator lights up if your Nature’s Generator main power is switched off. It means your Nature’s Wind Turbine is recognized by your Nature’s Generator, but it is not powerful yet to recharge your Nature’s Generator. When your Nature’s Wind Turbine spins at the proper speed, you will see the wind turbine icon on the display illuminates and the battery bar starts running. It means your Nature’s Wind Turbine is recharging your Nature’s Generator.
MAINTENANCE
Your Nature’s Wind Turbine has been designed to run for long periods without requiring any maintenance. The performance will be enhanced if you periodically inspect your system. Review the following simple maintenance procedures and implement them every six months.
Caution: Do not go near the wind turbine during operation.
- Check blades for superficial damage. Replace blades if damaged. It is important not to use blades that are damaged, as you will lose overall balance, resulting in a decrease inefficiency. Should you notice damage to the blades, you must replace all 5. The blades are balanced assets.
- Check the blade bolts and the nut for tightness.
- Check nose cone for cracks and tighten nuts.
- Wipe any excess dirt build-up from blades.
- Check electrical connections to make sure they are tight and free from corrosion.
Troubleshooting
Caution: You may require an extra person to assist with these tests.
- Remove the blade and hub from your Nature’s Wind Turbine.
- Drain your Nature’s Generator to show only one bar or two bars of battery level.
- Connect your Nature’s Wind Turbine to your Nature’s Generator. And make sure your Nature’s Generator main power is switched off.
- Set your power drill at speed mode and use an 8mm hex drive bit (not included, please purchase separately) to spin the rotor shaft.
- You will see the LCD display on your Nature’s Generator lights up and then your wind turbine icon illuminates and the battery bar starts running. It means your Nature’s Wind Turbine should be recharging your Nature’s Generator fine. You should also feel resistance on the rotor shaft.
If you have any questions on the troubleshooting procedures, please do not hesitate to contact our Customer Support line at 805-383-0003 or email us at [email protected].
Technical SpecificationsMaterial:Wind turbine blades: fiberglass nylon compositeWind turbine body: cast aluminum alloy with powder coatingWind turbine cable: 12AWG pure copper cable
Connectors:Wind turbine cable connectors: weatherproof M19 3P connectors.Wind input connectors: Anderson connectors.Yaw: fits 1.5 Inch schedule 40 pipes or towers
Power Rating:Rated mechanical power: 400 watts @ 27 mph or 12 m/s wind speedRated electrical power: 150 wattsMaximum wind speed 110 mph
General:Rotor diameter: 51 in / 1.3 mWeight 22 lbs/10 kg not including cables and controller box.Certifications: CE Rohs
Limited WarrantyOne Year Limited WarrantyHuntKey USA Inc. warrants to you, the original purchaser of this new product, that the product shall be free of defects in the original manufacture of the material or workmanship for a period of one (1) year from the original date of your purchase of the product (“Warranty Period”). This product must be purchased from an authorized dealer and packaged with this warranty statement. This warranty does not cover refurbished products.
What does this Warranty Cover?During the Warranty Period, if the original manufacture of the material or workmanship of the product is determined to be defective by an authorized dealer, HuntKey USA Inc. will (at its sole option): (1) repair the product with new or rebuilt parts; or (2) replace the product at no charge with new or rebuilt comparable products or parts. Products and parts replaced under this warranty become the property of Nature’s Generator and are not returned to you. If service of products or parts are required after the Warranty Period expires, you must pay all labor and parts charges. This warranty lasts as long as you own your product during the Warranty Period. Warranty coverage terminates if you sell or otherwise transfer the product.
How to Obtain Warranty Service?Please call 1-805-383-0003 Monday through Friday, 8:30 AM to 4:30 PM PST. You will be provided with a Return Merchandise Authorization (RMA) number and return instructions. Send product to:
Huntley USA, Inc.735 W Ventura Blvd., Suite BCamarillo, CA 93010
Please include the RMA number prominently displayed on the shipping box and include your name, phone number, and address with the product inside the box.
Where is the Warranty Valid? This warranty is valid only to the original purchaser of the product in North America (the United States, Canada, and Mexico).Visit NaturesGenerator.com for More Information 16
What does the Warranty not cover?This warranty does not cover:
- Cosmetic damage
- Damage due to acts of God, such as lightning strikes
- Accident
- Misuse
- Abuse
- Negligence
- Commercial use
- Modification of any part of the product
- Damage due to incorrect operation or maintenance
- Connection to an incorrect voltage supply
- Attempted repair by anyone other than a facility authorized by Huntkey USA Inc. to service the product
- products sold as is or with all faults
- Consumables, such as batteries
- Products where the factory-applied serial number has been altered or removed
REPAIR REPLACEMENT AS PROVIDED UNDER THIS WARRANTY IS YOUR EXCLUSIVE REMEDY. HUNTKEY USA INC. SHALL NOT BE LIABLE FOR ANY INCIDENTAL OR CONSEQUENTIAL DAMAGES FOR THE BREACH OF ANY EXPRESS OR IMPLIED WARRANTY ON THIS PRODUCT, INCLUDING, BUT NOT LIMITED TO LOST DATA, LOSS OF USE OF YOUR PRODUCT, LOST BUSINESS, OR LOST PROFITS. HUNTKEY USA INC. PRODUCTS MAKES NO OTHER EXPRESS WARRANTIES WITH RESPECT TO THE PRODUCT, ALL EXPRESS AND IMPLIED WARRANTIES FOR THE PRODUCT, INCLUDING, BUT NOT LIMITED TO, ANY IMPLIED WARRANTIES OF AND CONDITIONS OF MERCHANTABILITY AND FITNESS FOR A PARTICULAR PURPOSE, ARE LIMITED IN DURATION TO THE WARRANTY PERIOD SET FORTH ABOVE AND NO WARRANTIES, WHETHER EXPRESS OR IMPLIED, WILL APPLY AFTER THE WARRANTY PERIOD. SOME STATES, PROVINCES, AND JURISDICTIONS DO NOT ALLOW LIMITATIONS ON HOW LONG AN IMPLIED WARRANTY LASTS, SO THE ABOVE LIMITATION MAY NOT APPLY TO YOU. THIS WARRANTY GIVES YOU SPECIFIC LEGAL RIGHTS, AND YOU MAY ALSO HAVE OTHER RIGHTS, WHICH VARY FROM STATE TO STATE OR PROVINCE TO PROVINCE.
Contact HuntKey USA Inc:For customer service please call 1-805-383-0003Huntley USA, Inc.735 W Ventura Blvd., Suite BCamarillo, CA 93010Visit NaturesGenerator.com for More Information
![]()
References
[xyz-ips snippet=”download-snippet”]