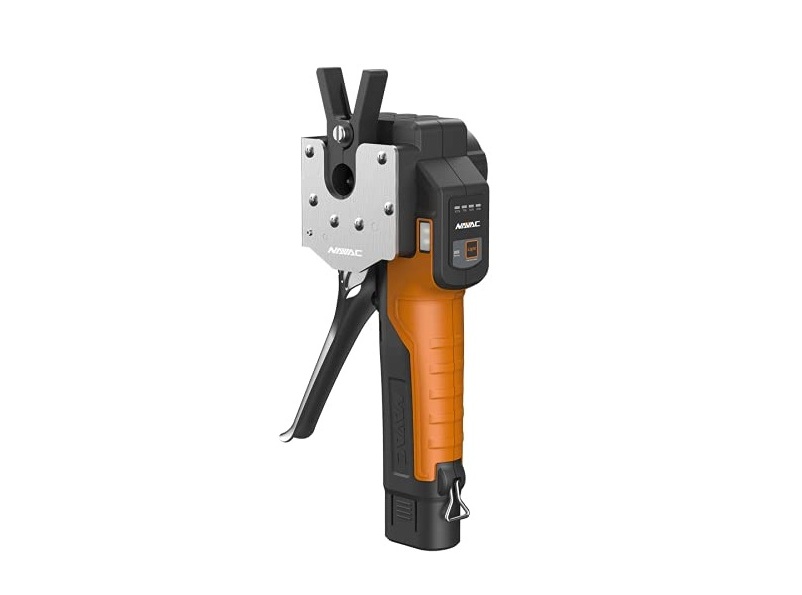
NAVAC NEF6LM Cordless Power Flaring Tool User Manual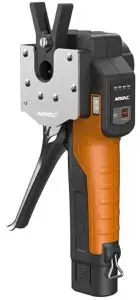
Safety Guide
Caution: Read this manual thoroughly before using.
- Keep the working area clean and tidy.
- Do not operate while under the influence of alcohol.
- Keep children and untrained people from using.
- Use original parts and auxiliary.
- Long time using may overheat its motor which activate overheat protection.
- Temperature higher than 158°F (70°C) or lower than 41 °F (5°C)may activate the motor overheat or subcooled protection.
- Don’t dismantle NEF6LM at random which may void warranty.
- Product is warranted against defects in materials and workmanship for two years from the date of purchase.
- Dispose the battery according to local regulations.
- Pending patent.
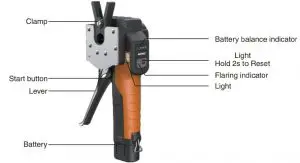
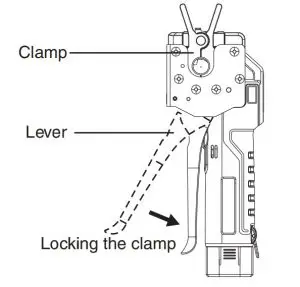
Structure
Technical Parameters
| Model | NEF6LM |
| Tubing Type | Copper |
| Tubing OD | 1/4″, 3/8″, 1/2″, 5/8″,3/4″ |
| Power | DC motor |
| Cone Speed | 120 RPM |
| Battery Capacity | Up to 100 flares per charge |
| Time to Flare | Complete a flare in < 30 seconds |
| Dimension | 10″x4″x4″ (265x101x100mm) |
| Weight | 2.9 lbs (1.3kg) |
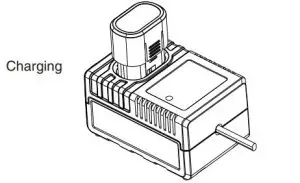
Battery pack
| Battery | 7.4V 2Ah 14.8Wh |
| Quick Charge | 30 minutes |
| Ambient Temperature | 41°F-104°F (5°C-40°C) |
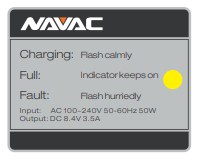
Charger
| Power Supply | AC 100-240V (50/60Hz ) 50W |
| Output Voltage | 8.4V |
| Output Current | 3.5A |
| Ambient Temperature | 41°F-104°F (5°C-40°C) |
Light/Hold 2s to Reset Button:
- Press to show battery life.
- Press to turn Wolf the light.
- Press 2 seconds to reset (draw back) the cone.
Operation Instruction
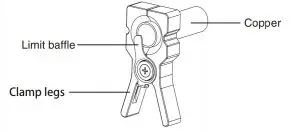
1. Get the copper placed.
- Open the damp by pressing the legs and insert the tubing.
- Use the baffle to set the correct depth of the tubing.

2. Get the clamp placed.
- Keep the lever open and put in the clamp. A locked lever resists the clamp being placed.
- Push the lever inward to lock the clamp.Caution: Make sure hash marks lineup. Otherwise it may cause a defective flare and damage the clamp.
 Caution: Make sure hash marks lineup. Otherwise it may cause a defective flare and damage the clamp.
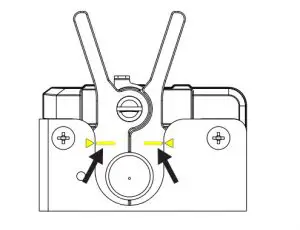
3. Press the START button to flare.
Caution:
- Don’t open the lever during flaring, otherwise the automatic flaring stops.
- If it happens, press the reset button 2 seconds to draw back the cone.
- Make sure the clamp is still horizontally placed.
- Press inward the lever to lock the clamp again.
- Press the start button to reflare.
4. It takes less than 30 seconds to complete a flare automatically.
- Alter the flame Indicator turns oft open the lover.
- Remove the clamp and tubing.
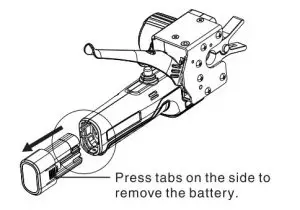
Battery Charge
- Charge battery when the last indicator flashes which means low battery.
- Make sure the battery pack is connected properly.
- Place back the battery pack.
Troubleshooting
| Problem | Possible cause | Solution |
| Flaring indicator flashes once
cyclically. |
Short circuit. | Contact NAVAC TechSupport. |
| Flaring indicator flashes twice
cyclically. |
Battery ID not recognized. | Use an original battery. |
| Flaring indicator flashes three times cyclically. | Overheat or subcooled of the
battery pack. |
Cool down or warm up the
battery pack. |
| Flaring indicator flashes four times cyclically. | Overload. Or the cone cannot be reset. | Contact NAVAC TechSupport. |
|
It does not flare or it stops during flaring. |
Low battery balance. | Charge the battery. |
| Motor or circuit board failure. | Contact NAVAC TechSupport. | |
| Dirty on the batter connections. | Clean the connections. | |
|
The copper flare is too small. |
Lever’s locking is loose. | Tighten the lever. (Figure 7) |
| Copper does not touch the baffle. | Make them contact. | |
| Copper not deburred. | Debur the copper. |
Charger
| Charger indicator flashes hurriedly. | Battery damaged. | Try another battery. |
Table 2 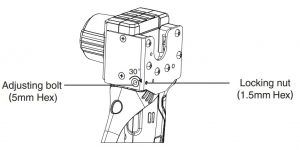
Caution
- To tighten the lock, loose the locking nut first.
- Then turn the bolt clockwise 30 degree each time to check the tightness.
- Don’t turn clockwise too much each time because it may over-tight the lever and cause damage.
Exploded View
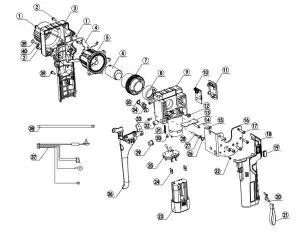
Spare Parts List
| Ref No. | Part No. | Item |
| 1 | PNEF1 | Screw |
| 2 | PNEF2 | Screw |
| 3 | PNEF3 | Right Cover |
| 4 | PNEF4 | Plate |
| 5 | PNEF5 | Chamber Assembly |
| 6 | PNEF6 | Axis Assembly |
| 7 | PNEF7 | Turbine Bushing |
| 8 | PNEF8 | Bearing |
| 9 | PNEF9 | Transmission Chamber |
| 10 | PNEF10 | Circuit Board |
| 11 | PNEF11 | Display Panel |
| 12 | PNEF12 | Bushing |
| 13 | PNEF13 | Subplate |
| 14 | PNEF14 | Stop Pin |
| 15 | PNEF15 | Pin |
| 16 | PNEF16 | Front Cover |
| 17 | PNEF17 | Screw |
| 18 | PNEF18 | Cover |
| 19 | PNEF19 | LED Plate |
| 20 | PNEF20 | Ring |
| 21 | PNEF21 | Strap |
| 22 | PNEF22 | Screw |
| 23 | PNEF23 | Battery Pack |
| 24 | PNEF24 | Dead Plate |
| 25 | PNEF25 | Circuit Board |
| 26 | PNEF26 | Spring |
| 27 | PNEF2? | Bushing |
| 28 | PNEF28 | Pin |
| 29 | PNEF29 | Button |
| 30 | PNEF30 | Screw |
| 31 | PNEF31 | Spring |
| 32 | PNEF32 | Screw |
| 33 | PNEF33 | Screw |
| 34 | PNEF34 | Switch |
| 35 | PNEF35 | Spring |
| 36 | PNEF36 | Lever |
| 37 | PNEF3? | Circuit |
| 38 | PNEF38 | Wire |
| 39 | PNEF39 | Screw |
| 40 | PNEF40 | Bushing |
References
[xyz-ips snippet=”download-snippet”]