Nedis Dashboard Camera HD car recordings
Intended useThe DCAM40BK is a dashboard camera that can be mounted to the windshield of your vehicle.This product is intended to take photos, record videos and playback recordings and is equipped with a g-sensor and night vision. Any modification of the product may have consequences for safety, warranty and proper functioning. The product is not intended for professional use.
Specifications
| Product | Dashboard Camera |
| Article number | DCAM40BK |
| Dimensions (l x w x h) | 100 x 55 x 43 mm |
| Input voltage | 5 VAC |
| Input current | 2 A |
| Battery | Lithium-ion polymer 3.7 VDC / 200 mAh |
| Battery capacity | 200 mAh |
| Power consumption | 660 – 750 mAh dual camera recording |
| Storage temperature | -10 – 70 °C |
| Operating temperature | -10 – 60 °C |
| Display | 2.31 inch LCD display |
| Front camera | IMX323 Sensor + 650NM camera |
| Cabin camera | IMX323 Sensor + 940NM camera |
| Viewing angle | 120 degrees |
| Minimum illumination | 1 Lux |
| Video | Loop video / motion detecting |
| Video format | .mp4 |
| Video encoding | H.264 |
| Video resolution | 2560 x 1440p / 1920 x 1080p / 1280 x 720p
@ 30 Hz |
| Image resolution | 4032 x 3024 / 3648 x 2736 / 3264 x 2448 /
2592 x 1944 / 2048 x 1536 / 1920 x 1080 / 1280 x 960 / 640 x 480 |
| HDMI output | No |
| Seamless video | Yes |
| Language | English, French, Spanish, Portugese, German, Italian, simplified Chinese, traditional Chinese, Russian, Japanese |
| Video recording time | 3 / 5 / 10 min |
| Recording audio | Built-in microphone
The microphone can be switched on/off |
| Memory card | MicroSD card |
| Memory card capacity | 8 – 128 GB |
| USB interface | Mini5Pin USB2.0 |
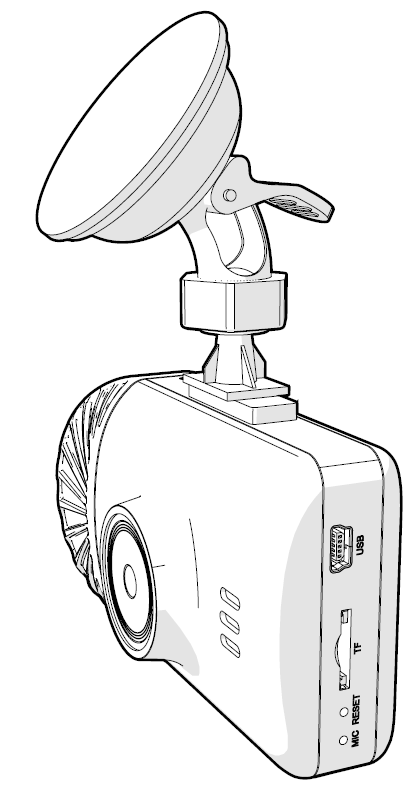
Main parts

- Suction fix clip
- Suction fix
- Micro USB port
- MicroSD card slot
- Front camera
- Speaker
- Reset button
- Microphone
- Auxiliary power plug
- Infrared light
- Cabin camera
- Infrared light
- Display
- Power button
- Menu / mode button
- Up button
- Down button
- OK button
- Micro USB cable
Safety instructions
- Ensure you have fully read and understood the instructions in this document before you install or use the product. Keep this document for future reference.
- Only use the product as described in this manual.
- Do not use the product if a part is damaged or defective. Replace a damaged or defective product immediately.
- Do not drop the product and avoid bumping.
- This product may only be serviced by a qualified technician for maintenance to reduce the risk of electric shock.
- Disconnect the product from the power source and other equipment if problems occur.
- Do not expose the product to water or moisture.
- Non-rechargeable batteries are not to be recharged.
- Do not short-circuit a cell or a battery.
- In the event of a cell leaking, do not allow the liquid to come in contact with the skin or eyes. If contact has been made, wash the affected area with copious amounts of water and seek medical advice.
- Do not use any charger other than that specifically provided for use with the equipment.
- Do not cover ventilation openings.
- Be careful when using the product while driving. Always focus your attention on the road.
- Do not place the product near heat sources, this can damage the product.
- Do not expose the product to very hot or very cold temperatures or drastic changes in temperature or humidity.
- Do not install the product within the operation range of the airbag.
- Ensure the product and the power cable are installed and do not interfere with the sight of the driver or impede with the operation of any driving controls.
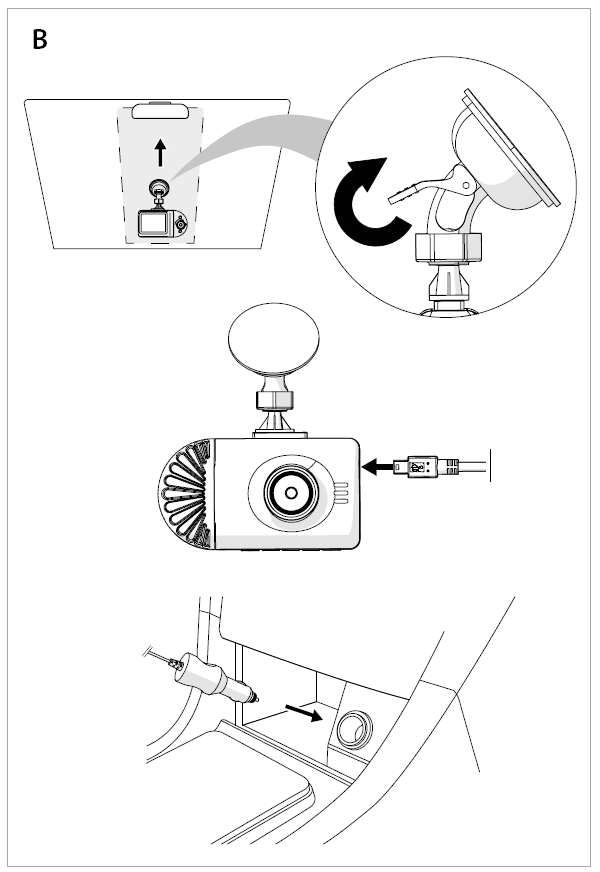
Installing the product
Before using the product, the user shall check the applicable laws and regulations on the use of the product.In some jurisdictions, the use of this product can be considered as an invasion of privacy.The mounting of the product on the windshield might be regulated by law in some jurisdictions.It is the user’s own responsibility to consult the local laws and regulations before installing and using this product.
Switch off the car engine.
- Clean and degrease the spot where you want to fix the product.Place the product just behind or below the rearview mirror.
- Place suction fix A2 on the windshield.
- Use the suction fix clip A1 to fix the product to the windshield.
- Insert a microSD card (not included) into the microSD card slot A4.
- Adjust the position of the front camera A5 for optimal view of the road.
- Adjust the position of the cabin camera Aw for optimal view of the inside.
Ensure the product and the power cable are installed and do not interfere with the sight of the driver or impede with the operation of any driving controls.
Connecting the product to a power source
Option 1:
- Plug the other end of the auxiliary power plug A9 into the micro USB port A3.
- Plug A9 into an auxiliary power outlet.
Option 2:
Charge the product using the USB port A2.
- The product automatically switches on and starts recording when you switch on your car engine.
- The recording time can be set in the menu with the range of 3, 5 or 10 minutes.
- The camera switches off after the engine is off.
Using the product
Press power button At for 3 seconds to switch the product on or off. When switching off the product automatically saves the recordings.
- Press menu / mode button A15 to enter the menu.
- Press A15 again to select the desired option.
- Press up A16 or down A17 to navigate through the menu.
- Press OK A18 to confirm a selection.
- Press A15 to exit the menu.
In case of first use: set the correct time and date using the menu settings.While in standby mode: Press A15 to toggle between video, photo, and playback mode and menu settings.
Camera switching mode
Press A16 to switch between camera views.Options: front camera, cabin camera or both camera views.
Video mode
- Press A14 for 3 seconds to enter the video mode.The film camera icon in the upper left lights up and starts blinking.
- Press A18 to start or stop recording.Short press A17 to switch audio recording on or off.The product automatically saves recordings on the microSD card.
Emergency lockIn video mode, press and hold Ay for 3 seconds to save the recording as a read-only file. This recording cannot be overwritten or deleted when not connected to a computer.
![]()
References
[xyz-ips snippet=”download-snippet”]