Nedis PIRII42xx PIR Motion Detector
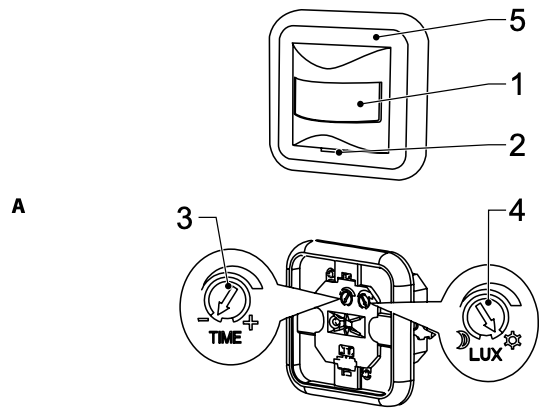
Description (fig. A)
| 1. Infrared sensor |
|
| 2. Function switch |
|
| 3. Time button |
|
| 4. Illuminance button |
|
| 5. Faceplate |
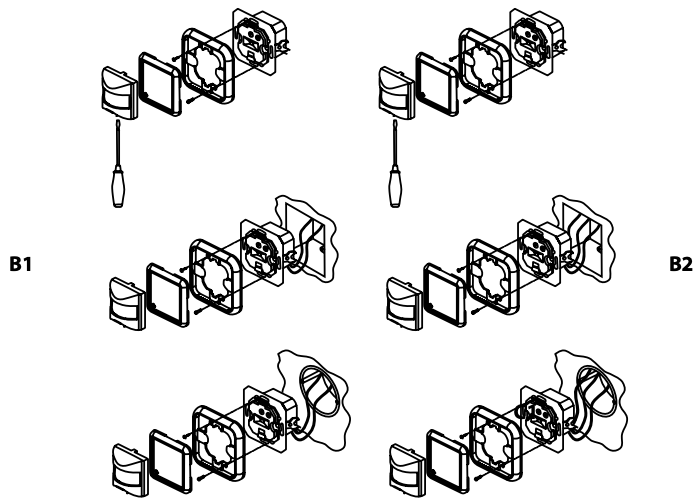
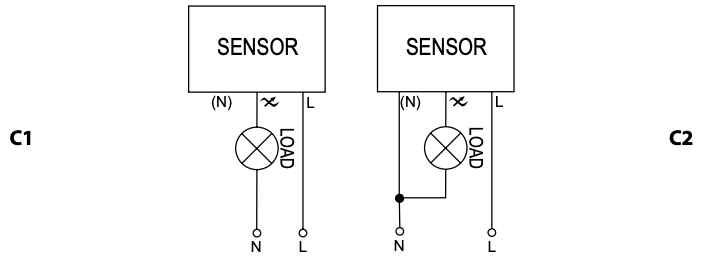
Installation and connection (fig. B & C)
- Do not install the detector near heat sources (e.g. heating vents, air conditioning units, lamps).
- Do not point the detector towards objects with highly reflective surfaces (e.g. mirrors).
- Do not point the detector towards objects that may move in the wind (e.g. curtains, tall plants). · Before installation, make sure that the power supply is disconnected.
- Choose a suitable location. Install the detector at least 1 meter from the floor.
- Disconnect the sensor from the faceplate.
- Take one of the following actions:
- Fig. B1/C1: Connect the two wires to the connection terminal in the sensor. Refer to the connection diagram for the correct wiring.
- Fig. B2/C2: Connect the three wires to the connection terminal in the sensor. Refer to the connection diagram for the correct wiring.
- To install the sensor to the connection box, install the sensor into the hole and tighten the screw.
- If necessary, adjust the position of the sensor and tighten the setscrew.
- Connect the sensor to the faceplate. Connect the sensor with the faceplate into the connection box.
Testing the device
- Set the function switch to the “ON” position.
- Turn the illuminance button clockwise to the maximum position. Turn the time button counterclockwise to the minimum position.
- Connect the power supply.
- Set the function switch to the “OFF” position. The device should be switched off. All functions should be deactivated immediately.
- Set the function switch to the “PIR” position. The infrared sensor will heat up. After 30 seconds, the device goes to operation mode. The lamp will switch on after receiving motion signals for 20 seconds.
- Turn the illuminance button counterclockwise to the minimum position. If you test the device below 3 lux, the device should not work. If you cover the infrared sensor with opaque objects (e.g. towel), the device should work. If there are no motion signals, the device should stop working within 7-13 seconds.
Note: If you test the device in daylight, turn the illuminance button clockwise to the maximum position to make sure that the infrared sensor can detect motion.
Technical data
| Installation height | 1-1.8 m |
| Detection range | 160° |
| Detection distance | max. 9 m (< 24 °C) |
| Detection motion speed | 0.6-1.5 m/s |
| Ambient light | 3-2000 lux (adjustable) |
| Time delay | min. 10 sec. ±3 sec. / max. 7 min. ±2 min. |
| Rated load | 500 W (incandescent lamp)200 W (energy-saving lamp) |
| Power consumption | 0.45 W (working) / 0.1 W (static) |
| Operating temperature | -20 ~ +40 °C |
| Relative humidity | < 93% |
Safety
General safety
- Read the manual carefully before use. Keep the manual for future reference.
- The manufacturer is not liable for consequential damages or for damages to property or persons caused by nonobservance of the safety instructions and improper use of the device.
- The device can be used by children from 8 years and above and by persons with a physical, sensory, mental or motor disability, or lack of experience and knowledge if they are supervised or instructed on how to use the device in a safe way and understand the hazards involved. Cleaning and user maintenance shall not be made by children unless they are older than 8 years and supervised. Keep the device and the mains cable out of the reach of children younger than 8 years. Children shall not play with the device.
- Only use the device for its intended purposes. Do not use the device for other purposes than described in the manual.
- Do not use the device if any part is damaged or defective. If the device is damaged or defective, replace the device immediately.
- The device is suitable for outdoor use only. Do not use the device indoors.
- The device is suitable for domestic use only. Do not use the device for commercial purposes.
- Do not use the device near bathtubs, showers, basins or other vessels containing water.
- Do not use a timer or a separate remote-control system that switches on the device automatically.
- Do not cover the device.
Electrical safety

- To reduce risk of electric shock, this product should only be opened by an authorized technician when service is required.
- Disconnect the product from the mains and other equipment if a problem should occur.
- Do not use the device if the mains cable or mains plug is damaged or defective. If the mains cable or mains plug is damaged or defective, it must be replaced by the manufacturer or an authorised repair agent.
- Before use, always check that the mains voltage is the same as the voltage on the rating plate of the device.
- Do not move the device by pulling the mains cable. Make sure that the mains cable cannot become entangled.
- Do not immerse the device, the mains cable or the mains plug in water or other liquids.
- Do not leave the device unattended while the mains plug is connected to the mains supply.
- Do not use an extension cable.
Cleaning and maintenance
Warning!
- Before cleaning or maintenance, switch off the device, remove the mains plug from the wall socket and wait until the device has cooled down completely.
- Do not use cleaning solvents or abrasives.
- Do not clean the inside of the device.
- Do not attempt to repair the device. If the device does not operate correctly, replace it.
- Clean the device using a soft, damp cloth. Thoroughly dry the device with a clean, dry cloth.
Support
If you need further help or have comments or suggestions please visit www.nedis.com/support
Contact
NEDIS B.V., De Tweeling 28, 5215 MC `s-Hertogenbosch, The Netherlands
References
[xyz-ips snippet=”download-snippet”]