
nedis Walkie-talkie set
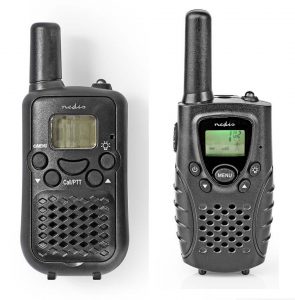 Model: WLTK0500/WLTK0800
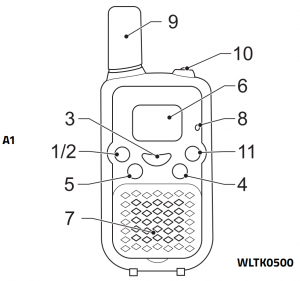
WLTK0500
Specifications
- Maximum range: Up to 5 km (vary depending on terrain and conditions)
- Channels: 8
- Automatic channel scan: Yes
- Operation frequency: 446 MHz
- Transmission Power: ≤ 0.5 W
- CTCSS Codes (for private talking): 38
- VOX: Yes, 3 levels
- Built-in flash light: Yes
- Maximum play time (continuous use): 2.5 hours
- Maximum standby time: 24 hours
- Display colour: Green
- Battery level indicator: Yes
- Automatic battery saving: Yes
- Battery: 2×3 AAA (not included)

WLTK0800
Specifications
- Maximum range: Up to 8 km (vary depending on terrain and conditions)
- Channels: 8
- Automatic channel scan: Yes
- Operation frequency: 446 MHz
- Transmission Power: ≤ 0.5 W
- CTCSS Codes (for private talking): 38
- VOX: Yes, 3 levels
- Built-in flash light: Yes
- Key lock: Yes
- Maximum play time (continuous use): 2.5 hours
- Maximum standby time: 24 hours
- Display colour: Green
- Battery level indicator: Yes
- Automatic battery saving: Yes
- Connections: 2.5 mm jack output, micro-USB
- Battery: 2×3 AAA (not included)
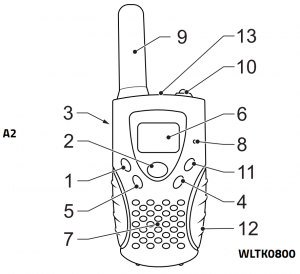
Description
| 1. On/off button |
|
|
2. Menu button |
|
|
|
|
3. PTT/talk button |
|
| 4. Up button Scan button |
|
| 5. Down button Monitor button |
|
| 6. Display |
|
| 7. Speaker | |
| 8. Microphone | |
| 9. Antenna |
|
| 10. Lamp | You can use the lamp to provide additional light or for sending light signals.
|
| 11. Lamp button | |
| 12. USB port (Micro USB) |
|
| 13. Headphone jack (2.5 mm) | Warning:
|
|
The belt clip is located on the rear of the device.
|
|
The battery compartment is located on the rear of the device.
Note: The batteries are not included in the packaging.Note: If you do not use the device for an extended period of time, remove the batteries. |
Receiving/transmitting communication
- When the device is switched on, the device is in reception mode.
- When a signal is received on the current channel, the display will show that the device is in reception.
- When you press the PTT/talk button, the device switches to transmission mode.
- Hold the device in a vertical position with the microphone 5 cm away from your mouth. While holding the PTT/talk button, speak into the microphone in a normal tone of voice.
- Release the PTT/talk button when you have finished transmitting. For others to receive your transmission, they must use the same radio channel.Note: The talking range depends on your environment and be affected by obstructions such as hills or buildings.Note: Do not use two devices closer than 1.5 m from one another to prevent interference.
Scanning for an active radio channel
Press and hold the up button for 2 seconds to scan for an active radio channel. The display shows the scan indicator. The channel will scan continuously from 1 to 8. If an active channel is found, the scanning will stop and you can listen to the transmission. If the transmission stops, the scanning will resume automatically.Note: If you press the PTT/talk button while listening to a found channel, the device will return to standby mode on the found channel.
Changing channels
- Press the menu button. The channel number (1-8) flashes on the display.
- Press the up/down buttons to change the channel.
- Press the PTT/talk button to confirm and return to standby mode.Note: If you do not press a button within 15 seconds, the device will return to standby mode automatically.
CTCSS (Continuous Tone-Coded Squelch System)
The device can operate on 8 different radio channels. If there are many users in your vicinity, other users may be operating on the same radio channel. When using CTCSS, a low-frequency tone (67-250 Hz) is transmitted along with the voice signal.
- Press the menu button twice. The current CTCSS code flashes on the display.
- Press the up/down buttons to change the CTCSS code (38 codes).
- Press the PTT/talk button to confirm and return to standby mode.Note: Due to filtering, these sub-channels will generally not be audible and not disturb the communication.
VOX (hands-free function)
In VOX mode, the device transmits a signal when it is activated by your voice or any other sound. To overrule the VOX mode, press the PTT/talk button.
- To enable VOX mode, press the menu button three times. The current VOX setting flashes on the display. The display shows the VOX indicator.
- Press the up button to set the VOX sensitivity level: 1 = low sensitivity / 2 = medium sensitivity / 3 = high sensitivity.
- To disable VOX mode, press the down button until the display shows “OFF”.
- Press the PTT/talk button to confirm and return to standby mode.Note: Do not use VOX mode in a noisy or windy environment.
Call tones
- Press the menu button four times. The display shows “CA”.
- Press the up/down buttons to change the call tone (10 call tones).
- Press the PTT/talk button to confirm and return to standby mode.
Roger beep on/off
- Press the menu button five times. The display shows “RO”.
- Press the up/down buttons to switch the roger beep on or off.
- Press the PTT/talk button to confirm and return to standby mode. When you release the PTT/talk button, the device transmits a roger beep to confirm that you have stopped talking.
Battery saving function
When the device has not been used for 6 seconds, the device goes to economy mode. The reception of transmission is not affected in economy mode. If the device detects a radio signal, the device will return to standby mode.
Channel frequencies
The device meets all required standards for radio equipment using PMR 446 frequencies as authorized. The use of this two-way radio product involves the public airways and its use may be subject to local laws or regulations. Contact your radio licensing authority for more information.Transmission power: ≤ 0.5 W
| 1. | 446.00625 MHz | 2. | 446.01875 MHz |
| 3. | 446.03125 MHz | 4. | 446.04375 MHz |
| 5. | 446.05625 MHz | 6. | 446.06875 MHz |
| 7. | 446.08125 MHz | 8. | 446.09375 MHz |
Specific absorption rate (SAR)
- WLTK0500BK – Maximum SAR values: 0.333W/kg for FM 12.5KHz
- WLTK0800BK – Maximum SAR values: 0.327W/kg for FM 12.5KHz
Safety
General safety
- Read the manual carefully before use. Keep the manual for future reference.
- The manufacturer is not liable for consequential damages or for damages to property or persons caused by nonobservance of the safety instructions and improper use of the device.
- Only use the device for its intended purposes. Do not use the device for other purposes than described in the manual.
- Do not use the device if any part is damaged or defective. If the device is damaged or defective, replace the device immediately.
- Do not modify the device in any way. Have a damaged device repaired by a qualified electrician.
- The device is suitable for indoor use only. Do not use the device outdoors.The device is suitable for domestic use only. Do not use the device for commercial purposes.
- Do not use the device in locations with high humidity, such as bathrooms and swimming pools.
- Do not use the device near bathtubs, showers, basins or other vessels containing water.
- Do not use the device in potentially explosive settings (e.g. around pumps, on the lower deck of a boat or in the vicinityof fuel-storage installations or chemical products).
- Do not expose the device to extreme temperatures (temperature range: -20 °C ~ +55 °C).
- Do not use the device on an airplane or in a hospital.
- Do not use the device in close proximity to a radio to avoid interference.
- If you carry a personal medical device, consult a doctor before use.
- To avoid the risk of burns, do not use the device if the antenna is damaged.
- Keep the device away from water and dust.
Battery safety
- Use only the batteries mentioned in the manual.
- Do not use old and new batteries together.
- Do not use batteries of different types or brands.
- Do not install batteries in reverse polarity.
- Do not short-circuit or disassemble the batteries.
- Do not expose the batteries to water.
- Do not expose the batteries to fire or excessive heat.
- Batteries are prone to leakage when fully discharged. To avoid damage to the product, remove the batteries when leaving the product unattended for longer periods of time.
- If liquid from the batteries comes into contact with skin or clothing, immediately rinse with fresh water.
Cleaning and maintenance Warning!
- Before cleaning or maintenance, always switch off the device, remove the mains plug from the wall socket and wait until the device has cooled down.
- Do not use cleaning solvents or abrasives.
- Do not clean the inside of the device.
- Do not attempt to repair the device. If the device does not operate correctly, replace it with a new device.
- Do not immerse the device in water or other liquids.
- Clean the outside of the device using a soft, damp cloth. Thoroughly dry the device with a clean, dry cloth.
SupportIf you need further help or have comments or suggestions, please visit www.nedis.com/supportContactNEDIS B.V., De Tweeling 28, 5215 MC ‘s-Hertogenbosch, The Netherlands

References
[xyz-ips snippet=”download-snippet”]