netAlly EtherScope nXG
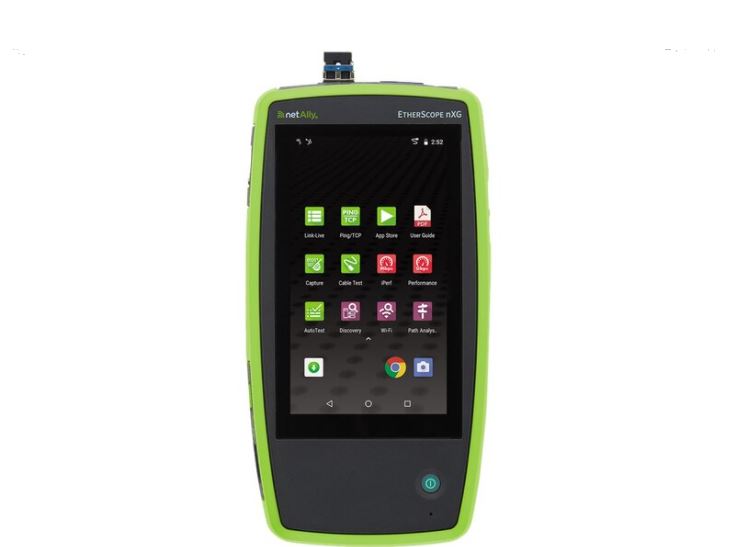
The EtherScopeTM nXG is a rugged, hand-held tool for testing and analyzing copper, fiber, and Wi-Fi networks. This Portable Network Expert features applications developed by NetAlly for network discovery, measurement, and validation.
![]() AutoTest – Verify your network layers 1 through 7 in seconds.
AutoTest – Verify your network layers 1 through 7 in seconds.![]() Capture – Record Wired or Wi-Fi frames with filters.
Capture – Record Wired or Wi-Fi frames with filters.
![]() Wi-Fi – Identify APs, SSIDs, clients, and channels from your location.
Wi-Fi – Identify APs, SSIDs, clients, and channels from your location.![]() AirMapperTM – Perform Wi-Fi site surveys and generate heat maps in Link-Live.
AirMapperTM – Perform Wi-Fi site surveys and generate heat maps in Link-Live.![]() iPerf – Test Wired or Wi-Fi connections to a NetAlly Test Accessory or server.
iPerf – Test Wired or Wi-Fi connections to a NetAlly Test Accessory or server.
![]() App Store – Download and install third-party Android applications.
App Store – Download and install third-party Android applications.![]() Ping/TCP – Validate and monitor responsiveness and connectivity.
Ping/TCP – Validate and monitor responsiveness and connectivity.![]() Discovery – Identify and analyze all devices on your network.
Discovery – Identify and analyze all devices on your network.
![]() Path Analysis – Trace Layer 2 and 3 routes.
Path Analysis – Trace Layer 2 and 3 routes.
![]() Performance – Measure up to four streams at a 10G line rate.
Performance – Measure up to four streams at a 10G line rate.
![]() Link-Live – Upload, manage and analyze results and data in the Cloud.
Link-Live – Upload, manage and analyze results and data in the Cloud.![]() Cable Test – Determine the length, status, and wiretapping, and employ toning.
Cable Test – Determine the length, status, and wiretapping, and employ toning.
View the complete User Guide and instructional videos from the Home screen of your EtherScope nXG.
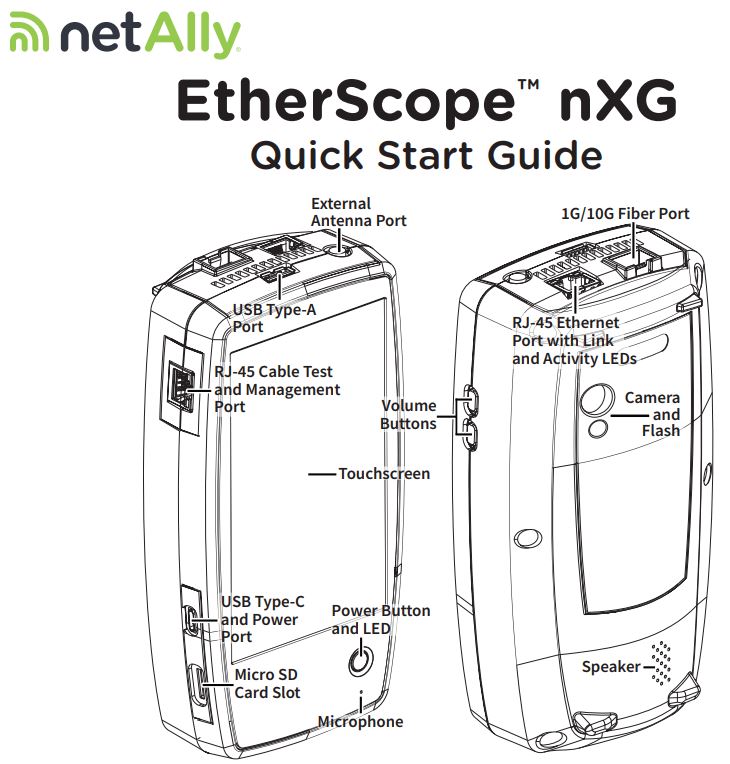
Power Up and Connect
Your EtherScope nXG includes a USB-C 15V/3A (45 W) power adapter. Other USB-C power adapters are not supported. EtherScope nXG can also charge via 802.3at (25.5 W) PoE using the top RJ-45 port.
- To begin charging the internal battery, plug the included power adapter into the left-side USB-C port. The unit will fully charge in 2-3 hours via AC power. The power LED button turns red when the unit is charging and off at full charge. Press it briefly to view the battery level on the screen.
- To fully start up the EtherScope nXG, hold down the power button for approximately one second, until the power button LED turns green.
- For wired testing capabilities, connect your EtherScope nXG to a network using the RJ-45 Ethernet port or Fiber port on the top of the unit.
Start Testing
When you power on the EtherScope nXG, the AutoTest, Discovery, and Wi-Fi apps begin collecting available wired and Wi-Fi data from your network in the background. Open Discovery or Wi-Fi to view discovered devices on your networks, or open AutoTest and run test “Profiles.” An AutoTest Profile is a series of tests and their saved connection and threshold settings. After running a profile, you can touch the individual test cards to view more details, retest, or open other apps for further analysis.For more options, tap the Floating Action Button (FAB)![]() at the lower right corner of the app screen. Touch the Menu button
at the lower right corner of the app screen. Touch the Menu button![]() or Settings button
or Settings button![]() to configure apps and tests for your network. To return to Home and open other apps, tap the home button
to configure apps and tests for your network. To return to Home and open other apps, tap the home button![]() at the bottom of the screen.
at the bottom of the screen.
The EtherScope nXG touchscreen supports many of the operations typical of any Android device. Use dragging and swiping motions to navigate through apps, open side menus, drag down the notification panel from the top, and drag up the Apps screen from the bottom of the Home screen.The main navigation buttons are always shown at the very bottom of the touchscreen:![]() The back icon returns to the previous screen.
The back icon returns to the previous screen.![]() The circle icon opens the Home screen.
The circle icon opens the Home screen.![]() The square icon displays your recently used applications for easily switching between them.The Android operating system also allows you to add third-party apps from the NetAlly App Store. To download these curated apps, first, visit our Link-Live website, and claim your unit.
The square icon displays your recently used applications for easily switching between them.The Android operating system also allows you to add third-party apps from the NetAlly App Store. To download these curated apps, first, visit our Link-Live website, and claim your unit.
Connect to Link-Live
Link-Live Cloud Service is a free, online system for collecting, organizing, analyzing, and reporting your test results. AutoTest data is automatically uploaded once your EtherScope nXG is “claimed” to Link-Live and properly configured.To start, create a user account at Link-Live.com, and sign in.
The first time you sign in, a pop-up window prompts you to claim a device. If you already have other devices claimed, go to the Units page from the left-side drawer, and select the Claim Unit![]() button at the lower right corner of the page. Then, select the EtherScope nXG image.On your EtherScope nXG Home screen, open the Link-Live app
button at the lower right corner of the page. Then, select the EtherScope nXG image.On your EtherScope nXG Home screen, open the Link-Live app![]() , and touch CLAIM NOW.Tap QUICK CLAIM in the Link-Live app’s claiming dialog to claim without entering the MAC address.To learn more about Link-Live.com and view video tutorials, open Support from the left-side navigation drawer on the website.
, and touch CLAIM NOW.Tap QUICK CLAIM in the Link-Live app’s claiming dialog to claim without entering the MAC address.To learn more about Link-Live.com and view video tutorials, open Support from the left-side navigation drawer on the website.
Other Helpful URLsNetAlly.com/Products/EtherScopenXG for product information NetAlly.com/Registration to register your productNetAlly.com/Support for technical assistance
References
Link-Live
NetAlly Support | AllyCare Support | Product Registration
NetAlly Network Tester & Wi-Fi Analysis
Login · Customer Self-Service
NetAlly.com/Products/EtherScopenXG
NetAlly Support | AllyCare Support | Product Registration
Link-Live
Login
· Customer Self-Service
NetAlly.com/Products/EtherScopenXG
NetAlly Network Tester & Wi-Fi Analysis
[xyz-ips snippet=”download-snippet”]