
E300 Branch Router
E300 Branch Router Quick Start Guide-DRAFT
Introduction
This document provides a brief overview of the E300 Branch Router, discusses what’s inside the box, and provides basic setup and install instructions.
What’s in the Box Hardware Accessories Required Tools Before You BeginLocation Considerations SIM Card for Wireless Connectivity Installing an External Modem Setup Understanding LEDs Connecting to NetCloud Troubleshooting Resources Help and Support E300 Branch Router Models
What’s in the Box
- One router with built-in WiFi and embedded LTE modem
- Two or Four LTE universal modem antennas (SMA)*
- An AC/DC power adapter · One MC400 modem door screw
- Four rubber feet for desk mounting
- Antenna Alignment instructions/Wall Mount Template
- Safety, Regulatory, and Warranty Guide
*Number of antennas vary depending on the model
Hardware
Hardware specifications vary by model type.
Accessories
To enable cellular connectivity, you will also need at least one activated 2FF-sized SIM card with an active cellular data plan.
Required Tools
#0 Philips-head screwdriver (for LTE modem door cover)
Before You Begin
Read the following before setting up the E300 Branch Router.
Location Considerations
To ensure the E300 operates efficiently, do the following:
- Ensure the device is positioned to receive optimal signal. Avoid positioning near concrete walls, metal or reflective surfaces, or any other objects that may interfere with RF reception.
- Ensure plenty of ventilation. Avoid installing the device in enclosed spaces. · Do not install the device in direct exposure to the elements. Extreme heat or cold can and will impact the router’s performance.
- Refer to the E300 Safety, Regulatory, and Warranty Guide (included with your hardware) for more information about location considerations.
SIM Card for Wireless Connectivity
A wireless broadband data plan must be added to your Cradlepoint E300 for wireless broadband connectivity. Wireless broadband data plans are available from wireless carriers such as Verizon, AT&T, Sprint, and T-Mobile. The SIM card must be activated and provisioned by the carrier. Contact your carrier for details about selecting a data plan and about the process for provisioning your SIM.
Installing an External Modem
The E300 includes a slot for an additional MC400 LTE modem. This enhanced capability allows for redundancy, advanced configuration, failover, and upgradability. The E300 supports both the MC400600M or the MC400-1200M. Refer to the following for more information:Insert Optional MC400 External ModemMC400 WebpageMC400 Spec SheetMC400 Quick Start Guide
Setup
Read through the following to set up your E300 Branch Router.
- Insert an Activated SIM.a. If setting up cellular connectivity, do the following:b. Remove the modem door covering the SIM slots.c. Insert an activated 2FF-sized SIM card with metal contacts face up and notch in, into the SIM 1 slot. It will click into place. Depress again to remove, if necessary.d. Insert a secondary/backup, activated SIM card into the SIM 2 slot, if desired.e. Replace the modem door and secure with the modem door screw.NOTE: The modem door cover must be on the device or the embedded modem will not power on.
- Insert Optional External MC400 Modem. The E300 has a slot for second, removable modem (MC400). Before the E300 can be set up, the additional modem must be installed. To install this modem, do the following:a. Insert an activated 2FF-sized SIM card into the MC400 modem, metal contacts down, notch end first.b. Remove the modem door on the E300 device.c. Slide the MC400 modem into the available modem slot, USB plug first, with the Cradlepoint logo facing up.d. Replace the MC400 modem door cover.NOTE: Remove the plastic SMA covers from the modem door cover for the additional antenna ports on the modem. e. Secure with the door cover screw.
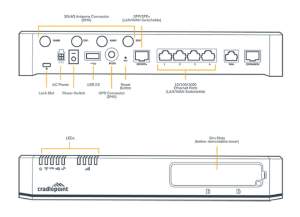
- Attach the Antennas. Attach the cellular modem antennas (included) to the connectors.a. Hold the antenna straight and twist the base of the antenna to connect to the device, folding the joint if needed.NOTE: Do not over-tighten. The maximum recommended torque is 4 in-lbs.b. Angle the antennas for optimal signal reception.
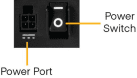
- Connect the Power Sourcea. Connect the power supply to the router and then plug the provided power supply into an electrical outlet.b. Switch the device to ON (O = OFF, = ON). The LED lights will begin lighting up.

 report this ad
Once the E300 is powered on, log into your NetCloud account and configure the device. Refer to the Connecting to NetCloud section of this document for more information.
Understanding LEDs
|
INDICATOR |
BEHAVIOR |
|
|
POWER: The Cradlepoint E300 must be powered using an approved 54 VDC power source.• Green = Powered On.• No Light = Not receiving power. Check the power switch and the power source connection.• Amber = Attention. Open the administration pages and check the router status. (WiFi version only) |
|
VPN |
VPN: Indicates status of VPN connection.• Blue = Connected to an active VPN.• Green = Router is connected to remote modem via WAN (captive modem) |
|
|
REMOVABLE MODEM: Indicates the status of removable LTE modem(s).• Green = Modem has established an active connection.• Blinking Green = Modem is connecting.• Blinking Amber = Data connection error. No modem connection possible.• Blinking Red = Modem is in the process of resetting. |
|
|
WiFi BROADCAST: Indicates activity on the WiFi broadcast for both 2.4 GHz and 5 GHz bands.• Blue = WiFi is on and operating normally.• No Light = WiFi is not operating. |
|
|
ALERT:• Amber = Attention. Open the administration pages and check the router status.• No Light = Not receiving power. Check the power switch and the power source connection. |
|
INDICATOR |
BEHAVIOR |
|
|
SIGNAL STRENGTH: LED bars indicate the active modem’s signal strength (only for embedded and removable modems). When the embedded modem is active, the bars will be blue. When the removable modem is active, the bars will be green. When the remote (captive) modem is active, the bars will be cyan (blue-green color.)• 4 Solid Bars = Strongest signal.• 1 Blinking Bar = Weakest signal. (A blinking bar indicates half of a bar.)• 4 Blinking Bars = SIM door is not installed, modem is off. |
|
|
EMBEDDED MODEM: Indicates information about the embedded modem.• Green = Modem has established an active connection.• Blinking Green = Modem is connecting.• Amber = Modem is not active.• Blinking Amber = Data connection error. No modem connection possible. • Blinking Red = Modem is in the process of resetting.• Blinking Red with Signal Strength LEDs = SIM door is not installed, modem is off.• No Light = Modem not connected. |
|
Other |
ADDITIONAL LED INDICATIONSThe white lights along the base of the endpoint and the CP logo on the top face of the device light up when the device is connected to a registered NCM account. |
Connecting to NetCloud
Activate your device through NetCloud Manager (NCM). Your device is packaged with NetCloud services and activation requires that you log into your NetCloud account. Refer to the following for more information: Getting Started with NetCloud Manager
Troubleshooting
If the device takes longer than 5 minutes to connect to the Internet, you may need to log into the local UI of the device to make configuration changes or to start the troubleshooting process. You must be physically co-located with the device in order to do this. Refer to the following document for additional help: How to Troubleshoot Connection Issues
Once the device connects to the Internet, it should then connect to your NetCloud Manager account and start its configuration download.
Resources
E300 Spec Sheet
Help and Support
Cradlepoint Customer Connect CommunityCradlepoint Support Services
E300 Branch Router Models
This document applies to all of the following E300 models:
CRADLEPOINT E300 MODELS
E300-C18B Model: S5A946AE350-C18B Model: S5A951AE300-C4D Model: S5A947AE350-C4D Model: S5A952AWITH OPTIONAL PLUG-IN LTE MODULESMC400LP6MC400-600M-CMC400-1200ME300 Power adapter model no.:APD WA-36A12RAPD WA-36N12RKtec KSA-36W-120300D5
Mounting screw installation on Spiderman
Install Spiderman: Pre-drill holes to a wall with a drill bit, Use appropriate wall anchors to attach the wall mount

[xyz-ips snippet=”download-snippet”]