NetComm Casa Systems NF18MESH – Port Forwarding Setup Instructions
Copyright
Copyright© 2020 Casa Systems, Inc. All rights reserved.The information contained herein is proprietary to Casa Systems, Inc. No part of this document may be translated, transcribed, reproduced, in any form, or by any means without prior written consent of Casa Systems, Inc.Trademarks and registered trademarks are the property of Casa Systems, Inc or their respective subsidiaries. Specifications are subject to change without notice. Images shown may vary slightly from the actual product.Previous versions of this document may have been issued by NetComm Wireless Limited. NetComm Wireless Limited was acquired by Casa Systems Inc on 1 July 2019.![]() Note – This document is subject to change without notice.
Note – This document is subject to change without notice.
Document history
This document relates to the following product:
Casa Systems NF18MESH
|
Ver. |
Document description | Date |
| v1.0 | First document release | 23 June 2020 |
Port Forwarding Overview
Port forwarding enables programs or devices running on your LAN to communicate with the internet as if they were directly connected. This is most commonly used for remotely accessing DVR/NVR Controller, IP Cameras, Web Server or online gaming (via game console or computer).Port forwarding works by “forwarding” a specific TCP or UDP port from the NF18MESH to the computer or device you are using.
Prerequisite
Prior to setting the port forwarding function you must know which ports need to be opened. If you are not sure, contact the application vendor or developer.
Add a Port Forwarding Rule
Open web interface
- Open a web browser (such as Internet Explorer, Google Chrome or Firefox), type following address into the address bar and press enter.http://cloudmesh.net or http://192.168.20.1Enter the following credentials:Username: adminPassword: <The password printed on the back of the modem> then click the Login button.NOTE – Some Internet Service Providers use custom password. If login fails, contact your Internet Service Provider. Use your own password if it is changed.

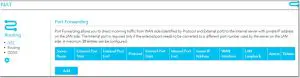
- Set up Port forwarding (Virtual Server)SETUP PORT FORWARDING option is available on the QICK TASK bar. Alternatively, available in theAdvanced menu, under Routing click on the option NAT.
- Then under the Port forwarding section, click the Add button to add a new port forwarding rule.
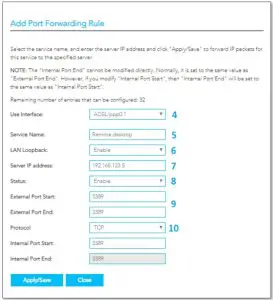
- The Add Port Forwarding Rule pop up window will appear.A sample configuration for allowing Remote desktop toward a LAN side device is provided below.
- Select the correct Interface in the Use Interface field as a misconfiguration will end up failing to forward anything.
- The correct interface can be checked from the Internet page.
- The Service Name needs to be unique, so provide something meaningful for future references.
- LAN Loopback needs to be enabled. This is important if you want to access resources using public IP address even when you are connected to the same network. A good example can be DVR security systems. You may watch your camera feed from anywhere in the world using the public IP address. Now if you are in the local network, with this option enabled, you do not need to change DVR IP address.
- Configure the Private IP address of the device (e.g. Computer, DVR, Gaming Console) you wish to port forward to in the Server IP Address field. 10
- This will be a local IP address in the subnet 192.168.20.xx (by default); where xx can be equal to 2 to 254.
- Open the Status drop down list and select Enable.
- Enter the port number or port range into the External Port Start and External Port End fields.
- If you only want to open one port, then enter the same number in Start and End port fields, but if you want to open range of ports, then enter the start number in Port Start field and end number in Port End field.
- Note that the Internal Port Start and Internal Port End fields will automatically populate with the same port numbers.
- Select the Protocol to be used for the port forwarding rule: TCP, UDP or TCP/UDP both.
- Click the Apply/Save button.
- The port forwarding rule will now be added to the list.
- This example created in this user document is displayed below.

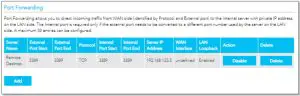
Port forwarding is now configured.You may also Enable/Disable, Delete any rule existing rule from this window.
Please note
- We recommend that you set a Static IP address on the end device, instead of obtaining one automatically, to make sure that the request is forwarded to the appropriate machine every individual time.
- You can only forward a port to one location (IP address). In some cases, this may cause issues when multiple LAN devices (computers, game consoles, or VOIP ATAs) attempt to use online gaming at the same time or make multiple VOIP service connections. In these cases, you will need to use an alternate port for any subsequent connections after the first device. Please consult your VOIP provider or game manufacturer for assistance with this.
- Similarly, remote access and the webserver must have unique port numbers.
- For example, you cannot host a web server accessible through port 80 of your public IP and enable remote http administration of the NF18MESH through port 80, you must provide both with unique port numbers.
- Note also that ports 22456 to 32456 are reserved for RTP protocol in VOIP services.
- Do not use any of these ports for any other service.
![]() casa system
casa system
References
[xyz-ips snippet=”download-snippet”]