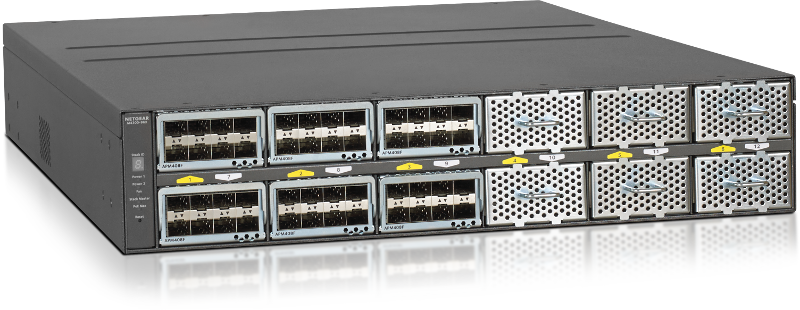
NETGEAR Campus Edge and SMB Core Chassis Switch M6100
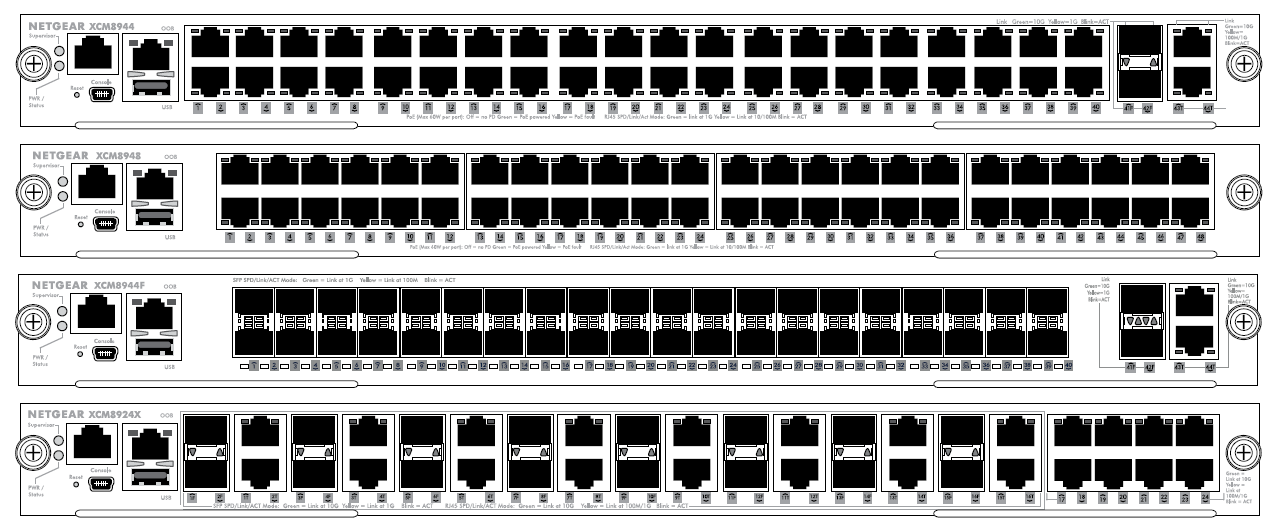
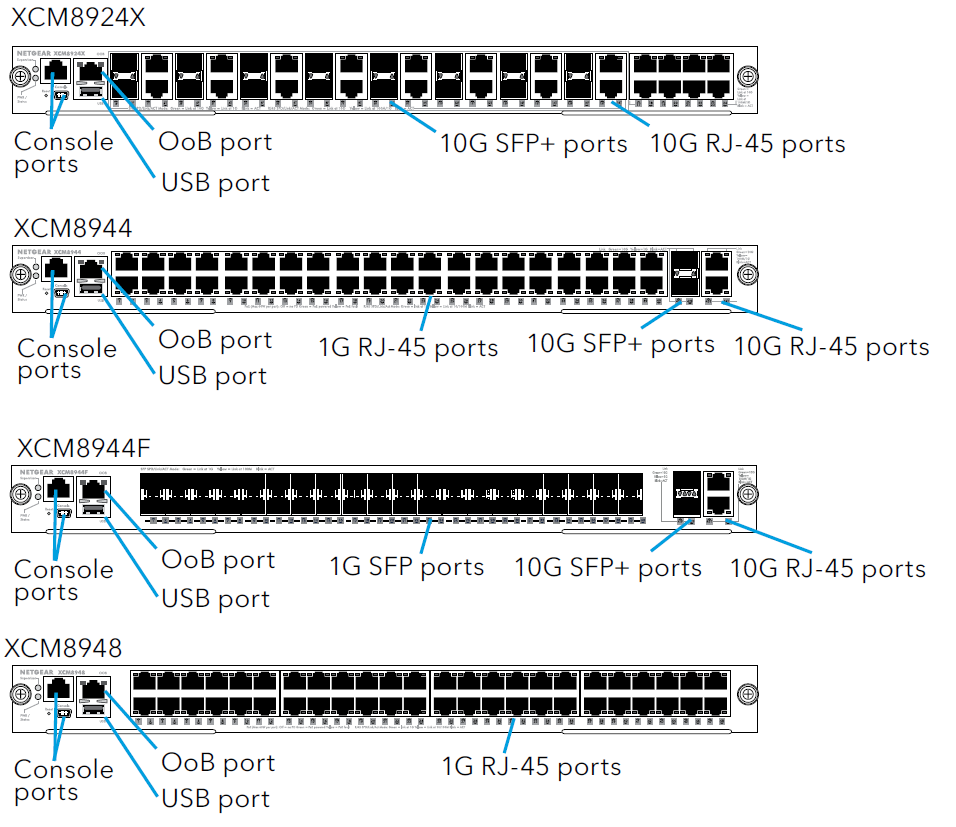
M6100 switch blade front panels
Before installing the switch blades
The M6100 series switch blades are designed to be installed in the XCM8903 switch chassis. We recommend installing the XCM8903 chassis into a rack before installing any switch blades. For more information about how to install the XCM8903 switch chassis, see the M6100 – Campus Edge and SMB Core Chassis Switch, Blades, and Daughter Cards Hardware Installation Guide.
Install the chassis
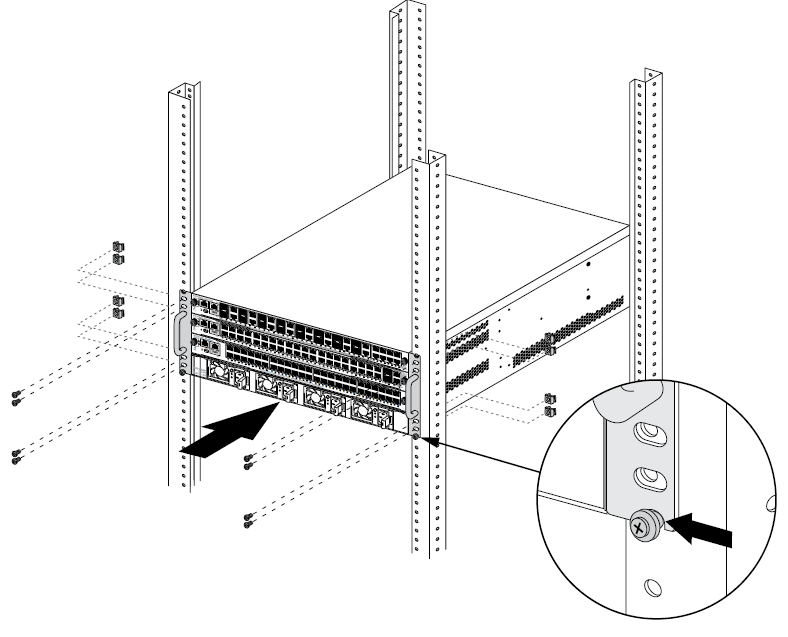
You can either rack-mount the chassis into a rack or install the chassis using the included rails. For information about installing the chassis using rails, see the Campus Edge and SMB Core Chassis Switches M6100 Series Hardware Installation Guide.
To rack-mount the chassis:
- Partially screw two of the included screws into the rack where you want the bottom of the chassis to rest.
- Rest the bottom of the chassis’ brackets on the two screws.

- Attach the rest of the screws to secure the bracket to the rack.
Install the fan tray
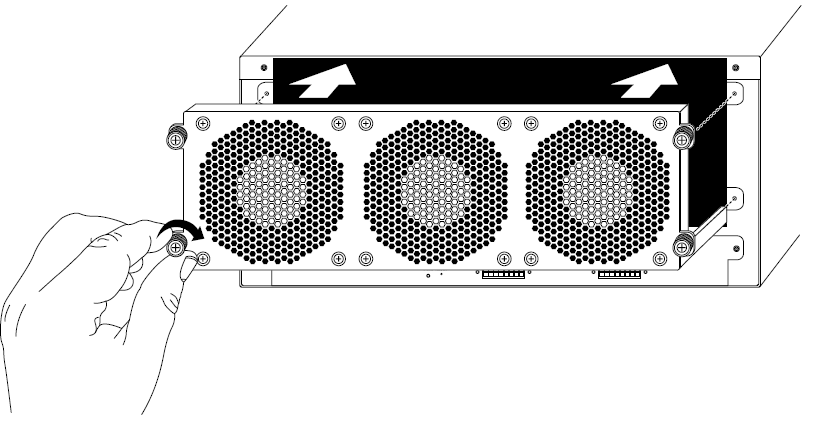
To install the fan tray:
- Carefully slide the fan tray all the way into the fan tray bay at the rear of the chassis.The fan tray is connected to power when it has been inserted completely into the fan tray bay.

- Screw the fan tray to the rear of the chassis using the included screws.
Install a switch blade
To install a switch blade in a M6100 series chassis switch:
- Select a slot for the switch blade.
- Remove a blank front panel from the chassis slot, if necessary. Any unoccupied switch blade slot in the chassis must have a blank faceplate installed to ensure satisfactory protection from EMI and to maintain adequate airflow through the chassis.
- Remove the switch blade from the antistatic packaging.CAUTION: To prevent ESD damage, hold the switch blade by the metal rail and front panel only. Never touch the components on the PCB or the pins on any of the connectors.
- Verify that the switch blade injector-ejector handles are open.
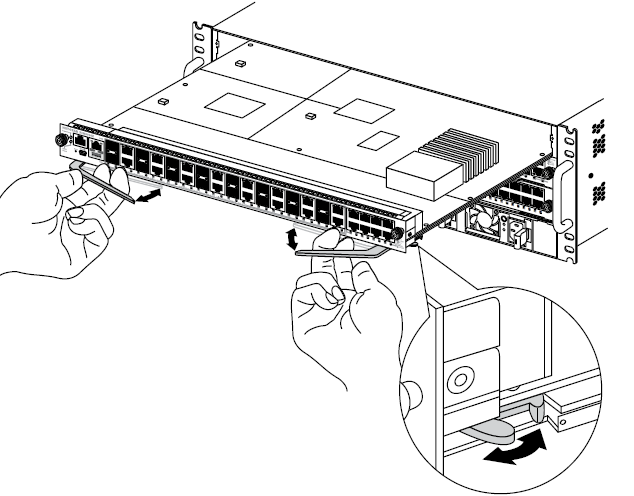
- Keep the injector-ejector handles in the open position as you slide the switch blade into the chassis slot.CAUTION: Do not slide the switch blade into the open chassis slot if the injector-ejector handles are in the latched position.
- Using both hands, push both handles toward the center of the switch blade, as shown.

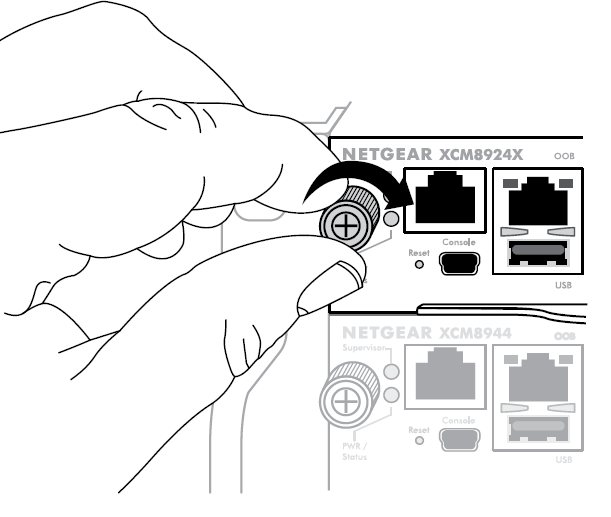
- Use your fingers or a screwdriver to turn the front panel screws on each injector-ejector handle clockwise and completely down.When the screw is fully tightened, the yellow band around the captive screw is completely hidden.CAUTION: Be careful to avoid over-torquing and stripping the screws.

Install a power supply
To install a power supply:
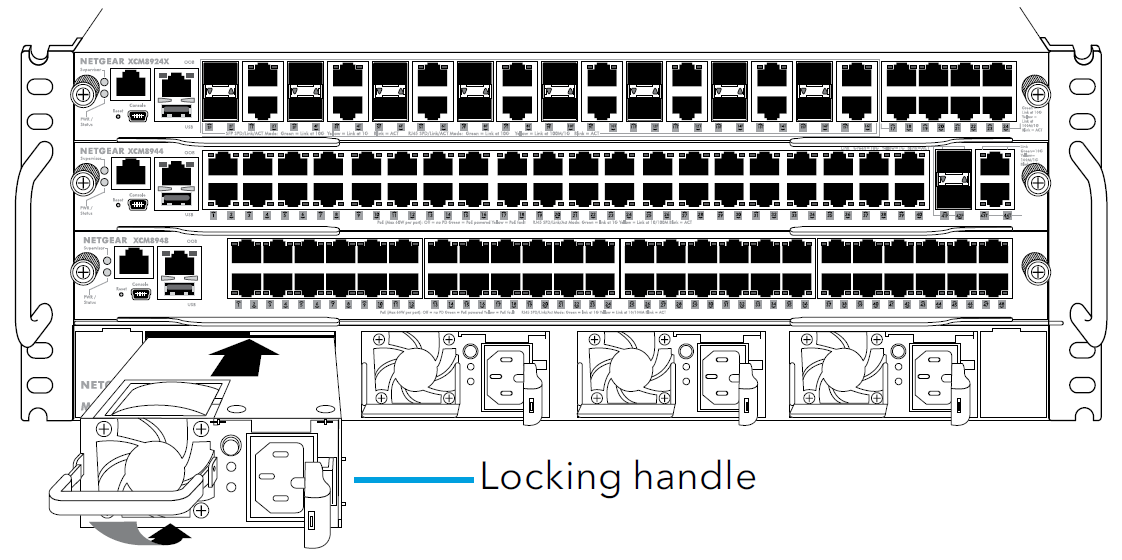
- Carefully slide the power supply all the way into the power supply bay until it clicks into place.CAUTION: Do not force the power supply into the system backplane.

- Use the locking handle to secure the power supply in the power supply bay.
- Repeat Step 1 and Step 2 to install each additional power supply.
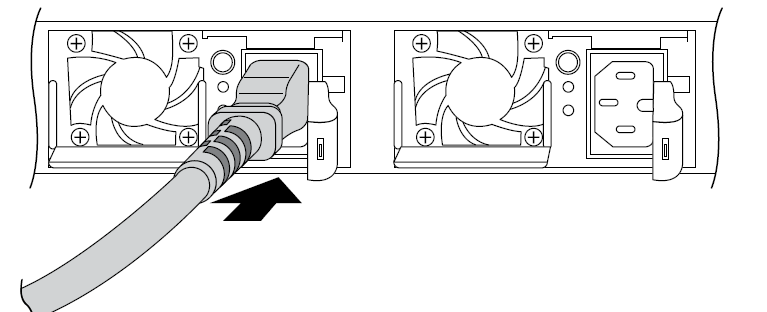
- After you install all power supplies, connect an AC power cord to the AC input connector below each power supply.WARNING: Be sure that the source outlet is properly grounded before plugging the AC power cord into the input connector.

Install an optional PoE or UPoE card
You can install an optional PoE (XCM89P) or UPoE (XCM89UP) card into the XCM8944 and XCM8948 switch blades.
To install the optional PoE or UPoE card:
- Remove the switch blade from the chassis.
- Connect the optional card and secure it with the attached screws as shown.

Configure the switch
You can manage your switch through its local browser UI or by using the command-line interface (CLI) through a console port. This guide shows you how to configure your switch using the local browser UI. It also covers using the CLI to determine a DHCP-assigned IP address or using ezconfig to assign a static IP address. For more information about CLI management, see the M5300, M6100, and M7100 Series ProSAFE Managed Switches CLI Command Reference Manual and the M5300, M6100, and M7100 Series ProSAFE Managed Switches Software Administration Manual.
When you configure your switch, connect your computer to one of the numbered ports on the front panel of a switch blade.
Note: Use the OoB port to manage the switch only after the switch is configured for your network. For more information about switch management using the OoB port, see the M5300, M6100, and M7100 Series ProSAFE Managed Switches CLI Command Reference Manual and the M5300, M6100, and M7100 Series ProSAFE Managed Switches Software Administration Manual.
To configure your switch, use one of the following procedures:
- Use the local browser UI to configure the IP address
- Use the CLI to configure the IP address
- Find the IP address assigned by the DHCP server
Configure the IP address of the switch
You can access the switch through a console port or through the out of band (OOB) port (which is also referred to as the service port) through a console port, or through any Ethernet network port. By default, the switch functions as a DHCP client.
To configure the IP address of the switch, use one of the following methods:
- Local browser UI. Use the local browser UI through the OOB port or through any Ethernet network port (see Use the local browser UI to configure the IP address
- CLI. Use the command-line interface (CLI) through the mini USB console port or RJ-45 RS232 console port. You can configure the IP address manually or use the ezconfig utility (see Use the CLI to configure the IP address
- DHCP server. Connect a DHCP server through the OOB port or through any Ethernet network port and find the assigned IP address (see Find the IP address assigned by the DHCP server
After you configure or find the IP address of the switch, you can configure the features of the switch through either the local browser UI or the CLI.
Use the local browser UI to configure the IP address
You can use a computer on the same subnet as the switch to access the local browser UI over the switch’s default IP address and assign a different static IP address to the switch.
- Configure your computer with a static IP address:
- For access over an Ethernet network port, use an IP address in the 169.254.0.0/16 subnet. For example, use 169.254.100.201.
- For access over the OOB port, use an IP address in the 192.168.0.0/16 subnet. For example, use 192.168.0.100.
- Connect an Ethernet cable from an Ethernet port on your computer to an Ethernet network port on the switch or to the OOB port on the switch.
- Launch a web browser and enter the default IP address of the switch in the address field of the browser:• For access over an Ethernet network port, enter 169.254.100.100.• For access over the OOB port, enter 192.168.0.239. A login window displays.
- Enter admin for the user name, leave the password field blank, and click the LOGIN button.The System Information page displays.
- Select System > Management > Initial Setup.
- Configure the IP address settings of the management interface and OOB port.
- Click the Apply button.Your setting are saved.
For information about using the local browser user interface (UI), see the user manual, which you can download by visiting netgear.com/support/download/
Use the CLI to configure the IP address
To use the CLI for initial configuration and assign a static or dynamic IP address to the switch, connect a computer or VT100/ANSI terminal to one of the console ports on the switch.
- Depending on the connector type at your computer or terminal, and the port that you are using on the switch, use one of the following cables, both of which are included in the product package:• USB console cable for use with the mini USB console port.Note: You can download the driver by visiting netgear.com/support/download/• Console cable for use with the RJ-45 RS232 console port.
- Connect one end of the cable to the appropriate port on the switch and connect the other end to your computer or terminal.
- If you connect a computer to a console port on the switch, start a terminal emulation program:• On a computer with a Windows operating system, you can use HyperTerminal or Tera Term.• On a computer with a Mac operating system, you can use ZTerm.• On a computer with a Linux operating system, you can use TIP.
- If you connect a computer to a console port on the switch, configure the terminal emulation program to use the following settings: baud rate, 115,200 bps; data bits, 8; parity, none; stop bit, 1; flow control, none.
- At the user prompt, log in to the switch using the user name admin and press Enter. At the password prompt, do not type a password but press Enter.You can now use the CLI to manually configure the IP address of the switch, or to use the ezconfig utility, continue with the next step.Note: For information about CLI management, see the CLI referencemanual.
- At the next command prompt, type ezconfig and press Enter.The ezconfig utility is now running on the switch. Netgear Switch) #ezconfig EZ Configuration Utility
- Using ezconfig, set up the basic switch configuration, including a static IP address and subnet mask.
- Use the switch IP address that is assigned by ezconfig to log in to the switch’s local browser UI.
Find the IP address assigned by the DHCP server
By default, the switch functions as a DHCP client and gets its IP address from a DHCP server in the network. To find the assigned IP address of the switch’s management interface or OOB port, connect a computer or VT100/ANSI terminal to one of the console ports on the switch.
- Make sure that the switch is connected to a DHCP server.
- Set up a console connection with the switch.For information about setting up a console connection, see Steps 1 through 5 in Use the CLI to configure the IP address on page 16. After you are logged in and at the CLI command prompt, continue with the next step.
- At the command prompt, type one of the following commands:• To find the IP address of the management interface, type the show ip interface vlan <management VLAN ID> command, and press Enter. By default, the management VLAN ID is 1.• To find the IP address of the OOB port (which is also referred to as the service port), type the show service port command, and press Enter.The active IP address displays.
- Use either the management interface IP address or the OOB port IP address to log in to the switch’s local browser UI.
Log in to the local browser UI
Manage the features of your switch through the local browser UI with the appropriate IP address for your configuration.Note: When you access the switch, make sure that it is running the latest firmware version. To download firmware, visit netgear.com/support/
- Enter http://<ipaddress> in the web browser address field. A login window displays.
- Enter admin for the user name, leave the password field blank, and click the LOGIN button.
The System Information page displays. You can now navigate from this page to other pages and configure your switch.For information about using the local browser UI, see the user manual. You can download the user manual, the hardware installation guide, and other manuals by visiting netgear.com/support/download/
Support and Community
Visit netgear.com/support to get your questions answered and access the latest downloads.You can also check out our NETGEAR Community for helpful advice at community.netgear.com
Regulatory and Legal
(If this product is sold in Canada, you can access this document in Canadian French at https://www.netgear.com/support/download/.)For regulatory compliance information including the EU Declaration of Conformity, visit https://www.netgear.com/about/regulatory/.
See the regulatory compliance document before connecting the power supply.For NETGEAR’s Privacy Policy, visit https://www.netgear.com/about/privacy-policy.By using this device, you are agreeing to NETGEAR’s Terms and Conditions at https://www.netgear.com/about/terms-and-conditions. If you do not agree, return the device to your place of purchase within your return period.Do not use this device outdoors. The PoE source is intended for intra building connection only.
References
[xyz-ips snippet=”download-snippet”]

