NETGEAR LM1200 4G LTE Modem 5

What’s in the box
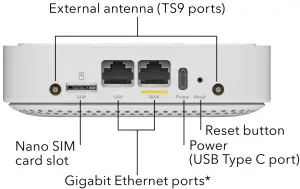
Rear panel
 *A future firmware upgrade will enable the WAN port.
Install the nano SIM card
To obtain an activated SIM card, contact your mobile broadband service provider.
- Ensure that power to the modem is off.
- Align the nano SIM card with the notch toward the nano SIM card slot and the chip side facing down.
- Gently insert the nano SIM card into the SIM card slot.
Power on your modem
- Connect the USB cable to the Power port on the modem and to the provided power adapter.
- Plug the power adapter into an indoor power outlet.Note: We recommend connecting the USB cable only to the power adapter that came in the package. Connecting the USB cable to a USB port on a computer might not work correctly.The Power LED
 lights solid amber and then lights solid green.The modem searches for the mobile broadband network for the nano SIM, which might take several minutes.
 - Check the Signal Strength LED .• Green: The LTE connection is good.• Amber: The LTE connection is weak. Try a different location, such as near a window.• Red: The nano SIM isn’t inserted correctly, or the modem can’t automatically connect to the LTE network (see Add and activate a custom APN profile).
Connect your modem
You can connect a router or computer to the LM1200 modem LAN port. (Your computer must have an Ethernet port.) The WAN port is reserved for use in a WAN failover connection.
To connect a router:
- Connect an Ethernet cable to the LAN port on the LM1200 modem.
- Connect the other end of the Ethernet cable to the WAN or Internet port on the router.
- For broadband Internet access, connect your computer or mobile device to the router.
To connect a computer:
Connect an Ethernet cable to the LAN port on the LM1200 modem and an Ethernet port on the computer.
Manage your modem
You can log in to your modem to view and change its settings from a computer that is connected to the modem with an Ethernet cable. Your computer must have an Ethernet port.
To access your modem settings:
- Connect an Ethernet cable to the LAN port on the modem and the Ethernet port on the computer.
- Launch a web browser from the computer.
- In the address field of the web browser, enter http://192.168.5.1.
- In the Sign In field, enter the default password, and click the Sign In button. See the modem label for the default password.
Note: While the password that you enter is unique to your modem and is secure, we recommend that you change it to a password that you want to use.
Add and activate a custom APN profile
If the modem does not automatically connect to your broadband network, contact your mobile service provider for the APN profile that they require. Then log in to the modem and enter the custom APN profile settings.
- Launch a web browser from a computer or mobile device that is connected to the modem.
- In the address field of the web browser, enter http://192.168.5.1.The limited Dashboard page displays.
- In the Sign In field, enter the password, and click the Sign In button. See the modem label for the default password.
- Select Settings > Network > APN.The APN page displays.
- Click the Add button.The New APN section opens on the page.
- Enter the settings for the new APN profile.Use the information that your mobile service provider gave you. If your mobile service provider did not specify some settings, leave the default settings.
- Click the Save button.The new APN profile displays on the page, but is not yet the active profile.
- Select the radio button next to the APN profile that you just added.The modem now uses the selected APN profile to establish a connection with the mobile broadband network of the mobile service provider.If you still cannot get an Internet connection, contact your mobile service provider to verify the information for the APN profile.
Support and Community
Visit http://netgear.com/support to get your questions answered and access the latest downloads.You can also check out our NETGEAR Community for helpful advice at http://community.netgear.com.
| LED | Description |
 Power Power |
|
 Ethernet LAN Ethernet LAN |
|
 Ethernet WAN Ethernet WAN |
A future firmware update will enable this port. For information about the Ethernet WAN port and WAN failover, see the user manual, which you can download from www.netgear.com/support. |
|
|
|
Regulatory and Legal
For regulatory compliance information including the EU Declaration of Conformity, visit https://www.netgear.com/about/regulatory/. See the regulatory compliance document before connecting the power supply.
For NETGEAR’s Privacy Policy, visit https://www.netgear.com/about/privacypolicy.
By using this device, you are agreeing to NETGEAR’s Terms and Conditions at https://www.netgear.com/about/terms-and-conditions. If you do not agree, return the device to your place of purchase within your return period.
For 6 GHz devices: The operation of this device is prohibited on oil platforms, cars, trains, boats, and aircraft, except that operation of this device is permitted in large aircraft while flying above 10,000 feet. Operation of transmitters in the 5.925-7.125 GHz band is prohibited for control of or Communications with unmanned aircraft systems.
© NETGEAR, Inc., NETGEAR and the NETGEAR Logo are trademarks of NETGEAR, Inc. Any non-NETGEAR trademarks are used for reference purposes only.
NETGEAR, Inc. 350 East Plumeria Drive San Jose, CA 95134, USA NETGEAR INTERNATIONAL LTD Floor 1, Building 3 University Technology Centre Curraheen Road, Cork, T12EF21, Ireland

 report this ad
References
[xyz-ips snippet=”download-snippet”]