NETGEAR WAX202 WiFi 6 AX1800 Dual Band Access Point Installation Guide
Package contents
- NETGEAR WAX202 WiFi access point
- DC power adapter (varies by region)
- Ethernet cable
- Installation guide
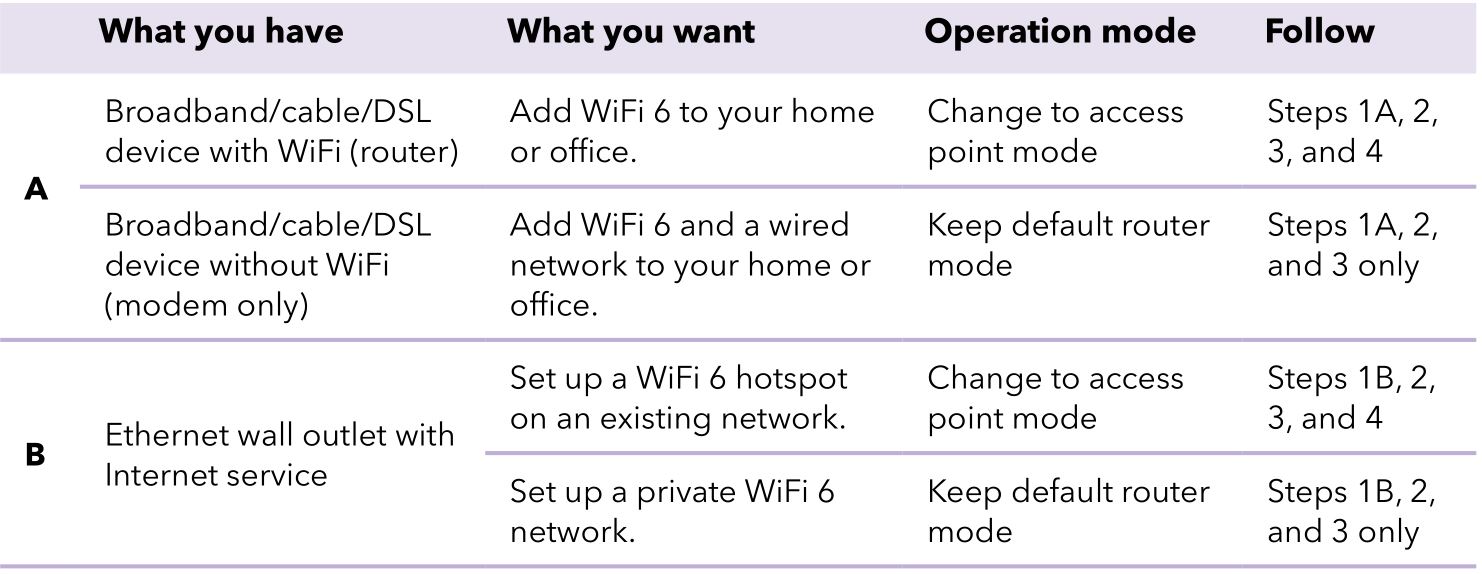
Start here: What WiFi setup do you want?
Step 1. Connect the WAX202
Follow the steps for the setup that you want.
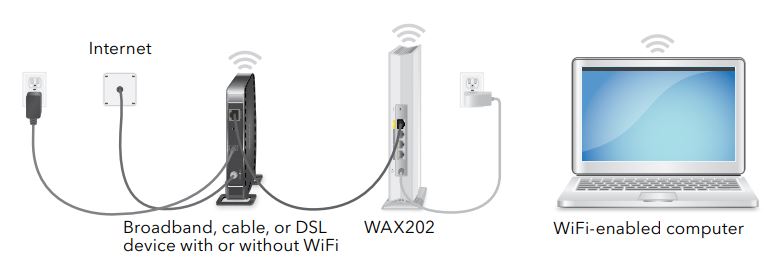
A. You have a broadband/cable/DSL device
- Unplug the power of the broadband, cable, or DSL device, but leave the device connected to the wall jack for your Internet service. If the device uses a battery backup, remove the battery.
- Connect the Ethernet cable to the yellow WAN port on the WAX202.
- Connect the other end of the cable to a LAN port on your broadband, cable, or DSL device.
- If the broadband, cable, or DSL device uses a battery backup, put the battery back in. Plug in and turn on the device.
- Power on the WAX202 and check that the LEDs are lit.
B. You have an Ethernet wall outlet with Internet service
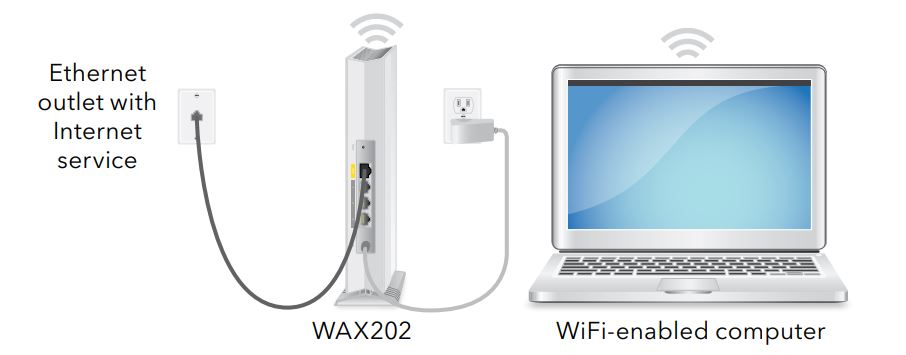
- Connect an Ethernet cable from the wall outlet to the yellow WAN port on the WAX202.
- Power on the WAX202 and check that the LEDs are lit.
Step 2. Join the WAX202’s WiFi network
- On the WiFi-enabled computer that you want to connect to the WAX202, open the software utility that manages the WiFi connections. This utility scans for all WiFi networks in your area.
- Find and select the WAX202’s WiFi network name (SSID), which is printed on the access point’s label, and connect to the WAX202’s WiFi network.
- Type the WiFi password that is printed on the access point’s label.

Step 3. Log in to the WAX202
- Launch a web browser and type http://www.routerlogin.net in the address field. Your browser might display a security warning, which you can dismiss. For more information on how to dismiss a browser security warning, see https://kb.netgear.com/000062980. The Setup Wizard starts.
- Follow the prompts onscreen to do the following:a. Set a new admin password (local device password) for local login, and set security questions and answers.b. As an option for greater security, you can set a new WiFi network name (SSID) and WiFi password.c. If you set a new SSID and WiFi password and your WiFi connection is terminated, reconnect to the WAX202 using your new SSID and WiFi password to complete the setup process.d. If a new firmware version is available, follow the prompts to update the firmware. When the setup process is complete, your browser might again display a security warning, which you can dismiss. The local device login page displays. If the page does not display, type http://www.routerlogin.net in the address field of your browser.Note: If you cannot connect to the WAX202, see the user manual for more detailed instructions. Download the user manual by visiting netgear.com/support/download.
- Enter your local device password. The BASIC Home page displays.
- If you are using the WAX202 in a country other than the U.S. or Canada, set the country or region where you are using the WAX202:a. Select Advanced > Advanced Setup > Wireless Settings.b. From the Region menu, select the country or region where you are using the WAX202.Note: Make sure that the country is set to the location where the device is operating. You are responsible for complying with the local, regional, and national regulations for channels, power levels, and frequency ranges.

c. Click the Apply button. Your settings are saved and the WAX202 is configured for the new country or region.d. If your WiFi connection is terminated, reconnect to the WAX202.
5. As an option, configure the WAX202 settings for your environment and security requirements. The WAX202 supports multiple WiFi and security settings. For more information about the configuration options, see the user manual.6. Identify if your broadband/cable/DSL device is a router or a modem:
- Broadband/cable/DSL device with WiFi: The device is a router. FollowStep 4. Change to access point mode
- Broadband/cable/DSL device without WiFi: The device is most likely a modem.Keep the WAX202 in its default router mode. The WAX202 is now ready to use
Step 4. Change to access point mode
By default, the WAX202 starts up in router mode. After you set up the WAX202, you must change the WAX202 operation mode to access point mode (to disable the router features) for the following network setups:
- Broadband/cable/DSL device with WiFi. Your broadband, cable, or DSL device already provides WiFi (it is a router), but you want to use the WAX202 to add WiFi 6 to your network.
- Ethernet wall outlet with Internet service. You want to set up a WiFi 6 hotspot on an existing network.
1. If you are not yet logged in to the WAX202 local browser user interface (UI), do the following: a. Launch a web browser from a WiFi-enabled computer that is connected to the WAX202’s WiFi network.b. Type http://www.routerlogin.net in the address field. A login window displays.Your browser might display a security warning, which you can dismiss. For more information on how to dismiss a browser security warning, see https://kb.netgear.com/000062980.c. Enter the local device password. The local device password is the one that you specified the first time that you logged in to the WAX202. The local device password is case-sensitive. The BASIC Home page displays.
2. Select ADVANCED > Advanced Setup > Router / AP / Bridge Mode The Router / AP / Bridge Mode page displays.3. Select the AP Mode radio button.4. Click the Apply button.Your settings are saved and the WAX202 is reconfigured in access point mode. The WAX202 receives a new IP address that is assigned by your existing broadband, cable, or DSL device or existing router.5. To connect to the local browser UI again, do the following:a. Reconnect to the WAX202’s WiFi network.b. Close and reopen your browser.c. Type http://www.routerlogin.net in the address field.For more information, see the user manual, which you can download by visiting netgear.com/support/download
Support and Community
Visit netgear.com/support to get your questions answered and access the latest downloads.You can also check out our NETGEAR Community for helpful advice at community.netgear.com .
Regulatory and Legal
Si ce produit est vendu au Canada, vous pouvez accéder à ce document en français canadien à https://www.netgear.com/support/download/. (If this product is sold in Canada, you can access this document in Canadian French athttps://www.netgear.com/support/download/.) For regulatory compliance information including the EU Declaration of Conformity, visithttps://www.netgear.com/about/regulatory/ See the regulatory compliance document before connecting the power supply.For NETGEAR’s Privacy Policy, visit https://www.netgear.com/about/privacy-policyBy using this device, you are agreeing to NETGEAR’s Terms and Conditions at https://www.netgear.com/about/terms-and-conditions. If you do not agree, return the device to your place of purchase within your return period.Do not use this device outdoors.For 6 GHz devices: Only use this device indoors. The operation of 6 GHz devices is prohibited on oil platforms, cars, trains, boats, and aircraft, except that operation of this device is permitted in large aircraft while flying above 10,000 feet. Operation of transmitters in the 5.925-7.125 GHz band is prohibited for control of or communications with unmanned aircraft systems.
NETGEAR, Inc.350 East Plumeria DriveSan Jose, CA 95134, USA
NETGEAR INTERNATIONAL LTDFloor 1, Building 3University Technology CentreCurraheen Road, Cork,T12EF21, Ireland
© NETGEAR, Inc., NETGEAR and theNETGEAR Logo are trademarks ofNETGEAR, Inc. Any non-NETGEARtrademarks are used for referencepurposes only.
References
NETGEAR Terms and Conditions | NETGEAR
What do I do if I my browser displays a security message? | Answer | NETGEAR Support
Download Center | Support | NETGEAR
Download Center | Support | NETGEAR
NETGEAR Privacy Policy | NETGEAR
NETGEAR Support | NETGEAR
Regulatory | NETGEAR
English – NETGEAR Communities
Router Login & Setup | NETGEAR
[xyz-ips snippet=”download-snippet”]