![]()
USER MANUAL
LARDER
INSTRUCTION MANUAL
LANGUAGES
English ……………………………. Error! Bookmark not defined.
1
Thank you for purchasing this product.
Before using your refrigerator, please carefully read this instruction manual in order to maximize its performance. Store all documentation for subsequent use or for other owners. This product is intended solely for household use or similar applications such as:
-the kitchen area for personnel in shops, offices and other working environments
-on farms, by clientele of hotels, motels and other environments of a residential type
-at bed and breakfasts (B & B)
-for catering services and similar applications not for retail sale.
This appliance must be used only for purposes of storage of food, any other use is considered dangerous and the manufacturer will not be responsible for any omissions. Also, it is recommended that you take note of the warranty conditions. Please, to obtain the best possible performance and trouble free operation from your appliance it is very important to carefully read these
2
instructions. Failure to observe these instructions may invalidate your right to free service during the guarantee period.
SAFETY INFORMATION
This guide contains many important safety information. Please, we suggest you keep these instructions in a safe place for easy reference and a good experience with the appliance. The refrigerator contains a refrigerant gas (R600a: isobutane) and insulating gas (cyclopentane), with high compatibility with the environment, that are, however, inflammable.
 Caution: risk of fire If the refrigerant circuit should be damaged:
- Avoid opening flames and sources of ignition.
Thoroughly ventilate the room in which the appliance is situated
WARNING!
- Care must be taken while cleaning/carrying the appliance to avoid touching the condenser metal wires at the back of the appliance, as you might injure your fingers and hands or damage your product.
- This appliance is not designed for stacking with any other appliance. Do not attempt to sit or stand on top of your appliance as it is not designed for such use. You could injure yourself or damage the appliance.
- Make sure that mains cable is not caught under the appliance during and after carrying/moving the appliance, to avoid the mains cable becoming cut or damaged.
- When positioning your appliance take care not to damage your flooring, pipes, wall coverings etc. Do not move the appliance by pulling by the lid or handle. Do not allow children to play with the appliance or tamper with the controls. Our company declines to accept any liability should the instructions not be followed.
- Do not install the appliance in humid, oily or dusty places, nor expose it to direct sunlight and to water.
- Do not install the appliance near heaters or inflammable materials.
- If there is a power failure do not open the lid. Frozen food should not be affected if the failure lasts for less than 20 hours. If the failure is longer, then the food should be checked and eaten immediately or cooked and then refrozen.
- If you find that the lid of the chest freezer is difficult to open just after you have closed it, don’t worry. This is due to the pressure difference which will equalize and allow the lid to be opened normally after a few minutes.
- Do not connect the appliance to the electricity supply until all packing and transit protectors have been removed.
- Leave to stand for at least 4 hours before switching on to allow compressor oil to settle if transported horizontally.
- This freezer must only be used for its intended purpose (i.e. storing and freezing of edible foodstuff).
- Do not store medicine or research materials in the Wine Coolers. When the material that requires a strict control of storage temperatures is to be stored, it is possible that it will deteriorate or an uncontrolled reaction may occur that can cause risks.
- Before performing any operation, unplug the power cord from the power socket.
- On delivery, check to make sure that the product is not damaged and that all the parts and accessories are in perfect condition.
- If in the refrigeration system a leak is noted, do not touch the wall outlet and
3
do not use open flames. Open the window and let air into the room. Then call a service center to ask for repair.
- Do not use extension cords or adapters.
- Do not excessively pull or fold the power cord or touch the plug with wet hands.
- Do not damage the plug and/or the power cord; this could cause electrical shocks or fires.
- If the supply cord is damaged, it must be replaced by the manufacturer, its service agent or similarly qualified person in order to avoid a hazard.
- Do not place or store inflammable and highly volatile materials such as ether, petrol, LPG, propane gas, aerosol spray cans, adhesives, pure alcohol, etc. These materials may cause an explosion.
- Do not use or store inflammable sprays, such as spray paint, near the Wine Coolers. It could cause an explosion or fire.
- Do not place objects and/or containers filled with water on the top of the appliance.
- We do not recommend the use of extension leads and multi-way adapters.
- Do not dispose of the appliance on a fire. Take care not to damage, the cooling circuit/pipes of the appliance in transportation and in use. In case of damage do not expose the appliance to fire, potential ignition source and immediately ventilate the room where the appliance is situated.
- The refrigeration system positioned behind and inside the Wine Coolers contains refrigerant. Therefore, avoid damaging the tubes.
- Do not use electrical appliances inside the food storage compartments of the appliance, unless they are of the type recommended by the manufacturer.
- Do not damage the refrigerant circuit.
- Do not use mechanical devices or other means to accelerate the defrosting process, other than those recommended by the manufacturer.
- Do not use electrical appliances inside the food storage compartments, unless they are of the type recommended by the manufacturer.
- Do not touch internal cooling elements, especially with wet hands, to avoid cracks or injuries.
- Maintain the ventilation openings in the appliance enclosure or in the built-in structure, free of obstruction.
- Do not use pointed or sharp-edged objects such as knives or forks to remove the frost.
- Never use hairdryers, electrical heaters or other such electrical appliances for defrosting.
- Do not scrape with a knife or sharp object to remove frost or ice that occurs. With these, the refrigerant circuit can be damaged, the spill from which can cause a fire or damage your eyes.
- Do not use mechanical devices or other equipment to hasten the defrosting process.
- Absolutely avoid the use of open flame or electrical equipment, such as heaters, steam cleaners, candles, oil lamps and the like in order to speed up the defrosting phase.
- Never use water wash the compressor position, wipe it with a dry cloth thoroughly after cleaning to prevent rust.
- It is recommended to keep the plug clean, any excessive dust residues on the plug can be the cause fire.
- The product is designed and built for domestic household use only.
- The guarantee will be void if the product is installed or used in
4
commercial or non-residential domestic household premises.
- The product must be correctly installed, located and operated in accordance with the instructions contained in the User Instructions Booklet provided.
- The guarantee is applicable only to new products and is not transferable if the product is resold.
- Our company disclaims any liability for incidental or consequential damages.
- The guarantee does not in any way diminish your statutory or legal rights.
- Do not perform repairs on this Wine Coolers. All interventions must be performed solely by qualified personnel.
SAFETY CHILDREN!
- If you are discarding an old product with a lock or latch fitted to the door, ensure that it is left in a safe condition to prevent the entrapment of children.
- This appliance can be used by children aged from 8 years and above and by persons with reduced physical, sensory or mental capabilities or with a lack of experience and knowledge; provided that they have been given adequate supervision or instruction concerning how to use the appliance in a safe way and understand the hazards involved.
- Children should not play with the appliance. Cleaning and user maintenance should not be made by children without supervision.
SPECIFICATIONS OF YOUR LARDER FRIDGE
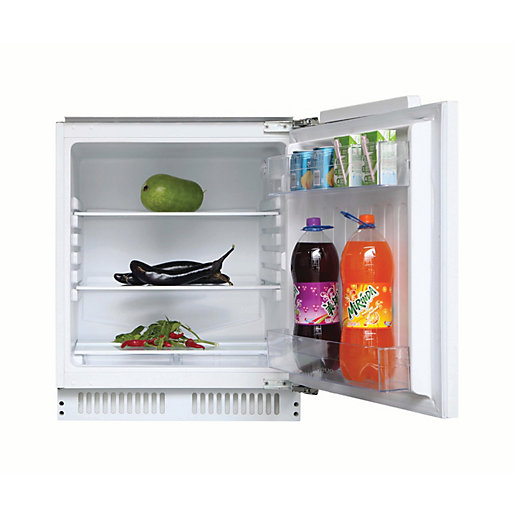
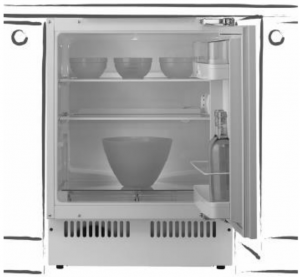
DESCRIPTION OF THE APPLIANCE
5

NOTE:
Image is for reference only and may differ from your product.
DESCRIPTION OF THE PRODUCT FEATURES
1) Shelves
- The shelves may be placed in any of the guide slots within the interior of the appliance. They are protected from sliding out.
- To remove a shelf: Take off all of the items that are stored on the shelf that you want to remove. Then lift the front of the shelf and carefully pull it out of the grooves.
2) Defrost water outlet
- The interior of the refrigerator is cooled by the cooling plate that is on the rear wall. Beneath this there is a channel and an outlet for the defrost water.
- It is important that this channel never becomes clogged (see “The defrost drain hole” section for a detailed explanation of how to keep the channel clear).
3) Crisper (salad) drawers and cover
- The crisper drawers are in the bottom of your refrigerator and there is a cover that goes over them.
- The cover helps to prevent fruit and vegetables from drying out prematurely.
4) Dairy shelf (door rack)
- The dairy shelf is suitable for storing eggs, cheese and yogurt. As well as smaller packages, tubes, cans etc.
5) Bottle shelf (bottle door rack)
- The lower shelf should be used for storing reasonably sized bottles.
IMPORTANT: IT IS IMPORTANT THAT NONE OF THE SHELVES THAT SIT IN THE DOOR ARE OVERLOADED, AS THIS WILL DRASTICALLY REDUCE THEIR WORKING LIFE.
USING YOUR BAUMATIC LARDER FRIDGE
Before switching on
- Make sure that it has been installed by a suitably qualified person, as per the information contained in Baumatic’s installation instructions.
- After delivery, wait for eight hours before connecting the appliance to your mains supply. This will allow any refrigerant gasses that may have been disturbed during the transportation process to settle.
- The outside of the appliance and the removable accessories contained within it, should be cleaned with a solution of liquid detergent and water.
- The interior of the appliance should be cleaned with a solution of sodium bicarbonate dissolved in lukewarm water. The interior and accessories should be thoroughly dried, after the cleaning process has been completed.
- There can be an odour when you first switch on the appliance. It will lessen as the appliance starts to cool.
During first use
- You should set the thermostat dial to its maximum setting for 24 hours after switching on the appliance for the first time.
- When you first switch on the appliance, the compressor will run continuously for approximately 24 hours or until the fridge freezer reaches a cool enough temperature.
- During this period of time, you should try not to open the door frequently or place a large amount of food within the appliance.
- You should then adjust the thermostat dial down to its normal operating position.
- If the unit is switched off or unplugged, you must allow at least 5 minutes before restarting the appliance on the thermostat or connecting it to your mains supply.
Switching on the appliance and setting the thermostat
You switch on your appliance by connecting it to your mains supply and setting the thermostat. The thermostat control knob is located on the righthand side of the fridge.
- The thermostat automatically regulates the temperature inside of the fridge, depending on what number you have turned the thermostat control knob to:-
o Position <0> means that the appliance will not cool. However the light will still function.
o Position <1> will give you a higher temperature inside of the fridge.
o Position <6> will give you a lower temperature inside of the fridge.
- Ideally the thermostat should be set to a position of between <3> to <4>.
- Your refrigerator can maintain a temperature of between 4 –6 degrees centigrade.
IMPORTANT: The ambient temperature of the room, the temperature of the food and the amount of food that has been placed in the appliance and how often the door is opened, will all affect the temperature being maintained by the appliance.
- On the maximum setting (position <6>), your fridge will work harder to maintain a lower temperature and will increase the energy usage. There is no need to run your appliance on this setting for prolonged periods and you should return the thermostat knob to between <3> to <4>.
IMPORTANT: Do not run the appliance with the thermostat above number 5 in normal usage otherwise the defrost drain hole will freeze.
ARRANGING AND STORING FOOD IN YOUR REFRIGERATOR
- Warm food or evaporating liquids should not be stored in your refrigerator, as this will increase the humidity inside of the appliance.
- All foods should be wrapped or covered, this is particularly important if the food has a strong flavour . You should use polythene bags or sheets, aluminium foil, wax paper. Liquids should be stored in covered containers or bottles.
- To maximise the space inside of your refrigerator, any excessive packaging on the food should be removed.
- Quickly perishable food should be stored at the back of the refrigerator, which is the coldest part of the appliance.
- No food items should be allowed to come into contact with the back wall of the refrigerator.
- Make sure that you arrange food in such a way that the door can close completely. Particular attention should be given to bottles that may protrude when placed on shelves inside the main section of the refrigerator.
- Some organic solutions, such as the oils in lemon/orange peel and acid in butter, can cause damage to the plastic parts contained inside of the refrigerator.
- Do not open the refrigerator door too often or leave the door open for long periods of time, as this will increase the temperature inside of the appliance and will increase the energy usage.
- Meat should be wrapped in polythene bags and then placed on the glass shelf above the salad drawer.
(Meat should only be stored in this manner for one or two days at the most).
- Cold dishes/cooked food should be covered and can be placed on any shelf.
- Fruit and vegetables should be cleaned thoroughly and placed in the salad drawer.
- Cheese and butter should be placed in airtight containers, or they can be wrapped in aluminium foil or polythene bags. As much air as possible should be removed from the bags.
- Milk bottles should have a cap on them and be stored on the bottle shelf that sits in the door.
- Garlic, potatoes, onions and bananas should only be stored in a refrigerator IF they are stored in airtight containers.
6
SAVING ENERGY WHEN USING YOUR REFRIGERATOR
Installing:
- Install the appliance in a cool position. If it is placed in direct sunlight or next to an oven or other heat source, the energy consumption can increase substantially.
- Ensure the appliance is installed with the correct ventilation requirements. Restricting ventilation can increase the energy consumption by 15%.
Cleaning and Maintenance:
- Occasionally clean the condenser coils (if present) at the back of the appliance to maintain a high performance level.
- Clean the door gasket with warm water or a neutral detergent that leaves no residue. A tight-sealing door gasket is critical to the efficiency of your appliance.
Usage:
- Do not open the door repeatedly or more frequently than you have to.
- Do not set the thermostat too low. A change of just one degree can effect the energy consumption by 5%. Use a thermometer to check the temperature.
- The refrigerator should operate at around 3 to 4 degrees Celsius.
- Allow food to sufficiently cool before putting it in the appliance (but don’t let it sit at room temperature for too long).
- If you are going away for a long period of time, turn off the appliance, empty and clean it and leave the door ajar.
- If you have a second appliance that is not used, make sure that it is stored with the power off and the door left ajar until it is actually required.
Disposing:
- If you’re going to throw out your old fridge, see if there’s a chlorofluorocarbons (CFCs) recycler in your area. The government department which looks after the environment in your area may be able to help you.
CLEANING AND MAINTENANCE
WARNING: PLEASE ENSURE THAT YOUR APPLIANCE IS DISCONNECTED FROM YOUR MAINS SUPPLY BEFORE ATTEMPTING TO CLEAN IT.
- Do not clean the appliance by pouring water onto it or spraying water over it.
- The refrigerator compartment should be cleaned periodically, using a solution of bicarbonate of soda and lukewarm water.
- Clean the accessories separately with soap and water. Do not clean them in a dishwasher.
- Do not use abrasive products, detergents or soaps.
- After washing the appliance, wipe over the area that you have cleaned with a damp cloth and then dry it thoroughly.
- When cleaning is complete, dry your hands and then reconnect the plug to your mains supply.
The defrost drain hole
Defrosting occurs automatically in the refrigerator compartment during operation. The defrost water is collected by the evaporating tray and evaporates automatically.
- The drain hole should be cleaned periodically with the drain hole cleaner. This will prevent water from collecting in the bottom of the refrigerator, instead of flowing down the defrost drainage channel and drain hole.
IMPORTANT: Please note that the drain hole cleaner should not be left in position permanently. Otherwise this may prevent the defrost water from entering the drain hole.
- You can also pour a small amount of water down the drain hole to clean the defrost drainage channel.
- You should be careful to make sure that food packages do not touch the rear wall of the appliance, as this can interrupt the automatic defrosting process and deflect water into the base of your refrigerator.
- Use a solution of bicarbonate of soda and lukewarm water to clean the evaporating tray.
IMPORTANT: It is normal to get some ice droplets forming on the back wall of the appliance. The formation of ice droplets does not indicate an appliance fault.
Replacing the light bulb
WARNING: PLEASE ENSURE THAT YOUR APPLIANCE IS DISCONNECTED FROM YOUR MAINS SUPPLY BEFORE ATTEMPTING TO REPLACE THE LIGHT BULB.
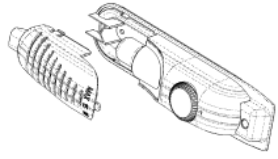
- Press the rear end of the bulb cover until the sides release and then lift the bulb cover clear of the bulb.
- Change the present light bulb with a new one. The replacement bulb should not have a greater rating than 15 W; (an E14 15 W bulb should be used).
- Replace the light cover and after waiting five minutes, reconnect your plug to your mains supply.
INSTALLATION
IMPORTANT: Before installation and usage read all the instructions and make sure that the voltage (V) and the frequency (Hz) indicated on the rating plate are exactly the same as the voltage and frequency in your home. The rating plate can be found on the front left edge of the inside of the refrigerator.
The manufacturer declines all responsibility in the event of the installer failing to observe all the accident prevention regulations in force, which are necessary for normal use and the regular operation of the electric system.
Electrical connection
YOUR REFRIGERATOR IS INTENDED FOR FITTED AND PERMANENT INSTALLATION.
We recommend that the appliance is connected by a qualified electrician, who is a member of the N.I.C.E.I.C. and who will comply with the I.E.E. and local regulations.
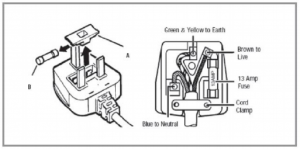
- Your refrigerator comes supplied with a 13 amp plug fitted. If in future you need to change the fuse in this plug, then a 13 amp ASTA approved (BS 1362) fuse must be used.
- The wiring in the mains lead is coloured as follows:
Brown Live
Blue Neutral
Green and yellow Earth
- As the colours of the wires in the appliance’s mains lead may not correspond with the coloured markings identifying the terminals in your spur box, please proceed as follows:
The brown wire must be connected to the terminal marked “L” (live), or coloured red.
The blue wire must be connected to the terminal marked “N” (neutral), or coloured black.
The green and yellow wire must be connected to the terminal marked “E” (earth), or by the earth symbol, or coloured green and yellow.
- When the connection is completed, no stray strands or cut wire should be present. The cord clamp must be secured over the outer sheath.
Positioning
- It is advisable that your appliance is only installed in a location where the ambient temperature of the room, corresponds with the climate classification that is stated on the rating plate of your appliance. Your appliance may not
7
function correctly if the ambient temperature falls outside of the following ranges.
Climate classification Appropriate ambient temperature
SN +10 to +32 degrees centigrade
N +16 to +32 degrees centigrade
ST +16 to +38 degrees centigrade
T +16 to +43 degrees centigrade
- Your appliance should not be located in direct sunlight or exposed to continuous heat or extremes of temperature (e.g. next to a radiator or boiler).
- The door should be able to open completely and freely.
- The appliance should be situated so you can easily access the food that is stored in it.
- You should check whether there is an electrical socket available, which will be accessible after your appliance is installed.
Reversing the door of your appliance
This procedure MUST be completed before the furniture door is attached. Any parts that you remove from the appliance whilst reversing the door, should be retained for later use.
WARNING-Take care when opening the hinges, they are sprung loaded and there is the risk of injury if they close on your hand.
Tools required:
- Phillips screwdriver
- Flat bladed screwdriver
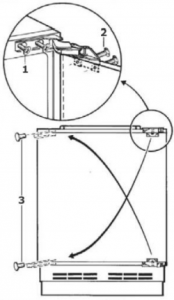
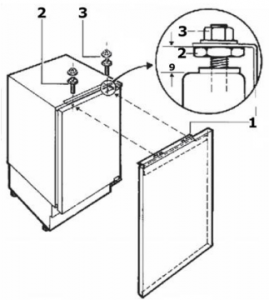
- Slacken the retaining screws (1) on the appliance and then carefully remove the appliance door.
- Place the appliance door on a cushioned surface, so that it does not get damaged.
- Lever off the cover caps (3).
- Insert the retaining screws (1) into the opposite side of the appliance from their original position. These screws should be partially tightened but not fully tightened.
- Remove the door retaining screws (2) and then reverse the position of the top and bottom hinge (as shown in the above diagram).
- Reattach the appliance door and then fully re-tighten the retaining screws (1) and the door retaining screws (2).
- Insert the cover caps (3) into the holes that are now exposed on the righthand side of the cabinet.
IMPORTANT: Check that the door opens and shuts correctly, without fouling, after you have completed the door reversal process.
After the door has been reversed, you should check the door seal of the appliance. The seal should not be creased or crushed; otherwise there will be a gap between it and the inside of the door.
- The seal must adhere properly all the way around the door.
- If the seal is not adhering to the cabinet properly, then you should either:
1. Use a warm damp cloth and manipulate the seal until it does adhere to the cabinet properly, all the way around the door.
Or
2. Use a hair dryer on its lowest heat setting and lightly heat the areas of the door seal that are not adhering correctly. The heat will make the seal more pliable and this will allow you to manipulate the seal into the correct position.
IMPORTANT: DO NOT HEAT THE DOOR SEAL ON ANYTHING BUTTHE LOWEST HEAT SETTING, OR HEAT THE SEAL FOR A LONG PERIOD OF TIME. OTHERWISE DAMAGE MAY BE CAUSED TO THE DOOR SEAL, WHICH WOULD NOT BE RECTIFIED UNDER THE GUARANTEE FREE OF CHARGE.
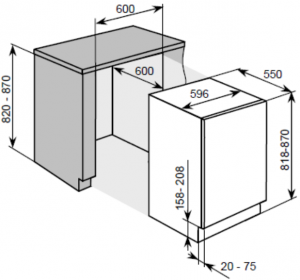
Aperture dimensions
The diagram below shows the aperture size that you will need to be able to install your appliance.
- The appliance must be stood on a level floor. You can use the levelling feet to take into account any minor unevenness in the floor.
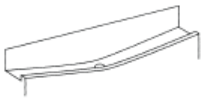
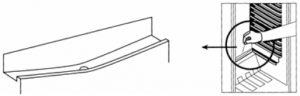
Adjusting the plinth/kickboard
When the appliance has been placed underneath the worktop, you may decide to attach a plinth or kickboard to match your existing kitchen units.

- Remove the grid on the base of the appliance by unscrewing the screws on each side of the grid and then pull the grid towards you.
- Use a spanner to adjust the height of the adjustable feet.
- If your aperture has a height of 820 mm, then the adjustable feet should be fully tightened.
- If your aperture has a height of 870 mm, then the adjustable feet should be set at a height of 50mm.
- The appliance should be flush with the underside of the worktop and be
8
level.
IMPORTANT: If the appliance is not level, then the door and door seal may be affected.
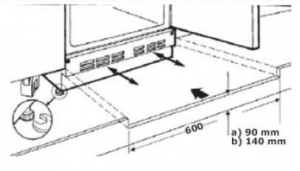
- A cut out must be made in the plinth/kickboard for ventilation. The cut out should measure 600mm in width, and between 140mm and 90mm in height, depending on the height that you have set your appliance.
- Insert the plinth/kickboard and then refit the grid in its original position to hold it in place.
IMPORTANT: Please note that as shown in the above drawing, an appropriately sized ventilation cut out MUST be made in the furniture plinth/kickboard.
Fitting the furniture door to the appliance
If you need the appliance door to open from the other side, then please reverse the door before commencing the installation process. (See “Reversing the door section”).
Tools required:
- Tape measure
- Sharp pencil
- Small flat bladed screwdriver
- Spanner
IMPORTANT: We recommend that two people install this appliance.
- Undo the screws from the two adjusting bolts that are located on the top of the appliance door and then remove the mounting bracket (1).
2. Measure the width of the furniture door, at the halfway point mark a line vertically down the inner surface of the furniture door. You should draw the line from the top of the furniture door to approximately halfway down.
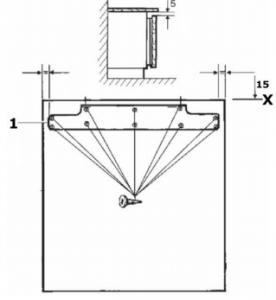
- Place the mounting bracket (1) on the reverse of the furniture door.
- The middle of the mounting bracket should be positioned on the line that you have just drawn. Please note the position of the mounting bracket in the above drawing, to ensure that you have the mounting bracket the correct way up.
- The top of the mounting bracket should be positioned approximately 15 mm from the top of the furniture door. This will allow you a 5 mm gap from the top of the furniture door, to the underneath of your worktop.
- Fix the mounting bracket to the furniture door using the screws provided and a Phillips-head screwdriver. These screws should be fully tightened.
3. Hang the furniture door onto the appliance door, making sure that the brackets on the mounting bracket locate over the adjusting bolts.
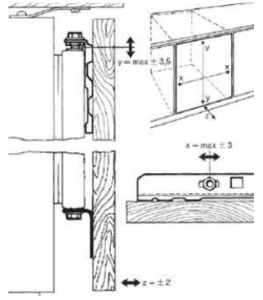
4. Use a screwdriver to adjust the gap on the lower section of the adjusting bolts. The gap should be set to approximately 9 mm (as shown in the above drawing).
5. Fix the lower bracket to the bottom of the furniture door and the underneath of the appliance door.
- It is possible to make minor adjustments to the position of the furniture door using the screws on the top and the bottom of the appliance door. You should make these adjustments so that the furniture door is level.
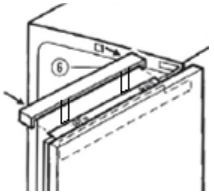
6. Insert the cover plate to the top of the appliance, this will just clip into place.
9
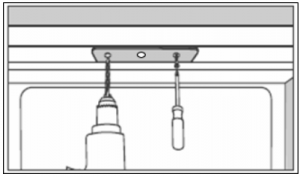
7. Open the appliance door.
- Use a suitably sized drill bit to drill through the holes in the bracket, into the work top.
IMPORTANT: The drill bit should be appropriate for the material that your work top is made from.
- Secure the bracket to the underside of the worktop, using the screws provided.
IMPORTANT: These screws should be fully tightened.
- If the appliance is being installed under a granite worktop, use the L shaped brackets provided to secure the fridge to the side of the cabinet. Use a suitably sized drill bit to drill through the three holes in the bracket into the cabinet side on the opposite side to the hinges.
- The oval holes rest over the hinge positions which are not being used on the front of the appliance. Use two screws to secure the bracket to the front of the appliance.
- Check that the door opens and shuts without snagging, as well as checking that the door is sealing correctly.
TROUBLESHOOTING
IMPORTANT: If your refrigerator appears not to be operating properly, before contacting the Customer Care Department, please refer to the checklist below.
My fridge does not appear to be working/there is no power to my appliance.
- Check that the plug is fully inserted into the power socket.
- Check that there is power to your mains supply (e.g. that there hasn’t been a power cut or that the fuse hasn’t blown).
- Check that the thermostat inside the appliance has not been turned to the off position.
- Check that your mains supply voltage, corresponds to the voltage stated on the rating plate of your appliance.
My fridge appears to be performing poorly
- Check that the appliance isn’t overloaded and that food hasn’t been packed too tightly into it.
- The thermostat setting is too low; you should turn the thermostat up higher.
- Ensure that the door is closing properly and that the door has not been opened for a prolonged period in error.
- Ensure that there is adequate ventilation for your appliance.
My fridge is noisy
- The refrigerant gas that circulates the pipework of the appliance may make a slight noise, even if the compressor is not running.
- If the noise worsens or the appliance gets louder than normal; check that it is levelled off correctly, that nothing is touching the rear of the fridge and that nothing placed inside the appliance is rattling.
Ice has formed on the inner back wall of my fridge
- Check that food has not been pushed too far back inside the appliance, so that it is in contact with the inner back wall.
IMPORTANT: It is normal to get some ice droplets forming on the back wall of the appliance. The formation of ice droplets does not indicate an appliance fault.
There is water in the base of the fridge or leaking out of my fridge.
- Follow the “The defrost drain hole” section on page 15.
DO NOT ATTEMPT TO REPAIR THE APPLIANCE YOURSELF.
Please note that if an engineer is asked to attend whilst the product is under guarantee and finds that the problem is not the result of an appliance fault, then you may be liable for the cost of the call out charge.
The appliance must be accessible for the engineer to perform any necessary repair. If your appliance is installed in such a way that an engineer is concerned that damage will be caused to the appliance or your kitchen, then they will not complete a repair.
This includes situations where appliances have been tiled in, sealed in with sealant, have wooden obstructions placed in front of the appliance, like plinths. Or any installation other than the one specified by Baumatic Ltd. has been completed.
Please refer to the conditions of guarantee that appear on the warranty card that you receive with the appliance.
SCRAPPING OLD APPLIANCES
This appliance is marked according to the European directive 2012/19/EU on Waste Electrical and Electronic Equipment (WEEE).
WEEE contains both polluting substances (which can cause negative consequences for the environment) and basic components (which can be re-used). It is important to have WEEE subjected to specific treatments, in order to remove and dispose properly all pollutants, and recover and recycle all materials.
Individuals can play an important role in ensuring that WEEE does not become an environmental issue; it is essential to follow some basic rules:
WEEE should not be treated as household waste.
WEEE should be handed over to the relevant collection points managed by the municipality or by registered companies. In many countries, for large WEEE, home collection could be present.
In many countries, when you buy a new appliance, the old one may be returned to the retailer who has to collect it free of charge on a one-to-one basis, as long as the equipment is of equivalent type and has the same functions as the supplied equipment.
10
Conformity
By placing the mark ![]() on this product, we are confirming compliance to all relevant European safety, health and environmental requirements which are applicable in legislation for this product.
on this product, we are confirming compliance to all relevant European safety, health and environmental requirements which are applicable in legislation for this product.
11
CANDY HOOVER GROUP S.R.L.
Via Privata Eden Fumagalli
20861 Brugherio Milan Italy
12
Neue NLB 822/N Integrated Under Counter Fridge – Neue NLB 822/N Integrated Under Counter Fridge –
[xyz-ips snippet=”download-snippet”]