
newair AF-600 18” Outdoor Misting Fan Owner’s Manual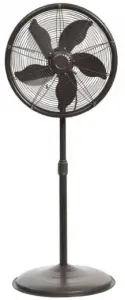
SAFETY INFORMATION & WARNINGS
If you feel the mist output is too strong and want to reduce the mist output, you can either turn the valve handle counter clockwise to reduce the water supply or change the fan speed from high to low setting.
![]() WARNING: When using electrical appliances, basic safety precautions should always be followed to reduce the risk of fire, electric shock, and injury to persons, including the following:
WARNING: When using electrical appliances, basic safety precautions should always be followed to reduce the risk of fire, electric shock, and injury to persons, including the following:
- Read all instructions before using this appliance.
- Use fan only for purposes described in the instruction manual.
- This product must be grounded to reduce the risk of electric shock. Plug the appliance directly into an appropriate 120V AC outlet that is properly installed and grounded in accordance with all local codes and ordinances.
- This product employees an GFCI device. If the GFCI device is deactivated, this indicates a current leakage fault, unplug and check the supply cord and product. If no damage is visible, reset the device by pressing the reset button. If the GFCI device deactivates again, a hazardous condition may be present and the product should be discarded or returned to an authorized service facility for examination and/or repair.
- Close supervision is necessary when any appliance is used by or near children.
- Unplug from outlet when not in use, when moving fan from one location to another, before putting on or taking off parts and before cleaning.
- Avoid contact with moving parts.
- Do not operate in the presence of explosive and/or flammable fumes.
- To avoid fire hazard, NEVER place the cod under rugs or any parts near an open flame, cooking or other heating appliance.
- Do not operate any appliance with a damaged cord or plug after the appliance malfunctions, or has been dropped/damaged in any manner.
- The use of attachments not recommended or sold by the appliance manufacturer may cause hazards.
- Do not let the cord hang over the edge of a table counter o come in contact with hot surfaces or leave exposed to high traffic areas.
- To disconnect, grip plug and pull from wall outlet. Never yank on cord.
- Always use on a dry, level surface. Do not use the fan on the carpet as the mist may get the flooring.
- Do not operate fan until fully assembled with all parts properly in place.
- This product is intended for household use ONLY and not for commercial or industrial applications.WARNING: To reduce the risk of fire or electric shock, DO NOT use this fan with any solid-state speed control device.
- This product uses overload protection (fuse). A blown fuse indicates an overload or short-circuit situation. If the fuse burns out, unplug the product from the outlet. Replaced the ruse as per the user servicing instructions (follow product marking for proper fuse rating) and check the product. If the replace fuse blows, a short-circuit may be present and the product should be discarded or returned to an authorized service facility for examination and/or repair.
- Do not run cord under carpeting. Do not cover cord with throw rugs, runners, or similar coverings. Do not route cord under furniture orappliances. Arrange cord away from traffic area and where it will not be tripped over.
PARTS LIST
Make sure all contents are present, take them out of the package, the contents should have included like Fig.1.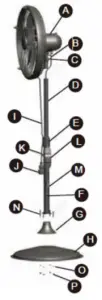
|
PART |
DESCRIPTION |
UNIT |
|
A |
Fan Head |
1 |
|
B |
Power Cord | 1 |
| C | Tilt Adjustment Krob |
1 |
|
D |
Inner Pole | 1 |
| E | Height Adjustment Knob |
1 |
|
F |
Telescope Pole | 1 |
| G | Cover |
1 |
|
H |
Base | 1 |
| I | M:sting Hose |
1 |
|
J |
Valve | 1 |
| K | Tube Holder |
1 |
|
L |
GEC’ Switch | 1 |
| M | Plug |
1 |
|
N |
Screw | 4 |
| 0 | Washer |
4 |
|
P |
Nut |
4 |
NOTICE: There will be one replacement nozzle put in a bag and attached to the manual. Please keep it properly for future replacement.
ASSEMBLY & INSTALLATION
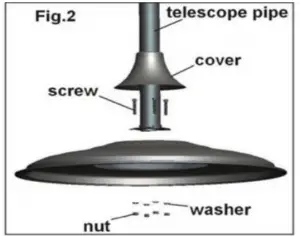
BASE ASSEMBLY
- Remove the four screws from the center of base.
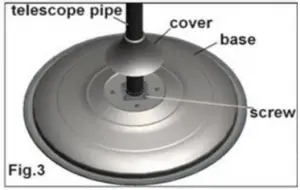
- Place the Telescope Pole onto the Base, align the four screw holes in both parts, then insert each hole with the screw and tighten them together firmly with four washers and four nuts at the base bottom. (Fig. 2 & Fig. 3)

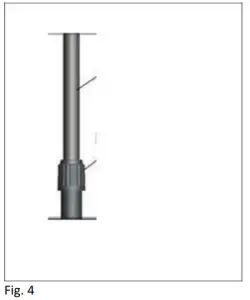
- Remove the Height Adjustment Knob, insert the cover from top of the Telescope Pole and slide it down onto the base. Raise the Inner Fig.2 Pole to desired height, and then retighten the Height Adjustment Knob clockwise until secured. (Fig. 4).
FAN HEAD ASSEMBLY
Align the two Buckles with the Holes, press the two Buckles with fingers, and then insert down into the Inner Pole until the Buckles pop out from the Holes. (Fig. 5)http://www.newair.com/
OPERATING INSTRUCTIONS
Place the fan on a level surface. Plug the GFCI plug into a standard 120V 3- prong wall outlet.
OFF/SPEED SELECTION
The fan speed is controlled by a pull chain switch located at the back of motor housing. Pull the string repeatedly to set the fan speed in the sequence of Low speed – Medium speed – High speed – Off. (Fig. 6).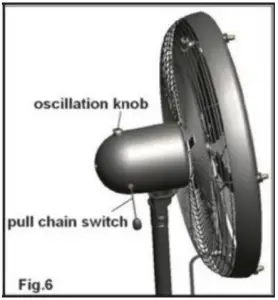
OSCILLATION
To allow the fan to oscillate, push the Oscillation Knob down. Pull up this knob if oscillation is not desired. (Fig. 6)
FAN HEAD ADJUSTMENT
To adjust the angle of the fan head, loosen the Tilt Adjustment Knob under the Fan Motor. Adjust the fan to the angle desired and retighten the knob to secure the fan at that angle. (Fig. 7)
FAN HEAD ADJUSTMENT
- Turn the fan speed to off position.
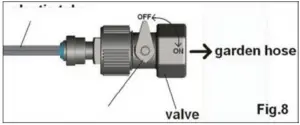
- Attach the end of the Misting Hose Valve to a standard ¾” garden hose and turn on the water.
- Turn the Valve Handle to “ON” position to turn on water to the fan. (Fig. 8)
- Turn the fan on again and enjoy the mist.
- Turn the Valve Handle to “OFF” position to temporarily shut down the mist, if needed.
CLEANING & MAINTENANCE
Follow these instructions to correctly and safely care for your fan.
ATTENTION:
- Always unplug the fan before cleaning or disassembling.
- Do not allow water to drop on or enter into fan housing.
- To ensure adequate air circulation to the motor, keep the vents at the rea of the motor housing clear of dust, fluff, etc. Unplug the fan before using a vacuum cleaner to clean the grilles. It should not be necessary to disassemble the fan to clean it.
- Wipe the exterior with a soft cloth moistened with a mild soap solution. Do not use any of the following as a cleaner: gasoline, thinner, or benzene.
FAN BLADE & FRONT GRILLE CLEANING
If you feel it’s necessary to clean the fan blade and interior of the fan grilles, please follow these steps.
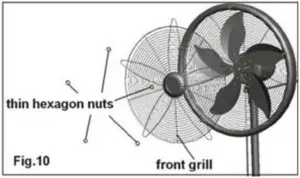
- Use a spanner to carefully remove five hexagon nuts from the front grille. (Fig. 9)
- Remove the front grille. (Fig. 10)
- Clean the fan blades and grille with a soft damp cloth. DO NOT ATTEMPT TO REMOVE THE FAN BLADE. Do not allow the motor or other electrical components to be exposed to water.
- Replace the front grille and secure it with the hexagon nuts removed in the first and second steps.

MISTING NOZZLE MAINTENANCE
If the misting nozzles become clogged, remove them from the grille and soak them in vinegar or a lime scale remover until the buildup is cleared. Use a non-metallic brush to scrub them, if necessary. If the obstacle still exists, use the replacement nozzles or contact the manufacturer. (Fig. 11)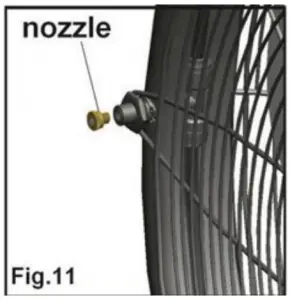 WARNING: Never clear the nozzles with pins or other sharp objects which may result in damage.
MISTING HOSE VALVE MAINTENANCE
If the misting hose valve becomes clogged, unscrew it from the garden hose; flush it with running water to remove the obstacle and debris. Make sure the filter washer is clean as well. (Fig. 12)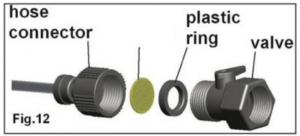
USER SERVICING INSTRUCTIONS
LEAKAGE AND OVERCURRENT PROTECTION
The plug of this misting fan was equipped with a leakage protection device. It will automatically cut off the circuit if any electricity leakage happens during operation. If this happens, examine the fan carefully to find out the cause, contact a qualified electrician for help, if needed. You can only restart the fan when the fault was removed. To restart the fan or every beginning of using the fan, press the RESET button first. (Fig. 13) WARNING: Before each use, follow below steps to check the plug. (Fig. 13)
- Plug into proper receptacle.
- Press RESET button, INDICATOR should be ON.
- Press TEST button, INDICATOR should be OFF.
- Do not use if test fails.
FUSE REPLACEMENT INSTRUCTIONS

- Grasp the plug and remove it from the receptacle or other outlet device. Do not unplug by pulling on the cord.
- Open the fuse cover. Slides open the fuse access cover on top of attachment plug towards blades.
- Remove the fuse carefully. Push the fuse from the other side or turn the fuse holder over to remove the fuse.
- Risk of fire. Replace the fuse only with 5A, 125 Volt fuse.
- Close the fuse cover. Slide closed the fuse access cover on top of the attachment plug.
- Risk of fire. Do not replace attachment plug or GFCI device. It contains a safety device (fuse, GFCI) that should not be removed. Discard product if the attachment plug or GFCI device is damaged.
STORAGE
When storing your fan in the off season, it is important to keep it in a safe, dry location and protect the fan head from dust. We strongly recommend using the original box from purchase to pack it or cover it with plastic or cloth.
TROUBLESHOOTING
|
Problem |
Possible Causes |
Solution |
|
The fan will not operate |
The unit may be plugged in using a different voltage. |
Make sure fan is plugged into a 120V AC, 60Hz polarized outlet / receptacle |
|
The circuit breaker may be tripped or there is a blown fuse. |
Reset the circuit breaker or check for a broken fuse. |
|
|
Fan is on but air coming out of it is not strong enough. |
There is dust built up at the back of the fan. |
Clean the front and rear grilles as described under “Cleaning/Maintenance Instructions.” |
|
No mist is produced. |
There is no water coming from the hose. |
Check and make sure below:
|
|
Mist output is too strong. |
Water supply is too strong. Fan speed is in high setting. |
|
|
Nozzles are leaking or dropping |
The nozzles or the misting hose valve are clogged. |
Clean the clogged nozzles and misting hose valve as described under “Cleaning/Maintenance Instructions.” |
LIMITED MANUFACTURER’S WARRANTY
This appliance is covered by a limited manufacturer’s warranty. For one year from the original date of purchase, the manufacturer will repair or replace any parts of this appliance that prove to be defective in materials and workmanship, provided the appliance has been used under normal operating conditions as intended by the manufacturer.
Warranty Terms:
During the first year, any components of this appliance found to be defective due to materials or workmanship will be repaired or replaced, at the manufacturer’s discretion, at no charge to the original purchaser. The purchaser will be responsible for any removal or transportation costs.
Warranty Exclusions:
The warranty will not apply if damage is caused by any of the following:
- Power failure
- Damage in transit or when moving the appliance
- Improper power supply such as low voltage, defective household wiring or inadequate fuses
- Accident, alteration, misuse or abuse of the appliance such as using non-approved accessories, inadequate air circulation in the room or abnormal operating conditions (extreme temperatures)
- Use in commercial or industrial applications
- Fire, water damage, theft, war, riot, hostility or acts of God such as hurricanes, floods, etc.
- Use of force or damage caused by external influences
- Partially or completely dismantled appliances
- Excess wear and tear by the user
Obtaining Service:
When making a warranty claim, please have the original bill of purchase with the purchase date available. Once confirmed that your appliance is eligible for warranty service, all repairs will be performed by a NewAir™ authorized repair facility. The purchaser will be responsible for any removal or transportation costs. Replacement parts and/or units will be new, re-manufactured or refurbished and is subject to the manufacturer’s discretion. For technical support and warranty service, please email [email protected].
REGISTER YOUR PRODUCT ONLINE
Register Your NewAir Product Online Today!
Take advantage of all the benefits product registration has to offer:
![]() Service and SupportDiagnose troubleshooting and service issues faster and more accurately
Service and SupportDiagnose troubleshooting and service issues faster and more accurately
![]() Recall NotificationsStay up to date for safety, system updates and recall notifications
Recall NotificationsStay up to date for safety, system updates and recall notifications
![]() Special PromotionsOpt-in for NewAir promotions and offers Registering your product information online is safe & secure and takes less than 2 minutes to complete.Register.NewAir.com
Special PromotionsOpt-in for NewAir promotions and offers Registering your product information online is safe & secure and takes less than 2 minutes to complete.Register.NewAir.com
Alternatively, we recommend you attach a copy of your sales receipt below and record the following information, located on the manufacturer’s nameplate on the rear of the unit. You will need this information if it becomes necessary to contact the manufacturer for service inquiries.
Date of Purchase: ___________________________________________Serial Number: ____________________________________________
Model Number: ____________________________________________
A Name You Can Trust
Trust should be earned and we will earn yours. Customer happiness is the focus of our business.
From the factory to the warehouse, from the sales floor to your home, the whole NewAir family promises to provide you with innovative products, exceptional service, and support when you need it the most.
Count on NewAir.As a proud NewAir owner, welcome to our family. There are no robots here, real people shipped your product and real people are here to help you.
Contact Us:For questions regarding your product, please contact us at:
Call: 1-855-963-9247Email: [email protected]Online: www.newair.com
Connect with Us:
![]() Facebook.com/newairusa
Facebook.com/newairusa![]() YouTube.com/newairusa
YouTube.com/newairusa![]() Instagram.com/newairusa
Instagram.com/newairusa![]() Twitter.com/newairusa
Twitter.com/newairusa

References
[xyz-ips snippet=”download-snippet”]