
32 QT. All Stainless Steel Turkey Fryer
USER MANUAL
- Safety Precautions & Warnings
- Parts List
- Assembly Instructions
- Leak Testing
- Lighting Instructions
- Troubleshooting
- General Cleaning and Maintenance
- Preparation and Cooking Instructions
- Limited Warranty
- Recipes
WARNING:
- READ ALL INSTRUCTIONS BEFORE USING THIS TURKEY FRYER. FAILURE TO FOLLOW ALL MANUFACTURER’S INSTRUCTIONS COULD RESULT IN A FIRE OR EXPLOSION WHICH COULD CAUSE PROPERTY DAMAGE, PERSONAL INJURY OR DEATH.
- USE ONLY THE ENCLOSED HOSE & REGULATOR.
- DO NOT USE THE ENCLOSED HOSE & REGULATOR ON ANY OTHER GAS APPLIANCES!!
- USE OUTDOORS ONLY!!
Model Number: 720-0076
SAFETY PRECAUTIONS & WARNINGS
- NEVER operate an outdoor cooker inside a building or confined area or within 10 feet of any combustible surface or material. Perform all testing outdoors in a well-ventilated area. OUTDOOR USE ONLY Use cooker on level, solid ground or on a concrete surface.
- NEVER leave cooker unattended while cooking.
- NEVER place an empty pot on the burner or allow liquid to evaporate completely from the stockpot.
- NEVER fill cookware more than half way with water to prevent a boil over when food is added.
- NEVER fill the pot more than 1/3 full of cooking oil. This is to allow for displacement of oil caused by the addition of food; however, always check the oil level to ensure adequate coverage so foods will fry evenly.
- NEVER leave hot oil unattended when frying.
- Always follow leak testing procedures before lighting burner.
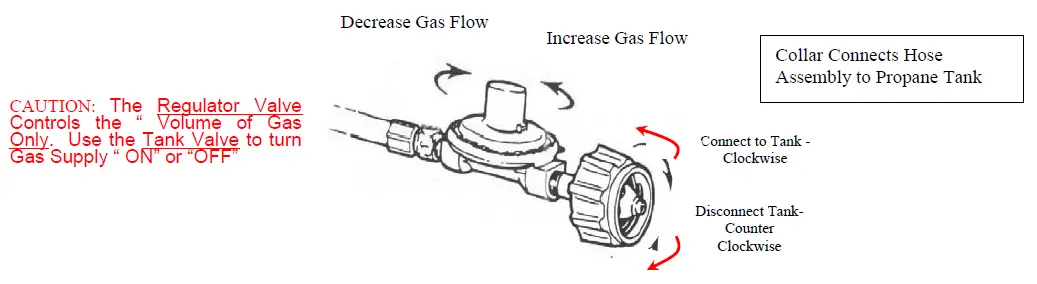
- Use regulator valve only to adjust the flame. Use tank valve to turn the cooker ON and OFF. When finished cooking, or in case of an emergency, turn the tank valve clockwise to the “OFF” position. Be sure to close the tank valve before disconnecting the hose.
- KEEP CHILDREN AND PETS AWAY from the cooker when it is in operation and afterward while it is still hot.
- NEVER use a flame to test for leaks.
- The burner should always light within 5 seconds; if not, turn tank valve and regulator off then always wait 5 minutes for gas fumes to dissipate before repeating lighting procedure.
- Use only D.O.T. certified (US Department of Transportation) LP gas cylinders. Always close LP cylinder valve after use. Always use and store LP cylinder in a cool, well-ventilated area away from heat and flames. Carefully read and follow instructions on LP cylinder.
- The pot, including handles and lid, gets dangerously hot in use. Use well-insulated pot Holders or oven mitts when handling the pot. Safety goggles are also recommended to protect you from oil splatter. The oil remains dangerously hot hours after use.
- Maximum cooking temperature is 375°F, and maximum turkey weight is 25 pounds.
DANGER
If you smell gas:
- Shut off gas to the appliance.
- Extinguish any open flame.
- Open lid.
- If odor continues, keep away from the appliance and immediately call your gas supplier or your fire dept.
WARNING
- Do not store spare LP cylinder within 10 feet (3m) of this appliance.
- Do not store or use gasoline or other flammable liquids or vapors within 25 feet (8m) of this appliance.
- When cooking with oil/grease, do not allow the oil/grease to get hotter than 350°F (177°C.
- Do not leave oil/grease unattended.
PARTS LIST
ASSEMBLY INSTRUCTIONS
Required Tools: adjustable wrench(not supplied); Philips or flat head screwdriver(not supplied)Estimated Time of Assembly: 10 minutes
Assemble Regulator
The hose and regulator is a pre-assembled unit. Do not take it apart. Simply connect the hose and regulator assembly to the LP gas cylinder and to the cooker. An adjustable wrench is needed when attaching the hose to the gas cooker.
1. Insert the hose with brass connector through the spring and the air shutter into the receptor hole on the burner. Turn the brass connector clockwise into the threads of the receptor and tighten with a wrench. (Figure #a)
2. Make sure the valve on the Propane Tank is clean. Connect the hose to the tank valve by turning the collar to the right. Hand tighten. (Figure #b)
Assemble Burner
Place heat shield piece between windproof circle and burner support panel. (Figure #c)Place burner on heat shield piece. (Figure #d)Adjust burner bolt to go through heat shield piece and burner support panel. Secure burner and heat shield piece with a screw by using a spanner(not provided). (Figure #e)
Assemble Safety Ring
Put the safety ring on the stand. (Figure #f)Secure the safety ring to the stand by using the 2 clamps fixed on the stand. (Figure #g)
Assemble Basket Handle
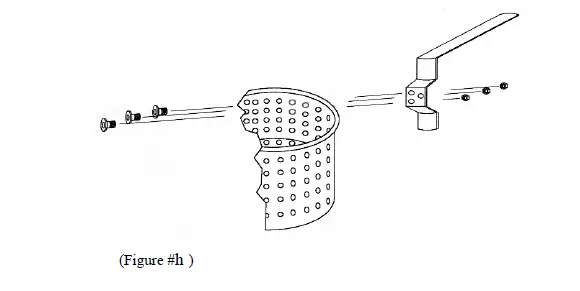
To attach the handle to the dipping basket, align the 3 holes on handle to any 3 holes along the upper-outer rim of basket. With nuts and bolts provided, use a philips or flat head screwdriver, attach the nuts on the outside of the basket and bolts from the inside. Tighten securely and make sure handle is tight and secure. (Figure #h)
LEAK TESTING
(After assembly is complete, check for gas leaks before lighting.)
FOR YOUR SAFETY
- A leak test must be repeated each time the LP tank is connected or reconnected.
- Do not smoke during leak test.
- Do not use an open flame to check for gas leaks.
- The cooker must be leak tested outdoors in a well-ventilated area, away from ignition sources such as gas fire or electrical appliances. During the leak test, keep the cooker away from open flames or sparks.
TO TEST FOR A LEAK
- Close the regulator valve. This shuts off the flow of gas from the regulator to the burner.
- Be sure regulator is tightly connected to Propane Tank.
- Open the Propane Tank valve by 1/4 turn. This allows gas into the regulator and stops it at the closed regulator valve. If you hear a rushing sound, turn the gas off immediately. There is a major leak at the connection. Correct before proceeding.
- Splash on a soapy liquid (ex. dishwashing liquid and water) on the connections around the regulator and Propane Tank connection. (Figure #i)
If “growing” bubbles appear, there is a leak. Close Propane Tank Valve immediately. Retighten connections and repeat the leak test procedures. If a leak persists, Teflon tape may be needed on the threads. Teflon tape is available at any hardware store. DO NOT use the cooker if any leak cannot be stopped. Call 1-866-984-7455 for replacement of hoses.
- Always close the Propane tank valve after performing a leak test by turning the hand wheel clockwise.
LIGHTING INSTRUCTIONS
* Read instructions before lighting.
- Adjust the air shutter before you attempt to light the burner. Make sure the air shutter does not fully cover the two air holes when you try to light the burner.
- Reopen tank valve
- Have a fireplace match or long-nosed lighter lit and ready to place under the burner.
- Slowly reopen the regulator valve ¼ turn. Gas will immediately flow through the system. Light the burner from the bottom, keeping hands and face away from the top of the cooker. (Figure #j)
- After lighting the burner, open the regulator valve until a large yellow flame appears. Adjust the air shutter on the burner until the flame turns blue. Use the regulator valve to adjust the flame intensity.
- If you’ve attempted to light the burner and failed, then allow 5 minutes for any accumulated gas to dissipate before attempting to light it again.
- When finished using the cooker, turn off the gas from the tank valve first. It will take a few seconds for the fire to go out and for the propane gas to “bleed” from the hose and regulator assembly. After the fire is completely out, turn the regulator valve to the “OFF” position. After the gas is off, a small “candle” flame may appear at the orifice for about two seconds. This is normal.
Make sure the regulator fitting is screwed into the air shutter on the burner, but do not over tighten. The air shutter needs to rotate freely in order to adjust air intake.
TIPS
If you have difficulty lighting this cooker, be sure to:a. First open tank valve fully.b. Open regulator valve 1/8 – 1/4 turn and light your cooker.c. Control flame intensity with regulator valve.d. Turn the unit “off” with the tank valve.
TROUBLESHOOTING
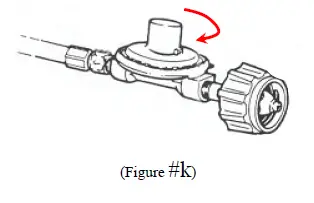
1. Most propane tanks are equipped with a safety device to shut off the flow of gas should the hose be cut or severed. Sometimes this safety device may be tripped when lighting the cooker. To prevent this, ALWAYS make sure the regulator valve is in the closed position ( turned fully “ clockwise”: Figure #k) before opening the tank valve.
2. To prevent tipping and the fryer oventurn, the LP gas cylinder should be placed far from the burner and reach the maximum distance as 35 inches(88.9cm). See Figure #l.

GENERAL CLEANING AND MAINTENANCE
TIPS
*** Before using for the first time, wash your stainless steel pot in hot, soapy water. Dry immediately to prevent water spots. To prevent scratches, avoid using sharp utensils when cooking.*** Discoloration of the stainless steel will result if the pieces are allowed to overheat excessively. For hard-to-clean stains or discoloration of the stainless steel, use a non-abrasive stainless steel cleaner. Follow the directions on the cleaning product, using a clean, damp sponge or cloth. DO NOT scrub finish with a soap-filled steel wool pad or harsh abrasive cleanser, as scratching will occur.
- Store cooker in a cool dry place.
- Spray WD-40 on the burner grid after it has cooled to prevent rust.
- For long term storage, store the cast iron burner, the hose and regulator assembly in a plastic bag.
- Spiders and small insects have been known to spin webs inside the venturi tube of the cast iron burner. Obstructions in the venturi tube interfere with the flow of air and gas through the burner. This can cause a yellow flame or a flashback. If this happens, remove the cast burner from the frame and clean the venturi tube with a stiff, bent wire or screwdriver. We also advise cleaning inside the top ports as well.
- Do not tamper with or attempt repairs on the burner, frame, valve, or Propane Tank. Allow only qualified LP gas dealers to make repairs.
- Always close the tank valve first after use. Always use and store the Propane Tank in an upright position. Never store the Propane Tanks in occupied enclosures.
Some Useful Reminders
- Outdoor Use Only!! Never use inside a garage, porch, on a closed deck or near any building.Keep the cooker away from open flames, sparks and lit cigarettes.
- NEVER COVER THE POT WHEN FRYING WITH OIL. Always use a 12” Steel long stem thermometer when deep-frying. Do not exceed 375° F. Fire will occur if you exceed this temperature. Control the heat intensity with the valve on the gas cooker. If the oil begins to smoke, reduce the heat by turning valve clockwise!
- Do not touch hot surfaces. Always wear long oven mitts to protect hands and forearms when lifting the lid. Use the grab hook to lift the stockpot.
- After boiling or frying in large pots, allow the unit to set for two hours before moving. Never attempt to move the cooker when in use. Be extremely careful when moving the pot if it contains hot oil or other liquids. Always allow the cooker to cool before attempting to move or clean it.
- An approved fire extinguisher nearby is recommended – consult your local authority for recommended type and size.
- When the cooker is not in use, always disconnect the tank safety plug from the tank valve.
- After boiling seafood or peanuts, do not pour salt water onto your lawn. It will kill the grass!! Allow the water to cool and pour it down street drains.
- Do not modify or alter this cooker or its components.
PREPARATION AND COOKING INSTRUCTIONS
Thank you for your purchase of the Nexgrill Outdoor Turkey Fryer. This product is made of rugged stainless steel so it will last for years. Your deluxe outdoor cooker will fry, steam or boil meat, seafood and vegetables. Maximum capacity is 25 pounds.
CAUTION: DO NOT use a kitchen stove for frying a turkey in this unit. This Nexgrill unit is designed for use as a outdoor cooker. Be sure to read and follow all the instructions provided with your gas cooker and propane tank.
Step 1: The Equipment
- Included in the unit carton is a high-pressure burner, a 32 quart turkey fryer stockpot with accessories. Accessories include a perforated seafood boiler, a perforated poultry rack, a 12” long stainless steel thermometer, a grab hook and a vented lid, as well as a 10 Quart Fish Fryer Stockpot and a dipping basket.
- A long-stemmed deep fry thermometer must be used to maintain proper oil temperature at all times.
Step 2: Ingredients
- The 32-qt turkey fryer is capable of frying a turkey up to 25 pounds.
- Peanut oil or vegetable oil may be used for frying. Peanut oil is the healthier choice for frying and also remains clear longer for reuse. For a 10-16 pound turkey use 2-1/2 – 3 gallons. ( Larger size turkeys require less oil.)
TIPS
** To determine the amount of oil needed, lower the turkey into the pot and cover with water. Remove the turkey and measure the amount of water. Use the same amount of oil in place of the water when frying the turkey.
- Seasonings: salt and pepper, poultry seasoning or Cajun seasoning.
- Optional: Marinade for injecting into turkey. (Figure 1)
Step 3: Preparation:
- Thaw the turkey completely.
- Wash the turkey and pat dry with paper towels. Remove giblets, neck, and trim away all excess fat. Make sure the opening around the neck is clear.
- Make a 1-inch cut in the skin at the leg-thigh joints. ( This will allow oil to drain when turkey is done. )
- Coat the turkey inside and out with seasonings and/or use an injectable marinade.
- Place turkey upside down on poultry rack, with legs facing up.
Step 4: Cooking
- Follow the the instructions to set up the burner and fryer pot.
- Place the burner and the fryer pot on a flat, level, non-combustible solid surface.
- Pour peanut oil into the pot. Use the amount determined in Step 2. Attach the thermometer to the top edge, making sure the stem of the thermometer is as far down as possible without touching the bottom of the pot.
- Light the burner as per instructions. Carefully place the pot on the cooker and then adjust the flame higher. DO NOT adjust the frame to full blast.
- Heat the peanut oil to 350°F. Measure the temperature of the oil with the deep fryer thermometer. When the oil reaches 325°F, reduce heat and allow the oil to heat gradually up to 350°F.
- Attach grab hook to the top loop of the poultry rack. Very slowly and carefully lower the turkey into pot. (Figure 2) Wear mitts for protection. Then, remove grab hook from rack. (Figure 3)
- After you lower the turkey into the hot oil the temperature will go down. Slowly increase and keep the temperature at constant 350°F. Fry the turkey about 3 to 4 minutes per pound.
- When the turkey is done, turn the cooker off at the the tank valve. Leaving the pot on the cooker, use oven mitts to hold the grab hook and lift the turkey out of the pot slowly and into another pan to drain and cool.(Figure 4) Using a meat thermometer, check the thigh joint temperature for doneness. Poultry should be at 180°F when completely cooked.
- Carefully remove the poultry rack from the turkey and place on platter……Enjoy!!
CAUTION! Use extreme care and caution when frying whole turkeys, chickens, or any other foods. Grease fires can occur. To reduce the chance of injury and/or property damage, be sure to:
- Use outdoors only! Never leave the cookers unattended!!
- Use in an open area away from any building, decks, shrubbery, or trees.
- Carefully read and follow all operation instructions provided with the gas cooker and the propane tank.
- Should a grease fire occur, turn off the gas at the tank and cover the pot with the lid.
- The poultry rack will be very hot after frying. Be careful when handling.
NexGrill 32 Qt Stainless Steel Turkey Fryer Instruction Manual [720-0076] –
 report this ad
NexGrill 32 Qt Stainless Steel Turkey Fryer Instruction Manual [720-0076] –
[xyz-ips snippet=”download-snippet”]