
![]()

2K GPS Dash Camerawith Rear CameraQV3849User Manual
ABOUT THE PRODUCT
This product is designed to provide high definition recording of your trips for security and evidence in the case of an incident. Being portable, this convenient and durable multi-vehicle driving recorder can be used in a variety of situations for video recording.This product is not guaranteed to record ALL events. Use this product only for reference when investigating incidents or road accidents. The device may not properly record accidents, it only operated by a range of impact. Ensure completely turned on the recorder, then video recording and event recording will available. The Dash Cam is not designed to be used without accessory power.Nextech is not responsible for any loss caused by an accident, nor is it responsible for providing any support regarding the outcome of an accident.
PRODUCT STRUCTURE AND INSTRUCTIONS
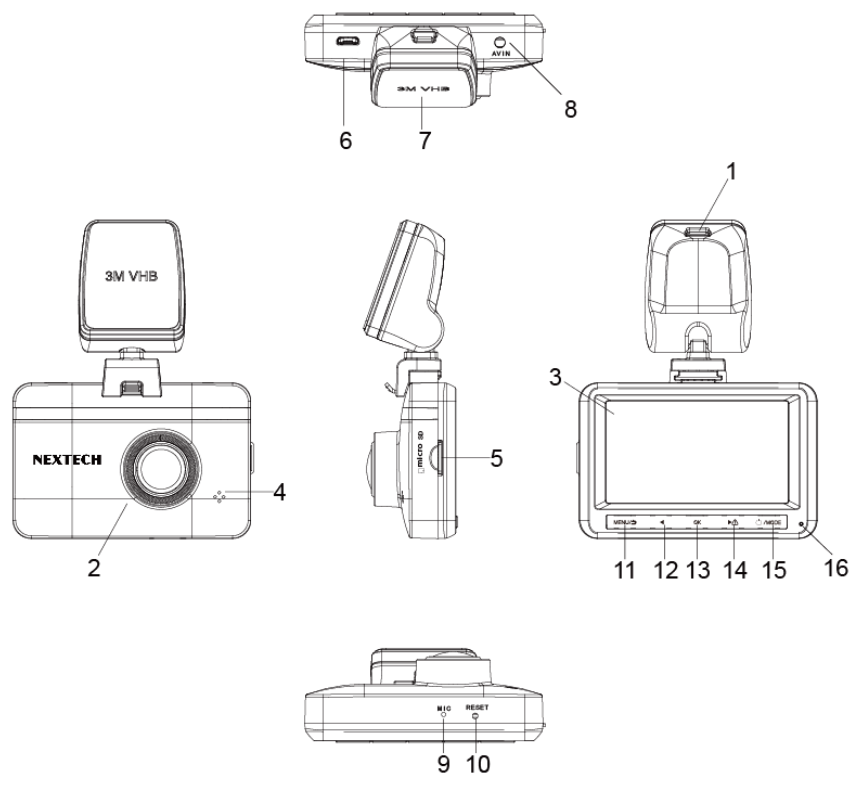 1. Charging port on bracket2. Camera Lens3. LCD Display4. Speaker5. SD Card Slot6. Charging Port7. 3M sticker8. AV/IN Hole9. Microphone10. Reset11. Menu /Back12. Left13. OK14. Locked Video/ Right15. Power/Mode16. LED IndicatorMENU/Back
Press ![]() button to enter Menu selection during standby mode, to press the back button to back to the video standby mode. Long press the menu button to switch between front/rear camera.LeftPress
button to enter Menu selection during standby mode, to press the back button to back to the video standby mode. Long press the menu button to switch between front/rear camera.LeftPress  button to move to the last selection during menu setting or file selection. Press the left button to turn on /off the voice recording during video standby or video recording mode.OKPress
  button to confirm current selection. In standby mode, press OK to start to record video.Emergency Recording/ForwardPress
  button to enter emergency recording mode during video recording, the video will not be covered by loop recordings, and the Lock icon will be shown in the right corner of LCD display; To press the Forward button to move to the next step during menu setting or file selection.POWER/MODEQuick press
 ![]() button to start the camera.The camera will start recording automatically if SD-card has already been installed; Long press the power button for 2 seconds to turn off the device Short press the Mode button to enter into camera/ video recording/ video playback in standby mode.
button to start the camera.The camera will start recording automatically if SD-card has already been installed; Long press the power button for 2 seconds to turn off the device Short press the Mode button to enter into camera/ video recording/ video playback in standby mode.
PRODUCT FUNCTIONS
Video RecordingInsert SD card into the product and get power from the car charger, the dashcam will start recording automatically, click OK button to stop recording.Video playbackPress the Mode button to review photos, Press Menu to select emergency or loop recording video and press the back button to review. G-sensor The machine has a built-in G-sensor, it will lock the video automatically during a vehicle collision, the locked video won’t be overwritten, and the locked icon shows in the right corner of the LCD display screen.Parking monitorIn shutdown mode, when the dashcam detects a vibration, it will start to video record and will then lock the current file, It will then shut down automatically after 30 seconds if no operation is detected.Loop recordingOverwrites existing files and records in either 1/3/5 minutes blocks.Record audioThe close or open audio recording in the video file.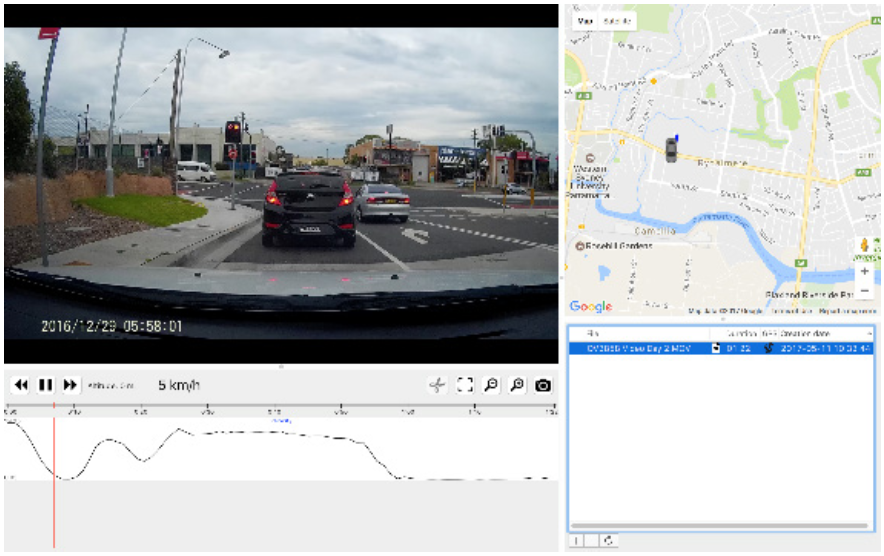 GPS LocationInstall the GPS Media player on your computer, so you can review GPS location as shown in the top right-hand corner and the speed is also shown at the bottom.Rear CameraConnect the camera with the included rear camera by inserting the plug into AV/IN on the device. You will find the rear camera image shows on the right corner of the LCD display after 3–5 seconds, then long-press the Menu button to switch the front/ rear videos.When the reversing camera is connected to the Dash Cam and it is powered on, the reversing camera will be displayed in the top right corner of the LCD screen after 3–5 seconds. When recording, it will save both videos from the front Dash Camera and Reversing Camera inside the microSD Card. When you put your vehicle in reverse, the reverse camera will be displayed on the Dash Cam with reversing lines (A short cable on the rear camera needs to be wired to the reverse light on your car).
PRODUCT SPECIFICATION
| Display: | 3.0” LCD |
Front Camera:
|
Up to 1296p3MP30fps140° |
Rear Camera:
|
640 x 48060°IP655VDC5.5m |
| Video Compression: | H.264 |
| Video File Format: | MOV |
| Image File Format: | JPG |
| Storage: | Up to 64GB microSD |
| Battery: | Li-ion 3.7V, 300mAh |
| Power: | 5VDC @ 1.5A |
| Car Charger Voltage Input: | 12-36VDC |
| Dimensions: | 85(W) x 61(H) x 32(D)mm (Excluding Mount) |
WARNING
- Do not expose the product to direct sunlight or intense light. Such damages are not covered by the warranty.
- Frequently check the product for the proper installation position.The impact caused by extreme road conditions may alter the installation position. Ensure that the product is positioned as instructed in this guide.
- Do not use chemical cleaners or solvents to clean the product.
- Do not disassemble the product or subject the product to impact.
- This device is designed to record video while the vehicle is in operation. The quality of the video might be affected by weather conditions and the road environment, such as whether it is day or night, the presence of street lighting, entering/exiting tunnels, and the surrounding temperature.
- This device is intended to be used inside the vehicle only.
DRIVING AND PRODUCT OPERATION
- Do not operate the product while driving a vehicle. Distraction while driving may cause accidents and result in injury or death.
- Install the product in places where the driver’s view is not obstructed. Obstruction of the driver’s vision may cause accidents and result in injury or death. Check with your state and municipal laws before mounting the product to the windshield.
POWER SUPPLY
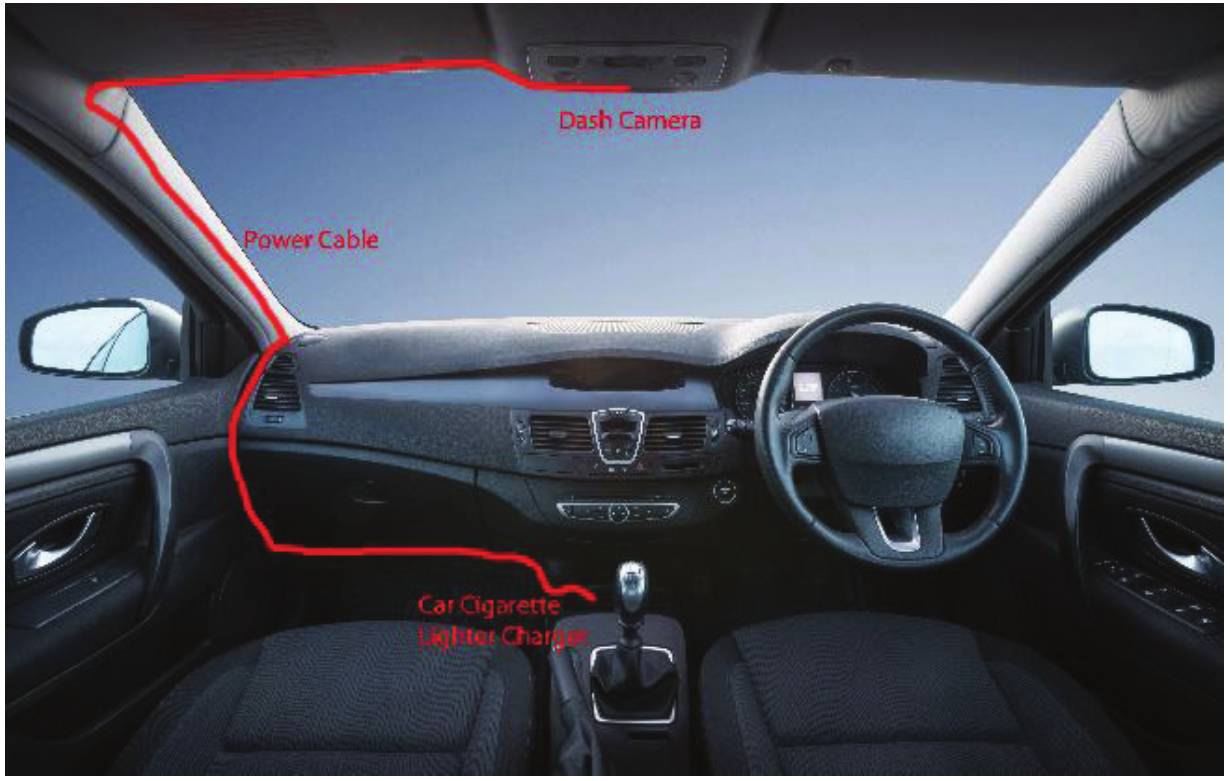
- Connect the car adapter’s mini USB plug to the mini USB port in the suction cup. Connect the cigarette lighter adapter plug to the vehicle’s cigarette lighter port. It is suggested to wire the cable along with your windscreen.

- In certain models of cars, the cigarette lighter keeps providing power even when the engine is off. Be sure to remove the car charger or disconnect the device when leaving the vehicle to prevent draining the vehicle battery. Check your vehicle’s owner’s manual to determine if this applies to your vehicle
INSTALLATION
- Fix the windscreen charging mount to the top of your windscreen, it is suggested towards the middle position of your windscreen.
- Peel off the adhesive sticker located on the top of the windscreen charging mount once you have the desired location and stick on your windscreen.
- Attach the dash camera to the windscreen charging mount by the magnet and adjust to the correct position facing forward.Note: It is recommended to place the dash camera behind the rear vision mirror to prevent the camera from obstructing your view while driving.
REAR CAMERA
With the help of a rear camera, you can get a high-resolution image behind your car for safe parking or recording while driving. Modern double recording technology allows saving recordings both in front and behind the car for fixing any unforeseen situation.Rear Camera InstallationThere are two options of using a rear camera.Option 1.DVR camera for getting view behind the car. Install the camera on the rear window with a sticker, put the wire through the cabin, connect the wire to the rear camera port.Option 2.Combination of DVR camera and rear camera for the back view when parking. Install the camera on the rear window inside the car, or outside on the license plate frame. In this case, it is required to apply +12 V when driving backward. This will allow the device to automatically switch the image from the front to the rear camera in the parking mode. Note: It is strongly recommended that works on installing the camera and connecting +12 V should be done by qualified personnel with the necessary skills. Cable routing may require special tools or attachments. Make sure these works are safe.
Distributed by:TechBrands by Electus Distribution Pty. Ltd.320 Victoria Rd, RydalmereNSW 2116 AustraliaPh: 1300 738 555Int’l: +61 2 8832 3200Fax: 1300 738 500www.techbrands.comMade in China
References
[xyz-ips snippet=”download-snippet”]