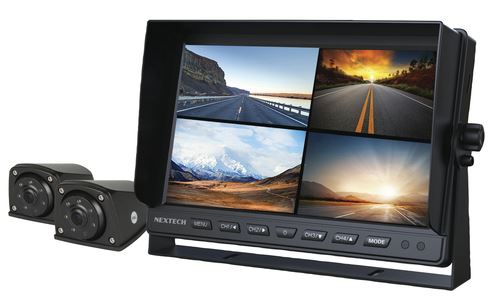
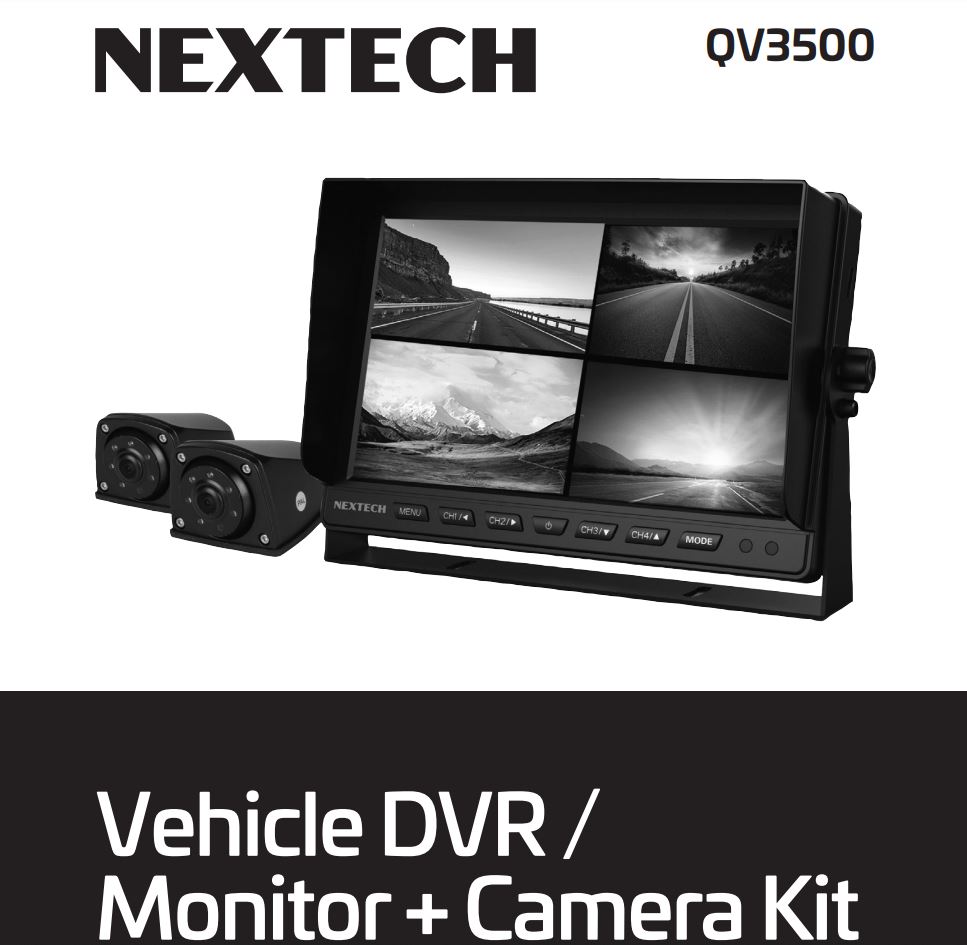
NEXTECH Vehicle DVR, Monitor, Camera Kit

INTRODUCTION:
This monitoring/surveillance system is ideal for a towed caravan, motor home, or large boat. It could even be adapted to a beach house, barn, or workshop. All that is required is a +12V supply.The monitor is configured to accept 4 x cameras. Additional weatherproof cameras are sold separately, or you can fit a dashboard forward-facing dome camera which can also be mounted.
PRODUCT FEATURES
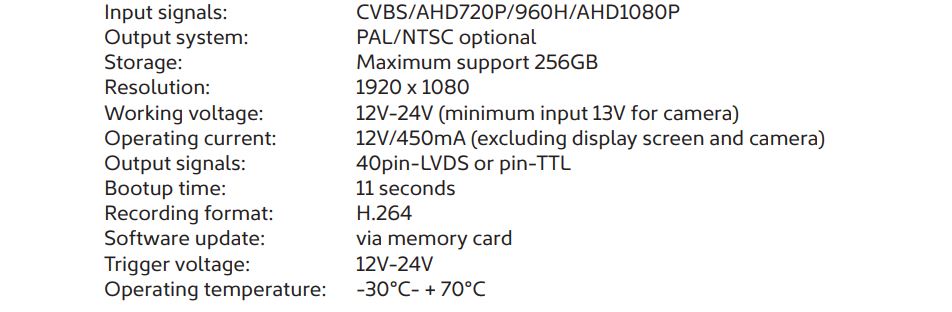
- Support AHD 1080P/960H/720P/CVBS multiple video formats mixed input.
- Support AHD/CVBS video signal with a different system, PAL/NTSC mixed input(automatically).
- Brightness, contrast, saturation, chroma, sharpness, up/down/left/right rotation function can be independently set for each input video signal.
- Support parking delay video recording (24H parking monitoring function).
- Maximum support 256GB memory card.
- Independent 4 channel display function, automatically switch the display when turning or reversing.
KEY FUNCTION:
MENU: on the split interface, press shortly to turn on/off the OSD menu (same as the “OK” key on the remote controller), press and hold for 5s to lock the key on the front panel, press and hold for 5s again to recover the function.
CH1: enter into CH 1 or move to the left side (same as a left arrow on the remote controller).
CH2: enter into CH2 or move to the right side (same as a right arrow on the remote controller).
POWER: press and hold to power on and power of the monitor, and press shortly to open and close the display screen (same as POWER key on the remote controller).
CH3: enter into CH3 or mover down or -1 when setup the parameter (same as a down arrow on the remote controller).
CH4: enter into CH4 or move up or +1 when setup the parameter (same as the up arrow on the remote controller).
MODE: on the split interface, press shortly to change to different multiple images display circularly (same as MODE key on the remote controller), on menu interface, press shortly to confirm (same as OK key on the remote controller).
CABLE AND CONNECTOR DEFINITION:
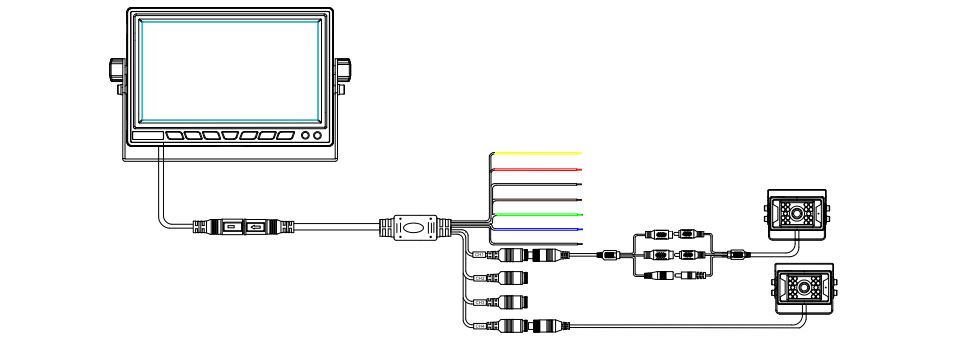 CH1CH2CH3CH4 4PIN connector: 4CH video input interface.BAT yellow line: 12V-24V power supply (Connect to the positive pole).ACC red wire: 12V-24V power supply (Connect to the key ignition circuit).GND Black wire: negative pole (Connect to the negative pole).Forward wire (CH1) brown wire: trigger CH1 single image to full screen.Reversing wire (CH2) green wire: trigger CH2 single image to full screen.Turning lamp wire (CH3) blue wire: trigger CH3 single image to full screen.Turning lamp wire (CH4) gray wire: trigger CH4 single image to full screen.Tips: BAT yellow wire and ACC red wire cannot be screwed together to connect to the ACC line to take power. After power off and power on again, the recording time will not be saved. Other functions are normal. Please take power according to the usage requirements!
The power cord is recommended to be connected directly to the positive and negative terminals of the vehicle battery, or after the battery is connected to the fuse box, connect the positive and negative poles of the power supply. It is not recommended to connect to the metal conductor in the car as the ground wire, otherwise, a negative pulse will be generated to interfere with the normal operation of the monitor.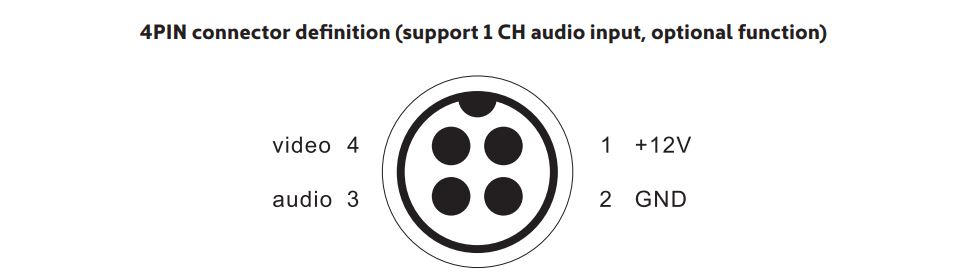
REMOTE CONTROLLER:
- Startup/shutoff monitor

- Return to the default screen/to the previous step
- Switch multi-screen display mode circularly
- CH1 single image full-screen display
- CH2 single image full-screen display
- CH3 single image full-screen display
- CH4 single image full-screen display
- Up
- Down
- Left
- Right
- Menu + confirmation
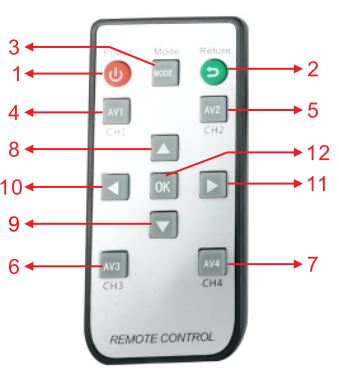
Press the “OK” key on the remote controller or press the “MENU” button on the screen to enter into the menu interface; use the arrow keys on the remote controller or the “Left” and “Right” buttons on the panel to move the check box, then press the “MENU” key on the remote controller or short press the “MENU” button to confirm the selection and enter into the next sub-menu.
Playback
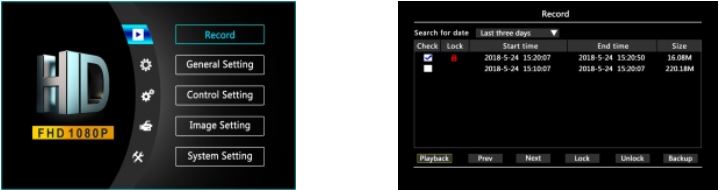
Press the remote controller arrow key or panel key to move the selection box, then press the remote controller “OK” key or press the “MENU” key to confirm.
- Search according to date: display the stored video files: (1) last three days, (2) last week, (3) last two weeks, (4) last month, all
- Playback: display the recording files on the monitor (support fast forward, fast reverse, pause, etc).
- Prev: switch to display the previous page of video files.
- Next page: switch to display the next page of video files.
- Lock: lock the selected video file and protect it from being automatically deleted and overwritten by the equipment.
- Unlock: Unlock the locked video files.
- Backup: copy and store the selected video files to an external disk, which can be plugged into a computer to play directly.
Basic setting
Press arrow keys of the remote controller or the panel keys to move the selection box, then press the “OK” key of the remote controller or press the “MENU” key shortly to confirm the option and enter the current setting. After completing the setting, press the “OK” key or the “MENU” key to exit the setting state, and select “OK” to save and exit.
- System time: modify the system time and date.
- Date format: change the display format of year, month, and day.
- Output format: PAL system or NTSC system.
- Language: Chinese and English menus(support customized other languages).
- Time show: turn on and off the time display.
- VGA resolution-output resolution adjustment: (800×600 / 1024×768 / 1280×720 / 1920×1080).
- Video quality: normal/standard/high definition/ultra-high definition.
- Plate number: add license plate number or driver’s name on the recording video.
Control Setting
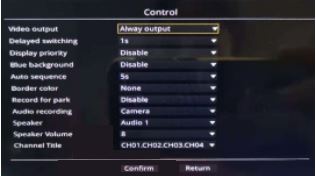
1. Video output:A. Always output: the display screen always outputs the display picture after starting up.B. Trigger output: the display screen does not display pictures all the time after starting up, and displays images after turning or triggered.C. Intelligent output: the display screen displays the picture after startup, and automatically closes the picture after 15 seconds if no operation.2. Delayed switching: choosing the trigger delay time.3. Display priority: choosing the channel to display as a priority when trigger.4. Blue background:Disable: black background when no signalEnable: blue background when no signal5. Auto sequence: time for CH1, CH2, CH3, CH4 automatically switching.6. Border colour: choosing the frame colour for the images.7. Record for the park: 24-hour delay recording function (please do not turn on all the time to avoid battery loss).8. Audio recording: Camera9. Speaker: Audio 110. Speaker Volume: choosing the speaker volume.11. Channel title: CH1, CH2, CH3, CH4.
Video

1. Guideline (the current setting will be automatically saved after pressing the return key to exit.)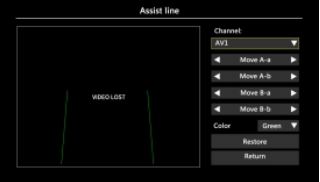 Adjust the position and length of the assist line for each channel independently. Colour: None (i.e. close assist line); Select “X”, press the panel key or the arrow on the remote controller to move and adjust the distance and position of assist line (Same for “Y” and “W”).2. Screen margin (the current setting will be automatically saved after pressing the return key to exit).
 Press the panel key or remote control arrow to adjust the margins around the output video are compressed inwards, which is suitable for full-screen display on various display screens.
3. Colour (the current setting will be automatically saved after pressing the return key to exit.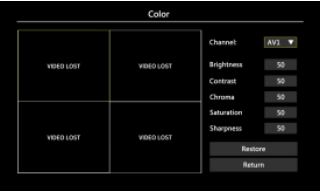 Press the panel key or remote controller arrow to adjust the chroma, brightness, sharpness, contrast, and saturation of each channel independently.4. Mirror (the current setting will be automatically saved after pressing the return key to exit).
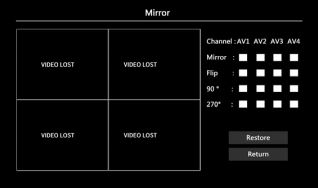 Press the panel key or remote controller arrow to adjust the image of each channel. Mirror, Flip, 90-degree rotation, 270-degree rotation optional.5. Image adjust (the current setting will be automatically saved after pressing the return key to exit).
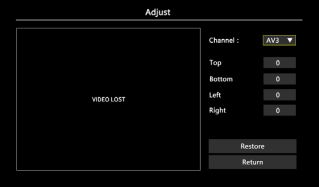 Cut each channel picture independently and adjust the display range of each channel image.
System Maintenance
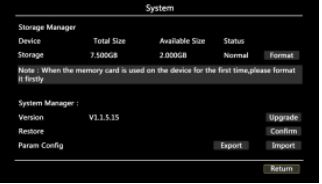
- Format: (the memory card has to be formatted before first use).
- Upgrade: upgrade the product.
- Confirm: restore the product to the factory default settings.4. Parameter configuration.
Export: Export the current setting parameter configuration to the monitor operating memory or memory card to store.Import: import the setting parameter configuration stored in the monitor operating memory or the memory card(import the parameter configuration of the memory card preferentially).
PRODUCT SPECIFICATION:
Distributed by:Electus Distribution Pty. Ltd.320 Victoria Rd, Rydalmere NSW 2116 Australiawww.electusdistribution.com.auMade in China
References
[xyz-ips snippet=”download-snippet”]