

Wi-Fi IP Camera With Alarm
QC3870 User Manual
Before using this product, please read the guide carefully to avoid any damages to the product. do not misconfiguration or misuse.
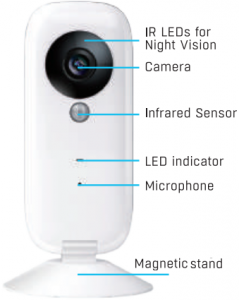
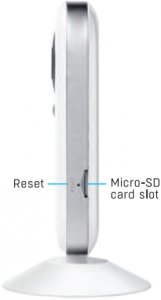
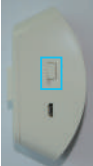
Camera Overview
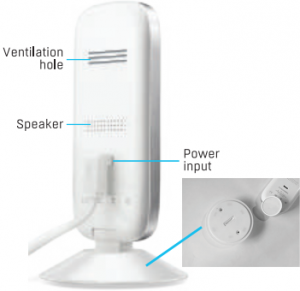
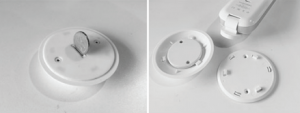
Mounting the Camera (screws not included)
-2-
1. Install App


Download Nextech SmartCam app on your smartphone or tablet. If you have done so already and you’re adding additional cameras, begin at step 2.
2. Connect the power adapter

![]()

Connect the power adapter to the camera and then plug it into a wall socket. The LED on the front will light up and the camera will start up.
Different LED colours correspond to a different camera status:
Blue System start upSlow blue flash Syncing modeFast blue flash Connecting to Wi-FiSolid blue Camera working correctly
-3-
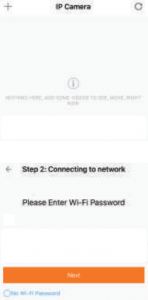
3. Register IP Camera
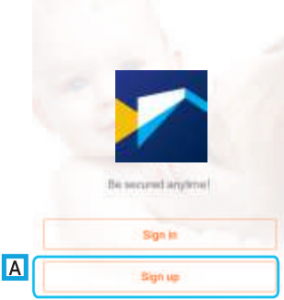
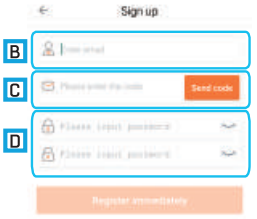
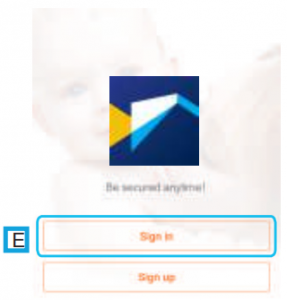
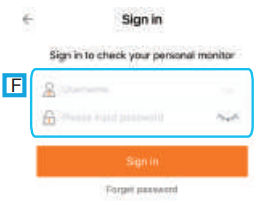
Please connect your mobile device to 2.4GHz WiFi network before opening the Nextech SmartCam app on your mobile device. If this is your first time setting up your camera, you will need to create an account. Please follow below.A: Select “Sign up” tab.B: Enter your Email ID.C: Check email, and input the received verification code. Kindly note sometimes the verification mail may be found in spam mailbox.D: Set password for your account. Press “Register immediately” tab.E: Select “Sign in” tab.F: Input email and password of your new created account (or an existing account), select “Sign in” tab
-4-
Connecting smart camera
It takes only 30 seconds to complete binding for keeping an eye on children, parents anywhere any time and two-way talking. And more intimate function waiting for you to discover.
-5-
4-2. Connect to Camera
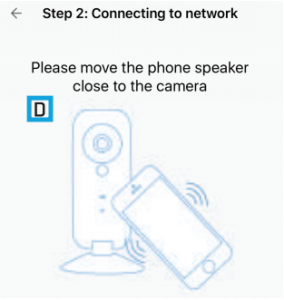
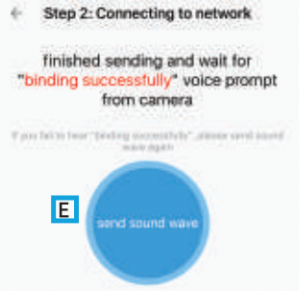
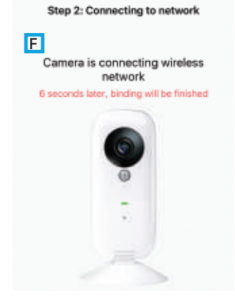
D Place speaker of your mobile device in front of the camera closely.E Press “send sound wave” icon to binding the camera with your mobile device.F Voice prompt “Binding Successfully” from the camera after it is done. Now the camera connects to the WIFI network automatically.
-6-
5. Operation
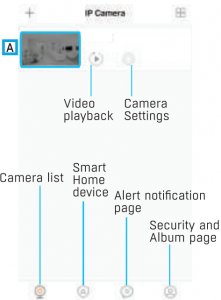

A The camera will list in the Camera list. To open the video streaming page, press this image.
-7-

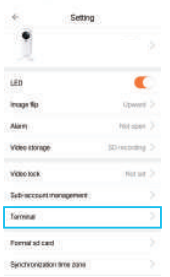
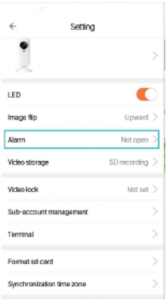
“Click” camera: Camera information.LED: Turn ON/OFF LED light.Image Flip: Flip video orientation on displayed device.Alarm: Turn ON/OFF Alarm and Alarm Settings.Video Storage: Turn ON/OFF Video Storage and Set video quality.Video Lock: Create/Disable slide lock for the IP camera.Sub-account Management: Add other account so that other mobile devices can access this camera.Terminal: Add various security sensors to work with cameraFormat sd card: Formatting SD card to delete videosSynchronization time zone: Synchronize IP camera time to local timeDelete: Delete the IP camera in the app.
7. Add Security Sensors
Press “Terminal”, then the top-right “+” button, then scan the QR code of sensors

Sensors will be connected successfully as the picture shows

-9-
Kindly note:
There is an on-off switch in PIR and infrared curtain. Please turn on before use

Press sensor icon to rename or delete the sensor


-10-
8. Alarm system setting
Press “Alarm” to open and set
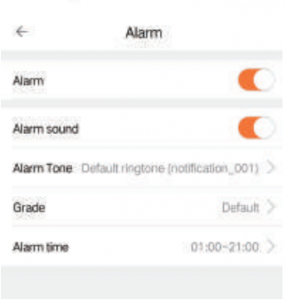
Alarm: Turn on/off alarm systemAlarm sound: Turn on/off alarm sound of the cameraAlarm tone: Set prompt tone when receiving APP push notificationGrade: Set camera alarm sensitivityAlarm time: Set alarm system working time
-11-
9. Notes
- Restore Factory Settings-Keep the device powered on for at least 30 seconds to complete its normal startup.-Find a pin to press the reset button on the camera and hold it for 3-5 seconds.-Voice prompt appear saying say system is resetting. The camera will be restored to factory defaults after rebooting.
- Pull-down the screen of your phone to refresh camera list.
- Support a 64GB micro-SD card, and store videos up to 40days.
- Video playback is available 10 minutes after a micro-SD card is installed.
- Maximum 15 accounts to each camera. The first account binding to the camera is default as the administrator account.
- Please bind in a quite environment when using sound wave binding.
- When binding, do not leave the binding page, wait for the camera finish automatically.
Distributed by:TechBrands by Electus Distribution Pty. Ltd.320 Victoria Rd, RydalmereNSW 2116 Australia
Ph: 1300 738 555Int’l: +61 2 8832 3200Fax: 1300 738 500
Made in China
-12-
References
[xyz-ips snippet=”download-snippet”]