NextLight PRO Series CONTROL User Manual![]()
Thank you for choosing
WARNING: Please read and follow the instructions before installing and using your NextLight Control Pro
1. NextLight Control Pro
- Dimming Control – Adjusting output power of your light fixtures
- On/Off Timing – Set precise times for daily shut off
- Sunrise/Sunset Simulation over 60 minute periods
- Included Temperature Sensor allows dimming and shut off at designated temperature thresholds
- 5 Year Full Warranty.
The NextLight Control Pro enables Dim-to-Off, Dimming Control and Programming for NextLight Pro Series products. Designed for controllingNextLight Pro Series fixtures. The NextLight Control Pro can control up to 500 NextLight Pro Series fixtures per controller (250 fixtures per channel).
Please scan the QR code to access our online product listing for the NextLight Control Pro. There you can access more info,digital versions of this User Manual, Spec Sheets and more!
If you still have questions, please call 513.718.7556 or email
2. Package Contents
- NextLight Control Pro x1
- 12V AC/DC Adapter x1
- Temperature Sensor x1
- NextLight Pro Series Control Cable (20′) x2
3. Connections
- DC Input
- Temperature Sensor Input
- Channel A
- Channel B
4. Product Installation
- The NextLight Control Pro can be mounted to the wall using two nails/screws and mounting holes (3 3/8” apart) on back of controller.
- Insert 12V AC/DC Adapter into DC Input and plug into a power source.
- Screen will automatically turn on and you can continue setting up your controller.
- Insert NextLight Pro Series Control Cable into Channel A/B of your NextLight Control Pro. Then screw the locking ring clockwise to ensure proper connection.
- Insert other end of Control Cable into Dim In connection on Driver of first Fixture in lighting system chain.
- Connect Control Cable from Dim Out on Driver of first Fixture to Dim In on Driver of next Fixture in the lighting system chain.
- Repeat until all Drivers/Fixtures are connected.
- To ensure proper dimming control, make sure Onboard Dimmer on Driver is set toEXT (External Control). Not applicable to all NextLight Pro Series fixtures.
5. Temperature Sensor
 WARNING: If the sensor becomes less sensitive or oxidized, it will cause the
temperature on controller to be different from actual ambient temperature. If this occurs, you will need to calibrate the sensor (H. Temp Calibrate).
- Insert Temperature Sensor into Temperature Sensor Input.
- Suspend the sensor down toward the space above the plant canopy, preferably not against the wall. Do not position the sensor in direct air flow.
- Cover the sensor from direct light exposure from fixtures. Direct light cast upon sensor will affect the temperature readings and may cause premature auto dimming (D. Auto-Save Temp) or shutdown (E. Shutdown Temp) of lighting system.
7. Controls
![]() Enter
Enter
- Press to view Settings Menu
- Press to save changes
Brightness
- Shortcut to Output Power menu
![]() Back
Back
- Navigate back to previous menu
![]() Up
Up
- Move selection up
- Increase value
![]() Down
Down
- Move selection down
- Decrease value
NOTES: Press once – Single value change, Press and hold (3 seconds) – Quick value change.
6. Main Screen
*Example values shown
Temperature
Ambient temperature detected byTemperature Sensor.TEMP: 80.0ºF
Date/Time
Current date and time of controller.01/01/2021 07:00:00
Outputs
Channel Dim % Schedule Current Status
A 50% 08:00-20:00 OFFB 50% 08:00-20:00 OFF

8. Settings
*Example values shown for all screen Settings
Settings MenuPress Enter to view Settings Menu
A. Output SelectE. Shutdown TempH. Temp CalibrateB. Output PowerF . Rise/FallI. Factory ResetC. Light TimerD. Auto-Save TempG. System Date/TimeJ Screen Saver
A. Output Select
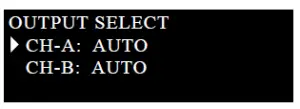
Set Output mode.
- Press Up/Down to change value
- Set AUTO to use fixtures with controller
- Set ON to turn all fixtures ON at set Output Power
- Set OFF to turn all fixtures OFF at 0%
- Press Enter to save changes
B. Output Power
Set Output Power % for Channels A & B
- Press Up/Down to change value
- Press Enter to save changes
C. Light Timer
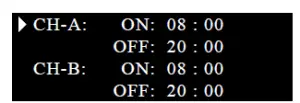
Set Light Timer ON/OFF values for hour/minute
- Press Up/Down to change hour
- Press Enter to select channel
- Press Enter to save hour change
- Press Enter to save minute change
- Repeat and set hour/minute for OFF time
- Press Up/Down to change minut
D. Auto-Save Temp
Set temperature threshold for auto dimming to 50% of current setting
- Press Up/Down to change Auto-Save Temp value
- Press Enter to save changesFor example:OUTPUT SELECT AUTO AUTO-SAVE TEMP 90.0°FCurrent Output Power setting is 50%, it will auto dim to 25% when temperature reaches 90ºF.
E. Shutdown Temp
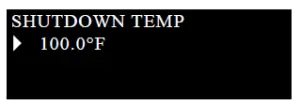
Set temperature threshold to shut down fixture automatically
- Press Up/Down to change Shutdown Temp value
- Press Enter to save changes
F. Rise/Fall
Set time period for sunrise and sunset
- Press Up/Down to change minute value
- Set 1 – 60 minutes or NONE
- Press Enter to save changes
G. System Date/Time
Set local date and time
- Press Up/Down to change date values
- Press Enter to save changes
- Press Up/Down to change time values
- Press Enter to save changes
H. Temp Calibrate
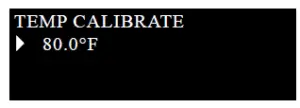
Set Temperature Sensor calibrationTemperature Sensor may become less sensitive or get oxidized causing temperature on controller to be different from actual ambient temperature.
- Press Up/Down to change Temp Calibrate value
- Press Enter to save changes For example:
- Temperature shown on controller is 79.0ºF
- Real ambient temperature is 80.0ºF tested by a reliable third party temperature sensor
- There is a 1ºF difference
- Set Temp Calibrate setting to match ambient temperature (80ºF)
- This will offset all readings from Temperature Sensor by 1ºF
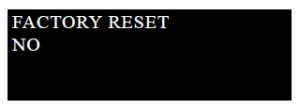
I. Factory Reset
Set controller to original factory settings
- Press Up/Down to change YES/NO
- Select YES and press Enter to save and return to original factory settings
J. Screen Saver
Set Screensaver ON/OFF
- Press Up/Down to change ON/OFF
- Select ON to turn screen off after one minute
- Select OFF and screen will stay on
- Press Enter to save changes
9. Safety Recommendations and Warnings
WARNING: Please read and follow all Safety Recommendations and Warnings before installing your NextLight Control Pro.
- Please check and adhere to all local rules, regulations and zoning codes when installing.
- The installer is responsible for correct and safe installation of light system.
- The NextLight Control Pro may only be used to control NextLight Pro Series products. Do NOT connect the controller to other products as this may be dangerous and may causemalfunctions in the connected equipment. Doing so will void the warranty.
- Do NOT hang Controller by Power Cord.
- Only use Power Cords that were supplied with your Controller.
- Do NOT use the Controller with a damaged Power Cord.
- Do NOT attempt to open, rewire or reconfigure any components of the Controller. It will void the warranty and could cause serious injury or death.
- Always disconnect power from the Controller before moving or cleaning it.
- Do NOT clean the Controller with detergents, abrasives or other aggressive substances.
- Do NOT use the Controller near flammable, explosive or reactive substances.
- Keep the Controller away from excessive heat, water, dust and contamination.
- Do NOT use any Volatile Organic Compounds (VOCs) on or near the Controller. VOCs can cause damage to the components (including insect foggers).
- If the surface of the NextLight Control Pro is dirty, wipe it with a dry towel.
10. NextLight Support

nextlight.com/support
Please scan the QR code to access our online Support page, which includes the User Manual, FAQ and additional Warranty Claim information.
11. Five (5) Year Full Manufacturer’s Warranty
All NextLight products carry a Five (5) Year Full Manufacturer’s Warranty from date of purchase. Please follow all instructions and guidelines to ensure warrantyis not voided. This warranty does not apply to any product which has been damaged, defaced, subjected to misuse, abnormal service or handling (including shippingdamage) or which has been altered in design or construction.

To file a Warranty Claim, visit nextlight.com/warranty.

 This product is for horticulture use only. Not suitable for room illumination
Legal Disclaimer
NextLight products are to be used for lawful purposes only. It is the responsibility of you as the purchaser to know and abide by all laws pertaining to the use of NextLight products. NextLight, LLC will NOT be held liable for any unlawful state or federal activity arising out of the use of our products. By purchasing a NextLight product, you are agreeing to these terms and conditions, confirming that you as the purchaser are attesting to the lawful use of our product and are thereby solely responsible for acting in conformance with all applicable regulations.
 report this ad
Thank you for choosing513.718.7556Questions about your NextLight Pro Series products?
Read More About This Manual & Download PDF:
[xyz-ips snippet=”download-snippet”]