![]() PILOT XRSUser Manual / Dashcam
PILOT XRSUser Manual / Dashcam
DESCRIPTION AND FUNCTION
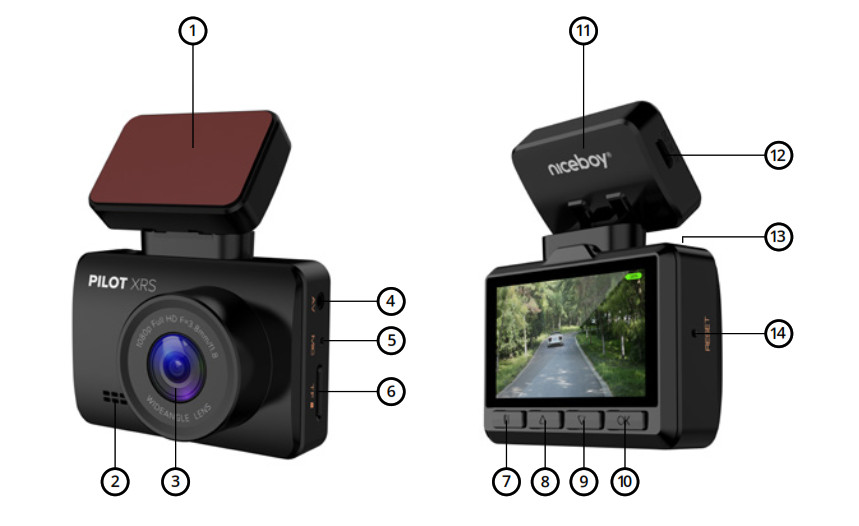
- Adhesive back of the magnetic camera mount – used to permanently attach the mount to the glass of the vehicle.
- Speaker – plays back sound.
- Lens – captures video and photos.
- Input port for services purposes
- Microphone – records sound.
- Micro SD slot – entry port for memory card insertion.
- Mode change/Menu/Emergency recording – press and hold while in standby mode (while the camera is powered on and not recording video) to switch between video recording mode, photo mode, and playback mode. Quick press while in the standby mode to get to the video/ photo settings (settings according to the mode selected) and press again to enter the camera settings. By pressing the button while in the playback mode you may get to the options to delete and lock a recorded video. You may start an emergency recording by pressing the button when the camera is recording video – this function prevents videos from accidentally being deleted even if the memory card is full.
- Up button / digital zoom – press to move through the menu. Press when filming to use the digital zoom function.
- Down button / Wi-Fi – used to move through the menu list. Press and hold while in the standby mode to turn on/ offWi-Fi.
- OK button – used to confirm the selected item in the menu. While in video mode, press here to start/finish recording video. While in photo mode, press here to take a photo.
- Magnetic camera mount – holds the camera using magnets.
- micro USB – charging port used to connect the magnetic camera mount to the vehicle.
- On and off button/screen saver button – press and hold to power on the camera. Press again once the camera is one to turn on/off the display (the display is powered on or off does not affect video recording).
- Reset – you may restart the camera should the need arise.
Press the power-on button (13) to turn on the camera or connect the camera to a charging port. Once the camera has powered on, select the camera settings: press the Menu button (7) twice and use the down button (9) to move within the menu to the “Language” option and confirm by pressing the OK button (10). Here you may select the preferred language of the camera.
VIDEO MODE SETTINGS
Resolution: definition settings for recorded video. Video loop: set cyclical recording, or rather time segments, during which video will be recorded. When the memory card is filled, the camera will begin to delete the oldest recordings (videos recorded while in the emergency recording mode will not be deleted.WDR: turn on or off the function which allows for improved dynamic range (suitable for recording scenes with high contrast or for night recording).G-Sensor: intensity settings for the G-Sensor. The G-Sensor records any shaking movement of the camera and launches the emergency recording function when the video is recording.Exposition: exposition settings. The higher the positive value, the lighter the video, and the lower the negative value, the darker the video.Movement detection: when the camera detects movement, it will start recording (assuming this function is turned on), after the movement stops the recording will stop as well. Only use this function while the car is parked and with the video loop function turned off. Movement detection only works when the camera is powered on.Parking mode: when this mode is activated, the camera will power on and begin recording when the G-Sensor records any shaking movement (this requires the G-Sensor to be activated as well).Microphone: turns on/off the option for the camera to play video-recorded sound.Timestamp: turns on/off the option to have information regarding date and time displayed on a video.
CAMERA SETTINGS
Wi-Fi: turns on/off Wi-Fi.Date/time: settings for date and time.Automatic power-off: set the time at which you would like the camera to automatically power off when not in use (the camera will not record video).Button sound: turns on/off the sound made by each pressed button.Language: language settings menu for the camera.Car plate: set the name of the driver, or rather the registration information for the vehicle that is to be recorded.Display screen saver: set the time when the display will turn off (does not affect the recording of video). The display can once again be activated by pressing the button (13).Frequency: frequency settings. GPS: turns on/off GPS. For the GPS function to work you must purchase the magnetic camera mount with integrated GPS as an optional accessory.Unit of speed: option to change between the speed options of Km/h and MPH. Time zone: time zone settings for displaying the current time. Format: deletes all the data stored on the memory card. Default settings: return the camera to its factory settings. Version: information regarding the camera’s firmware.
PHOTO MODE SETTINGS
Resolution: definition settings for taking photos.Photo burst: turns on/off the function for taking several photos one after another.Quality: quality settings for taking photos.Sharpness: sharpness settings for taking photos.White balance: white balance settings for photographing a scene.Colour: colour rendition settings for photos.ISO: ISO value settings.Exposition: exposition settings. The higher the positive value, the lighter the photo and the lower the negative value, the darker the photo.Stabilization: turns on/off digital stabilization when taking a photo.Timestamp: turns on/off the option to have information regarding the date and time displayed on a video.
MICRO SD CARD
Use a name-brand micro SD CARD, Class 10 or faster with 32 GB max. capacity. Before using a memory card for the first time the card must be formatted in a PC to the file system FAT32 (by formatting the memory card you will delete all and any data stored on that card). Insert the memory card into the camera with the PINs facing the camera’s display.Recommendation: regularly format your memory card in a PC in order to prevent problems from arising while you are recording video. If you use the camera every day, format the card at least one a month.
AUTOMATIC POWERING ON/OFF WHILE IN A VEHICLE
As soon as the camera detects a charge, it will automatically power on and begin recording. When the camera is then disconnected from the charge source, it will then stop recording video and power off.
CHARGING THE CAMERA
The camera may be connected to an energy source via the vehicle charging adaptor (included in the purchase), or by using a USB cable connected to a PC or a mobile phone charging adaptor. The camera may also be charged using a power bank.
USING THE CAMERA WHILE ON BATTERY POWER (NOT CHARGING)
The camera is intended for use while the camera is permanently connected to a charging source. The camera has a reserve battery which is primarily intended for parking mode. Ensure the camera battery is fully charged in the event that battery power must be used. The camera battery lasts about 20 minutes while not connected to a charging source.
CONNECTING THE CAMERA TO A MOBILE DEVICE VIA WI-FI
Install the free application LuckyCam to your telephone (available in both the Appstore for iOS and Google Play for Android). After you have installed the application, do not open it, but first follow these steps:
- Turn on Wi-Fi in the camera either in the menu or by pressing and holding the button (9) on the camera.
- Open the Wi-Fi settings in your mobile phone and connect to the camera‘s network (name: Nice boy PILOT XRS, password: 1234567890)
- Once you have connected to the network, open the application where you will be able to control the camera with your phone.
- Press and hold button (9) on the camera to turn off the camera’s Wi-Fi.
Notice: Before using the application in your telephone settings, allow all access to the application, turn off “data connection” on your mobile device and leave the Wi-Fi- option turned on. The application is compatible with mobile telephones with iOS 8.0 and newer and Android 5.1 and newer.
GPS APPLICATION
Download the GPS installation file from www.niceboy.euLaunch the installation file on your PC and follow the instructions on the screen.The GPS application displays information regarding the position of your vehicle on the map, the path of the vehicle on the map, your coordinates and speed, and all according to the video being currently played.
Notice: for the GPS function to work you must purchase the magnetic camera mount with integrated GPS as an optional accessory.Important: after the GPS application has been installed, it is necessary for it to be first launched on a PC as administrator (right-click on the GPS icon and select “open as administrator”. The GPS application may be installed on PCs running Windows8.1 and newer.
CONTENTS INCLUDED IN THE PURCHASED PACKAGE:
Dashcam Nice boy PILOT XRSWindshield mount with magnetic attachment MicroUSB-B charging cableUSB car adaptor Manual
SPECIFICATIONS FOR THE NICEBOY PILOT XRS
|
Chip: |
Novatek 96658 |
| Sensor type: | CMOS |
| Lens: | 6G glass, 150° |
| Lens speed: | f/1.8 |
| Video definition: | Full HD (1920x1080p),HD (1280x720p), WVGA (848×480), VGA (640×480) |
| Video format: | MOV, H.264 |
| Max. photo definition: | 12MPx |
| Display: | 2.45“ IPS |
| Wi-Fi: | Yes |
| GPS: | accessory included with the GPS supported camera mount (may be purchased separately) |
| Memory card: | micro SD, Class 10, max 32GB, FAT32 format (memory card not included) |
| Battery: | built-in Li-Ion, 180mAh |
| Operational temperature: | -10 °C to +55 °C |
| Charging car adaptor: | voltage output 5 V, voltage input 12-24, output current 2.1A |
| Camera dimensions (W x H x D): | 70.1 x 47.2 (86.3 with mount) x 35.1 mm |
| Camera weight: | 66 g |
| Camera mount weight: | 23 g |
You can download an electronic copy of the manual at www.niceboy.eu. This product meets all basic requirements placed upon it by the EU.
![]()
Importer to EU: RTB media s.r.o., Pretlucka 16,Prague 10, 100 00, Czech Republic, ID: 294 16 876Made in China.
![]()
References
[xyz-ips snippet=”download-snippet”]