Nikon 1340 Wireless Bluetooth Remote Control Instruction Manual
Thank you for your purchase of the ProMaster 1340 Bluetooth remote for Nikon. Please be sure to refer to your camera’s instruction manual at the same time you read this one. Your camera will need to be paired with the remote and its manual can give the specifics about how to prepare it for that task. Also, check that you have the proper firmware installed in your camera to ensure Bluetooth remote operation.
Parts Diagram
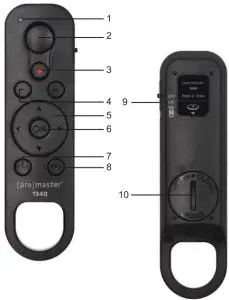
- Indicator Lamp
- Shutter Button
- Movie Record Button
- + / – Buttons
- Multi Selector
- OK (apply selection) Button
- Fn1 Button
- Fn2 Button
- Power/Pairing Switch
- Battery Compartment
Inserting the Battery
This remote uses a CR2032 battery and we indude one for your convenience. To install the battery, turn the remote over so the Battery Compartment (10) is facing you. Use a coin to rotate the battery cover counterclockwise and remove It. Insert the CR2032 battery with the • side facing up. Reinstall the cover.
Connecting to the Camera
Since the 1340 remote uses Bluetooth technology it veill need to be paired with your camera before its first use. Be sure your camera and its current firmware is compatible with a Nikon-type ML-1.7 Bluetooth remote.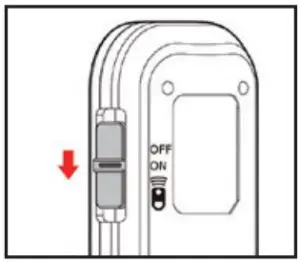
Start by pairing your new 1340 remote with you camera. Each camera does this a little bit differently so, please refer to your camera’s instructions for more specific information. On most Nikon cameras, this will be done by accessing the Main Menu. going to the Wireless Remote (ML-L7) options and choosing Save wireless controller Once the camera is ready use the remote’s Power/Pairing Switch (9) to turn the remote ON. Now hold the Power/Pairing Switch down, past the ON position for approximately 3 seconds until your camera shows the message Establishing connection. Once you see this message, release the Power/Pairing Switch (9) so it can return to the ON position and wait for your camera to show the message Wireless remote controller saved. Once the remote is saved (this means it has been paired with your camera) use the OK button on your camera to return to the Wireless remote (ML-L7) options menu.
Notice in the Wireless remote (ML-L7) options menu, the Wireless remote connection option will show ON. If it does not, please enter this option and turn It ON. Anytime you want to use the ProMaster 1340 remote this option should first be turned ON in your camera.
Operation for Still Photography
Be sure to set your camera’s Wireless remote connection menu option to ON, Make sure the 1340’s Power/Pairing Switch (9) is turned ON. Press the Shutter Button (2) on the remote to take a photo. Notice the Indicator Lamp (1) will illuminate yellow for a moment to confirm the shutter has been fired on the camera.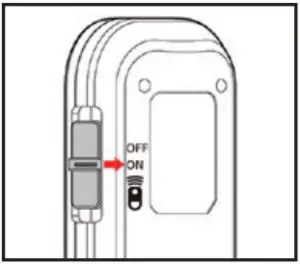
Note: If the camera is not responsive to the remote press the remote’s Power/Pairing Switch (9) down and release it. This will force the remote and the camera to ‘wake up’ and realize a connection.
Operation for Videography
Set your camera to videography.Press the Movie Record Button (3) on the remote to begin recording a video. Once the camera begins recording the Indicator Lamp (1) on the remote will illuminate red for a moment to notify you it has begun. Press the Movie Record Button (3) again to stop the recording. The Indicator Lamp (1) will illuminate red twice to notify you recording has stopped.You may use the + / – Buttons (4) to zoom the lens during video recording if you are using a camera/lens that is compatible with this function.Note: 11 the camera is not responsive to the remote press the remote’s Power/Pairing Switch (9) down and release it. This will force the remote and the camera to ‘Wake up” and realize a connection.
Zooming the Lens (for both still photos and video)For a camera with a power zoom lens, you can adjust the zoom using the + – Button (4) on the remote so long as the camera supports this function.
Using the Fnl & Fn2 Buttons
The Fn1 Button (7) and Fn2 Button (8) work as they would on your camera. If you assign a custom function to either of these buttons on your camera, they will also work with this custom function when accessed via the remote.
The Multi Selector Button (5) and OK Button (6) work as they would on your camera.
Tips for Operation
- Keep a close eye on the Bluetoothw icon shown on the LCD screen of your camera. For most Nikon models it will appear solid when the camera is ready to work with the 1340 remote and has an established connection. If the icon is blinking it typically means the camera is set to work with a remote, but it cannot connect. In this case, press the Power/Pairing Switch (9) of the 1340 remote down, past the ON position briefly and release it. This will allow the remote to “wake up” the camera to realize a connection. Once this happens the Bluetooth icon will appear solid.
- Bluetooth does not require line of sight. So, you can take photos even when there is a wall or obstacle between the remote and the camera. However, it does have a range of 32′ / 10M, beyond which it may not function.
- Once the remote is paired with your camera it will remember the pairing and be usable anytime your camera’s Wireless remote connection is set to ON. If you are in remote mode and it is not working properly refer to Tip 1 and if that does not reestablish the connection, try to Delete the wireless controller from your camera and then re-pair it as explained in the Connecting to the Camera section of this manual.
- The remote can only be paired with one camera at a time. If you pair It with a second camera you will need to delete it and then re-pair it with the first camera when you wish to use it with the first camera once again.
- When the battery is replaced the remote may lose its pairing and need to be re-paired.
- The loop built-in to the remote is a convenient place to connect it using a carabiner, or lanyard.
- Each camera may use different terms and nomenclature for remote operation. This manual was written to address the most common language. Always refer to your cameras manual for more specific references when understanding the remote operation process.
- Some buttons on the remote may not have any function or use with a particular camera model. Refer to your cameras instruction manual for more information.
 report this ad
Code 1340 Made in ChinaWWW.PROMASTER.COM I FAIRFIELD, CT 06825
[xyz-ips snippet=”download-snippet”]