![]()
MAXHealth Grill & Air Fryer
QUICK START GUIDEPlease make sure to read the enclosed Instructions prior to using your unit.
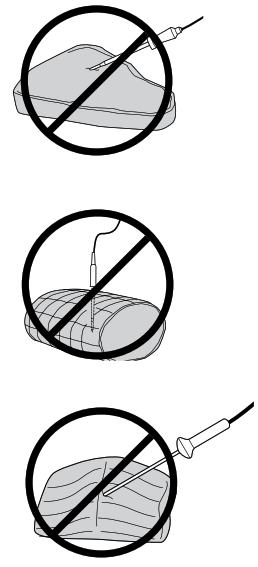
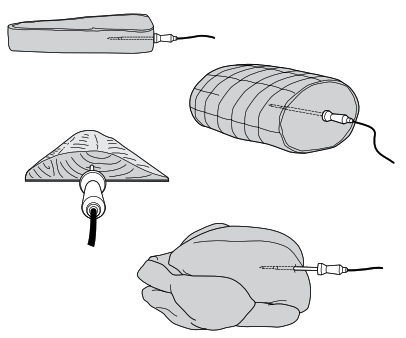
How to place the probe
| FOOD TYPE | PLACEMENT | CORRECT | INCORRECT |
| SteaksPork chopsLamb chopsChicken breastsBurgersTenderloinsFish fillets | • Insert probe horizontally into the centre of the thickest part of the meat.• Make sure the tip of the probe is inserted straight into the centre of the meat, not angled toward the bottom or top of it.• Make sure the probe is close to (but not touching) the bone and away from any fat or gristle.NOTE: The thickest part of the meat may not be the centre. It is important that the end of the probe hits the thickest part so desired results are achieved. | 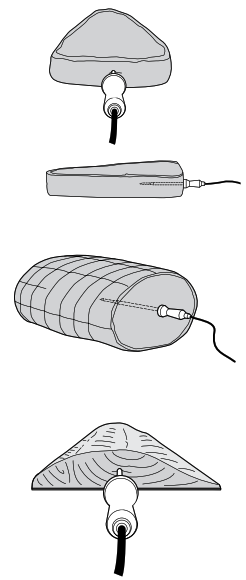 |
 |
| Whole chicken | • Insert probe horizontally into the thickest part of the breast, parallel to, but not touching, the bone.• Make sure the top reaches the centre of the thickest part of the breast and doesn’t go all the way through the breast into the cavity. | 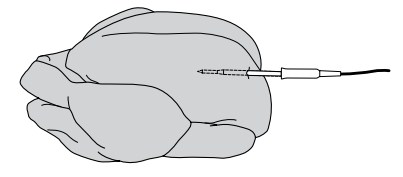 |
 |
DO NOT use the probe with frozen foods or for cuts of meat less than 1.5cm thick or for meat on the bone such as chicken drumsticks or ribs.Turn for Instructions on cooking with the probe
Preheat for better results For best grilling results, preheat before adding food. It will take approximately 10 minutes. Adding food before preheating is complete may lead to overcooking and smoke.How to turn off PreheatWe do not recommend skipping preheating, as it will impact cooking results. If, after selecting a function and pressing START/ STOP button you decide you do not want to preheat, then press the PREHEAT button to cancel preheating.
How to clean your splatter guard• Clean the splatter guard after every use. Soaking the splatter guard overnight will help soften the bakedon grease. After soaking, use the cleaning brush to remove the grease from the stainless steel frame and front tabs.• Deep clean the splatter guard by putting it in a pan of water and boiling it for 10 minutes. Then, rinse with room temperature water and allow to dry completely.
Cooking with the probe
The integrated Digital Cooking Probe continues to monitor temperature throughout the cooking process, unlike a traditional instant-read thermometer.
Setup
STEP 1• Remove probe from storage compartment on right side of the unit.• Unwind cord and remove probe.• Plug probe into port on right side of the unit.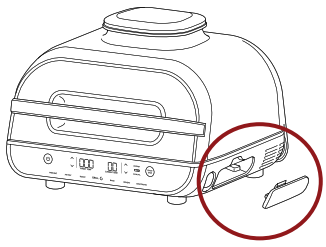
Select Cook Function
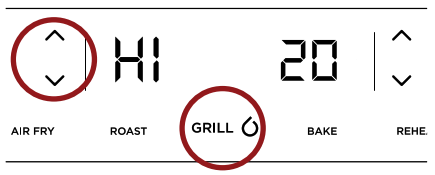
STEP 2• Press the desired cooking function (eg. Grill).• Use the left arrows to select desired cook temperature (setting a time is not necessary when using the probe).
 Program Probe
 Program Probe
STEP 3• Press the PRESET button.• Use the right arrows to choose the desired protein.• Use the left arrows to choose the desired outcome.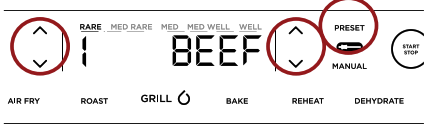
NOTE: If selecting the MANUAL button, use the internal cook temperatures recommended in the Instructions.
Probe Placement
STEP 4• Press the START/STOP button to begin preheating.• Wait until unit is fully preheated before adding food.• Insert probe in protein using the guide on the front page.
Add Food
 Add Food
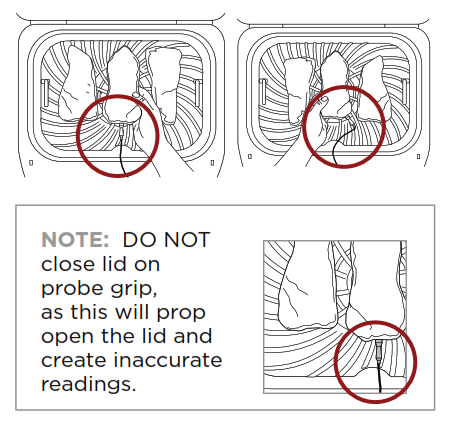
STEP 5• Once unit has preheated, “Add Food” will appear on the screen.• Add the food with probe grip fully inside the unitand close lid over cord to begin cooking (images below).
Track Progress
 Track Progress
STEP 6• The progress bar at the top of the display will track outcome.• Flashing outcome indicates progression to that outcome.
![]() • When using Roast and Grill, the unit will beep and display FLIP.
• When using Roast and Grill, the unit will beep and display FLIP.
 • Flipping is optional, but recommended.
Carry-Over Cook & Rest
STEP 7• Unit will beep and show “GET FOOD”, indicating it’s time to carry-over cook and rest food on a plate for 3–5 minutes.• Carry-over cooking is when food retains heat and continues to cook after being removed from the source of heat.
![]()
How do you like your steak?Everyone’s perception of levels of cook differs form person to person. The below guide shows what each PRESET visually correlates to when selecting beef. We have provided a range of options to allow for more customisation based on your preference |
 NOTE: This guide is based on Sirloin Steaks. Using different cuts and/or sizes of beef can alter the outcome. For cuts of 5cm thick or more (e.g., filet mignon), we recommend selecting the lower temperature setting within the presets (e.g., Rare 1 instead of Rare 2).
Using the probe in different cooking scenarios
SAME MEAT OR FISH SAME SIZE DIFFERENT OUTCOMES
1 Set the preset feature to the highest desired level of outcome.2 Insert the probe in the protein with the higher desired level of outcome.3 When the lower desired level of outcome is reached, remove the protein without probe.4 Continue cooking the remaining protein until the next level of cook is reached.
SAME MEAT OR FISH DIFFERENT SIZES1 Set the preset feature to the desired level of outcome for the smaller protein.2 Insert probe in the smaller protein. Then refer to Steps 5 and 6 in the above chart.3 As the probe does get hot, use oven gloves to transfer it to the larger protein. Then use the arrows to the left of the display to choose the level of outcome.
DIFFERENT MEAT OR FISH1 Insert probe in the protein with the lower desired level of outcome.2 Use the Manual feature to choose the desired internal temperature (refer to Instructions).3 As the probe does get hot, use oven gloves to transfer it to the other protein. Then use the Manual feature to choose the desired internal temperature.
| Did you know?Meat keeps cooking when you remove it from the grill.To prevent overcooking, the unit will beep right before your food reaches desired outcome, taking carry-over cooking into account. | |
Removing your food Remove meat from the grill and transfer to a plate using silicone-tipped tongs with the probe still inserted. Once all food is on the plate, carefully remove the probe using oven gloves. Remove meat from the grill and transfer to a plate using silicone-tipped tongs with the probe still inserted. Once all food is on the plate, carefully remove the probe using oven gloves.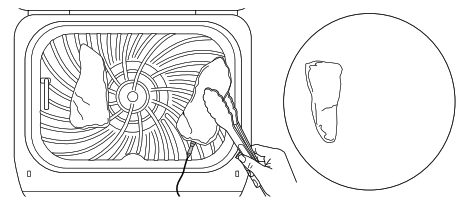
WARNING: Probe and grip will be hot. |
Carry-over cooking & resting
|
 Allow protein to carry-over cook and rest for 3–5 minutes. “REST” will appear and timer will count up.
 To check the internal temperature of other pieces of protein, press and hold MANUAL. Then insert the probe into another piece of protein and check the display for the internal temperature reading.
NOTE: Skipping carry-over cooking and cutting into food right away may result in a rarer level of outcome.For more instructions on cleaning the unit, refer to your Instructions.
More flavour. Less smoke.FOR LESS SMOKE, WE RECOMMEND USING OILS WITH A HIGH SMOKE POINT — LIKE VEGETABLE, COCONUT, AVOCADO, VEGETABLE OR RAPESEED OIL — INSTEAD OF OLIVE OIL.If you choose to cook ingredients at a higher temperature than recommended using olive oil, it may result in more smoke and food having a burnt flavour.
Grilling Cheat Sheet
Cooking times given as a guide, always check foods have reached a food safe temperature.
LO (200°C)Best for bacon andsausages and when usingthicker sauces. |
MED (230°C)Best for frozen meatsand marinated ingredients. |
HI (250°C)Best for steaks,chickenand burgers. |
MAX (up to 260°C)Best for veggies,fruit, fresh/frozenseafood and pizza. |

Sausages12 sausagesLO, preset to PORKand set outcomeCook: 7–10 mins |

Marinated Chicken Breast6 breasts (150-200g each)MED, preset to CHICKENor set to LO if using a thick sauceCook: 18 mins |

Sirloin Steaks4 steaks (225-280g each)Pat dry. Rub with vegetable oil and season.HI, preset to BEEFand set outcomeCook: 9–12 mins |
Salmon6 fillets (130g each)Pat dry. Rub with vegetable oil and season.MAX, preset to FISHand set outcomeCook: 6–8 mins |

Barbecue Chicken Thighs6 thighs (900g)LO, preset to CHICKENCook: 10-12 mins |
Frozen Pork Chops6 chops (250g each)Brush with vegetable oil and season.MED, 22–26 mins |

Chicken Breasts6 breasts (150-200g each)HI, preset to CHICKENCook: 16–20 mins |
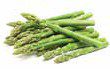
Fresh Asparagus(400g)Toss with vegetable oil.Season with salt and pepper.MAX, cook: 5–8 minsSpread evenly on grill plate. Do not flip. |
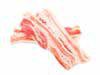
Bacon8 strips, thick cutLO, cook: 5–8 mins |

Frozen Chicken Thighs6 bone-in thighs (850g)Brush with vegetable oil and season.MED, cook: 25–28 mins |
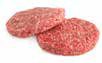
Beef Burgers6 burgers (125g each)HI, preset to BEEFand set outcomeCook: 10–12 mins |

Fresh Corn on the Cob (4 ears)Brush lightly with vegetable oil.Season with salt and pepper.MAX, cook: 7-10 mins |
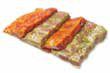
Barbecue MarinatedPork Ribs(store-bought, prepackaged)2 racks (460g each)LO, cook: 10-12 mins |
Frozen Beef Burgers6 burgers (125g each)MED, cook 10 mins |

Chicken Thighs8 thighs (200-260g each)Pat dry. Rub with vegetable oil and season.HI, preset to CHICKENCook: 10–12 mins |

Prawns560g (46 pieces)Pat dry. Rub with vegetable oil and season.MAX, cook: 1–2 mins |

When using the grill function, for best results flip meats. When cooking from frozen, it is not recommended to use the probe.For more charts and individual cook times, refer to the Recipe Guide.
[xyz-ips snippet=”download-snippet”]