
NITECORE Camping Lantern Power Bank
Warranty Service
All NITECORE® products are warranted for quality. Any DOA / defective product can be exchanged for a replacement through a local distributor/dealer within 15 days of purchase. After that, all defective / malfunctioning NITECORE® products can be repaired free of charge within 60 months from the date of purchase.Beyond 60 months, a limited warranty applies, covering the cost of labor and maintenance, but not the cost of accessories or replacement parts.The warranty will be nullified if
- The product(s) is/are broken down, reconstructed and/or modified by unauthorized parties;
- The product(s) is/are damaged due to improper use; (e.g. reversed polarity installation)
- The product(s) is/are damaged due to battery leakage.
For the latest information on NITECORE® products and services, please contact a local NITECORE® distributor or send an email to ※ All images, text and statements specified herein this user manual are for reference purpose only. Should any discrepancy occur between this manual and information specified on www.nitecore.com, Sysmax Innovations Co., Ltd. reserves the rights to interpret and amend the content of this document at any time without prior notice.
Features
- Utilizes 9 x high CRI LEDs (CRI≥90, Color Temperature: 4000-4500K) with a max output of 280 lumens
- Integrated intelligent USB charging and discharging management system to be used as a portable power bank with a max input and output power of 18W
- USB-C input port with QC fast charge
- 3 brightness levels and 2 special modes available
- Multiple illuminable direction settings available
- Highly translucent PC diffuser allowing all light source to be well distributed
- A power indicator indicates the remaining battery power (Patent No. ZL201220057767.4)
- The power indicator can display the battery voltage (±0.1V)
- Recommended to be powered by 1-2 x 21700 Li-ion batteries and compatible with 18650 and CR123 batteries
- Automatic detection of the battery level and automatic adoption of the optimal charging modes between CC and CV
- Activates over-discharged batteries with protective circuits
- Location Indication function
- Highly efficient constant current circuit provides stable output up to 150 hours
- Magnetic base and hanger equipped for multiple environments
- Body made from durable and fire-retardant PC materials
- IP66 rated
- Impact resistant to 1 meter
Specifications
Dimensions: 129.3mm×60.7mm×31.2mm (5.09″×2.39″×1.23″)Weight: 136g (4.8oz)
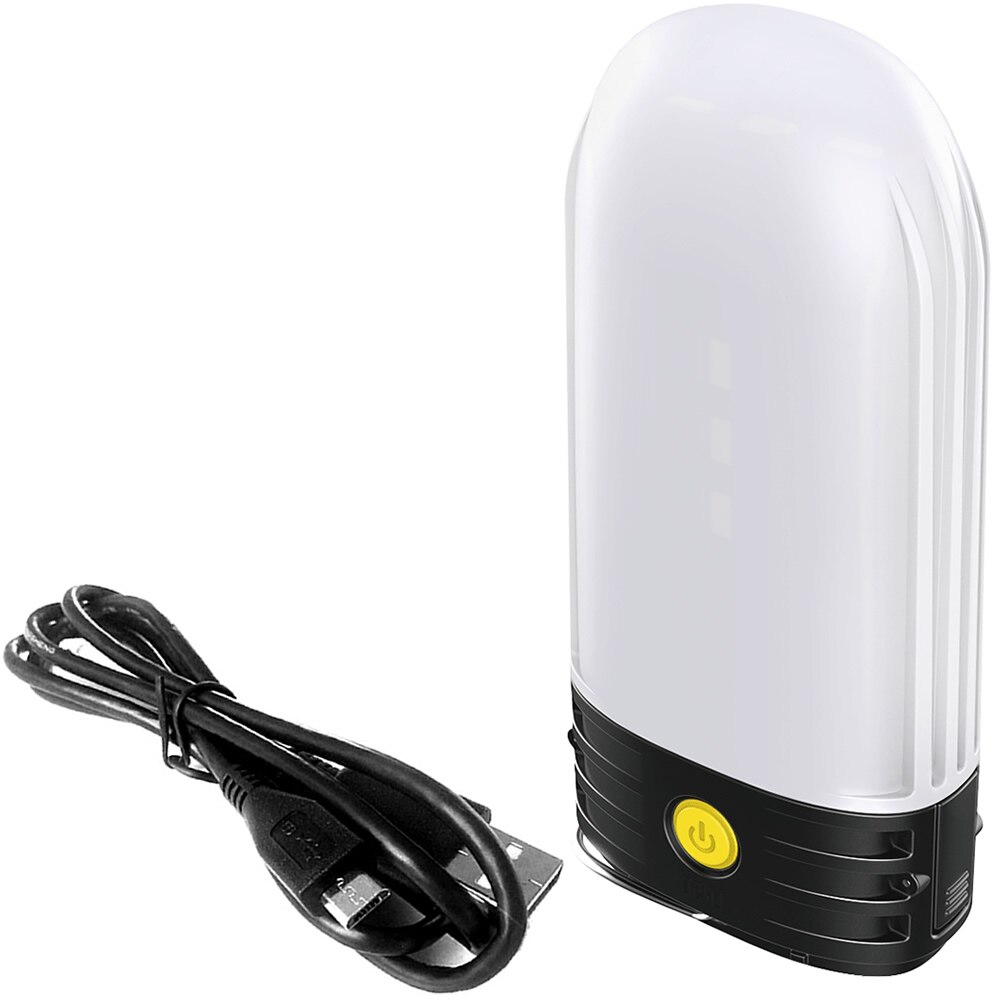
Accessories
USB-C Charging Cable, Spare O-ring (for the diffuser),18650/CR123 Battery Magazine x 2
Battery Options
| Type | Nominal Voltage | Compatibility | Rechargeability by LR60 | |
| 21700 Rechargeable Li-ion Battery (Button-topped) | 21700 | 3.6V/3.7V | Y
(Recommended) |
Y
(Rechargeable) |
| 18650 Rechargeable Li-ion Battery | 18650 | 3.6V/3.7V | Y
(Compatible) |
Y
(Rechargeable) |
| Primary Lithium Battery | CR123 | 3V | Y
(Compatible) |
N
(Not Rechargeable) |
| Rechargeable Li-ion Battery | RCR123 | 3.6V/3.7V | Y
(Compatible) |
N
(Not Rechargeable) |
| 21700 Rechargeable
Li-ion Battery (Flat-topped) |
21700 | – | N
(Incompatible) |
N
(Not Rechargeable) |
Note:
- The USB output function is not available when using CR123 and RCR123 batteries.
- NITECORE 21700 i Series Batteries are not compatible with the LR60.
- It is recommended to use 21700 batteries with a length shorter than 76mm (2.99″).
Technical DataUsing
2 x 21700 batteries
| HIGH | MID | LOW | BEACON | SOS | |
| Brightness | 280 Lumens | 75 Lumens | 6 Lumens | 280 Lumens | 280 Lumens |
| Runtime | 16h | 32h | 150h | ─ | ─ |
| Beam Distance | 28m | 14m | 4m | ─ | ─ |
| Peak Beam Intensity | 54cd | 15cd | 1cd | ─ | ─ |
| Impact Resistance | 1m | ||||
| Rating | IP66 |
Note: The stated data is measured using 2 x 21700 Li-ion battery (5,000mAh) under laboratory conditions when all illuminable directions of the product are turned on.The data may vary in real world use due to different battery usage or environmental conditions.
Using 2 x 18650 batteries:
| HIGH | MID | LOW | BEACON | SOS | |
| Brightness | 280 Lumens | 75 Lumens | 6 Lumens | 280 Lumens | 280 Lumens |
| Runtime | 11h | 22h | 100h | ─ | ─ |
| Beam Distance | 28m | 14m | 4m | ─ | ─ |
| Peak Beam Intensity | 54cd | 15cd | 1cd | ─ | ─ |
| Impact Resistance | 1m | ||||
| Rating | IP66 |
Note: The stated data is measured using 2 x 18650 Li-ion battery (3,500mAh) under laboratory conditions when all illuminable directions of the product are turned on.The data may vary in real world use due to different battery usage or environmental conditions.
Battery Installation
Charging Function

Battery Installation
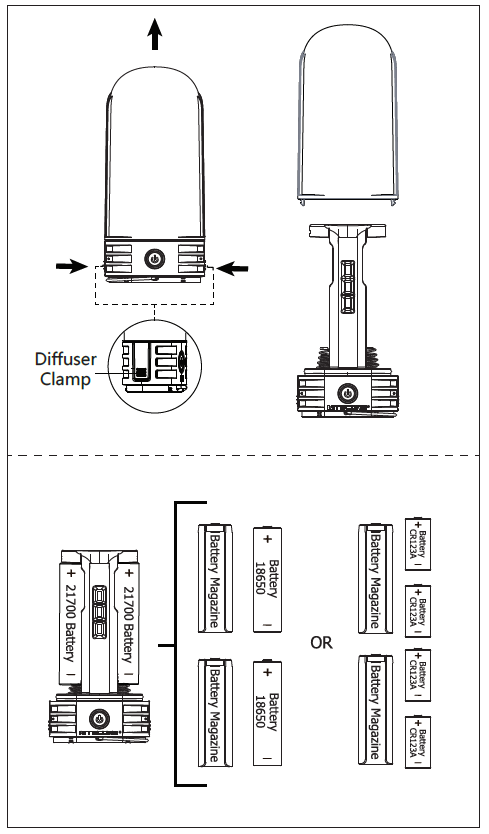
- As illustrated, press and hold both the diffuser clamps located on both sides of the LR60, and pull up to remove the diffuser
- Insert the batteries according to the polarity marks on the slots. (The LR60 can also be powered with 1 x 21700/18650 battery or 2 x CR123/RCR123 batteries but with lower )
- Put back the diffuser until a click is heard to indicate that the diffuser is fully clamped
Warnings:
- The LR60 is limited to charging button-topped 21700 Li-ion rechargeable batteries or 18650 in battery magazines only
- DO NOT mix batteries of different types, power levels, brands or models
The LR60 is equipped with dual power buttons located on both sides of the base which perform the same functions.
On / OffOn: When the light is off, press and hold both buttons until the LOW Level is accessed.Off: When the light is on, short press both buttons to turn it off.
Brightness LevelsWhen the light is on, short press either button to cycle through the following brightness levels: MID – HIGH – LOW.
Illuminable Direction SettingsThe LR60 has 3 illuminable directions available (top and both sides) for different needs according to the surroundings. When the light is on, press and hold either button to cycle through the following direction settings: TOP – ONE SIDE – TOP+ONE SIDE – ALL. Release to select the current direction setting. (This function has mode memory. When reactivated, the LR60 will automatically access the LOW Level of the previous memorized direction setting.)
Special Modes (BEACON / SOS)When the light is off, press and hold both buttons to cycle through the following modes: LOW – BEACON – SOS. Release to select the current mode. Turning off the light will exit special modes.
Location IndicationThe LR60 is equipped with the Location Indication. With this function turned on, the blue indicator located at the top of the product will flash once every 2 seconds to indicate the location of the LR60. When the light is on, press and hold both buttons for over 2 seconds to turn off the light and access Location Indication. With 2 x 21700 Li-ion batteries, the standby time is approx. 6 months with Location Indication turned on and approx. 12 months with this function turned off. Reactivating the LR60 will turn off this function.
Power Indication
- When the battery is inserted, the blue indicator will flash to show the battery voltage (±0.1V). For example, when the battery voltage is at 4.2V, the power indicator will flash 4 times followed by a 1.5-second pause and 2 more flashes. Different voltages represent the corresponding remaining battery power levels:Note: This function only applies to the first put-in 1 x 21700/18650 battery or 2 x CR123/ RCR123 batteries. When using 2 x CR123/RCR123 in series, the indicator will show the averagevoltage between the two batteries.
- When the light is off, short press either button and the power indicator will flash to indicate the remaining power of the batteries:
- Flashing three times indicates that the power is above 50%.
- Flashing twice indicates that the power is below 50%.
- Flashing once indicates that the power is below 10%.
 Note: This function only applies to the first put-in 1 x 21700/18650 battery or 2 x CR123/ RCR123 batteries. When using 2 x CR123/RCR123 in series, the indicator will show the averagevoltage between the two batteries.
The batteries should be replaced or recharged when the output appears to be dim or the product becomes unresponsive due to low power.
Used as a Power Bank
USB Output
The LR60 is equipped with USB output to charge an external USB device as a power bank.Connect to an external device: Connect the LR60 to an external USB device via the USB charging cable through the USB output port to begin charging. (Output: 5V⎓3A / 9V⎓2A / 12V⎓1.5A)Output indication: During the output process, the blue indicator will turn on constantly.
Note: The light of the LR60 will automatically turn off when the USB output power reaches too high with the light on.
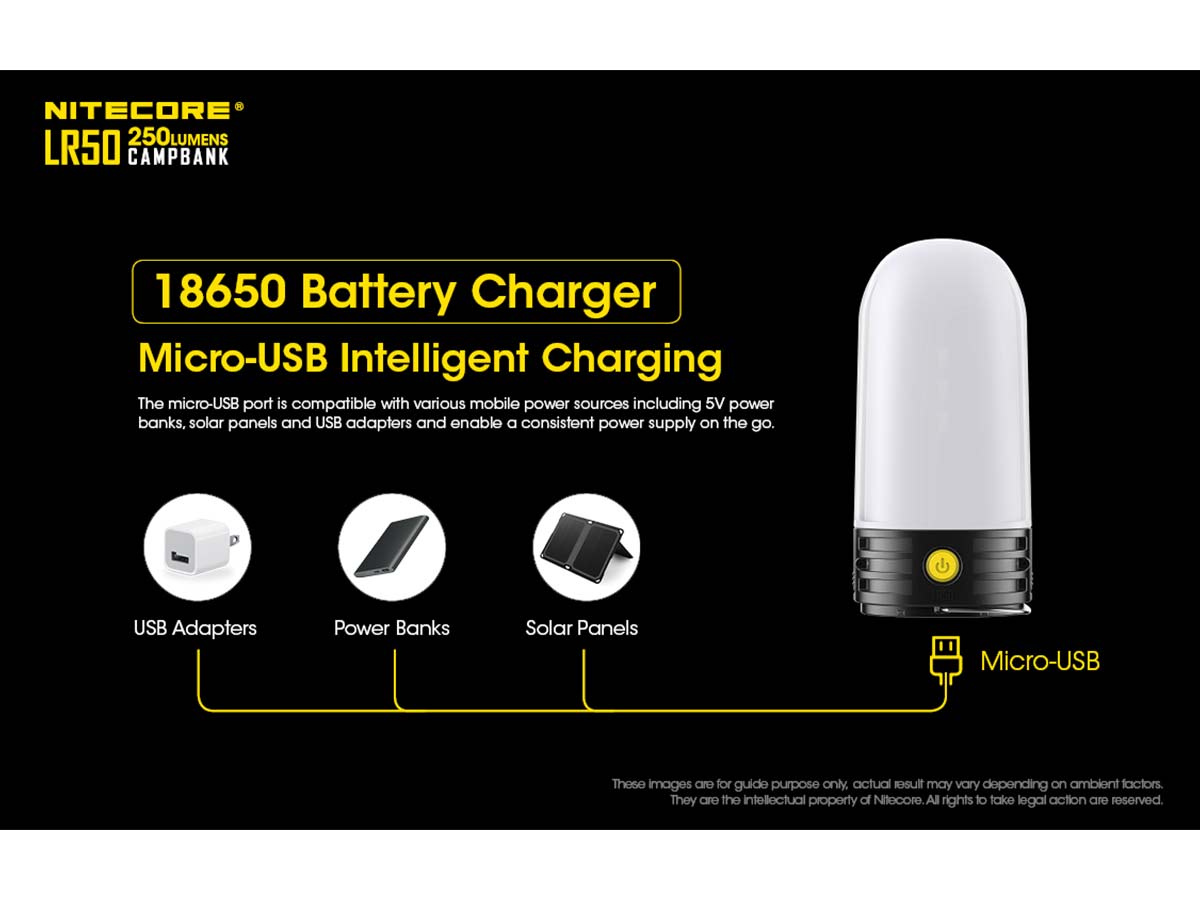
USB Charging
Connect to a power source: Connect the LR60 to an external power source (a USB adapter, a power bank or other USB charging devices) via the USB charging cable through the USB input port to begin charging. (Input: 5V⎓2A / 9V⎓2A / 12V⎓1.5A)Charging indication: During the charging process, the blue indicator will flash slowly. When the charging process is complete, the blue indicator will turn on constantly. The charging time for 2 x 21700 Li-ion batteries (5,000mAh) with fast charge is approx. 4.5 hours.Note: The light of the LR60 is still able to turn on during the USB input process. (HIGH Level excluded)
Over-Discharged Li-ion Battery Activation
The LR60 is capable of activating over-discharged Li-ion batteries with a protective circuit. After the battery insertion, the LR60 will test and activate the batteries when necessary.
Warnings:
- CAUTION! Possible dangerous radiation! Don’t look into the light! May be dangerous for your eyes.
- The product contains strong magnetic components. DO NOT put it close to objects that tend to suffer from magnetic interference.
- Ensure the battery(s) is/are inserted according to the polarity marks in the battery slots. The product will not work if the battery(s) is/are incorrectly inserted.
- The product is restricted to charging button-topped 21700 Li-ion rechargeable batteries or 18650 in battery magazines only. DO NOT use it with other types of batteries as this could result in battery explosion, cracking or leaking, causing property damage and/or personal injury.
- Moderate heat from this product is to be expected during the charging/discharging process, which is normal.
- Please DO NOT charge unprotected over-discharged Li-ion batteries, or it will result in fire or even battery explosions.
- DO NOT disassemble or modify the device as doing so will render the product warranty invalid and might damage the product.
References
[xyz-ips snippet=”download-snippet”]