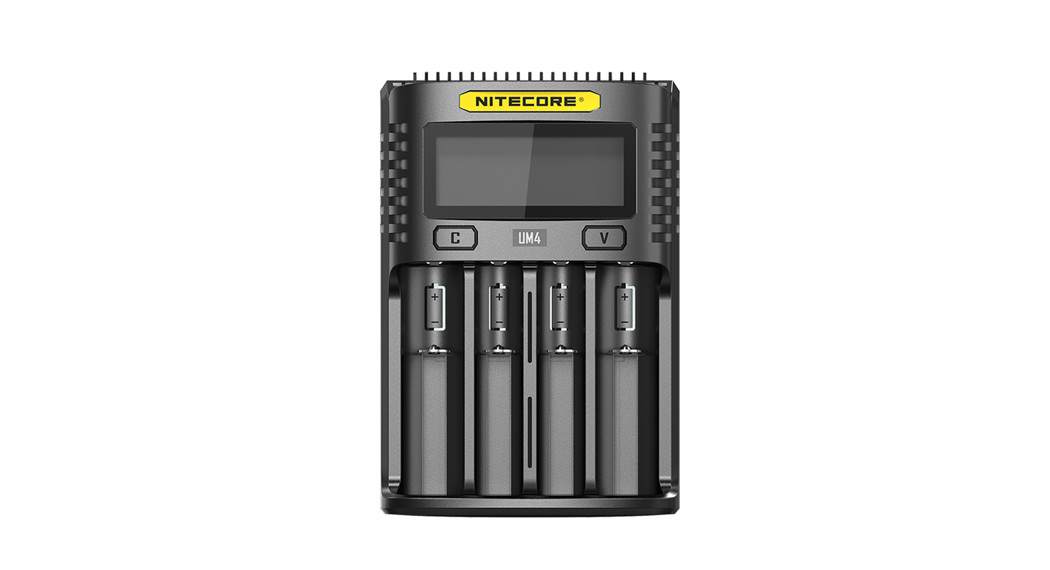
![]() KEEP INNOVATINGUM4Intelligent USBFour-Slot Charger■ Automatic and High-Speed Charging■ Real-time Information Display■ Over-Discharged Li-ion Battery Activation and IMR Battery Restoration
KEEP INNOVATINGUM4Intelligent USBFour-Slot Charger■ Automatic and High-Speed Charging■ Real-time Information Display■ Over-Discharged Li-ion Battery Activation and IMR Battery Restoration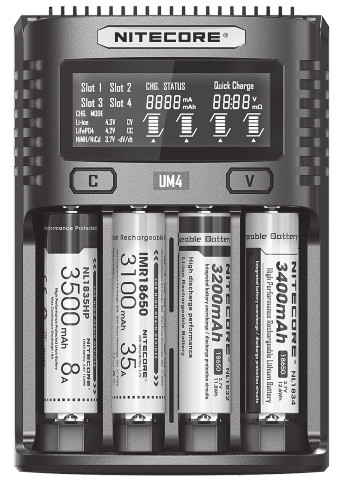
Features
- Intelligent USB Four-Slot Charger
- QC 2.0 input available
- Capable of charging 4 batteries simultaneously and controlling each slot independently
- Up to 1,500mA charging speed in a single slot
- Compatible with Li-ion and Ni-MH/Ni-Cd batteries with automatic detection
- Automatic detection of battery power level and automatic selection of the appropriate voltage and charging mode (LiFePO4 and 3.8V Li-ion batteries excluded)
- Automatic selection between 3 charging modes (CC, CV, and -dV/dt)
- Energy-efficient LCD display for real-time charging information
- Capable of manually selecting the charging cut-off voltage and the charging current
- Automatic detection of large/small capacity batteries and automatic selection of appropriate charging current
- Automatic termination upon charging completion
- Reverse polarity protection and short circuit protection
- Over-discharged battery activation
- Li-ion battery restoration
- Overtime charging protection
- Automatic detection of battery internal resistance and display of battery health
- Made from durable and fire-retardant PC materials
- Optimal heat dissipation design
- Certified by RoHS, CE, FCC, and CEC
- Insured worldwide by Ping An Insurance (Group) Company of China, Ltd.
Accessories
USB Charging Cable.
Specifications
|
Input: |
DC 5V/2A 9V/2A 18W (MAX) |
|
Output: |
4.35V±1% / 4.2V±1% / 3.7V±1% / 1.48V±1% QC Mode: 1,500mA*1 (MAX), 1,500mA*2 (MAX), 750mA*4 (MAX) |
|
Standard Mode: |
1,500mA*1 (MAX), 1,000mA*2 (MAX), 500mA*4 (MAX) |
|
Compatible with:IMR/Li-ion/LiFePO4: |
10440, 14500, 14650, 16500, 16340(RCR123), 16650, 17350, 17500, 17650, 17670, 17700, 18350, 18490, 18500, 18650, 18700, 20700, 21700, 22500, 22650, 25500, 26500, 26650, 26700 |
|
Ni-MH/Ni-Cd: |
M, MA, AMA, C, D |
|
Dimensions: |
159mmx 107mmx41mm (6.26″x4.21″x 1.61″) |
|
Weight: |
232.8g (8.21oz) (Charging cable not included) |
UM4 User Manual
Operating InstructionsConned to power source: connect the UM4 to an external power source (a USB adapter, a computer or other USB charging devices) via the USB charging cable.
Insert batteries: The UM4 features 4 independently controlled charging slots. Insert batteries of supported types into each slot according to the polarity marks on the slot. After battery installation, the UM4 begins charging and presents Battery Health by “Good” or “Poor”, Internal Resistance, Charging Current, Battery Voltage, Charged Volume and Charging Time on the LCD screen.
Battery Inspection and Error Report: The UM4 has reverse polarity protection and anti-short circuit function. If there are batteries inserted with polar reversed or short-circuited, the LCD screen of relevant slot will indicate “EE EE” and the power level display will flash to notify the user of an error.
Smart charging: The UM4 can choose appropriate charging currents based on intelligent detection about battery types and capacities. Manual charging current selection is also available. The UM4 is compatible with:
- 3.6V/3.7V Li-ion rechargeable batteries
- 3.8V Li-ion rechargeable batteries (4.35V±1% when fully charged)
- 1.2V Ni-MH/Ni-Cd rechargeable batteries
- 3.2V LiFePO4 batteries
Default SettingsThe default settings (not manually configured) for the UM4 are:
|
Battery Type and Capacity |
Standard Mode |
QC Mode |
|||
| DefaultChargingCurrent | Selectable Rangeof ChargingCurrent | DefaultChargingCurrent | Selectable Rangeof ChargingCurrent | ||
| Li-ion batteries(4.2V+1% when fully charged) | >1,200 mAh | 1,000mA | 300mA-1,500mA | 1,000mA | 300mA-1,500mA |
| <1,200 mAh | 500mA | 300mA-1,500mA | 500mA | 300mA-1,500mA | |
| Ni-MH/Ni-Cd batteries(1.48V+1% when fully charged) | AA/AAA | 500mA | 300mA-1,500mA | 500mA | 300mA-1,500mA |
| C/D | 1,000mA | 300mA-1,500mA | 1,000mA | 300mA-1,500mA |
Note: The UM4 can automatically select charging modes for Ni-MH/Ni-Cd batteries and 3.7V Li-ion batteries. LiFePO4 batteries and 3.8V Li-ion batteries require manual settings on charging cut-off voltages. For the battery whose length is >60mm (2.4″), the UM4 automatically identifies its capacity as >1,200mAh.
Button OperationsDuring the charging process:Short press the C button to cycle through the charging status of the 4 slots. Short press the V button to cycle through Battery Health, Internal Resistance, Charging Current, Battery Voltage, Charged Volume, and Charging time on the LCD screen. Long press the C button to enter the Charging Setting Mode. Long press the V button to enter Restoration Mode. (Only effective to over-discharged IMR batteries)
After entering the Charging Setting Mode:Short press the C button to switch to different setting parameters (Charging Current and Cut-Off Voltage). Short press the V button to increase with a 100mA increment each time when setting the Charging Current, or to switch to different battery types and voltage readings when setting the Cut-Off Voltage. Long press the V button to directly access the maximum setting when setting the Charging Current. Long press the C button to save and exit the Charging Setting Mode
Note: Perform no action in 10 seconds to exit the Charging Setting Mode without saving and return to the previous settings.
Charging Voltage SettingsThe UM4 is compatible with 3.6V/3.7V Li-ion and Ni-MH/Ni-Cd batteries with automatic detection and adoption of the suitable charging voltage. For LiFePO4 batteries and 3.8V Li-ion batteries, please follow the steps below for charging voltage settings:
- After the battery is inserted and the charging process begins, short press the C button to select the correct slot and long-press the C button to enter Charging Setting Mode.
- After entering Charging Setting Mode, short press the C button. When the screen shows the flashing text “CHG. MODE”, short press the V button to select the correct charging voltage (3.7V/4.2V/4.3V).
- For LiFePO4 batteries, the voltage needs to be set to 3.7V. For 3.8V Li-ion batteries, the voltage needs to be set to 4.3V.
- When the setting is finalized, long-press the C button to save and exit the Charging Setting Mode.
Charging Current SettingsPlease follow the steps below for charging current settings:
- After the battery is inserted and the charging process begins, short press the C button to select the correct slot and long-press the C button to enter Charging Setting Mode.
- After entering Charging Setting Mode, the screen will show the flashing text “CHG. STATUS”. Short press the V button to increase the charging current with a 100mA increment each time. Long press the V button to directly access the maximum setting.
- When the setting is finalized, long-press the C button to save and exit the Charging Setting Mode.Note: When the input power is insufficient and a large charging current is set, the charger will automatically adopt the intelligent current distribution according to the input power.
QC Charging ModeThe UM4 is QC 2.0 input available. When the charger is powered by a QC supportive device or connected to a QC adapter, the screen will show “Quick Charge” and the single slot max output will achieve 1,500mA.
Automatic Battery Internal Resistance DetectionWhen the UM4 is on and the battery is installed, it will automatically detect and display the Internal Resistance below the “CHG. STATUS”. When the Internal Resistance is below 250mQ, it will show “Good” on the screen. When it is above 250mQ, it will show “Poor” on the screen to indicate that the battery should be replaced.
Charged Volume CalculationDuring the charging process, the system will automatically calculate and display the Charged Volume below the “CI-1G. STATUS”.
Anti-short Circuiting and Reverse Polarity ProtectionIf there are batteries inserted with polar reversed or short-circuited, the screen will flash to show “EE EE”.
Energy Saving FunctionIf there is no action to the buttons or batteries in 3 minutes, the screen will automatically go dim to save energy. Perform any action to light up the screen.
Over-Discharged Li-ion Battery ActivationThe UM4 is capable of activating over-discharged U-ion batteries with a protective circuit. After battery installation, UM4 will test and activate the battery before charging. When a battery is detected as damaged, the screen will show “EE EE”.
Over-Discharged IMR Battery RestorationWhen an over-discharged IMR battery is inserted, the screen will show “EE EE”. In this case, long press the V button to enter Restoration Mode. After that, the charging process will continue. The battery should be replaced if it fails to be restored after several attempts. NOTE: When attempting to restore an IMR battery, reverse polarity protection is temporarily disabled. Please ensure batteries are correctly inserted. Failing to do so may result in fire or explosion.
Overtime Charging ProtectionThe UM4 will separately calculate the charging time of each battery. When the charging time exceeds 20 hours in one slot, it will automatically cease the charging process of this slot and display “END” below the “CHG. STATUS”. This is to prevent possible overheat or even explosion due to battery quality issue.
Precautions
- The charger is restricted to charging U-ion, IMR, LIFePO4, Ni-MH/Ni-Cd rechargeable batteries only. DO NOT use the charger with other types of batteries as this could result in battery explosion, cracking or leaking, causing property damage and/or personal injury.
- Moderate heat from this product is to be expected during the charging process, which is normal.
- Ambient Temperature of Usage: -1040°C (14104°F); Temperature of Storage: -2060°C (-4-440°F)
- Carefully read all labels on the device to ensure batteries are installed correctly.
- Please connect this charger to power supplies with the input voltage stated in the specifications of the user manual. If the input voltage is too low or too high, it may lead to malfunctions or even a fire.
- DO NOT charge batteries if there is any sign of faulty or short circuit.
- The charger is designed for adults. Use of the charger by kids under age must be under supervision. The operation, using, or cleaning of the charger may NOT be done by kids aged 8 years or younger.
- DO NOT leave the product unattended while it is connected to a power supply. Unplug the product at any sign of malfunction.
- Please make sure the correct program and settings are chosen and set. Incorrect program or setting may damage the charger, or cause fire and explosion.
- DO NOT attempt to charge primary cells such as Zinc-Carbon, Lithium, CR123A, CR2, or any other unsupported chemistry due to risk of explosion and fire.
- DO NOT charge a damaged IMR battery as doing so may lead to charger short-circuit or even explosion.
- DO NOT charge or discharge any battery having evidence of leakage, expansion/swelling, damaged outer wrapper or case, color-change or distortion.
- Use the original adapter and cord for power supply. To reduce the risk of damage to the power cord, ALWAYS pull by the connector rather than the cord. DO NOT operate the charger if it appears damaged in any way.
- DO NOT store or use the product in an environment where the temperature is extremely high / low or changes rapidly, or in a confined area with a high temperature.
- Store the device in ventilated areas. DO NOT use the device in moist environment and keep away from any combustible materials.
- Avoid any shock or impact to the device.
- DO NOT place any conductive or metal object in the device to avoid short drcuiting and explosions.
- DO NOT overcharge or over-discharge the batteries. Please recharge the battery as soon as the power runs out.
- Unplug the device and remove all batteries when it is not in use.
- DO NOT disassemble or modify the device as doing so will render the product warranty invalid. Please refer to the warranty section in the manual for complete warranty information.
- DO NOT misuse in any way! Use for intended purpose and function only.
Disclaimer
This product is globally insured by Ping An Insurance (Group) Company of China, Ltd. NITECORE shall not be held responsible or liable for any loss, damage or claim of any kind incurred as a result of the failure to obey the instructions provided in this user manual.
Warranty Details
Our authorized dealers and distributors are responsible for warranty service. Should any problem covered under warranty occurs, customers can contact their dealers or distributors in regards to their warranty claims, as long as the product was purchased from an authorized dealer or distributor. NITECORE’s Warranty is provided only for products purchased from an authorized source. This applies to all NITECORE products. To be qualified for a warranty, please refer to the “IMPORTANT WARRANTY NOTICE” section on top to validate your product. Any DOA / defective product can be exchanged for a replacement through a local distributor/dealer within the 5 days of purchase. After 15 days, all defective/malfunctioning NITECORE® products can be repaired free of charge for a period of 12 months (1 year) from the date of purchase. Beyond 12 months (1 year), a limited warranty applies, covering the cost of labor and maintenance, but not the cost of accessories or replacement parts.
The warranty is nullified if the product(s) is/are:
- broken down, reconstructed and/or modified by unauthorized parties
- damaged from wrong operations (i.e. reverse polarity installation, installation of non-rechargeable batteries or failure to obey the warnings)
- damaged by batteries leakage.For the latest information on NITECORE® products and services, please contact a local NITECORE® distributor or send an email to [email protected].
※ All images, text, and statements specified herein in this user manual is for reference purposes only. Should any discrepancy occur between this manual and information specified on www.nitecore.com, information on our official website shall prevail. SYSMEX Innovations Co., Ltd. reserves the right to interpret and amend the content of this document at any time without prior notice
Safety Instruction for Lithium-ion Batteries
- Charging VoltageLithium-ion (Li-ion) batteries have strict requirements on voltage control. Charging Li-ion batteries with electric voltage beyond safety standards can lead to battery damage and explosion.(1) 3.7V Li-ion Batteries / IMR Batteries3.7V Li-ion batteries are the most common rechargeable Lithium batteries. The skins of these batteries are often marked with 3.6V/3.7V signs. If our chargers judge that an inserted battery is a Li-ion battery, the battery will be automatically charged in 4.2V standard charging mode. You do not need extra voltage settings for these types of batteries.(2) 3.8V Li-ion Batteries3.8V Li-ion batteries are comparatively rare. It usually has a 3.7V mark on its skin. Normally its seller will inform its buyer that it needs to be charged with 4.35V power. When charging this type of battery, please manually set the charging voltage to 4.3V, otherwise, the charger will charge at 4.2V by default, and cannot provide adequate charging voltage.(3) 3.2V LiFePO4 Batteries3.2V LiFePO4 batteries have LiFePO4 and/or 3.2V marks on the skin. Be careful with this type of battery. Without manual setting, our chargers will charge this type of battery with 4.2V and will damage or even explode the battery with excessive charging voltage. You need to manually set the charging voltage to 3.7V for safe charging.
- Charging CurrentFor all rechargeable Lithium batteries (including Li-ion, IMR and LiFePO4 batteries), we suggest not using current larger than 1C* for charging. For small-capacity batteries, the charging current must be smaller than 1C.
* C=Capacity of a battery. For example, 1C in a 2600mAh rechargeable Lithium battery is 2.6A. 1C in a 3400mAh rechargeable Lithium battery is 3.4A.Excessively large charging current will lead to a great amount of heat, and consequently battery damage and explosion.
![]() Warning: Our chargers automatically judge and select charging current by the batteries’ length. For somelong but small capacity batteries (i.e. 12650, 13650, 14650, 16650), please manually set the appropriate charging current (smaller than 1C).
Warning: Our chargers automatically judge and select charging current by the batteries’ length. For somelong but small capacity batteries (i.e. 12650, 13650, 14650, 16650), please manually set the appropriate charging current (smaller than 1C).
3. Precautions(1) DO NOT short circuit the battery in any way.(2) DO NOT use a 3.7V/3.8V Lithium battery when its voltage is lower than 2.8V, otherwise, it can be over-discharged, and/or prone to an explosion at next charging.(3) We strongly recommend batteries with protective circuits. For batteries without protective circuits (such as IMR batteries), please stay alert for over-discharge and short circuits.(4) DO NOT discharge a battery with a discharging current larger than its maximum rated current.
4. Long-term StorageThe best storage voltage for 3.7V/3.8V rechargeable Lithium batteries is 3.7V. Voltage too low or too high can damage your battery during storage. You can discharge a battery to 3.7V, or charge it to 3.7V in a charger before you keep it in long-term storage.
Validation code and QR code on package can be verified on NITECORE website.
 The charger must be used with NITECORE’s official cords. Official cords are identified with clearly printed NITECORE on the plug. During charging, third party cords can cause malfunction, overheat and even fire on the charger. Damages from using unofficial cords cannot be covered by an official warranty. The charger is restricted to charging Li-ion, IMR, 3.2V LiFePO4, Ni-MH/Ni-Cd rechargeable batteries only. DO NOT use the charger with other types of batteries as this could result in battery explosion, cracking or leaking, causing property damage, and/or personal injury.
IMPORTANT NOTICE CONCERNING WARRANTY SERVICE
 Thank you for purchasing! Before using this charger, please find your verification code on the package box, and go to http://charger.nitecore.com/validation (or scan the QR code beside the verification code to visit on your mobile phone). Type in your verification code and personal information as required, and submit the page. After verification, Nitecore will send you a warranty service email. This email and your registration email address are essential to your possible warranty application. Before you complete the warranty service registration, you cannot enjoy our warranty service for your purchase.
References
[xyz-ips snippet=”download-snippet”]