
Noma Digital Timer

Noma Digital Timer
MODEL NO: 52-8867-6
Know your product
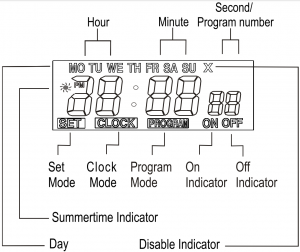
FRONT

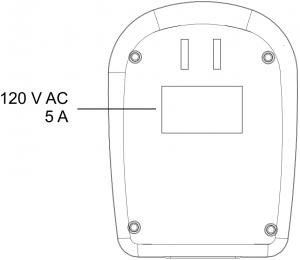
BACK
Introduction
Thank you for buying this Programmable Timer! By setting programs, you can tum on and off any plugged-in electrical appliances at your own selected time.
Operation of this Timer is simple. For optimal use, please read and follow the instructions carefully.
Features
- Real-time clock with Weekday, Hour, Minute and Second reading
- Display in selectable 12 or 24 hour display format
- 6 on/off program pairs with Weekday, Hour and Minute setting
- Settings can operate individually either on a specific day, Monday to Friday, Monday to Saturday or every day
- Daylight Savings Time
- Manual on/off
- Master/individual disable for pre-set program(s)
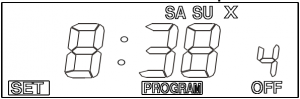
LCD Display
Battery Installation
The 1.5 V batteries have already been installed in the Timer. To activate, completely remove the piece of ribbon that is protruding from the battery compartment.
Note: The batteries serve to back up the clock and programs while the Timer is unplugged. The battery life is around 1 year when the Timer is not connected to the power outlet. If you plan to leave the Timer unplugged for a long period of time, you may want to remove the batteries from the Timer.
Reset Function / Abnormal Display
When an abnormal or blank display appears, or if you want to clear all programs, use a round object such as a ball-point pen to push the RESET key. After reset, clock and all programs will be cleared.
If the display is dim or abnormal, you should replace the button cell batteries.
Operation
The various program modes of the Timer are arranged in a continuous pattern as shown below:
Clock → Pgm.1 On → Pgm.1 Off → Pgm.2 On → Pgm.2 Off → Pgm.6 On → Pgm.6 Off → Clock…
The PROG symbol will light up to denote Program is being displayed.
Press either the ![]() or
or ![]() & key to scroll through clock and programs. If the key is pressed for more than 1 second, the key will repeat itself.
& key to scroll through clock and programs. If the key is pressed for more than 1 second, the key will repeat itself.
To return to the Clock display from other modes, simply press both ![]() and
and ![]() keys together.
keys together.
Setting the Clock
- To set the clock, press the SET key while the clock is displayed. SET will appear on the display and the day of the week will be flashing.
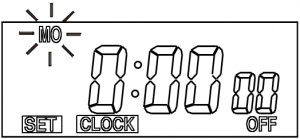
- Press
 or key to select the correct day. Hold the key and it will skip through the days.
 - Once the correct day has been selected press SET key and Hour will be flashing.
- Pressor key to select the hour
- Press SET key and Minutes will be flashing.
- Press or key to select the minutes
- Press SET key and Seconds will be flashing
- For the setting of Seconds, either or key will set the second to 00.
- Press SET to exit the clock setting function. The SET display will disappear and the Timer will return to the normal clock display.
To change between 12 or 24 hour display, press the ON/OFF & SET keys together briefly to toggle between 12 hour and 24 hour display.
NOTE: Pressing ON/OFF alone will disable all programs by placing an X on the screen. Pressing ON/OFF again will make the disappear and enable all programs again. This process is covered in depth on Page 9.
Setting the Program
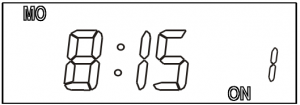
With this Timer you can set up to 6 On/Off Programs. To set each program, please see the example shown below:
Example of setting program 1:
MO 8:15 ON / MO 15:45 OFF
In this example, the Timer will be turned on Monday at 8:15 and off at 15:45.
- Press or key until PROG 1 ON appears on the Display.
- Press SET key and SET will appear on the display and Weekday will be flashing at the top of the screen.
- Press key to select the day(s) for Program 1 to be active. The day displayed will sequence through MO-SU (everyday), MO to SU (individually), MO to FR, then MO-SA, SA-SU and repeat again.
In this example, the day would be Monday.
- Press the SET key when MO appears on the display.
- Hour should be flashing. Use or key to change The hour to 8, then press the SET key.
- Minute should be flashing. Change it to 15. Press SET key to finish the setting of Program 1-On.
- Press key and PROG 1 OFF appears at the display. Use the same method to set the off time.
To set more programs, press the ![]() key and PROG 2 ON appears. Repeat the above procedures to set all Programs. If no key is pressed for 1 minute, the Timer will return to Clock display automatically.
key and PROG 2 ON appears. Repeat the above procedures to set all Programs. If no key is pressed for 1 minute, the Timer will return to Clock display automatically.

Summer/ Winter Time
Pressing and holding both ![]() and
and ![]() keys at the same time in the Clock mode display will change the current time to Summertime mode. The hour will advance by one and the symbol
keys at the same time in the Clock mode display will change the current time to Summertime mode. The hour will advance by one and the symbol ![]() will light up to denote that the Summertime is activated. Pressing and holding the 2 keys again in Clock mode will return to normal time.
will light up to denote that the Summertime is activated. Pressing and holding the 2 keys again in Clock mode will return to normal time.
Manual On/ Off
The timer can be turned on or off at anytime by using the ON/OFF key without affecting the programs. The flashing ON or OFF will indicate that the Manual On/Off function is activated.
Activating the Disable / Master Disable Function
This function allows you to disable any or all of the preset On/Off programs. To disable one particular program, display the program you wish to disable, then press the SET key. The display will be flashing and the word SET will light up.
Press the ON/OFF key to disable the program and the X symbol will appear to indicate that particular program is disabled.
Note: If the display is still flashing and there are no changes to be made on the preset program time, press the SET key until the display is not flashing. Use this function to disable as many available preset programs as you choose.
To disable all 6 programs, press the SET key while in Clock display, then press the ON/OFF key. The X symbol will appear on the Clock Display Mode and indicate that all preset programs are disabled.
To cancel this Disable function, just use the same method as above to turn off the X symbol.
Caution
This timer is equipped with a 2-pin polarized receptacle. An appliance with a 2-pin power cord is suitable to connect with it. Before plugging the timer in, it is recommended to view the correct polarization of pin. Do not force the plug or power cord into the receptacle. Do not remove the ground pin of a 3-pin plug to plug into the timer receptacle.
Technical Specifications
Program: 6 programs per day or per week
Minimum switching time: 1 minute
Ratings: 120V AC 5A
Maximum load: 600 W
WARRANTY
This Noma® product carries a 1 (one) year warranty against defects in workmanship and materials. Trileaf Distribution agrees to replace the defective product free of charge within the stated warranty period, when returned by the original purchaser with proof of purchase. This product is not guaranteed against wear or breakage due to misuse and/or abuse.
Customer Service
1-888-468-6876
DOWNLOAD RESOURCES
- Noma Digital Timer Instructions –
- Noma Digital Timer Instructions –
FAQ’S
The Noma Digital Timer with Remote Control has a remote control that can be used to turn on and off the device. The Noma Digital Timer does not have a remote control.
You can either keep pressing the button to change the hours or hold the button. And as well just change automatically. By itself you hold it.
CLEAN CONNECTORS IF NEEDED. DISCONNECT POWER FOR 30 SECONDS AND REAPPLY, SOMETIMES A POWER SURGE CAN LOCK UP THE ELECTRONICS AND THIS WILL RESET IT. IF YOU HAVE AN OLDER TIMER WITH AN INTERNAL BACK UP BATTERY IN IT THE BATTERY COULD BE WEAK OR DEAD.
The actual timer there’s a little black button on top of the week get something pointy. You can use a sim card remover you can use anything. Just hold down like that.
The first thing you’re going to want to do is press the r button to reset the device. Then hit program twice until you see the clock icon appear in the bottom left hand corner of the screen.
The digital timer have an internal battery backup that can maintain the clock and timing program during power outages that may total a hundred hours or more summed over the course of one year. The battery should be easy to change on a yearly basis, i.e., a standard AA battery.
To Set the Current Time: Press the HOUR button as many times as necessary to advance the display the correct time. …To Program the Timer: Press the PROGRAM button once, the letter P will flash. …To Connect/Operate the Timer: Plug device in to the timer and turn the device on.
Check for a tripped circuit breaker at your main electrical box when your outdoor power outlet stops working. GFCI outlets protect your outdoor electrical circuit, so check that outlet next to see if it suffered a trip. Rain and other weather can cause the same problems if the outdoor outlet gets wet.
Programming & Operating InstructionsPlug the lighting that is to be controlled into the timer’s receptacle. If the lighting has its own ON/OFF switch, set the switch to the ON position. 3. The “F” symbol will show on the display. This is confirmation that the unit is in “OFF” mode.
So right now the time is 2 pm. So put 2 pm. And then press the mode once you want to put your program start time so right now the p is blinking you have to tell.
The Noma Digital Timer with Countdown Timer has a countdown timer that can be used to count down from any hour, minute and second to zero. The Noma Digital Timer does not have a countdown timer.
The Noma Digital Timer with Alarm Clock has an alarm clock that can be set to go off at any hour, minute and second of any day of the week. The alarm clock will sound for 5 minutes or until turned off manually by pressing any button on the device or by disconnecting power from it. The alarm clock will sound for 5 minutes or until turned off manually by pressing any button on the device or by disconnecting power from it.
[xyz-ips snippet=”download-snippet”]