NORTHERN TOOL EQUIPMENT 200785 Rev2 Top Mount Box Mounting
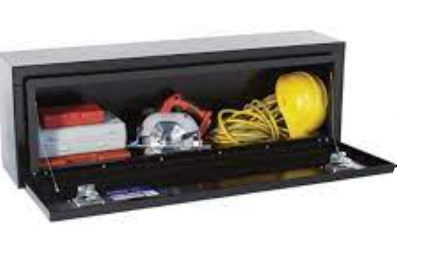
Read these instructions to familiarize yourself with assembly and installation. This tool box is designed for certain applications only.
NOTE:
- If your truck has a bed liner, use these instructions as a guide only.
- Due to the many differences in bed liner thickness and fit, longer fasteners are highly recommended.
- You will need to ensure that your new truck box is mounted securely to the truck, not the bed liner.
Caution: This tool box must be securely mounted to prevent movement or shifting.Warning: Any leaking caused by unsealed holes in the box bottom will void the warranty.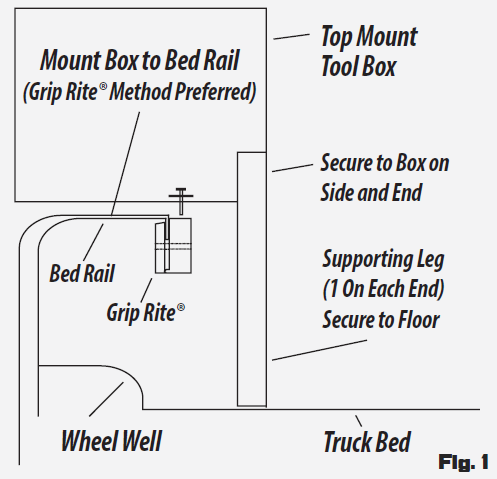
MOUNTING WITH GRIP RITES®
(Not included, sold separately. Grip Rites® not required for proper installation.)
- Place the tool box on top of the truck bed rail and move it to the desired position.
- Support the back of the tool box while mounting to the truck.
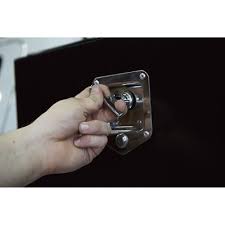
- Secure (attach) the box to the top of the truck bed rail. Most users prefer to use optional Grip Rite® no hole mounts. Instructions follow:
- Measure for location then mount Grip Rites® to the truck bed rail as shown in the illustration and on the Grip Rite® package.
- Set the tool box on the bed rail and sight down the front to determine where the Grip Rite® will line up under the front lip.
- Measure from the front of the tool box to the sighted line where the Grip Rite® lines up.
- Transfer the dimension just taken less 1/4” (for inside compensation) to the mounting surface inside the tool box.
- The Grip Rite® mounts have holes spaced 3 3/8” apart, and should be marked as such along the line just made. These will be the locations to drill the holes in your tool box.
- Drill to a finish hole size of 3/8” at the locations just indicated.
- Finish mounting the tool box to the Grip Rites® using the screws and washers provided.
- Position the support leg against the back and side of the tool box.
- Secure the support leg to the tool box using the hardware provided. Be sure to secure the leg on the back and side surfaces of the tool box.
- Secure the support leg to the bed of the truck.
- Repeat for the support leg on the opposite end.
MOUNTING WITH SCREWS
- Place the box on top of the truck bed rail and move it to the desired position.
- Support the back of the box while mounting to the truck.
- On opposing ends of the tool box, drill 1/4″ into the truck body. Secure it with 3/8″ sheet metal screws. Alternatively, self-tapping screws can be used for mounting. Secure no more that one screw at each end of the box. Using more than one screw on each end of the tool box will void the warranty for the tool box.
- Follow steps 4 through 7 listed above.
LIMITED WARRANTY
Northern Tool and Equipment Company, Inc. (“We” or ‘”Us”) warrants to the original purchaser only (“You” or “Your”) that the Northern Tool + Equipment product purchased will be free from material defects in both materials and workmanship, normal wear and tear excepted, for five years from date of purchase. The foregoing warranty is valid only if the installation and use of the product is strictly in accordance with product instructions. There are no other warranties, express with this limited warranty, Your sole and exclusive remedy is that We will, at our sole option and within a commercially reasonable time, either replace the product or product component without charge to You or refund the purchase price (less shipping). This limited warranty is not transferable.
Limitations on the WarrantyThis limited warranty does not cover: (a) normal wear and tear; (b) damage through abuse, neglect, misuse, or as a result of any accident or in any other manner; (c) damage from misapplication, overloading, or improper installation; (d) improper maintenance and repair; and (e) product alteration in any manner by anyone other than Us, with the sole exception of alterations made pursuant to product instructions and in a workmanlike manner.
Obligations of PurchaserYou must retain Your product purchase receipt to verify date of purchase and that You are the original purchaser. To make a warranty claim, contact Us at 1-800-222-5381, identify the product by make and model number, and follow the claim instructions that will be provided. The product and the purchase receipt must be provided to Us in order to process Your warranty claim. Any returned product that is replaced or refunded by Us becomes our property. You will be responsible for return shipping costs or costs related to Your return visit to a retail store.
Remedy LimitsProduct replacement or a refund of the purchase price is Your sole remedy under this limited warranty or any other warranty related to the product. We shall not be liable for: service or labor charges or damage to Your property incurred in removing or replacing the product; any damages, including, without limitation, damages to tangible personal property or personal injury, related to Your improper use, installation, or maintenance of the product or product component; or any indirect, incidental or consequential damages of any kind for any reason.
Assumption of RiskYour acknowledge and agree that any use of the product for any purpose other than he specified use(s) stated in the product instructions is at Your own risk.
Governing LawThis limited warranty gives you specific legal rights, ands you also may have other rights which vary from state to state. Some states do not allow limitations or exclusions on implied warranties or incidental or consequential damages, so the above limitations may not apply to You. This limited warranty is governed by the laws of the State of Minnesota, without regard to rules pertaining to conflicts of law. The state courts located in Dakota County, Minnesota shall have exclusive jurisdiction for any disputes relating to this warranty.![]()
[xyz-ips snippet=”download-snippet”]