NOSTALGIA RTOV2AQ Retro Toaster Oven
All products are trademarks of Nostalgia Products LLC. Worldwide design & utility patented or patents pending. © 2021 Nostalgia Products LLC.www.nostalgiaproducts.com(rev. 02/25/21 DL)
IMPORTANT PRECAUTIONS
- NEVER immerse appliance in water.
- NEVER use near water.
- NEVER use an abrasive sponge or cloth on the appliance.
- NEVER leave appliance unattended while in use.
- NEVER place anything other than what is being cooked in or on the appliance.
- Unplug unit from outlet when not in use and during cleaning.
- DO NOT operate this appliance with a damaged cord or plug, nor if the appliance ever malfunctions.
- DO NOT place appliance in a dishwasher.
- Keep out of reach of children.
- This appliance is NOT A TOY.
- Unsupervised young children and cognitively challenged individuals should never operate this appliance.
- Young children should be supervised while in proximity of the appliance to ensure that they do not play with it.
IMPORTANT SAFEGUARDS
Basic safety precautions should always be followed when using electrical appliances, including the following:
- Read all instructions before operating this appliance.
- To protect against electrical shock do not immerse cord, plug or any part of this appliance in water or other liquids.
- Close supervision is necessary when any appliance is used near children.
- Unplug from outlet when not in use, before removing parts and before cleaning.
- DO NOT operate any appliance with a damaged cord or plug, nor if the appliance has been damaged in any manner. Return the appliance to the nearest repair shop for examination or repair.
- The manufacturer does not recommend the use of accessory attachments. Use of accessory attachments may cause injuries.
- DO NOT use outdoors.
- DO NOT place on or near a hot gas or electric burner, nor in a heated oven.
- DO NOT use the appliance for other than its intended use.
- An appliance that is plugged into an outlet should not be left unattended while in operation.
- Check appliance for presence of foreign objects prior to use.
- DO NOT attempt to stick any utensils or other objects into the toaster while appliance is plugged in.
- A short power supply cord is provided to reduce the risk resulting from becoming entangled or tripping over a long cord.
- Longer detachable power supply cords can be used if care is exercised in their use.
- The marked electrical rating of an extension cord should be at least as great as the electrical rating of the appliance.
- This appliance has a polarized plug (one blade is wider than the other). To reduce the risk of electrical shock, this plug is intended to fit into a polarized outlet only one way.
INTRODUCTION
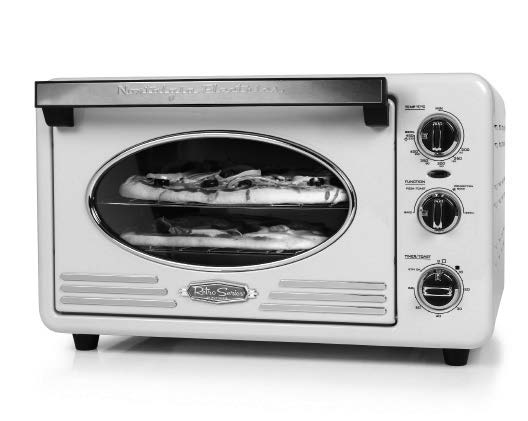
Thank you for purchasing the RETRO TOASTER OVEN from Nostalgia™! Now you can bake, toast, convection bake or broil a quick and energy efficient meal. Make everything from quick snacks to pizzas to toast and more. Check out the RECIPES section for tons of fun breakfast, lunch and dinner recipes!Features Include:
- 1500 Watts
- 22 L capacity holds two 12″ pizzas or 12 slices of toast
- Bake / Toast / Convection Bake / Broil functions
- Four stage heating selector: upper heating / lower heating / upper & lower heating / OFF
- Adjustable temperature between 200°F – 450°F
- Aluminum baking pan, two wire-baking racks & crumb tray
- Power light indicator
PARTS & ASSEMBLY
PARTS
Your RETRO TOASTER OVEN is fully assembled. 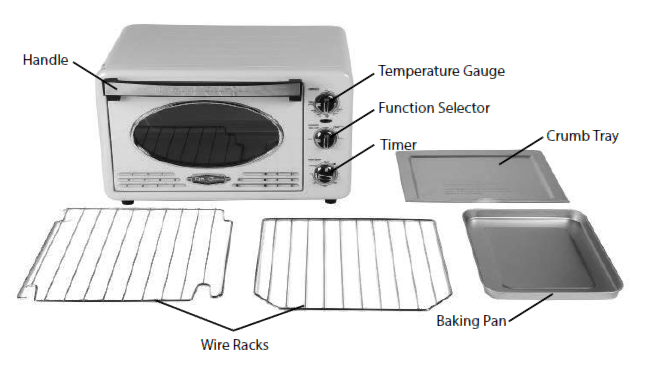
Control Panel
HOW TO OPERATE
Before you begin, wipe the outer housing and inner cavity wall with a damp cloth. Clean the Wire Racks, Crumb Tray and Baking Pan in hot, sudsy water.Place the RETRO TOASTER OVEN on a stable surface near an electrical outlet before starting. Make sure that the cord is away from any water source, then plug the appliance into an electrical outlet.Bake Function
- Open the oven door and insert the Grill Rack to the suitable rack slot, then close the oven door.
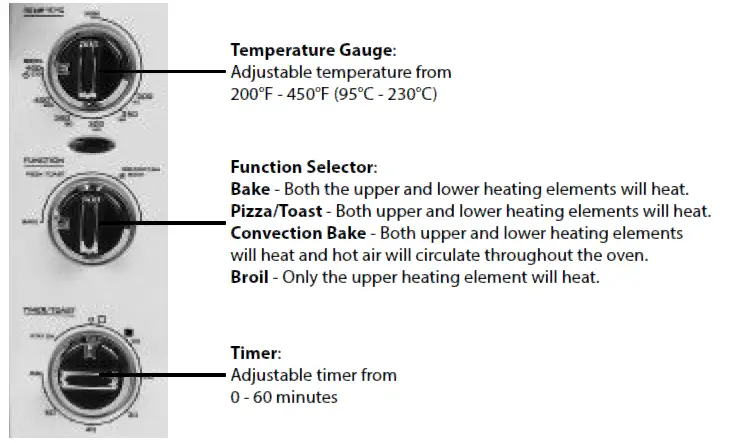
- Turn the Temperature Gauge to the desired temperature, then turn the Function Selector to the “BAKE” position.
- Turn the timer to 15 minutes to allow oven to preheat with the door closed.
- Once oven is preheated, place food on the Baking Pan using a hot pad or oven mitt. CAUTION: Interior of the toaster oven will be VERY HOT and contact may cause burns.
- Turn the timer to the desired cooking time. After setting the time, the power indicator light will illuminate.
- When the timer has expired, the timer bell will ring and the dial will be back to the “0”position. To stop the cycle at any time, simply turn the Timer to the “0” position and the timer bell will ring.
- Using a hot pad or oven mitt, carefully remove your food from the oven.
Pizza/Toast Function
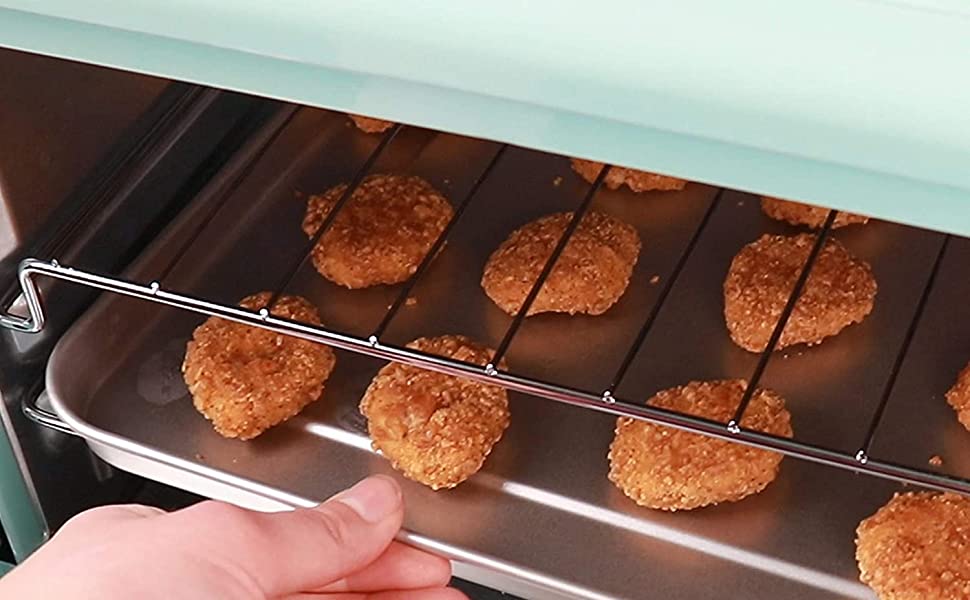
- Open the oven door, place the Grill Rack on the suitable rack slot, place up to six pieces of bread or two pizzas on the Wire Rack, then close the oven door. Bread should be evenly spaced on the Wire Rack so that it toasts evenly.
- Rotate the Temperature Gauge clockwise to “450°F/230°C”, and the Function Selector to “PIZZA/TOAST” position.
- Next, turn the Timer dial to the desired browning setting. A lighter toast corresponds to the symbol, while darker toast corresponds to the symbol.NOTE: Allow oven to preheat with the door closed for 15 minutes before putting pizza in the oven. Rotate pizzas 180° half way through the cycle for even cooking.
- After setting the timer, the power indicator light will illuminate. When the timer has expired, the timer bell will ring and the dial will be back to the “0”position. To stop the cycle at any time, simply turn the Timer to the “0” position and the timer bell will ring.
- Using a hot pad or oven mitt, carefully remove your food from the oven.
Convection Bake Function
- Open the oven door and insert the Grill Rack on the suitable rack slot, then close the oven door.
- Turn the Temperature Gauge to the desired temperature, then turn the Function Selector to the “CONVECTION BAKE” position.
- Turn the timer to 15 minutes to allow oven to preheat with the door closed.
- Once oven is preheated, place food on the Baking Pan using a hot pad or oven mitt.CAUTION: Interior of the toaster oven will be VERY HOT and contact may cause burns.
- Turn the timer to the desired cooking time. After setting the time, the power indicator light will illuminate.
- When the timer has expired, the timer bell will ring and the dial will be back to the “0”position. To stop the cycle at any time, simply turn the Timer to the “0” position and the timer bell will ring.
- Using a hot pad or oven mitt, carefully remove your food from the oven.
Broil Function
- Open the oven door and insert the Grill Rack on the suitable rack slot, then close the oven door.
- Turn the Temperature Gauge to the desired temperature, then turn the Function Selector to the “BROIL” position.
- Turn the timer to 15 minutes to allow oven to preheat with the door closed.
- Once oven is preheated, place food on the Baking Pan using a hot pad or oven mitt. CAUTION: Interior of the toaster oven will be VERY HOT and contact may cause burns.
- Turn the timer to the desired cooking time. After setting the time, the power indicator light will illuminate.
- When the timer has expired, the timer bell will ring and the dial will be back to the “0”position. To stop the cycle at any time, simply turn the Timer to the “0” position and the timer bell will ring.
- Using a hot pad or oven mitt, carefully remove your food from the oven.
By following these simple instructions, your RETRO TOASTER OVEN will be fun for friends, family and kids of all ages!
HELPFUL TIPS
OVERCOOKED / UNDERCOOKED FOODS
For overcooked or undercooked food, the temperature setting, time setting or Wire Rack may need to be adjusted or repositioned. Also, it is best to prevent heat loss while cooking and avoid opening the oven door frequently.Keep in mind that the RETRO TOASTER OVEN is smaller than a regular oven and will heat up faster and generally cook in shorter periods of time.In addition, frozen foods and thick meat will take longer to cook.
BURNING/SMOKING
A burnt smell coming from your RETRO TOASTER OVEN, may be due to food build-up inside the oven. Follow the directions under CLEANING & MAINTENANCE to clean the oven.
CLEANING & MAINTENANCE
Make sure the unit is unplugged and allow all parts to cool completely before cleaning.To prolong the life of your RETRO TOASTER OVEN, please follow these simple instructions for maintenance. Never place the appliance in a dishwasher.
- Wash the Wire Racks, Baking Pan, and Crumb Tray in warm, soapy water.
- Clean the outer surface with a soft, damp cloth.
- Dry all parts with a soft, non-abrasive towel or cloth.
- DO NOT use abrasive cleaning products as they may damage the unit.
- DO NOT wipe the heating elements.
RECIPES
Use your RETRO TOASTER OVEN to prepare quick, easy-to-serve meals! From breakfast to late night snacks, create your own masterpieces or follow the recipes below to become a toaster oven connoisseur.
WHOLE WHEAT BLUEBERRY CORNBREAD MUFFINS
- ½ cup buttermilk
- 1 large egg
- 2 Tbsp. of sugar
- 2 Tbsp. of unsweetened applesauce
- 1/3 cup cornmeal
- 2/3 cup of whole wheat flour
- 2 tsp. of baking powder
- ¼ tsp. of salt
- ½ tsp. cinnamon
- ½ cup of fresh blueberries
Method
- Using CONVECTION BAKE, preheat your RETRO TOASTER OVEN to 350°F as directed under HOW TO OPERATE.
- In a medium size bowl, mix together the flour, cornmeal, baking powder, cinnamon, and salt. Set aside.
- In a small bowl, whisk together the buttermilk, egg, applesauce, and sugar. Add the wet ingredients to the dry ingredients.
- Mix until just barely combined, then fold in the blueberries.
- Divide mixutre into 6 muffin cups and put in the toaster oven.
- Bake for 20 to 25 minutes.
BAKED APPLE BREAKFAST OATS
- 1 large apple
- 1/3 cup vanilla Greek yogurt
- 1/3 cup rolled oats
- 1 Tbsp. peanut butter
- Cinnamon
Method
- Using BAKE, preheat your RETRO TOASTER OVEN to 400°F as directed under HOW TO OPERATE.
- Cup an apple into ½ inch chunks and sprinkle generously with cinnamon.
- Bake in the toaster oven for 12 minutes.
- When apples are done baking, combine yogurt, rolled oats, and baked apples chunks in a bowl.
- Top with peanut butter and enjoy!
BAKED EGGS
- 4 eggs
- Butter
- 10 grape or cherry tomatoes
- 2 strips of bacon
- Cheese to grate
- ¼ tsp. Smoked paprika
- Salt
- Pepper
Method
- Using BAKE, preheat your RETRO TOASTER OVEN to 375°F as directed under HOW TO OPERATE.
- Cook the strips of bacon on the stove.
- Grease two ramekins with butter.
- Cut the tomatoes in half and divide among the dishes. Sprinkle with a little bit of salt.
- When bacon is nicely browned, blot off excess grease with paper towels and chop into small pieces. Divide the bacon between the two dishes.
- Grate the cheese into each dish and then crack two eggs into each dish.
- Sprinkle half of the smoked paprika on each dish, along with a pinch of salt and pepper.
- Place both ramekins on the Baking Pan and then into the oven.
- Cook until the egg whites turn opaque, roughly 15 minutes.Enjoy!
OPEN FACED TUNA MELT
- 1 can (3 oz.) white tuna in water, drained
- 2 Tbsp. chopped cilantro
- 2 Tbsp. salsa
- 1 Tbsp. light mayonnaise
- 1 English muffin, split, lightly toasted
- 2 slices colby jack cheese
Method
- Using BAKE, preheat your RETRO TOASTER OVEN to 350°F as directed under HOW TO OPERATE.
- Combine tuna, cilantro, salsa and mayonnaise in a small bowl.
- Place English muffin halves on the Baking Pan and top with the tuna mixture and cheese.
- Bake until cheese is melted, 2 to 3 minutes.Enjoy!
OVEN ROASTED ASPARAGUS
- 1 bunch asparagus
- 4 Tbsp. olive oil
- Kosher salt, to taste
- Freshly ground black pepper, to taste
Method
- Using BAKE, preheat your RETRO TOASTER OVEN to 425°F as directed under HOW TO OPERATE.
- Wash and trim asparagus, then spread out the aspargus in a single layer on the Baking Pan. Pat aspargus as dry as you can to avoid “steaming” the asparagus in the oven.
- Drizzle olive oil over the asparagus and then sprinkle with kosher salt and black pepper.
- Roast the asparagus for about 10 minutes.Enjoy!
PESTO SALMON
- 1 ¼ lb. salmon filet, cut into 4 pieces
- 2 Tbsp. white wine
- 2 Tbsp. toasted pine nuts (optional)
- 1 lemon, halved
Method
- Using BROIL, preheat your RETRO TOASTER OVEN to 450°F as directed under HOW TO OPERATE.
- Cover the Baking Pan with foil, then coat with canola cooking spray.
- Place salmon filets, skin-side dow, on the foil-lined pan.
- Squeeze one of the lemon halves over the salmon, then drizzle with white wine, and allow to marinate for 15 minutes.
- Spread ½ Tbsp. of the pesto over each serving of salmon.
- Broil until fish flakes and flesh is opaque and light pink, or about 8 to 10 minutes per inch of thickness.
- Cut the remaining lemon in thin slices, and garnish with toasted pine nuts.Enjoy!
QUICK AND EASY BRUSCHETTA
- ½ French baguette
- 1 clove garlic
- 12 cherry tomatoes, diced
- ¼ cup fresh mozzarella cheese, diced
- 4 large basil leaves, chiffonade
- Extra virgin olive oil
- Salt and pepper, to taste
Method
- Using PIZZA/TOAST, preheat your RETRO TOASTER OVEN to 450°F as directed under HOW TO OPERATE.
- Slice half of the baguette on the diagonal into 12 ½-inch thick pieces.
- Place the slices on a baking sheet and toast them on the top rack of the toaster oven for 5 to 6 minutes, until turning golden brown around the edges.
- When the slices are cool enough to handle, rub them with a clove of garlic, then drizzle with extra virgin olive oil.
- Place the diced tomatoes, diced mozzarella and basil together in a small bowl. Drizzle with olive oil and season with salt and pepper, to taste. Stir to combine.
- Spoon the mixture over the bruschetta or serve on the side as a dip.Enjoy!
FISH AND CHIPS
- 1 ¾ lbs. red or Yukon gold potatoes, cut into 1-inch chunks
- 4 Tbsp. olive oil
- 1 ¼ tsp. kosher salt
- 1 ¼ tsp. black pepper
- 8 sprigs fresh thyme
- 4 6-oz. pieces of cod
- 1 lemon, halved
- 1 clove garlic, thinkly sliced
- 2 Tbsp. capers, drained
Method
- Using BAKE, preheat your RETRO TOASTER OVEN to 450°F as directed under HOW TO OPERATE.
- Plate the potatoes, 2 Tbsp. of olive oil, 1 tsp. of salt, ¼ tsp. of pepper, and 4 sprigs of thyme in a bowl and toss to coat.
- Spread the potato mixture on the Baking Pan in a single layer and bake, stirring occasionally, until golden brown, 25 to 30 minutes.
- Transfer to a large piece of aluminum foil and wrap to keep warm.
- Wipe the Baking Pan and place cod in the tray.
- Thinly slice half the lemon. Top the cod with lemon slices, garlic, capers and the remaining salt, pepper and thyme sprigs. Drizzle with the remaining oil.
- Bake cod until cooked through, 8 to 12 minutes, depending on size.
- Transfer cod and potatoes to plates, squeeze the remaining lemon half over the Baking Pan and return to the oven until the juices are warmed through, about 5 minutes. Pour sauce over the fish and potatoes.Enjoy!
RETURNS & WARRANTY
SHOULD YOUR UNIT NOT WORK OR IF DAMAGED WHEN YOU FIRST TAKE IT OUT OF THE BOX, PLEASE RETURN IT TO THE PLACE OF PURCHASE IMMEDIATELY.
RETRO TOASTER OVEN / RTOV2AQShould you have any questions, please contact us via email or at the customer service number listed below between the hours of 8:00 AM and 5:00 PM, Monday through Friday, Central Standard Time.
Distributed by:Nostalgia Products LLC1471 Partnership Dr.Green Bay, WI 54304-5685Customer ServicePhone: (920) 347-9122Web: www.nostalgiaproducts.com
Customer Service InquiryTo submit a Customer Service inquiry, go to www.nostalgiaproducts.com and fill out the Customer Service Inquiry form and click the Submit button.A representative will contact you as soon as possible.
Product Warranty Terms
Nostalgia Products LLC (the “Company”) hereby warrants that for a period of one (1) year from the date of original purchase, this product will be free of defects in material and workmanship under normal home use, provided that the product is operated and maintained in accordance with the operating instructions. As the sole and exclusive remedy under this warranty, the Company willat its discretion either repair or replace the product found to be defective, or issue a refund on the product during the warranty period. This warranty is only available to the original retail purchaser of the product from the date of initial retail purchase, and is only valid with the original sales receipt, as proof of purchase date is required to obtain warranty benefits. All warranty claims must be brought to the attention of the Company within the warranty period and no later than 30 days of the failure to perform. This warranty does not cover normal wear or damage caused by shipping, mishandling, misuse, accident, alteration, improper replacement parts, or other than ordinary household use. You may be required to return the product (with shipping prepaid by you) for inspection and evaluation. Return shipping costs are not refundable. The Company is not responsible for returns damaged or lost in transit. Unless otherwise specifically permitted by the operating instructions, this warranty applies to indoor household use only. In order to obtain service under this warranty, please contact the Company at the telephone number listed above or by filling out the Customer Service Inquiry Form located at www.nostalgiaproducts.com. Warranty valid only in USA and Canada.
This warranty is in lieu of all other warranties, expressed or implied, including warranties of merchantability and fitness for a particular purpose, which are hereby excluded to the extent permitted by law. In no event shall the Company be liable for any indirect, incidental, consequential, or special damages arising out of or in connection with this product or the use thereof. Some states, provinces or jurisdictions do not permit the exclusion or limitation of incidental or consequential damages, so the foregoing exclusion or limitation may not apply to you.
This warranty does not apply to re-manufactured merchandise.Please read the operating instructions carefully. Failure to comply with the operating instructions will void this warranty.
For more information, visit us online at www.nostalgiaproducts.comLike us on Facebook at www.facebook.com/NostalgiaElectricsFollow our boards on Pinterest at www.pinterest.com/nostalgiaelctrxTweet along with us on Twitter at www.twitter.com/NostalgiaElctrx
References
[xyz-ips snippet=”download-snippet”]