NOVOCORE Waterproof Floors
INSTALLATION GUIDE
Thank you for choosing our flooring. When properly installed and cared for, your new flooring will be easy to maintain and will keep its great look for years.Please read all the instructions before you begin the installation. Improper installation will void warranty.
GENERAL PREPARATIONS
TOOLS REQUIRED: Spacers, rubber mallet, ruler, pencil, tape measure, utility knife.
- Prior to installation, inspect material in daylight for visible faults/damage, including defects or discrepancies in color or shine; check the edges of the flooring for straightness and any damage. No claims on surface defects will be accepted after installation.
- It is preferable to lay boards perpendicular to the window, following the direction of the main source of light. For the best result, make sure to always work from 3 to 4 cartons at a time, mixing the planks during the installation.
- Check if subfloor/site conditions comply with the specifications described in these instructions. If you are not satisfied, do not install, and contact your supplier.
- Flooring products can be damaged by rough handling before installation. Exercise care when handling and transporting these products. Store, transport and handle the flooring planks in a manner to prevent any damage. Store cartons flat, never on edge.
- Flooring products can be heavy and bulky. Always use proper lifting techniques when handling these products. Whenever possible, make use of material-handling equipment such as dollies or material carts. Never lift more than you can safely handle; get assistance.
- Calculate the room surface prior to installation and plan an extra 5-10% of flooring for cutting waste.
- The environment where the flooring is to be installed is critically important with regard to successful installation and continued performance of the flooring products. The flooring is intended to be installed in interior locations only. These interior locations must meet climatic and structural requirements as well.
- In most cases, this product does not need to be acclimated. However, if the boxes of flooring were exposed over 2 hours to extreme temperatures under 50°F / 10°C or over 104°F / 40°C within the 12 hours before the installation, acclimation is required. In this case, keep the boards in room temperature for at least 12 hours in unopened package before you start the installation. The room temperature must be maintained consistent between 70-80°F / 20-25°C before and during the installation.
- Flooring should only be installed in temperature-controlled environments. It is necessary to maintain a constant temperature of 70-80°F / 20-25°C before and during the installation. Portable heaters are not recommended as they may not heat the room and subfloor sufficiently. Kerosene heaters should never be used.
- After installation, make sure that the flooring is not be exposed to temperatures less than 50°F / 10°C or greater than 120°F / 50°C.
- For floor surfaces exceeding 4356 sq. ft. / 400 m2 and/or lengths exceeding 66 lineal ft. / 20 m, use expansion moldings.
SUBFLOOR INFORMATION
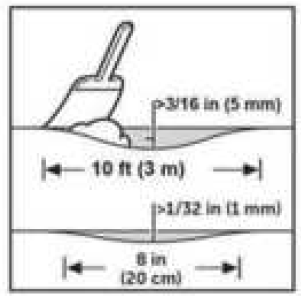
- Inspect your subfloor before you begin, it must be structurally sound, clean, dry, flat, and smooth. High spots and bumps must be leveled. Deflections more than 3/16” / 5 mm within 10 ft. / 3 m radius must be leveled out with an appropriate leveling compound, the same applies to unevenness of more than 1/32” / 1 mm within 8” / 20 cm.

- Ceramic tile floors, ceramic and marble grout joints, and irregularities in concrete should be filled and leveled.
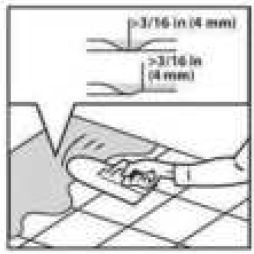
- Depressions, deep grooves, expansion joints and other subfloor imperfections that exceed 4mm wide & 4mm depth must be filled with patching & leveling compound.
- Substrates must be free from excessive moisture or alkali. Remove dirt, paint, varnish, wax, oils, solvents, any foreign matter and contaminates.
- Do not use products containing petroleum, solvents or citrus oils to prepare substrates as they can cause staining and expansion of the new flooring.
- Although this floor is waterproof, it is not aimed to be used as a moisture barrier. The concrete moisture vapor emissions should not exceed 8 lb / 3.63 kg (ASTM F1869) / 90 % RH (ASTM F2170) with a PH limit of 9 / max. 2.5 % moisture content (CM method).
- This product is also not to be installed in areas that have a risk of flooding such as saunas or outdoor areas.
- Existing sheet vinyl floors should not be heavily cushioned and not exceed more than one layer in thickness. Soft underlayment and soft substrates will diminish the products inherent strength in resisting indentations.
WOOD SUBFLOORS
- If this flooring is intended to be installed over an existing wooden floor, it is recommended to repair any loose boards or squeaks before you begin the installation.
- Nail or screw every 6” / 15 cm along joists to avoid squeaking.
- Basements and crawl spaces must be dry. Use of a 6 mil / 0.15 mm poly-film is required to cover 100 % of the crawl space earth.
- We recommend laying the flooring crossways to the existing floorboards.
- All other subfloors – Plywood, OSB, particleboard, chipboard, wafer board, etc. must be structurally sound and must be installed following their manufacturer’s recommendations.
CONCRETE SUBFLOORS
- Existing concrete subfloors must be fully cured, at least 60 days old, smooth, permanently dry, clean, and free of all foreign material such as dust, wax, solvents, paint, grease, oils, and old adhesive residue. Curing agents and hardeners could cause bonding failure and should not be used.
- We recommend using a minimum 6 mil / 0.15 mm poly-film as a moisture barrier between the concrete subfloor and the flooring.
DO NOT INSTALL OVER
- Any type of carpet.
- Existing cushion-backed vinyl flooring.
- Floating floor of any type, loose lay, and perimeter fastened sheet vinyl.
- Hardwood flooring / wood subfloors that lay directly on concrete or over dimensional lumber or plywood used over concrete.
IMPORTANT NOTICE: In-floor Radiant Heat: Flooring can be installed over 1/2” / 12 mm embedded radiant heat using the floating method. Maximum operating temperature should never exceed 85°F / 30°C. Use of an in-floor temperature sensor is recommended to avoid overheating.
- Turn the heat off for 24 hours before, during and 24 hours after installation when installing over radiant heated subfloors.
- Before installing over newly constructed radiant heat systems, operate the system at maximum capacity to force any residual moisture from the cementitious topping of the radiant heat system.
- Make sure that the temperature in the room is maintained consistent between 70-80°F / 20-25°C before and during the installation.
- Floor temperature must not exceed 85°F / 30°C.
- Once the installation has been completed, the heating system should be turned on and increased gradually (5-degree increments) until returning to normal operating conditions.
- Refer to the radiant heat system’s manufacturer recommendations for additional guidance.
Warning: Electric heating mats that are not embedded into the subfloor are not recommended for use underneath the floors. Using electric heating mats that are not embedded and applied directly underneath the floors could void the warranty for your floor in case of failure. It is best to install the flooring over embedded radiant floor heating systems and adhere to the guidelines listed above.
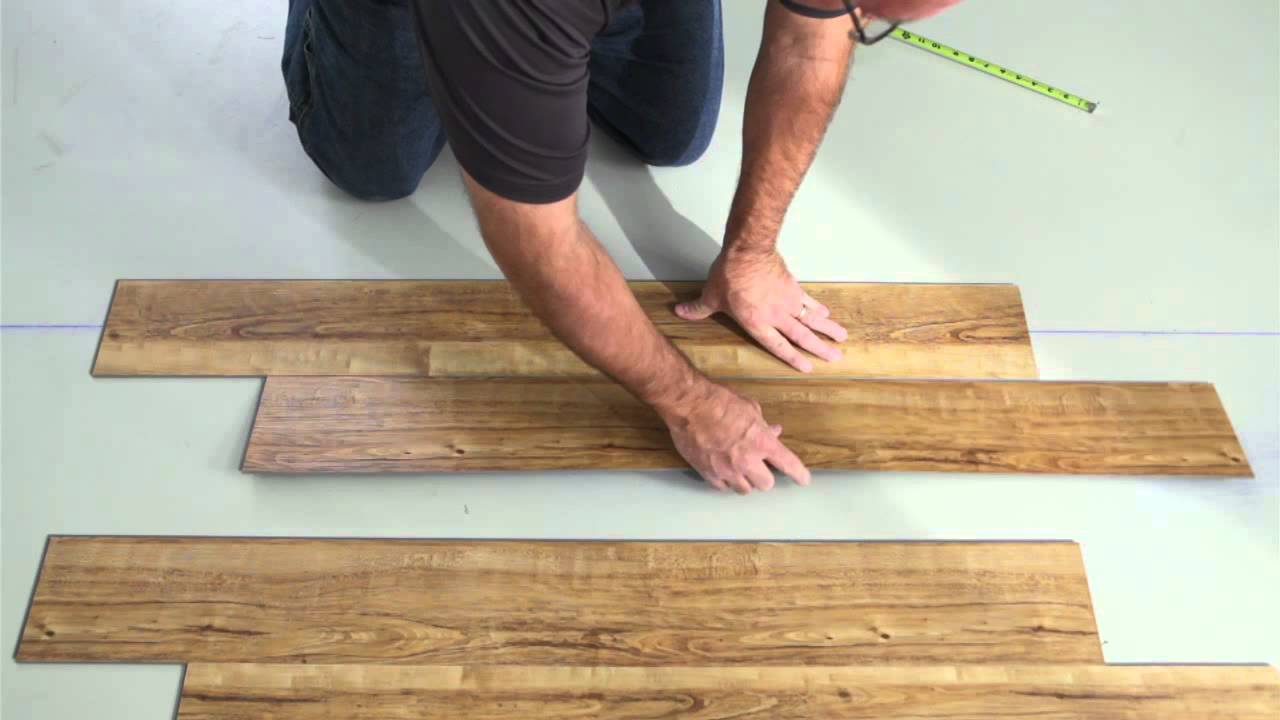
INSTALLATION
- Remove baseboard, quarter-round moldings, wall base, appliances and furniture from room. For best results, door trim should be under-cut to allow flooring to move freely without being pinched. After preparation work, sweep and vacuum the entire work area to remove all dust and debris.
- With a floating floor, you must always ensure you leave a 1/4” / 6 mm gap between walls and fixtures such as pillars, stairs, etc. These gaps will be covered with trim moldings after the floor is installed.
- Whenever possible, plan the layout so that the joints in the planks do not fall on top of joints or seams in the existing substrate. The end joints of the planks should be staggered a minimum of 8” / 20 cm apart. Do not install over expansion joints. Avoid installing pieces shorter than 12” / 30 cm at beginning or end of rows.
- Do not install your kitchen cabinets directly over your floor. The floor’s quality can be guaranteed as long as the floor can move freely.
- Decide the installation direction. It is recommended to install the boards perpendicular to the window following the direction of the main source of light.
- Measure the area to be installed: The board width of the last row shall not be less than 2” / 50 mm. If so, adjust the width of the first row to be installed. In narrow hallways, it is recommended to install the floor parallel to the length of the hall.
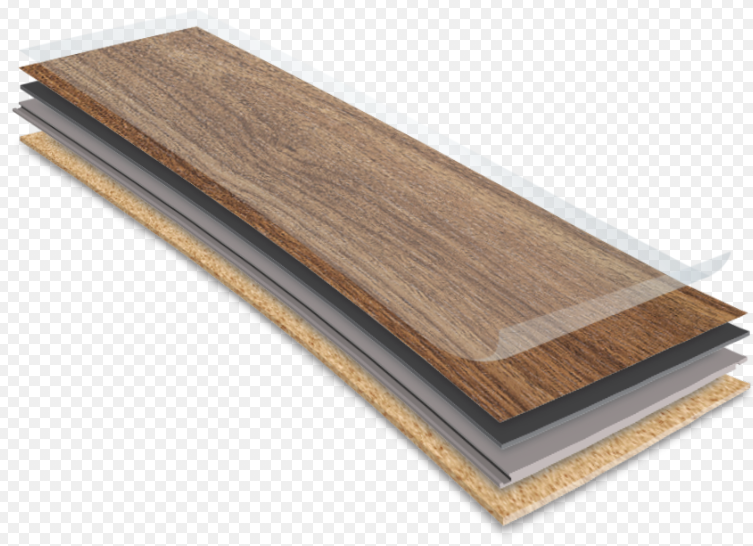
- UNDERLAY: If the floor does not have a pre-attached underlayment, an additional underlayment is recommended in order to improve acoustic performance and absorb some irregularities on the substrate. Best results can be expected with an underlayment of 0.04” / 1 mm to max 0.06” / 1.5 mm thickness with a high density (>397 lb / ft3 / >180 kg / m3) and high compressive strength (>200kPa) that supports the click system during daily use. Underlayments with a low density and an inadequate compressive strength could damage the locking mechanism and will void warranty. If the floor has a pre-attached underlayment, the use of an additional underlayment could damage the locking mechanism and will void warranty.
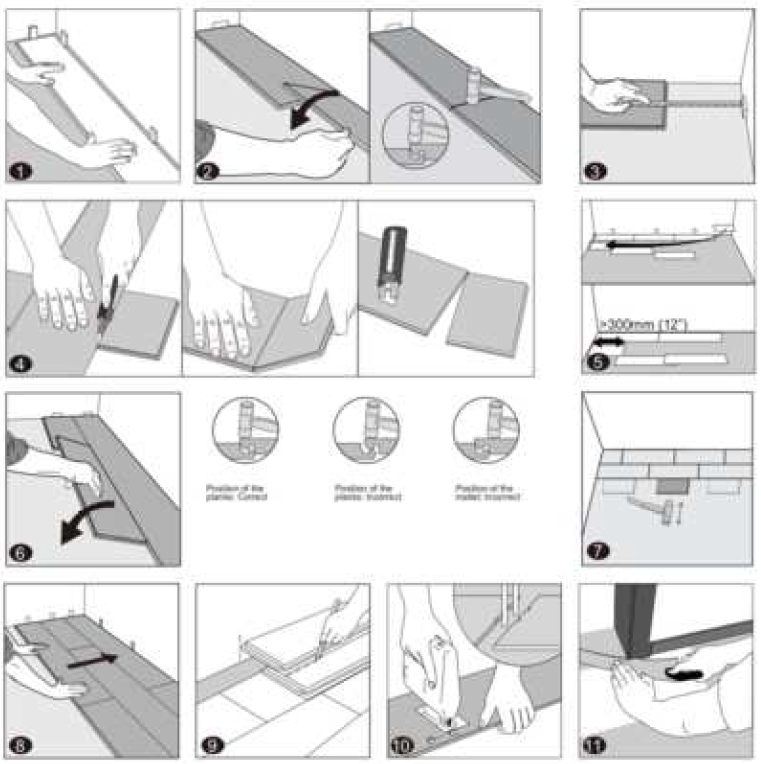
- First row, first plank: After thoroughly cleaning the subfloor, you should begin laying from left to right. Position the first plank so that grooved edge is facing you. Place the floorboard 1/4” / 6 mm from the left wall. Use spacers between the wall and the floorboard.
- First row, second plank: Drop the plank and gently tap down the end with a rubber mallet so it firmly locks into the previous plank until both are at the same height. Make sure both planks are perfectly aligned. It is crucial that after the short edges of two connecting planks are correctly aligned, and the rubber mallet contacts the plank in the area directly above the short edge, allowing for a correct locking.Note: Tapping the area close to the short edge, but not directly above it, may result in permanent damage to the joint. Continue installing the first row until you reach the wall on the right.IMPORTANT: If you notice both planks aren’t at the same height or are not well locked together, please follow the disassembling instructions at the bottom of the page, disassemble and check if any debris stuck inside the lock is obstructing. Failure to properly line up the end joint and attempting to force it in while out of alignment could result in permanent damage to the end joint.
- First row, last plank: At the end of the first row, leave an expansion gap of 1/4” / 6 mm to the wall and measure the length of the last plank to fit.
- To cut the plank: Use a simple utility knife and ruler, and with the top side facing up, cut heavily and several times on the same axis. The knife will not go through the surface but make a deep cut. You can then lift one half of the plank using your other hand to hold down the second placing it very close to the cut. The plank will split naturally.
- Second row, first plank: Start the second row with the leftover cut part of the last plank of the previous row. This small plank should measure at least 12” / 30 cm. Otherwise, cut a new plank in half and use it to begin the second row. The end joints of each adjoining row should not be closer than 8” / 20 cm to each other. Whenever practical, use the piece cut from the preceding row to start the next row.
- Second row, second plank: Click the long side of the plank into the previous row and place it tight to the short end of the previous plank with an angle of 25-30 degrees. Drop the plank and gently tap on the end with a rubber mallet so it firmly locks into the previous plank until both are at the same height. Make sure both planks are perfectly aligned.
- After finishing the installation of every row: Use scrap pieces and a small hammer or rubber mallet to gently tap the planks into the click of the previous row to make sure they are tightly clicked together and make sure there is no gap between the long side of the planks installed. Any gapping can compromise the whole installation.
- Tip: After the first 2-3 rows of planks are installed, they should be checked with a string line to ensure that rows are still running straight. If they are not, it could be that the starting wall has some irregularities that caused bowing in the installation. If so, the starting row of planks may have to be scribed and re-trimmed to account for any unevenness in the wall. This can be done without having to disassemble the beginning rows.
- To lay the last row: Position a loose board exactly on top of the last row laid. Place another board on top, with the tongue side touching the wall. Draw a line along the edge of this boards, to mark the first board. Cut along the edge of this board to mark the first board. Cut along this line to obtain the required width. Insert this cut board against the wall. The last row should be at least 2” / 50 mm wide. The spacers can then be removed.
- Holes for pipes: Measure the diameter of the pipe and drill a hole that is 1/2” / 12 mm larger. Saw off a piece as shown in the figure and lay the board in place on the floor. Then lay the sawed-off piece in place.
- Door molding and skirting: Lay a board (with the decorative side down) next to the door molding and saw as shown in the figure. Then slide the floorboard under molding.
FINISHING THE INSTALLATION
Replace molding or wall base, allowing slight clearance between the molding and the planks. Nail the molding to the wall surface, not through the flooring. At doorways and at other areas where the flooring planks may meet other flooring surfaces, it is preferable to use a “T” molding, or similar, to cover the exposed edge but not pinch the planks. Leave a small gap between the planks and the adjoining surface.
DISASSEMBLING
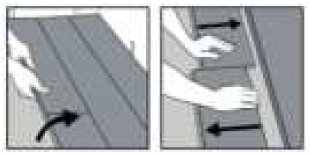
Separate the whole row by lifting it up delicately at an angle.To separate the planks, leave them flat on the ground and slide them apart. If planks do not separate easy, you can slightly lift up the planks (5°) when sliding them apart.
MAINTENANCE
- Sweep or vacuum daily using soft bristle attachments.
- Clean up spills and excessive liquids immediately.
- Damp mop as needed and use cleaners recommended for vinyl flooring.
- The use of residential steam mops on this product is allowed. Use at lowest power with a suitable soft pad, and do not hold a steam mop on one spot for an extended period of time (longer than 5 minutes). Refer to the steam mop’s manufacturer instructions for proper usage.
- Use proper floor protection devices such as felt protectors under furniture.
- Place a walk-off mat at outside entrances to reduce the amount of dirt brought into your home. Do not use mats with a latex or rubber backing since these backings can cause permanent discoloration.
- Do not use abrasive cleaners, bleach or wax to maintain the floor.
- Do not drag or slide heavy objects across the floor.
Warranties
| 0.3mm Wear Layer | 0.55mm Wear Layer | |
| Light Commercial Warranty | 5 Years | N/A |
| Commercial Warranty | N/A | 15 Years |
| Residential Warranty | 25 Years | Lifetime |
SCOPE OF APPLICATION 1.1. 0.5mm Wear Layer – Commercial Use
This Commercial Use Limited Warranty is offered by us and is Worldwide applicable. This warranty applies to our rigid core vinyl and thermoplastic flooring, purchased from authorized dealer and installed and used in commercial area. Commercial area is defined as: use in environments such as those outlined in the application table below. Applications considered “industrial” do not qualify for warranty coverage.
| EXAMPLES OF BUSINESS TYPE
COMMERCIAL USE |
RECOMMENDED APPLICATION |
| Med clinic, retirement centers, Doctor’s offices, hospice, assisted living. | All non-required “clean room” areas – Corridors,
patient rooms, lobby, waiting rooms, cafeteria, exam rooms, common areas. |
| Professional offices (i.e. accountants, lawyers,
etc.), banks. |
Offices, hallways, lobby, reception areas, break
rooms, conference rooms. |
| Boutiques, retail store, art galleries, book- stores, coffee shops, gift shops, jewelry stores, beauty
salons, barber shops. |
Dressing rooms, entire store. |
| Apartments, condos, military housing. | Any room in these segments will be suitable,
including common areas excluding bathrooms. |
| Hotel, motel, restaurants. | Guest rooms, lobby, hallways, elevator. |
| Day-care, school, universities, libraries. | Dorms, common areas, cafeterias, class rooms, auditoriums, libraries (excluding gymnasiums). |
0.3mm Wear Layer – Light Commercial Use
This Light Commercial Limited Use Warranty is offered by us and is Worldwide applicable. This warranty applies to our rigid core vinyl and thermoplastic flooring, purchased from authorized dealer and installed and used in light commercial area. Light commercial area is defined as: use in environments which do not experience heavy commercial traffic such as those outlined in the application table below.
| EXAMPLES OF BUSINESS TYPE | RECOMMENDED APPLICATION |
| Professional offices, Dr. offices. | All non-required “clean room” areas – offices,
lobby, waiting rooms, exam rooms, common areas. |
| Offices, banks. | Offices, hallways, lobby, reception areas,
bathrooms, break rooms, conference rooms. |
| Boutiques, retail store, art galleries, book- stores, coffee shops, dry cleaners, gift shops, jewelry stores, beauty
salons, barber shops. |
Dressing rooms, restrooms, entire store. |
| Multi-family housing. | Any room in these segments will be suitable, including common areas excluding bathrooms. |
WARRANTED INSTANCES
WEAR WARRANTY
We warrant to the original purchaser that the wear layer on our flooring:
- Will not wear through the decorative surface. Scratches, indentation or reduction in gloss level is not considered wear.
- Will not stain from normal household consumable items such as food or drink.
- Will not stain from pet (domestic cat or dog) stains, including urine, feces and vomit, providing it is immediately cleaned upon discovery. Stain resistance means the ability of the floor to resist (i.e. minimize or withstand) permanent stains for the warranty period.
- Will not fade as a result of direct sunlight or household lighting.
- Will be resistant to damage from normal household spills.
- In its original manufactured conditions, will be free from manufacturing defects. Starting from the date of purchase, but only if no exclusions are applicable and only if all conditions are fulfilled.
STRUCTURAL WARRANTY
We warrant the original purchaser that our flooring:
- Will not delaminate.
- In its original manufactured condition, will be free from manufacturing defects.
Starting from the date of purchase, but only if no exclusions are applicable and only if all conditions are fulfilled.
INSTALLATION OVER A RADIANT-HEATED SUBFLOOR WARRANTY
We warrant to the original purchaser starting from the date of purchase, the floor can be installed over an embedded radiant-heated subfloor, but only if no exclusions are applicable and only if all conditions are fulfilled:
- In-floor Radiant Heat: flooring can be installed over 1/2” /12 mm embedded radiant heat using the floating method.
- Electric heating mats that are not embedded into the subfloor are not recommended for use underneath the flooring. Using electric heating mats that are not embedded and applied directly underneath the flooring could void the warranty in case of failure.
- The radiant heating system must incorporate electronic temperature controls.
- Heat must be off for 24 hours before, during and 24 hours after installation when installing over radiant heated subfloors.
- Before installing over newly constructed radiant heat systems, operate the system at maximum capacity to force any residual moisture from the cementitious topping of the radiant heat system.
- Concrete moisture vapor emissions should not exceed 8 lb / 3.63 kg (ASTM F1869) / 90 % RH (ASTM F2170) with a PH limit of 9 / max 2.5 % moisture content (CM method).
- Please respect the temperature range in the room before and during the installation as specified in the installation manual, or your warranty will be void.
- Once the installation has been completed, the heating system should be turned on and increased gradually (5-degree increments) until returning to normal operating conditions.
- Floor temperature must not exceed 85°F / 30°C.
- Refer to the radiant heat system’s manufacturer recommendations for additional guidance.
MOISTURE WARRANTY
We warrant that all vinyl flooring and thermoplastic composite flooring in its original manufactured state to the original purchaser from the date of purchase, under normal and reasonable use, and the surface, when properly installed, shall be resistant to damage from mopping or normal household spills. This means planks or tiles will not swell, buckle or lose integrity. The moisture warranty does not cover flooding, leaking pipes, household mechanical failures, appliance leaks. Any damage to the subfloor and/or surrounding structure that is caused by standing water or flooding is not covered by this warranty.
PET WARRANTY
We warrant that the floor will resist staining caused by pet (domestic cat or dog) stains, including urine, feces, and vomit. Stain resistance means the ability of your floor to resist (i.e., minimize or withstand) permanent stains for the warranty period. However, accidents should be cleaned up immediately (within 24 hours), as the longer they sit, the more difficult they will be to remove. Any damage to the subfloor and/or surrounding structure caused by pets is not covered by this warranty.
EXCLUSIONS AND CONDITIONS
GENERAL EXCLUSIONS AND CONDITIONS
- Damage arising by not following relevant installation, care, maintenance and use instructions of the present warranty and the installation instructions provided.
- Damage arising from improper installation (for example installation on an unlevelled subfloor and installation when there is not sufficient perimeter expansion zone), improper care, improper maintenance or improper use.
- Damage arising because the flooring is exposed to extreme cold or extreme heat as specified in the provided installation manual.
- Damage caused by exposure to excessive moisture (for example excessive moisture in a concrete slab, excessive moisture from hydrostatic pressure, flooding, standing water, water underneath the flooring, excessive moisture as the result of malfunctioning appliances such as dishwashers, ice makers, refrigerators, sinks, pipes).
- Damage caused by spills which are not removed promptly.
- Normal wear and tear of the flooring.
- Normal changes in colour, gloss, grain pattern and tone (this is normal for flooring as it ages).
- Damage arising because the flooring is installed in an outdoor area, a solarium, a porch, a garage or areas similar to all of these.
- Damage arising because the flooring is not used under normal conditions.
- Damage arising from accidents, abuse, misuse, or the use of strong chemicals.
- Damage caused by an act of God (for example a natural disaster).
- Damage caused by vacuum cleaner beater bars or hard plastics, or metal caster wheels.
- Differences in aspect, colour, gloss, grain pattern and tone with the reference flooring sample in for example the store or showroom.
- Flooring that has been damaged or neglected during transportation.
- Scratches, marks, stains and other damage caused by exposure to “abrasives” such as pebbles, grit, sand, high heeled shoes, furniture, etc.
- Indentations.
- Damage to click joints or indentation due to heavy rolling loads.
- Damage of planks coming apart at the seams because they have been engaged/disengaged more than three times.
- Damage caused by the collections of dirt and moisture at entrances do due the lack of interior and exterior doormats.
- Damage caused by shoes having heeltaps or sharp objects protruding from the sole such as rocks, exposed nails and gravel.
- Damage caused by walking on with spike-or stiletto-heeled shoes.
- Damage caused by sliding or rolling heavy objects on the floor. A solid protective covering must be laid (must use at least 1/4” / 6 mm hard board) on your floor and gently “walk” the item a cross it. Carpet or cardboard is not adequate to prevent surface indentation or roller marks from occurring or scratches to the floor.
- Damage caused by non-compliant casters on furniture. Barrel-type caster wheels or wide, flat glides are best for protecting the floor. For areas with rolling chairs (e.g. desk area), ensure a protective mat is used under the chair.
- Damage caused by hard narrow furniture rollers. They must be replaced with wide rubber rollers.
This warranty is valid only to the original purchaser. It is not transferable and only applicable to the first installation of the flooring. The affected area must be visible and cover an area bigger than 0.038 inch2 / 25 mm2. This warranty does not apply to any products designated as B grade, cabin grades, closeouts, seconds, factory special, non-standard items and flooring sold “as is”.
It is the responsibility of the purchaser and the installer, whether they are professionals or a do-it-yourselves, to inspect all flooring and flooring accessories before installation. If during inspection the purchaser or the installer knows/ discovers or can reasonably be supposed to know/discover (for example when the default is visible), that the flooring has a visible manufacturing issue, do not install the flooring. Please immediately contact the retailer from which the flooring was purchased. No claims will be accepted for flooring of which the purchaser or installer knew/discovered or can reasonably be supposed to have known/discovered, that there was something wrong with it. In such case we only warrant the part of the flooring which has not been installed yet.
We do not allow or authorize any other person or entity to alter the obligations and limitations in this warranty. This warranty is the complete and exclusive expression of our warranty and is in lieu of all other express and/or statutory warranties. Any implied warranties, including but not limited to the implied warranties, merchantability and fitness for a particular purpose are limited to this express warranty. However, some jurisdictions do not allow exclusion or limitation on how an implied warranty lasts, so the above limitation or exclusion may not apply to you.
We expressly exclude and will not pay consequential or incidental damages under this warranty. By this we mean for example loss, expense, inconvenience or damages, other than to the flooring itself, that may result from a defect in the flooring. However, some jurisdictions do not allow exclusion or limitation of incidental or consequential damages, so the above limitation or exclusion may not apply to you. We reserve the right to inspect the flooring and to remove samples for additional evaluation, if we consider this necessary. Any attempt to repair or replace the flooring without our consent will void this warranty.
The failure of either party to enforce any of the provisions of this warranty agreement shall not be construed as a waiver of such provision or a waiver of the right of any party thereafter to enforce each and every provision. This warranty gives you specific legal rights and you may also have other rights which vary from jurisdiction to jurisdiction. We will always respect these other rights. No implied warranties extend beyond the term of this written warranty.
WHAT YOU SHOULD DO IF ANY OF THE ABOVE LISTED PROBLEMS OCCUR
You should notify the original dealer of the defect within 30 calendar days after you know/discover the defect and within the validity period of this warranty. Your dealer can answer your questions and, if necessary, start to process a claim. If your notification takes place outside this period, our warranty will not be applicable. In order to enjoy the warranty, you are obligated to present:
- A valid proof of purchase in the form of the sales receipt for the flooring and other accessories related to the installation which may affect the installation quality such as but not limited to adhesive, moulding, underlay, moisture barrier, moulding, etc.
- A detailed description of the defect and/or a photograph or sample of the flooring that clearly shows the defect. Provide additional information requested by the factory to understand the root cause of the issue.
WHAT WE WILL DO
If we honor a claim under this warranty, we will – at our sole discretion – repair or refinish the defective material or we will refund the price of the flooring. If the flooring was originally installed by a certified professional installer and if there is a justified claim within the first 36 months from the date of the original purchase, we will also pay the reasonable labour costs to perform the repair or replacement. This repair or replacement or refund will be a pro-rated percentage cost of the flooring and labour cost. This percentage is determined by the number of years remaining on the warranty and the length of the warranty. For example, if the claim is made 3 years after purchase on flooring warranted for 15 years, then 80% (12/15th) of the flooring cost will be considered.
This warranty is limited to the designs, colours, structures and styles available at the time of repair or replacement. If the original is no longer available, we have the right to substitute another design, colour, structure and style that is similar to the original and that has a similar value. We will always try to take into account the wish of the customer.
RESIDENTIAL USE LIMITED WARRANTY
SCOPE OF APPLICATION
This Residential Use Limited Warranty is offered by us and is Worldwide applicable. This warranty applies to our rigid core vinyl and thermoplastic flooring, purchased from authorized dealer and installed and used residentially. Residential use is defined as normal household use.
WARRANTIES
WEAR WARRANTY
We warrant to the original purchaser that the wear layer on our flooring:
- Will not wear through the decorative surface. Scratches, indentation or reduction in gloss level is not considered wear.
- Will not stain from normal household consumable items such as food or drink.
- Will not stain from pet (domestic cat or dog) stains, including urine, faces and vomit, providing it is immediately cleaned upon discovery. Stain resistance means the ability of the floor to resist (i.e. minimize or withstand) permanent stains for the warranty period.
- Will not fade as a result of direct sunlight or household lighting.
- Will be resistant to damage from normal household spills.
- In its original manufactured conditions, will be free from manufacturing defects.
Starting from the date of purchase, but only if no exclusions are applicable and only if all conditions are fulfilled
STRUCTURAL WARRANTY
We warrant the original purchaser that our flooring:
- Will not delaminate.
- In its original manufactured condition, will be free from manufacturing defects.
Starting from the date of purchase, but only if no exclusions are applicable and only if all conditions are fulfilled.
INSTALLATION OVER A RADIANT-HEATED SUBFLOOR WARRANTY
We warrant to the original purchaser starting from the date of purchase, the floor can be installed over an embedded radiant-heated subfloor, but only if no exclusions are applicable and only if all conditions are fulfilled:
- In-floor Radiant Heat: flooring can be installed over 1/2” / 12 mm embedded radiant heat using the floating method.
- Electric heating mats that are not embedded into the subfloor are not recommended for use underneath the flooring. Using electric heating mats that are not embedded and applied directly underneath the flooring could void the warranty in case of failure.
- The radiant heating system must incorporate electronic temperature controls.
- Heat must be off for 24 hours before, during and 24 hours after installation when installing over radiant heated subfloors.
- Before installing over newly constructed radiant heat systems, operate the system at maximum capacity to force any residual moisture from the cementitious topping of the radiant heat system..
MOISTURE WARRANTY
We warrant that all vinyl flooring and thermoplastic composite flooring in its original manufactured state to the original purchaser from the date of purchase, under normal and reasonable use, and the surface, when properly installed, shall be resistant to damage from mopping or normal household spills. This means planks or tiles will not swell, buckle or lose integrity. The moisture warranty does not cover flooding, leaking pipes, household mechanical failures, appliance leaks. Any damage to the subfloor and/or surrounding structure that is caused by standing water or flooding is not covered by this warranty.
PET WARRANTY
We warrant that the floor will resist staining caused by pet (domestic cat or dog) stains, including urine, feces, and vomit. Stain resistance means the ability of your floor to resist (i.e., minimize or withstand) permanent stains for the warranty period. However, accidents should be cleaned up immediately (within 24 hours), as the longer they sit, the more difficult they will be to remove. Any damage to the subfloor and/or surrounding structure caused by pets is not covered by this warranty.
EXCLUSIONS AND CONDITIONS
- Damage arising by not following relevant installation, care, maintenance and use instructions of the present warranty and the installation instructions provided.
- Damage arising from improper installation (for example installation on an unlevelled subfloor and installation when there is not sufficient perimeter expansion zone), improper care, improper maintenance or improper use.
- Damage arising because the flooring is exposed to extreme cold or extreme heat as specified in the provided installation manual.
- Damage caused by exposure to excessive moisture (for example excessive moisture in a concrete slab, excessive moisture from hydrostatic pressure, flooding, standing water, water underneath the flooring, excessive moisture as the result of malfunctioning appliances such as dishwashers, ice makers, refrigerators, sinks, pipes).
- Damage caused by spills which are not removed promptly.
- Normal wear and tear of the flooring.
- Normal changes in colour, gloss, grain pattern and tone (this is normal for flooring as it ages).
- Damage arising because the flooring is installed in an outdoor area, a solarium, a porch, a garage or areas similar to all of these.
- Damage arising because the flooring is not used under normal conditions.
- Damage arising from accidents, abuse, misuse, or the use of strong chemicals.
- Damage caused by an act of God (for example a natural disaster).
- Damage caused by vacuum cleaner beater bars or hard plastics, or metal caster wheels.
- Differences in aspect, colour, gloss, grain pattern and tone with the reference flooring sample in for example the store or showroom.
- Flooring that has been damaged or neglected during transportation.
- Scratches, marks, stains and other damage caused by exposure to “abrasives” such as pebbles, grit, sand, high heeled shoes, furniture, etc.
- Indentations.
- Damage to click joints or indentation due to heavy rolling loads.
- Damage of planks coming apart at the seams because they have been engaged/disengaged more than three times.
- Damage caused by the collections of dirt and moisture at entrances do due the lack of interior and exterior doormats.
- Damage caused by shoes having heeltaps or sharp objects protruding from the sole such as rocks, exposed nails and gravel.
- Damage caused by walking on with spike-or stiletto-heeled shoes.
- Damage caused by sliding or rolling heavy objects on the floor. A solid protective covering must be laid (must use at least 1/4” / 6 mm hard board) on your floor and gently “walk” the item a cross it. Carpet or cardboard is not adequate to prevent surface indentation or roller marks from occurring or scratches to the floor.
- Damage caused by non-compliant casters on furniture. Barrel-type caster wheels or wide, flat glides are best for protecting the floor. For areas with rolling chairs (e.g. desk area), ensure a protective mat is used under the chair.
- Damage caused by hard narrow furniture rollers. They must be replaced with wide rubber rollers.
This warranty is valid only to the original purchaser. It is not transferable and only applicable to the first installation of the flooring. The affected area must be visible and cover an area bigger than 0.038 inch2 / 25 mm2. This warranty does not apply to any products designated as B grade, cabin grades, closeouts, seconds, factory special, non-standard items and flooring sold “as is”.
It is the responsibility of the purchaser and the installer, whether they are professionals or a do-it-yourselves, to inspect all flooring and flooring accessories before installation. If during inspection the purchaser or the installer knows/discovers or can reasonably be supposed to know/discover (for example when the default is visible), that the flooring has a visible manufacturing issue, do not install the flooring. Please immediately contact the retailer from which the flooring was purchased. No claims will be accepted for flooring of which the purchaser or installer knew/discovered or can reasonably be supposed to have known/discovered, that there was something wrong with it. In such case we only warrant the part of the flooring which has not been installed yet.
We do not allow or authorize any other person or entity to alter the obligations and limitations in this warranty. This warranty is the complete and exclusive expression of our warranty and is in lieu of all other express and/or statutory warranties. Any implied warranties, including but not limited to the implied warranties, merchantability and fitness for a particular purpose are limited to this express warranty. However, some jurisdictions do not allow exclusion or limitation on how an implied warranty lasts, so the above limitation or exclusion may not apply to you.
We expressly exclude and will not pay consequential or incidental damages under this warranty. By this we mean for example loss, expense, inconvenience or damages, other than to the flooring itself, that may result from a defect in the flooring. However, some jurisdictions do not allow exclusion or limitation of incidental or consequential damages, so the above limitation or exclusion may not apply to you. We reserve the right to inspect the flooring and to remove samples for additional evaluation, if we consider this necessary. Any attempt to repair or replace the flooring without our consent will void this warranty.
The failure of either party to enforce any of the provisions of this warranty agreement shall not be construed as a waiver of such provision or a waiver of the right of any party thereafter to enforce each and every provision. This warranty gives you specific legal rights and you may also have other rights which vary from jurisdiction to jurisdiction. We will always respect these other rights.No implied warranties extend beyond the term of this written warranty.
WHAT YOU SHOULD DO IF ANY OF THE ABOVE LISTED PROBLEMS OCCUR
You should notify the original dealer of the defect within 30 calendar days after you know/discover the defect and within the validity period of this warranty. Your dealer can answer your questions and, if necessary, start to process a claim. If your notification takes place outside this period, our warranty will not be applicable. In order to enjoy the warranty, you are obligated to present:
- A valid proof of purchase in the form of the sales receipt for the flooring and other accessories related to the installation which may affect the installation quality such as but not limited to adhesive, moulding, underlay, moisture barrier, moulding, etc.
- A detailed description of the defect and/or a photograph or sample of the flooring that clearly shows the defect. Provide additional information requested by the factory to understand the root cause of the issue.
WHAT WE WILL DO
If we honour a claim under this warranty, we will – at our sole discretion – repair or refinish the defective material or we will refund the price of the flooring. If the flooring was originally installed by a certified professional installer and if there is a justified claim within the first 36 months from the date of the original purchase, we will also pay the reasonable labour costs to perform the repair or replacement. This repair or replacement or refund will be a pro-rated percentage cost of the flooring and labour cost. This percentage is determined by the number of years remaining on the warranty and the length of the warranty. For example, if the claim is made 3 years after purchase on flooring warranted for 15 years, then 80% (12/15th) of the flooring cost will be considered.
This warranty is limited to the designs, colours, structures and styles available at the time of repair or replacement. If the original is no longer available, we have the right to substitute another design, colour, structure and style that is similar to the original and that has a similar value. We will always try to take into account the wish of the customer.![]()
[xyz-ips snippet=”download-snippet”]