
Introduction
Support
For the latest information about this product (system requirements, compatibility information, etc.) and product registration, visit numark.com. For additional product support, visit numark.com/support.
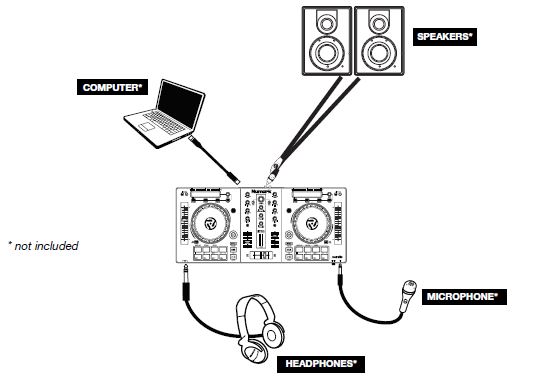
Connection Diagram
- Place MIXTRACK PRO 3 on a flat, stable surface.
- Make sure all devices are turned off and all faders and gain knobs are set to “zero”.
- If using a microphone, connect it to MIXTRACK PRO 3’s mic input.
- Connect MIXTRACK PRO 3’s outputs to power amplifiers, tape decks, and/or other audio sources.
- Plug all devices into AC power and connect MIXTRACK PRO 3’s USB port to a computer’s USB port using the included USB cable.
- When powering everything on, power on your devices in the following order:• Your computer• Any amplifiers, speakers, or output devices
- Locate the Serato DJ Intro installation card in the box to download and install the software.
- Open your software program and load music to the decks.
- Start DJ’ing!
- When powering everything off, power off your devices in the following order:• Any amplifiers, speakers, or output devices• Your computer

Features
Top Panel

- Browser Knob: Rotate this knob to cycle through folders and tracks. Press the Knob To cycle between the Crates and Library.
- Master Gain: Adjusts the master volume in the software.Note: This control does not affect the microphone volume which is summed with the final output of the Master Gain to the Master Output. Use the Mic Gain knob to control the microphone volume.
- Cue Mix: Adjusts the software’s audio output to the headphones, mixing between the cue output and the master mix output.
- Cue Gain: Adjusts the volume for headphone cueing in the software.
- Load: Press one of these buttons while a track is selected to assign it to Deck 1 and 2, respectively, in the software.
- High EQ: Controls the treble frequencies for the individual channels.
- Mid EQ: Controls the mid range frequencies for the individual channels.
- Low EQ: Controls the bass frequencies for the individual channels.
- Filter: Adjusts the amount of the filter effect. Turning the knob left and right will produce a Low Pass Filter or High Pass Filter.
- Cue/PFL: Sends pre-fader audio to the Cue Channel for headphone monitoring.
- Channel Volume: Adjusts the volume of the individual channels in the software.
- Crossfader: Controls the blend between the two decks.
- Pitch Bend Down: Press and hold to momentarily reduce the speed of the track.
- Pitch Bend Up: Press and hold to momentarily increase the speed of the track.
- Pitch Fader: This controls the speed of the music. Moving towards the “+” will speed the music up, while moving towards the “–” will slow it down.
- Touch Strip: Use the Touch Strip to adjust the assigned FX. Hold Shift + Strip Search to search through a track’s time.
- Beats Multiplier: Increases and decreases the rate of the effects to the beat. When using a time-based effect, this knob adjusts its time division.
- FX 1 On/Off: Turns FX1 on and off. Hold Shift + FX1 to select from the list of available effects in the software.
- FX 2 On/Off: Turns FX2 on and off. Hold Shift + FX2 to select from the list of available effects in the software.
- FX 3 On/Off: Turns FX3 on and off. Hold Shift + FX3 to select from the list of available effects in the software.
- Tap BPM: Press this 4 or more times to manually enter a new BPM. The software will ignore the track’s BPM and follow your manually entered tempo.
- Wheel Button: Activate this button to use the platter/jog wheel to grab and move the audio, “scratching” the track as you would with a vinyl record.
- Platter/Jog Wheel: This capacitive, touch-sensitive jog wheel controls the audio when the wheel is touched and moved. When the Wheel button is not active, use the jog wheel to bend the pitch of the track. When the Wheel button is active, use the jog wheel to grab and move the audio, “scratching” the track as you would with a vinyl record. You can also grab the non-touch-sensitive outer wheel to bend the pitch of the track.
- Shift: Allows multiple control commands to be triggered when pressed first along with other buttons.
- Pad Mode: This is used to change the operation of the top 4 performance pads.
- Sync: Enables BPM syncing between decks for the 3 modes of the top 4 Performance pads. To manually adjust BPM and exit Sync, hold Shift + Sync.
- Cue (Transport Control): Sets and recalls the main Cue point in the current track. Hold down the Cue button for temporary play of the cue point. The track will play for as long as the button is held down and return to the cue point once it is released. Hold Shift + Cue to return the play head to the start of the track.
- Play/Pause: Starts and suspends playback. Hold Shift + Play/Pause to stutter the track from the last set cue point. If a cue point has not been set, the play head will return to the start of the track.
- Performance Pads: The top row of pads is used to trigger autoloop points. The bottom row of pads is used to trigger Cue points. If a Cue point has not already been set for the loaded track, this control will mark the Cue point. If a Cue point has already been set, this control will jump to Cue point.
- Master Out put LEDs: Displays the audio level going to the Master Output.
Front Panel
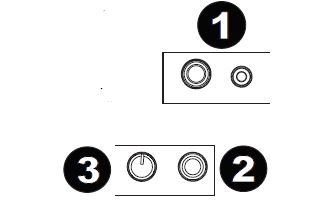
- Headphone Output: Connect headphones to these 1/4” and 1/8” jacks for monitoring the signal. The headphone volume is controlled using the Cue Gain knob.
- Microphone Input: Connect a standard dynamic microphone to this 1/4” jack.
- Mic Gain: Adjusts the level for the microphone input.
Rear Panel

- Master Output (RCA): Use standard RCA cables to connect this output to speakers or an amplifier system.
- USB: Sends USB MIDI data to control various software parameters.
Performance Pad Modes
The upper row of pads has different functions depending on their mode: Manual Loop Mode, Auto Loop Mode, and Sample Mode. To select a mode, hold down the Pad Mode button and press one of the upper pads. An LED under the pad section indicates the currently selected mode.
Manual Loop Mode: Hold Pad Mode and press the pad marked Manual Loop (silkscreened above the pad) to assign the lower 4 pads to the functions listed below:
- Loop In – Sets the beginning of a loop. After a Loop Out point is set, when this button is pressed again, it will allow for fine adjustment of the Loop In point.
- Loop Out – Sets the end point for the loop. When this button has been pressed after a
- Loop Out point has been set, it will allow for fine adjustment of the Loop Out point.
- On/Off – When this is pressed inside a loop, this will turn the loop off. When pressed outside a loop, this will activate the loop and start playback from its Loop In point. If a loop has not been set, this button will have no effect.
- Loop x1/2 – Cuts the currently playing loop in half. Press Shift + Loop x1/2 to double the length the currently playing loop. Auto Loop Mode: Hold Pad Mode and press the pad marked Autoloop to assign the lower 4 pads to the functions listed below:
- Auto 1 – Sets and starts playback of a 1-beat autoloop.
- Auto 2 – Sets and starts playback of a 2-beat autoloop.
- Auto 4 – Sets and starts playback of a 4-beat autoloop.
- Auto 8 – Sets and starts playback of an 8-beat autoloop.Sample Mode: Hold Pad Mode and press the pad marked Sampler to assign the lower 4 pads to the functions listed below:• Sample 1 – Plays the sample assigned to Sample Pad 1.• Sample 2 – Plays the sample assigned to Sample Pad 2.• Sample 3 – Plays the sample assigned to Sample Pad 3.• Sample 4 – Plays the sample assigned to Sample Pad 4.
Beatmixing with MIXTRACK PRO 3 and Serato DJ intro
Below is an example of how to mix tracks using MIXTRACK PRO 3 and Serato DJ Intro:
- Load tracks onto the decks of Serato DJ Intro by using the Load 1 and Load 2 buttons on MIXTRACK PRO 3.
- Move the crossfader all the way to the left on MIXTRACK PRO 3.
- Turn the Cue Mix knob all the way to the right to ‘PGM’.
- Play the track that is loaded on Deck 1.
- Play the track that is loaded on Deck 2 and match it’s BPM to Deck 1’s track. To match the BPM, press Deck 2’s Sync button on MIXTRACK PRO 3.
- Once the BPM is matched, move the crossfader on MIXTRACK PRO 3 to fade between Deck 1 to Deck 2.
Beatmixing Tracks in Other Programs
If you are using MIXTRACK PRO 3 with another software program that does not support BPM syncing between decks, follow the traditional example below to sync tracks. You can match the tempo by ear and adjust the pitch by monitoring the music from both decks in your software.
- Play the track on Deck 1.
- Play the track on Deck 2.
- Listen to Deck 2 in your headphones. If the beat of Deck 2 is faster than Deck 1, move the pitch fader to the ( – ) side. (see Figure 1.)
- If the beat of Deck 2 is slower than the beat of Deck 1, move the pitch fader to the ( + ) side. (see Figure 2.)
Note: This procedure can be done on either Deck.
Numark Mixtrack Pro 3 User Guide – Numark Mixtrack Pro 3 User Guide –
[xyz-ips snippet=”download-snippet”]