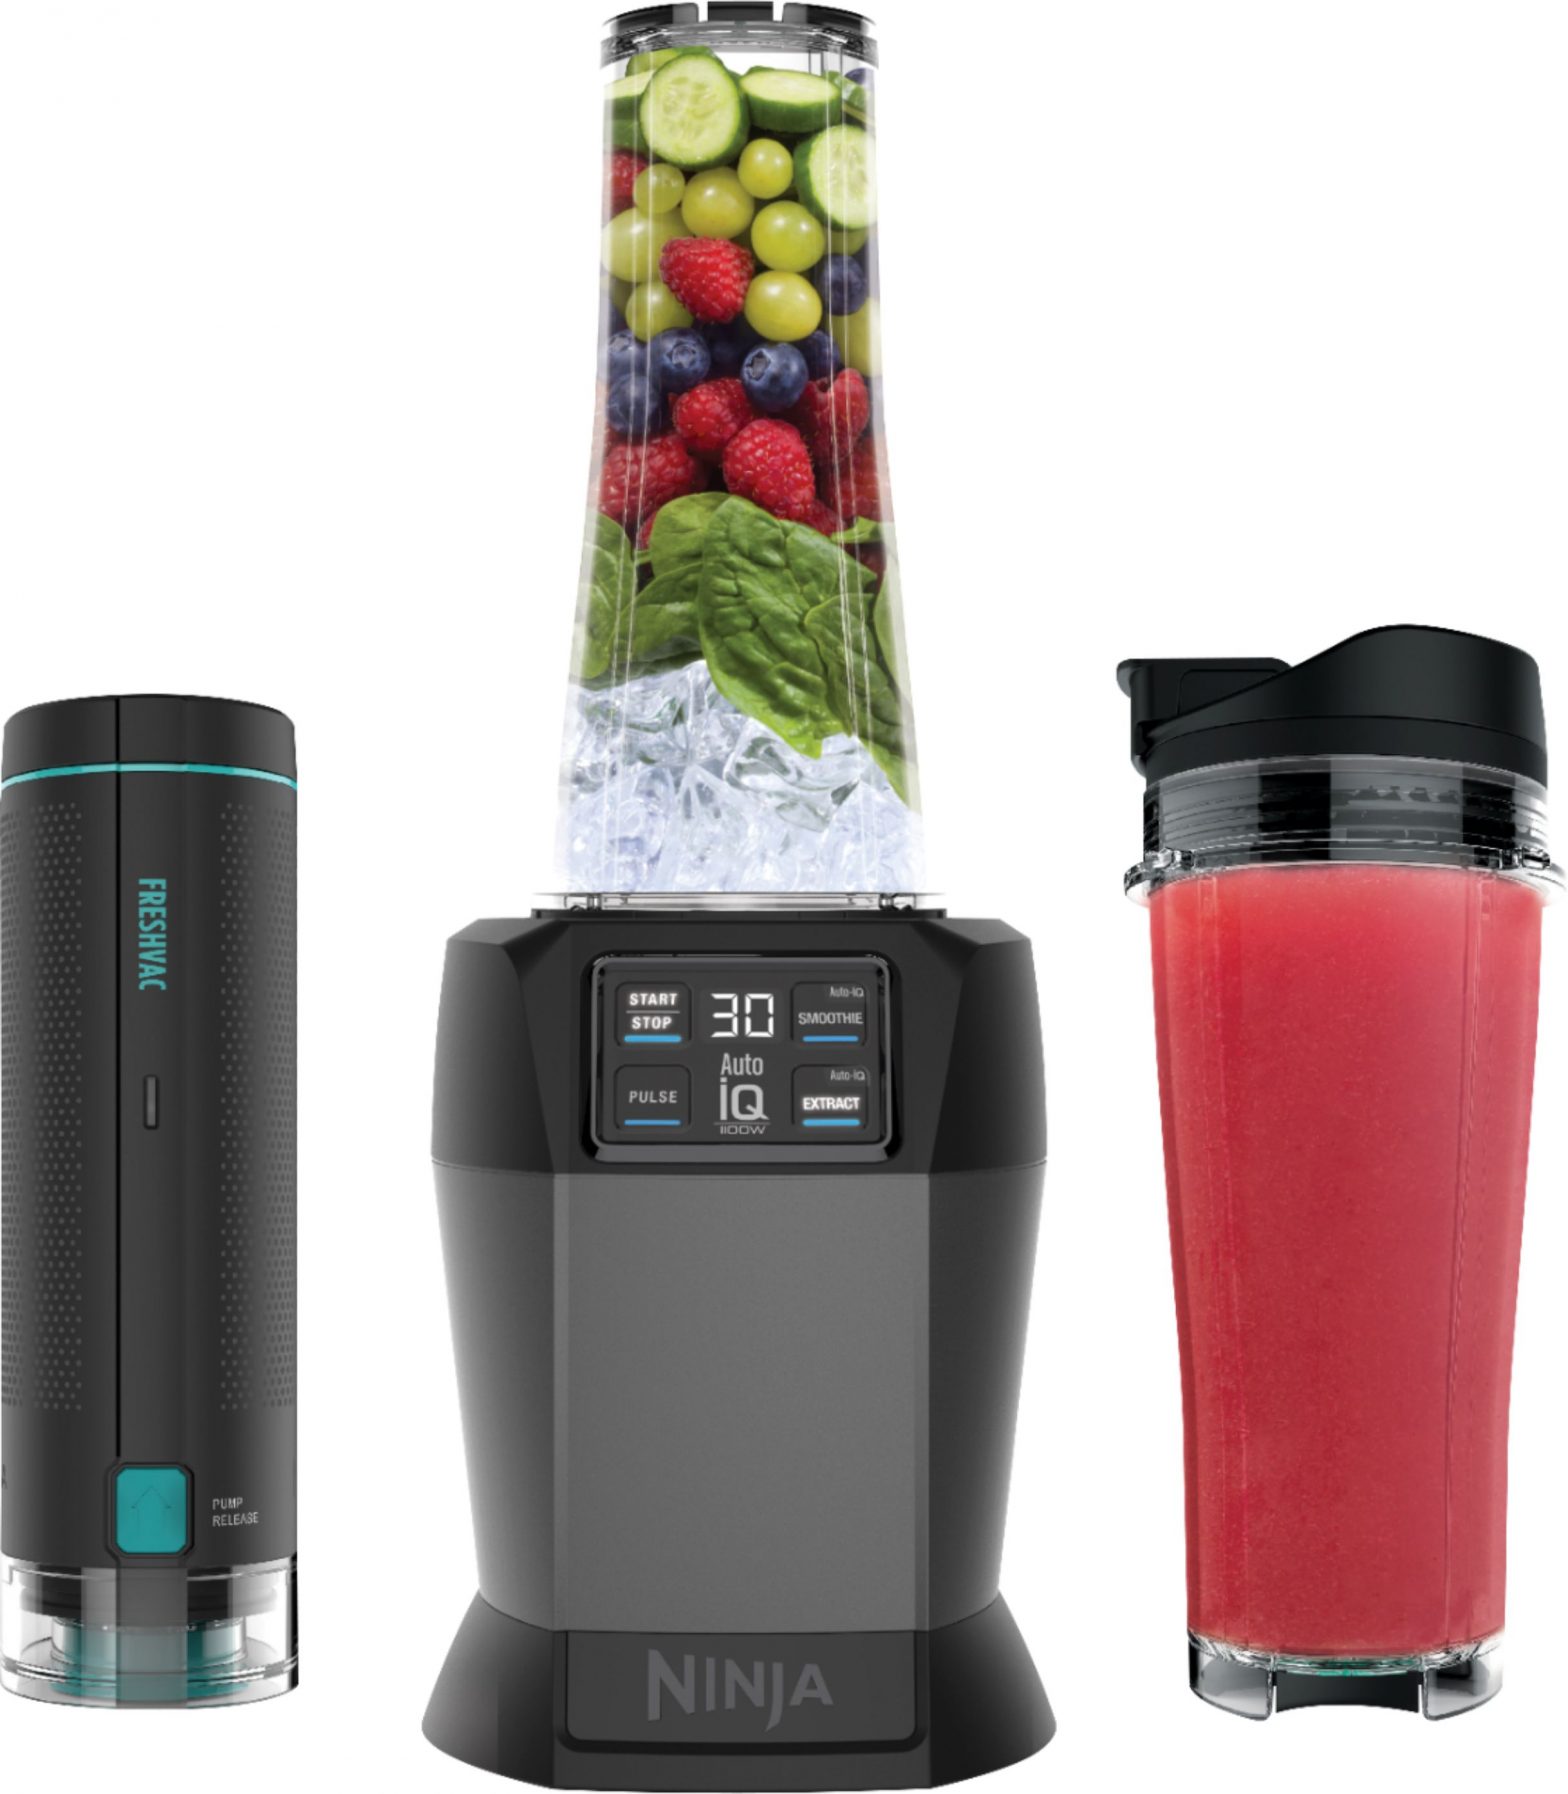
THANK YOU FOR PURCHASINGThe Nutri Ninja® with FreshVac™ Technology
REGISTER YOUR PURCHASEregisteryourninja.com1-877-646-5288Scan QR code using mobile device
RECORD THIS INFORMATIONModel Number: ________________Serial Number: _________________Date of Purchase: ______________(Keep receipt)Store of Purchase: ______________
THIS BOOK COVERSMODEL NUMBER:BL580TECHNICAL SPECIFICATIONSVoltage: 120V~, 60HzPower: 1100 WattsCUP CAPACITY:24 oz (2 cups)
PLEASE READ CAREFULLY ANDKEEP FOR FUTURE REFERENCE.These instructions are designedto help you get a completeunderstanding of your new NutriNinja with FreshVac Technology.If you have any questions, pleasecall our Customer Service line at1-877-646-5288
TIP: You can find the model and serialnumbers on the QR code label located onthe back of the unit by the power cord.
CONTENTSImportant Safeguards………………………………………4Getting to Know YourNutri Ninja® with FreshVac™ Technology……8Parts………………………………………………………………..9Before First Use……………………………………………..10Installing the Batteries…………………………………….10Using an Optional AC Adapter……………………….10Using the Control Panel………………………………….11Vacuum Blending with theSingle-Serve FreshVac Cup …………………………….12Care & Maintenance ………………………………………16Cleaning …………………………………………………………16Storing ……………………………………………………………16Resetting the Motor Thermostat ……………………16Troubleshooting Guide ………………………………….17Replacement Parts ………………………………………….18Product Registration ………………………………………18Warranty ………………………………………………………..19
IMPORTANT SAFEGUARDSHOUSEHOLD USE ONLY • READ ALL INSTRUCTIONS BEFORE USE
Read all instructions before using yourNUTRI NINJA® WITH FRESHVAC™ TECHNOLOGYWhen using electrical appliances, basic safety precautionsshould always be followed, including the following:
![]() WARNINGTo reduce the risk of fire, electricshock, serious injury, death, ordamage when using this appliance,follow these basic safety precautions.
WARNINGTo reduce the risk of fire, electricshock, serious injury, death, ordamage when using this appliance,follow these basic safety precautions.
General Precautions1. Read all instructions prior to usingthe appliance and its accessories.2. Carefully observe and follow allwarnings and instructions. This unitcontains electrical connectionsand moving parts that potentiallypresent risk to the user.3. ALWAYS exercise care whenhandling the Pro Extractor Blades®Assembly. The blades are sharp,handle carefully. ONLY grasp thePro Extractor Blades Assembly bythe outer perimeter of the bladeassembly base. Failure to use carewhen handling the blade assemblywill result in a risk of laceration.4. Take your time and exercise careduring unpacking and appliancesetup. This appliance containssharp, loose blades that can causeinjury if mishandled.5. Take inventory of all contents toensure you have all parts neededto properly and safely operateyour appliance.6. Turn the appliance off, thenunplug from the outlet whennot in use, before assembling ordisassembling parts, and beforecleaning. To unplug, grasp theplug and pull from the outlet.NEVER pull from the power cord.7. Before use, wash all parts thatmay contact food. Follow washinginstructions covered in thisinstruction manual.8. To protect against the risk ofelectric shock, DO NOT submergethe appliance or allow the powercord to contact any form of liquid.9. DO NOT use this applianceoutdoors. It is designed for indoorhousehold use only.10. This appliance has importantmarkings on the plug blade. Theattachment plug or entire cordset(if plug is molded onto cord) isnot suitable for replacement. Ifdamaged, the appliance shallbe replaced.11. This appliance has a polarizedplug (one prong is wider thanthe other). To reduce the risk ofelectric shock, this plug will fit ina polarized outlet only one way.If the plug does not fit fully in theoutlet, reverse the plug. If it stilldoes not fit, contact a qualifiedelectrician. DO NOT modify theplug in any way.
12. DO NOT operate any appliancewith a damaged cord or plug, orafter the appliance malfunctionsor is dropped or damaged in anymanner. This appliance has nouser-serviceable parts. If damaged,contact SharkNinja for servicing.13. This appliance has importantinformation on the plug prong.The power cord is not suitable forreplacement. If damaged, contactSharkNinja for servicing in order toavoid a hazard.14. Extension cords should NOT beused with this appliance.15. DO NOT allow young childrento operate this appliance or useas a toy. Close supervision isnecessary when any applianceis used near children.16. This appliance is NOT intendedto be used by persons (includingchildren) with reduced physical,sensory, or mental capabilities, orlack of experience and knowledge,unless they are closely supervisedand instructed concerning useof the appliance by a personresponsible for their safety.17. Before each use, inspect bladeassembly for damage. If a bladeis bent or damage is suspected,contact SharkNinja to arrangefor replacement.18. DO NOT attempt to sharpen blades.19. DO NOT allow the unit or the cordto hang over the edges of tablesor counters. The cord may becomesnagged and pull the appliance offthe work surface.
20. DO NOT allow any part of theunit to contact hot surfaces,including stoves and otherheating appliances.21. ALWAYS use the appliance on adry and level surface.22. NEVER place a blade assemblyon the motor base without it firstbeing attached to the cup.23. Keep hands, hair, and clothing outof the container.24. ONLY use attachments andaccessories that are provided withthe product or are recommendedby SharkNinja. The use ofattachments not recommended orsold by SharkNinja may cause fire,electric shock, or injury.25. During operation and handling ofthe appliance, avoid contact withmoving parts.26. DO NOT operate the appliancewith an empty container.27. DO NOT fill containers past theMAX FILL or MAX LIQUID lines.28. DO NOT microwave any containersor accessories provided withthe appliance.29. DO NOT perform grindingoperations with the Single-Serve Cup and Pro ExtractorBlades® Assembly.30. Before operation, ensure all utensilsare removed from containers.Failure to remove utensils cancause containers to shatter andpotentially result in personal injuryand property damage.31. Keep hands and utensils out ofcontainers while chopping toreduce the risk of severe personalinjury or damage to the blender/food chopper. A scraper may beused ONLY when the blender orprocessor is not running. Whenusing the processor, always usefood pusher to add food. NEVERadd food by hand.32. NEVER operate the appliancewithout lids and caps in place.DO NOT attempt to defeat theinterlock mechanism. Ensure thecontainer and lid are properlyinstalled before operation.33. DO NOT expose the containersand accessories to extremetemperature changes. They mayexperience damage.34. NEVER leave the applianceunattended while in use.35. DO NOT open lid or pour spoutcap while blender is operating.36. DO NOT blend hot liquids. Doingso may result in pressure buildupand steam exposure that can posea risk of the user being burned.37. If you find unmixed ingredientssticking to the sides of the the cup,stop the appliance, remove thelid, and use a scraper to dislodgeingredients. NEVER insert yourhands into the pitcher, as you maycontact one of the blades andexperience a laceration.38. DO NOT attempt to remove thecontainer and lids from the motorbase while the blade assembly isstill spinning. Allow the applianceto come to a complete stop beforeremoving lid and container.39. Upon completion of blendingor processing, ensure the bladeassembly is removed BEFOREemptying container’s contents.Remove the blade assembly bycarefully grasping the top ofthe shaft and lifting it from thecontainer. Failure to remove theblade assembly before emptyingthe container results in a riskof laceration.40. Remove the Pro Extractor Blades®Assembly from the Single-ServeCup upon completion of blending.DO NOT store ingredients beforeor after blending them in the cupwith the blade assembly attached.Some foods may contain activeingredients or release gases thatwill expand if left in a sealedcontainer, resulting in excessivepressure buildup that can posea risk of injury. For ingredientstorage in the cup, use onlySpout Lid to cover.41. If the appliance overheats, athermal switch will activate andtemporarily disable the motor. Toreset, unplug the appliance andallow it to cool for approximately30 minutes before using again.42. The maximum wattage rating forthis appliance is based on theconfiguration of the Pro ExtractorBlades Assembly and Single-ServeCup. Other configurations maydraw less power or current.43. DO NOT process dry ingredientswithout adding liquid to the Single-Serve Cup. The Single-Serve Cup isnot intended for dry blending.44. To protect against risk of electricalshock, DO NOT immerse the motorbase in water or other liquid.DO NOT spray the motor base withany liquids. Turn off and unplugthe motor base before cleaning.45. WARNING: The maximum wattagerating for this appliance is achievedby mixing 350g dried soy beanswith 50g oil on “start/stop” for 15seconds. Other recipes may drawless power or current. The unit isNOT intended for dry blending.46. DO NOT operate pumpduring blending.47. DO NOT operate pumpupside down.48 DO NOT immerse pump in wateror any other liquid.49. DO NOT incinerate this applianceeven if it is severely damaged. Thebatteries can explode in a fire.
GETTING TO KNOW YOURNUTRI NINJA® FRESHVAC™ TECHNOLOGY
WELCOME!Congratulations on yourpurchase. Use this instructionmanual to learn about the greatfeatures of your Nutri Ninja withFreshVac Technology. Fromassembly to use to maintenance,you will find it all in here.
If you have any questions, concerns orfeedback, we’d love to hear from you.Give us a call at 1-877-646-5288 orvisit ninjakitchen.com
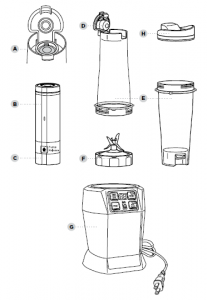
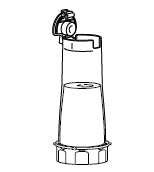
MAIN UNITA Cup FreshVac TabB FreshVac PumpC Twist-Off ReservoirD Flip & Seal LidE 24 oz. Single ServeFreshVac Cups (x 2)F Pro Extractor Blades®AssemblyG Motor Base with Power CordH Spout Lid (x 2)
PART
BEFORE FIRST USE
IMPORTANT: Review all warningson pages 4-7 before proceeding.
DID YOU KNOW?• You can take your drinks on the gousing the spout lids.• The cups, blade assembly, and lids areBPA free and dishwasher safe.
NOTE: Handle the Pro Extractor Blades®Assembly by grasping around theperimeter of the blade assembly base.
NOTE: All attachments are dishwashersafe. It is recommended that thecups, lids, twist-off reservoir, andblade assembly be placed on thetop rack of the dishwasher. Ensureblade assembly and lid are removedfrom the cup before placing in thedishwasher. Exercise care whenhandling blade assembly.
1. Remove all packaging materialsfrom the appliance. Exercise carewhen unpacking blade assembly.The blade assembly is sharp.2. Wash cups, lids, and blade assemblyin warm, soapy water using adishwashing utensil with a handle toavoid direct contact with the blades.Exercise care when handling bladeassembly, as the blades are sharp.3. Thoroughly rinse and air-dry all parts.4. Wipe touchscreen with a soft,damp cloth. Allow it to drycompletely before using.
INSTALLING THE BATTERIES1. Unscrew the FreshVac™ Pump’spower button cap and remove thespring-loaded battery cover.2. Install 6 AA alkaline batteries(included), ensuring the +/-symbols on the batteries matchthe markings on the battery coverand battery housing.3. Replace the battery cover, makingsure it is fully seated and clickedin place.4. Screw on the pump’s powerbutton cap.NOTE: If the battery cover and powerbutton cap are not properly installedor tightly in place, the pump willnot function.
USING AN OPTIONALAC ADAPTERIf you prefer to power your FreshVacpump using a AC Adapter, you maypurchase one on ninja accessories.com.1. Insert the small round end of theAC power cord into the jack onthe pump.2. Insert the 2-pronged plug of the ACcord into an electrical outlet.NOTE: Use only an optional ACadapter manufactured by SharkNinja.Other after-market adapters are notcompatible with the FreshVac pump.
USING THE CONTROL PANEL
AUTO-IQ® PROGRAMS FOR THE SINGLE-SERVE FRESHVAC™ CUPIntelligent pre-set programs combine unique blending and pausing patternsthat do the work for you. Once a pre-set program is selected, it will startimmediately. Press the selected program again to pause it.

MANUAL SETTINGS:START | STOPPress once to start continuousrunning; press again to stop.Timer counts up by seconds,up to 60 seconds.PULSERuns only while pressed down.Short presses create short pulses.Timer counts up by seconds aslong as button is pressed down.
AUTO-IQ PROGRAMS:AUTO-IQ SMOOTHIEMake super-smooth, sippable drinksand shakes from fresh or frozenfruit, milk, liquids, and ice.AUTO-IQ EXTRACTIdeal for tough, leafy, or fibrouswhole fruits and vegetables,including their skins, seeds,and stems.
VACUUM BLENDING WITH THESINGLE-SERVE FRESHVAC™ CUP
IMPORTANT: Review all warningson pages 4-7 before proceeding.
Vacuum blending recommendedfor extractions, smoothies, soups, dips,and dressings for brighter flavors,vibrant colors, and improved textures.Non vacuum blending recommendedfor whipped desserts that benefit fromadded air and frozen drinks with highlyfrozen ingredients for thicker results.
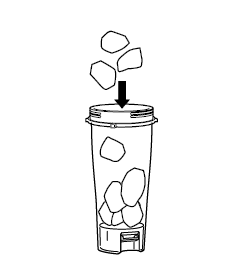 1. Add ingredients to the FreshVacCup. DO NOT add ingredients pastthe MAX LIQUID line on the cup.
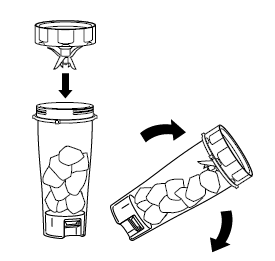 2. Place the Pro Extractor Blades®Assembly on the top of the cupand turn clockwise to seal.3. Turn cup upside down so theFlip & Seal Lid is on top and thebottom of the blade assembly isflat on the counter.
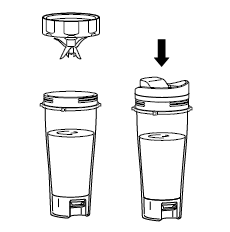
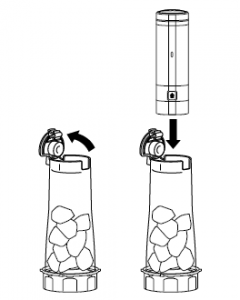 4. To open the Flip & Seal Lid, pressand lift the latch. Set the FreshVacPump on top of the FreshVac Tab.The pump DOES NOT lock intoplace on the lid.
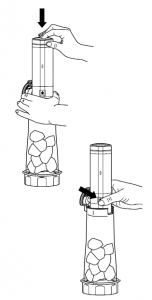
5. To vacuum seal the cup, place thepump over the tab. Press the powerbutton on top of the pump to beginvacuum sealing. The pump will makea motorized noise and the light onthe pump will illuminate in whitewhile vacuum sealing is in progress.You do not need to hold the pump inplace while vacuum sealing.
6. When vacuum sealing is complete,the pump will shut off automaticallyand the green light on the pumpwill illuminate.7. To release the pump from the cup,press the pump release button onthe bottom front of the pump and lift.
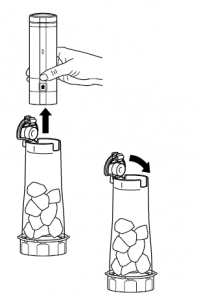 8. Close the Flip & Seal Lid, pressing ituntil it clicks into place.9. To blend ingredients, followinstructions on the next page.When blending is complete, pressuremust be released from the cupthrough the FreshVac™ Tab beforeopening the lid. See step 14 on onpage 15 for more information.
VACUUM BLENDING WITH THESINGLE-SERVE FRESHVAC™ CUP – CONT.
IMPORTANT: Review all warningson pages 4-7 before proceeding.
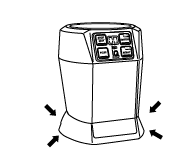
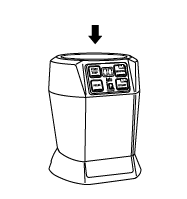 10 Place the unplugged motor baseon a clean, dry, level surface suchas a countertop or table. Pressdownward on the motor base toadhere the suction cups to thework surface. Plug the motor baseinto a wall outlet.
11. Turn the Single-Serve FreshVacCup upside down and install ontothe motor base. When the unit iscorrectly locked into the motorbase, program lights will illuminate.

12. If using a pre-set program, selectthe program that best suits yourrecipe. The preset feature willautomatically stop the unit at theend of the program. To pausethe unit at any time, press thecurrently active program asecond time. Reference page 11for program descriptions.

13. When blending is complete, liftthe cup up and out of the motorbase. Pressure must be releasedbefore opening the cup. (see step14 below). DO NOT store contentsin the cup with the Pro ExactorBlades® Assembly attached.

14. Open the Flip & Seal Lid by pressingthe tab and lifting. To release thevacuum seal, gently lift the FreshVacTab. Air will enter the cup, making iteasy to remove the blade assembly.
 15. Close the Flip & Seal Lid, pressing ituntil it clicks into place.
16. Turn cup over so blade assemblyis on top. Rotate blade assemblycounterclockwise to remove. Totake your blended contents on thego, place the spout lid on cup andturn clockwise to seal.
17. Unplug the unit when finished. To liftthe motor base, place your handsunderneath both sides of it andgently pull the unit up and towardyou. Refer to the Care & Maintenancesection for storing instructions.
CARE & MAINTENANCE
CLEANING1. Separate all parts.2. Wash all cups in warm, soapywater with a soft cloth.3. Hand-WashingWash blade assembly in warm, soapywater using a dishwashing utensilwith a handle to avoid direct contactwith the blades. Exercise care whenhandling blade assembly as theblades are sharp. Thoroughly rinseand air-dry all parts.DishwasherAll attachments are dishwashersafe. Place the lids, blade assembly,and twist-off reservoir on the toprack of the dishwasher ONLY.Ensure the blade assembly and lidare removed from the cup beforeplacing in the dishwasher. Exercisecare when handling blade assembly.Motor BaseTurn off the unit and unplug themotor base before cleaning. Wipemotor base with a clean, damp cloth.To clean the touchscreen, apply an allpurposecleaner to a soft cloth, such asmicrofiber, and wipe gently.NEVER directly spray the base ortouchscreen with water or other liquids.DO NOT use abrasive cloths, pads, orbrushes to clean base or touchscreen,as they can dull or scratch the surface.FreshVac™ PumpNEVER submerge the pump in water orother liquid. If you see water or otherliquid in the twist-off reservoir:1. Remove twist-off reservoirfrom pump and wash and dryit thoroughly.2. Run pump for 10 seconds to clearany fluid.3. Wipe pump clean with a soft cloth.4. Reattach twist-off reservoir to pump.STORINGWrap power cord around cord wrap onback of motor base. Store unit uprightand store all blade assemblies inside orattached to their respective containerswith their lids locked into place.DO NOT store blended or unblendedingredients in the Single-ServeFreshVac Cup with the Pro ExtractorBlades® Assembly attached. Use onlythe spout lid when storing blended orunblended ingredients in the cup.DO NOT stack items on top ofthe cups. Store any remainingattachments alongside the unit orin a cabinet where they will not bedamaged or create a hazard.RESETTING THE MOTORTHERMOSTATThis unit features a unique safetysystem that prevents damage tothe motor and drive system shouldyou inadvertently overload it. If theunit is overloaded, the motor will betemporarily disabled. Should this occur,follow the reset procedure below.1. Unplug the unit from theelectrical outlet.2. Allow the unit to cool forapproximately 15 minutes.3. Remove the cup’s blade assembly.Empty the cup and ensure noingredients are jamming theblade assembly.IMPORTANT: Ensure thatmaximum capacities are notexceeded. This is the most typicalcause of appliance overload.If your unit needs servicing,please call Customer Serviceat 1-877-646-5288.
TROUBLESHOOTING GUIDEWARNING: To reduce the risk of shock and unintended operation,turn power off and unplug unit before troubleshooting.
Unit doesn’t turn on.• Make sure unit is plugged in.• Place cup on base and rotate it clockwise until it clicks into place.Unit doesn’t turn off.• Remove cup from base by rotating it counterclockwise and lifting it. Unplug the powercord from the outlet.Doesn’t mix well; ingredients get stuck.• Using the pre-set programs is the easiest way to achieve great results. The pulses andpauses allow the ingredients to settle toward the blade assembly. If ingredients areroutinely getting stuck, adding some liquid will usually help.• When filling the cup, start with fresh fruit or veggies, then leafy greens or herbs. Next addliquids or yogurt, then seeds, powders, or nut butters. Finally, add ice or frozen ingredients.Motor base won’t stick to counter or tabletop.• Make sure surface and suction feet are wiped clean. Suction feet will only stick tosmooth surfaces.• Suction feet will not stick on some surfaces such as wood, tile, and non-polished finishes.• DO NOT attempt to use unit when the motor base is stuck to a surface that is notsecure (cutting board, platter, plates, etc.).Unit is difficult to remove from counter for storage.• Place your hands underneath both sides of the motor base and gently pull the unit upand toward you.FreshVac™ Pump won’t turn on.• Ensure that working batteries are installed correctly in the pump, and the battery coveris securely in place.• If using an optional AC adapter, make sure it is manufactured by SharkNinja. Otherafter-market adapters are not compatible with the pump.• If using a SharkNinja AC adapter, make sure the connector is inserted fully into the pump.FreshVac Pump won’t turn off.The pump will shut off automatically once a vacuum seal is achieved. If a vacuum seal isnot achieved, you will be able to remove the pump from the lid. If this happens, turn offthe pump and check the following:• Make sure the Pro Extractor Blades® Assembly is tightly attached to the cup.• Ensure the FreshVac Tab on the Flip & Seal Lid is properly installed.DO NOT remove the tab from the lid.Accidentally removed the FreshVac tab and need to reinstall.• In a case you accidentally remove the FreshVac Tab and need to reinstall, follow theseeasy steps. First ensure the FreshVac Tab matches up with the opening on the Flip &Seal Lid. Next, align the bottom side of the tab to match the shape of the opening onthe cup. Then press the tab down until it is seated flat.
TROUBLESHOOTING GUIDE – Cont.
Can’t remove Pro Extractor Blades® Assembly from cup.• Cup will be vacuum sealed shut after using the FreshVac™ Pump.• Release the vacuum seal by gently pulling up on the FreshVac Tab.FreshVac Pump does not lock onto cup.• Pump will not lock onto cup. Once pump is activated, the pump will sealto the cup and become secure.FreshVac Pump is stuck on the cup.• To release the pump from the cup, press the pump release button (up arrow)and lift up.What do the lights on the FreshVac Pump mean?• White LED light indicates the pump has been activated and vacuum sealingis in progress.• Green LED light indicates vacuum sealing is complete. Pump will automaticallyshut off when complete.• A blinking light indicates the batteries have been loaded incorrectly or needto be replaced.
REPLACEMENT PARTSTo order additional parts and accessories, visit ninjaaccessories.comor contact Customer Service at 1-877-646-5288.
PRODUCT REGISTRATIONPlease visit registeryourninja.com or call 1-877-646-5288 to registeryour new Ninja® product within ten (10) days of purchase. You will beasked to provide the store name, date of purchase, and model numberalong with your name and address.The registration will enable us to contact you in the unlikely event of aproduct safety notification. By registering, you acknowledge you haveread and understood the instructions for use and warnings set forth inthe accompanying instructions.
![]() The 1-Year Limited Warranty applies to purchases made from authorized retailers ofSharkNinja Operating LLC. Warranty coverage applies to the original owner and to theoriginal product only and is not transferable.SharkNinja warrants that the unit shall be free from defects in material and workmanshipfor a period of 1 year from the date of purchase when it is used under normal householdconditions and maintained according to the requirements outlined in this instruction manual,subject to the following conditions and exclusions.
The 1-Year Limited Warranty applies to purchases made from authorized retailers ofSharkNinja Operating LLC. Warranty coverage applies to the original owner and to theoriginal product only and is not transferable.SharkNinja warrants that the unit shall be free from defects in material and workmanshipfor a period of 1 year from the date of purchase when it is used under normal householdconditions and maintained according to the requirements outlined in this instruction manual,subject to the following conditions and exclusions.
What is covered by my warranty?1. The original unit and/or non-wearable components deemed defective, in SharkNinja’s solediscretion, will be repaired or replaced for up to 1 year from the original purchase date.2. In the rare event that a replacement unit is issued, the warranty coverage ends 6 monthsafter the receipt date of the replacement unit or the remainder of the existing warranty,whichever is greater. If the unit is replaced, SharkNinja reserves the right to replace theunit with one of equal or greater value.What is not covered by my warranty?Our Customer Service and Product Specialists are available to provide all the warrantyservice options available to you, including the possibility of upgrading to our VIP WarrantyService Options for select product categories.1. Normal wear and tear of wearable parts (including all blending vessels, lids, blades,blender base, and pump) that require regular maintenance and/or replacement toensure the proper functioning of your unit are not covered by this warranty.2. Any unit that has been tampered with or used for commercial purposes.3. SharkNinja will cover the cost for the customer to send the unit to us for repair orreplacement. A fee of $19.95 for return shipping costs will be charged at the time ofreturn shipment of the repaired or replacement unit.4. Damage caused by misuse, abuse, or negligent handling, or damage due tomishandling in transit.5. Consequential and incidental damages.6. Defects caused by or resulting from damages from shipping or from repairs, service, oralteration to the product or any of its parts that have been performed by a repair personnot authorized by SharkNinja.7. Products purchased, used, or operated outside of North America.Problems with your unit/How to get service:If your appliance fails to operate properly while in use under normal household conditionswithin the warranty period, visit ninjakitchen.com for product care/maintenance self-help.Our Customer Service and Product Specialists are also available at 1-877-646-5288 to assistwith product support and warranty service options.How to initiate a warranty claim:You can call 1-877-646-5288 to have a Customer Service specialist assist you. Please note,you must call 1-877-646-5288 to initiate a warranty claim. Return and packing instructioninformation will be provided at that time.For Customer Service hours, visit ninjakitchen.comReplacement parts are available for purchase at ninjaaccessories.com. For more informationon what are classified as wearable and non-wearable parts, visit ninjakitchen.com/warrantyThis warranty gives you specific legal rights, and you may also have other rights that varyfrom state to state.Some states do not permit the exclusion or limitation of incidental or consequential damages,so the above may not apply to you.
VISIT US ONLINE AT:ninjakitchen.comOr follow us on any of our social media pages:Facebook.com/ninjakitchenTwitter.com/ninjakitchenInstagram.com/ninjakitchenPinterest.com/ninjakitchenYoutube.com/epninjakitchenNUTRI NINJA BL580 With Freshvac Technology Owner’s Guide – NUTRI NINJA BL580 With Freshvac Technology Owner’s Guide –
[xyz-ips snippet=”download-snippet”]