![]()
Nutri-Q Food ProcessorInstruction Manual
![]()
IMPORTANT:
![]() READ THIS MANUAL BEFORE USING THIS APPLIANCE.FAILURE TO FOLLOW THE WARNINGS AND INSTRUCTIONS LISTED BELOW MAY RESULT IN ELECTRIC SHOCK, FIRE, AND/OR INJURY
READ THIS MANUAL BEFORE USING THIS APPLIANCE.FAILURE TO FOLLOW THE WARNINGS AND INSTRUCTIONS LISTED BELOW MAY RESULT IN ELECTRIC SHOCK, FIRE, AND/OR INJURY
SAFETY INSTRUCTIONS:
- The intended use of this appliance is explained in this manual. The use of accessories other than those recommended in this manual may present a risk of personal injury.
- Always check the mains voltage corresponds to the voltage on the rating plate.
- Do not use this appliance if the cord or plug is damaged. Dispose of
- Do not let the cord hang over the edge of the table or counter.
- To protect against the risk of electrical shock, do not put the motor base into water or other liquid. To disconnect, turn any control to “off”, then remove plug from wall outlet by pulling the plug, not the cord.
- Close supervision is necessary when any appliance is used by or near
- Keep hands and utensils away from moving blades or discs while processing food to reduce the risk of severe injury to persons or damage to the Food Processor. A scraper or spatula may be used but must be used only when the Food Processor is not running.
- Avoid contacting moving parts.
- Never feed food by hand. Always use the food pusher provided.
- Before removing the lid from the jug from the power unit, switch off the unit, wait until the blades have come to a complete stop.
- Do not use fingers to scrape food away from the discharge disc while the appliance is operating.
- Be certain the lid is securely locked into place before operating the appliance.
- Be sure to switch off the appliance after each use of your food Make sure the motor stops completely before disassembling.
- Do not put your fingers or other objects into the unit opening while it is in operation. If food becomes lodged in the opening, use a food pusher or another piece of fruit or vegetable to push it down. When this method is not possible, turn the motor off and disassemble to remove the remaining food.
- Do not attempt to override the cover interlock mechanism.
- The metal blades and disk are extremely sharp, handle with care. Always hold the blade assembly by the finger grip or stem, away from the cutting edge, both when handling and cleaning.
- To reduce the risk of injury, never place the processing blade or circular blade on the drive shaft without the processing jug locked properly in place.
- Do not leave this appliance unattended during use.
- If this appliance falls or accidentally becomes immersed in water, unplug it immediately. Do not use this appliance after it has fallen into or become immersed in water.
- To reduce the risk of injury to persons or property, never use this appliance in an unstable position.
- Do not use this appliance for anything other than its intended use.
- Switch off the appliance and disconnect from supply before changing accessories or approaching parts that move in use.
- Always disconnect the appliance from the supply if it is left unattended and before assembling, disassembling, or cleaning.
- Do not use outdoors.
- Caution: never immerse in water, unplug before inserting or removing
- CAUTION: DO NOT OPEN THE LID UNTIL THE BLADES STOP.
- Appliances can be used by persons with reduced physical, sensory or mental capabilities or lack of experience and knowledge if they have been given supervision or instruction concerning the use of the appliance in a safe way and if they understand the hazards involved. Children shall not play with the appliance.
- This appliance shall not be used by children. Keep the appliance and its cord out of reach of children.
- Do not use this appliance if the cable or plug is damaged. Dispose of
- This appliance is not intended for use by persons (including children) with reduced physical, sensory or mental capabilities, or lack of experience and knowledge unless they have been given supervision or instruction concerning the use of the appliance by a person responsible for their safety.
- Children should be supervised to ensure that they do not play with the
- This is not a toy and should not be used by children I play
- The operating times and speed settings for accessories should be given (Details)
- Always disconnect the blender from the supply if it is left unattended and before assembling, disassembling, or cleaning;
- Do not allow children to use the blender without supervision;
- How to clean surfaces in contact with food. (see details);
- Switch off the appliance and disconnect from supply before changing accessories or approaching parts that move in use.
- Care shall be taken when handling the sharp cutting blades, emptying the bowl, and cleaning.
HOUSEHOLD USE ONLY
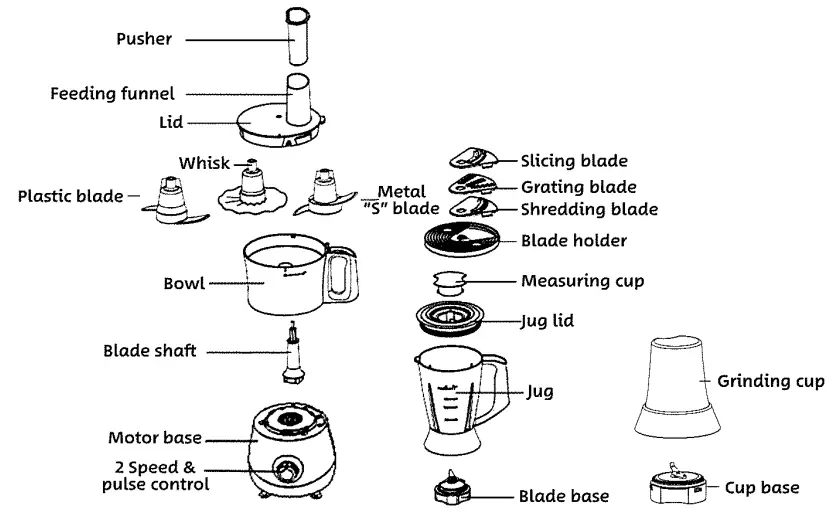
KNOW YOUR FOOD PROCESSOR
EFORE FIRST USE
Before first use, carefully unpack the food processor and its attachments and remove any packing material or label, or stickers. Clean all the parts except the motor base following the instructions in CLEANING AND MAINTENANCE. Handle the “5” blade or circle blade with extreme care as they are sharp. The food processor can be used for kneading, beating, and whisking, chopping the meat or vegetable and fruit, shredding, slicing, and grating the vegetables or potatoes, blending the smooth soup, sauces, creams, fruit purees, and milk.
BLENDING
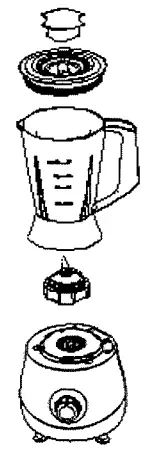
- Place the blending jug on the Motor Unit from the unlock position and slightly turn the jug clockwise until the blending jug locks into the lock position on the motor If the blending jug is not in position the blender will not work.
- Peeled or cored the fruit or vegetables and then cut them into small dices(15mmX15mmX15mm), but the food piece into the jug. Usually, a certain amount of purified water has to be added to facilitate the smooth running of the appliance. The amount of mixture should not exceed the max level as indicated on the blending jug.
- NOTE: NEVER USE BOILING LIQUIDS OR RUN THE APPLIANCE THE BLENDING JUG MUST NOT BE USED FOR BLENDING MEAL
- Replace the jug Cover on the jug and ensure that the jug Cover fits onto the jug securely.
- You may add ingredients into the jug through the center opening of jug Cover during operation, then replace Measuring Cup if necessary. Let the tabs of the Measuring Cup align with the grooves of the Top Cover, put down and turn in clockwise by 90°to lock it in place, when disassembling, turn the measuring cup in anti-clockwise by 90°to unlock it.
- Connect the plug to the wall outlet and set Speed Selector to your desired speed. There are four settings: P, 0,1, 2. The 1 setting is a low speed, the 2 setting is a high speed. Turn the selector to P position and hold it to pulse actuate motor for delicate chopping. Release it to return the 0 positions. The Pulse mode allows you to create a burst of power for quick, efficient blending.
- NOTE: THE TOTAL OPERATING TIME SHOULD NOT BE MORE THAN 3 MINUTES.
- Turn the Speed Selector to 0 Position once the mixture has been blended to your desired consistency.
- Remove the blending jug from the Motor Unit (turning the jug anti-clockwise), carefully remove the jug cover pour and serve.
CLEANING
- Disconnect the power supply before cleaning.
- Pour a little warm water into the jug, turn and hold the speed selector to P position for a few seconds.
- Remove the jug and rinse and rinse under running water. Remove jug cover and measuring cup, then immerse the top cover, measuring cup in water and clean them with a soft brush, finally clean them with dump
CAUTION: THE BLADE BASE CAN BE DISASSEMBLED FOR CLEANING.
- Wipe the outside of the base with a damp cloth. Never immerse it in water as an electric shock is possible to occur. Then dry thoroughly. Ensure the interlock area is free of food particles.
CHOPPING
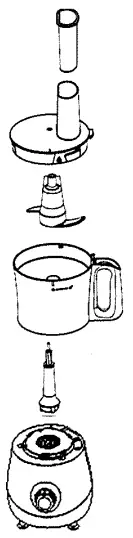
- Assemble the driving shaft into the motor base, make sure it is clipped into position.
- Place the chopping jug on the Motor Unit from the unlock position and slightly turn the chopping jug clockwise until the chopping jug locks into the lock position on the motor Make sure it is assembled in place correctly, otherwise the appliance will not operate.
- Insert the “5” blade into the driving shaft in the chopping jug securely. Make sure it is locked into position.
- Then place the prepared chopping food into the jug. The food must be cut into small sizes firstly (such as 2cms2cm *6cm for beef). During chopping, you can add food through the feeding funnel with the pusher, never using food or a finger to push the food into the feeding funnel.
- Place the lid onto the jug and turn it clockwise until the tab of the lid clicks into a slot in the jug handle. Make sure it is locked in position correctly, otherwise the appliance will not operate.
- Conned the appliance to the power supply and set Speed Selector to your desired speed.
- There are four settings: P, 0,1, 2. The 1 setting is a low speed, the 2 setting is a high speed. Turn the selector to P position and hold it to pulse actuate motor for delicate chopping. Release it to return the 0 positions. The Pulse mode allows you to create a burst of power for quick, efficient blending. You can chop up to 400g of the following food types
HARD SUBSTANCE: Cheese, dried fruits, and certain vegetables (carrots, celery…),
SOFT SUBSTANCE: certain vegetables (onions, spinach…) RAW AND COOKED MEAT: (boned and sliced)
CAUTION: THE TOTAL OPERATING TIME SHOULD NOT BE MORE THAN 90 SEC.
Turn the Speed Selector to the “0” position and unplug the appliance after chopping. Open the top lid and grasp the blade by its hub and remove. Unlock the chopping jug by turning it in anti-clockwise away from the motor base, and lifting it off. Empty the processed food.
CAUTION: THE “5” BLADE IS EXTREMELY SHARP, HANDLE WITH CARE.
CLEANING
- Disconnect the power supply before cleaning.
- Empty the chopping jug, dismantle all detachable parts and rinse them in warm soapy water. Extreme caution must be taken when handling the blade as it is very sharp. All the accessories except the motor base are dishwasher-safe components. The water temperature setting shall not exceed 70°. Always dry thoroughly.
- Wipe the outside of the base with a damp cloth. Never immerse it in water as an electric shock is possible to occur. Then dry thoroughly. Ensure the interlock area is free of food particles.
FOR A QUICK WASH-UP
Between processing tasks, pour in some water into the chopping jug turn, and hold the speed selector to P position a few seconds for quick cleaning.
KNEADING/MIXING
- Firstly assemble the driving shaft into the motor base, make sure it is clipped into position.
- Place the chopping jug on the Motor Unit from the unlock position and slightly turn the chopping jug clockwise until the chopping jug locks into the lock position on the motor Make sure it is assembled in place correctly, otherwise the appliance will not operate.
- Insert the plastic blade into the driving shaft in the jug
- Measure the flour with the food pusher and put it into the jug. The maximum quantity of flour is 375g.
- Place the lid onto the chopping jug and turn it clockwise until the tab of the lid clicks into a slot in the jug handle. Make sure it is locked in position correctly, otherwise the appliance will not operate.
- Insert the food pusher into the feeding funnel.
- Add one tablespoon oil into the appliance from the feeding funnel. Connect the appliance to the power supply. Turn the speed selector to the “2” setting.
- Then add water (the maximum water quantity is 225g) with the food pusher from the feeding funnel slowly within the 20s.
NOTE: THE FOOD PUSHER ALSO CAN BE USED AS A MEASURING CUP FOR MEASURING OIL OR WATER.
- The proportion of flour and water is 5:3. Make sure the quantity of the water shall not be more than the maximum specified water
NOTE: ADD SOME MORE WATER IF THE PROCESSING SPEED SLOWS DOWN DURING OPERATING SO AS TO MAKE THE MOTOR RUN SMOOTHLY, OTHERWISE THE MOTOR MAY BE DAMAGED. DURING KNEADING/MIXING, TO AVOID SHAKING, PRESS THE LID WITH ONE HAND, AND THE OTHER HAND IS HOLDING THE HANDLE.
- Stop the process by turning the speed selector to the “0” position as soon as the pastry starts to form a ball.
CAUTION: THE TOTAL OPERATION TIME IS NOT MORE THAN 90 SECONDS. AND MINIMUM 2 MINUTES REST PERIOD MUST BE MAINTAINED AFTER ONE OPERATION CYCLE. AT LEAST 30 MINUTES REST PERIOD MUST BE MAINTAINED TO LET THE APPLIANCE COOL DOWN AFTER THREE OPERATION CYCLES.
- Unplug the appliance, detach the cover, firstly remove the plastic blade, then remove the dough.
CLEANING
- Disconnect the power supply before cleaning.
- Empty the jug and remove the lid, the plastic blade, pusher, then immerse them in water and clean them with a damp cloth or soft brush.
- Wipe the outside of the base with a damp cloth. Never immerse the motor base in water. Dry thoroughly. Ensure the interlock area is free of food
BEATING AND WHISKING
- Assemble the driving shaft into the motor base, make sure it is clipped into position.
- Place the chopping jug on the Motor Unit from the unlock position and slightly turn the chopping jug clockwise until the chopping jug locks into the lock position on the motor Make sure it is assembled in place correctly, otherwise the appliance will not operate.
- Insert the whisk into the driving shaft in the jug securely.
- Place the ingredient into the bowl. You can use it to prepare mayonnaise, sauces, egg whites, meringues (up to 10 egg whites), and whip cream.
- Place the lid onto the chopping jug and turn it clockwise until the tab of the lid clicks into a slot in the jug handle. Make sure it is locked in position correctly, otherwise the appliance will not operate.
- Set the speed selector to the high speed.
NOTE: NEVER USE THIS WHISK TO KNEAD DOUGH OR MIX CAKE MIXTURES.
- Do not run the appliance for more than 2 minutes per time.
CLEANING
- Disconnect the power supply before cleaning.
- Empty the jug and remove the lid, the whisk, pusher, then immerse them in water and clean them with a damp cloth or soft brush.
- Wipe the outside of the base with a damp cloth. Never immerse the motor base in water as an electric shock is possible to occur. Then dry thoroughly. Ensure the interlock area is free of food particles.
SLICING/GRATING/SHREDDING

- Firstly assemble the driving shaft into the motor base, make sure it is clipped into position.
- Place the chopping jug on the Motor Unit from the unlock position and slightly turn the chopping jug clockwise until the chopping jug locks into the lock position on the motor base. Make sure it is assembled in place correctly, otherwise, the appliance will not
- Fit the shredding blade or slicing blade or grating blade (coarse or fine) into the disk stand, place them in the bowl.
NOTE: FOR ASSEMBLING THE BLADE INTO THE DISK STAND, FIRSTLY PUSH THE SIDE WITHOUT TAB INTO THE DISK STAND, THEN PUSH THE OTHER SIDE IN POSITION. FOR DISASSEMBLING, FIRSTLY PUSH THE SIDE WITH TAB OUTWARDS AND THEN PUSH THE OTHER SIDE OUT OF THE DISK STAND.
- Place the lid onto the chopping jug and turn it clockwise until the tab of the lid clicks into a slot in the jug handle. Make sure it is locked in position correctly, otherwise the appliance will not operate.
- Turn the speed selector to 1 or 2 settings to start.
NOTE: THE SHREDDING/SLICING/GRATING DISKS CAN SLICE THICKLY-POTATOES, ONIONS, THINLY-CUCUMBERS, BOOT ROOT, APPLES, AND CARROTS…
- Use the food pusher to feed food into the feeding funnel. The food shall be cut into proper size {60*2541(1s120MM)} to be suitable for the feeding funnel. You can slice/chip up to 500g of food.
- Minimum 2 minutes rest period must be maintained after one operation cycle. At least 30 minutes rest periods must be maintained to let the appliance cool down after three operation cycles.
- Turn the speed selector to “0” position and unplug unit after processing. Remove the blade. Unlock the jug by turning it in anti-clockwise away from its base and lifting it off. Empty the processed food.
CAUTION: THE BLADE IS EXTREMELY SHARP, HANDLE WITH CARE.
CLEANING
- Disconnect the power supply before cleaning.
- Empty the chopping jug and remove the disk stand from the bowl, then remove the shredding/slicing/grating blade from the disk stand, the pusher from the lid, the lid from the bowl, then immerse the lid, pusher, chopping jug, disk stand, and the shredding/slicing/grating blade in the water and clean them with a soft brush. Extreme caution must be taken when handling blades as they are very sharp.
NOTE: FOR ASSEMBLING THE BLADE INTO THE DISK STAND, FIRSTLY PUSH THE SIDE WITHOUT TAB INTO THE DISK STAND, THEN PUSH THE OTHER SIDE IN POSITION. FOR DISASSEMBLING, FIRSTLY PUSH THE SIDE WITH TAB OUTWARDS AND THEN PUSH THE OTHER SIDE OUT OF THE DISK STAND.
- Wipe the outside of the base with a cloth. Never immerse it in water as an electric shock is possible to occur. Then dry thoroughly. Ensure the interlock area is free of food particles
NOTE: SOME FOOD MAY DISCOLOR THE DISK STAND. THIS IS NORMAL AND WILL NOT HARM THE PLASTIC OR AFFECT THE FLAVOR OF FOOD. RUB WITH CLOTH DIPPED WITH VEGETABLE OIL TO REMOVE DISCOLORATION
GRINDING FUNCTION
- Place the motor unit on the flat surface. Make sure the power outlet is
- Place the grinding cup on a flat surface with the open ending facing up. Fill the cup with your favorite ingredients (eg. coffee bean). Be sure not to fill ingredients that exceed the MAX mark, the max capacity is 50g.
- Assemble the cup base onto the opening end of the cup by turning it in
- Upend the assembly of cup and cup base, and insert them into the motor unit, make sure the arrow on the motor unit aligns with the cup base, then turn the cup base clockwise to lock them.
- Connect the plug to the wall outlet and turn the speed selector to the desired setting. Setting 1 is the lowest speed and setting 2 is the highest speed.
NOTE: DO NOT OPERATE THIS APPLIANCE CONTINUOUSLY FOR MORE THAN 305, ALLOW THE APPLIANCE TO COOL DOWN FOR 3 MINUTES BETWEEN TWO CONTINUOUS CYCLES.
- When the operation is finished, unplug the power outlet. Then turn the cup in anti-clockwise to remove.
- Upend the cup assembly, hand the cup with one hand, and turn the cup base in anti-clockwise with the other hand to remove.
PLUG:
- This appliance has been fitted with a BS UK compliant molded plug which should not be replaced or removed.
- The plug is fitted with a 3 amp fuse link which is suitable for this type of appliance and should only be replaced by a fuse link of the same rating.
- If access to the fuse link is only possible by removing the plug cover this must only be done by a suitably qualified person.
- If the plug or the mains cable of this appliance is damaged do not use and dispose of the appliance responsibly.
- This appliance is a Class 2 appliance protected by double and reinforced insulation and does not require earthing. Class2 appliances are indicated by this
 symbol marked on the appliance rating plate.
Information on Waste Disposal for Consumers of Electrical & Electronic Equipment
 This mark on a product and/or accompanying documents indicates that when it is to be disposed of, it must be treated as Waste Electrical & Electronic Equipment (WEEE).
Any WEEE marked waste products must not be mixed with general household waste, but kept separate for the treatment, recovery, and recycling of the materials used.
For proper treatment, recovery and recycling; please take all WEEE marked waste to your Local Authority Civic waste site, where it will be accepted free of charge.
If all consumers dispose of Waste Electrical & Electronic Equipment correctly, they will be helping to save valuable resources and preventing any potential negative effects upon human health and the environment, of any hazardous materials that the waste may contain.
MADE IN P.R.CImported by Benross® L24 9WD
report this ad
[xyz-ips snippet=”download-snippet”]