![]()
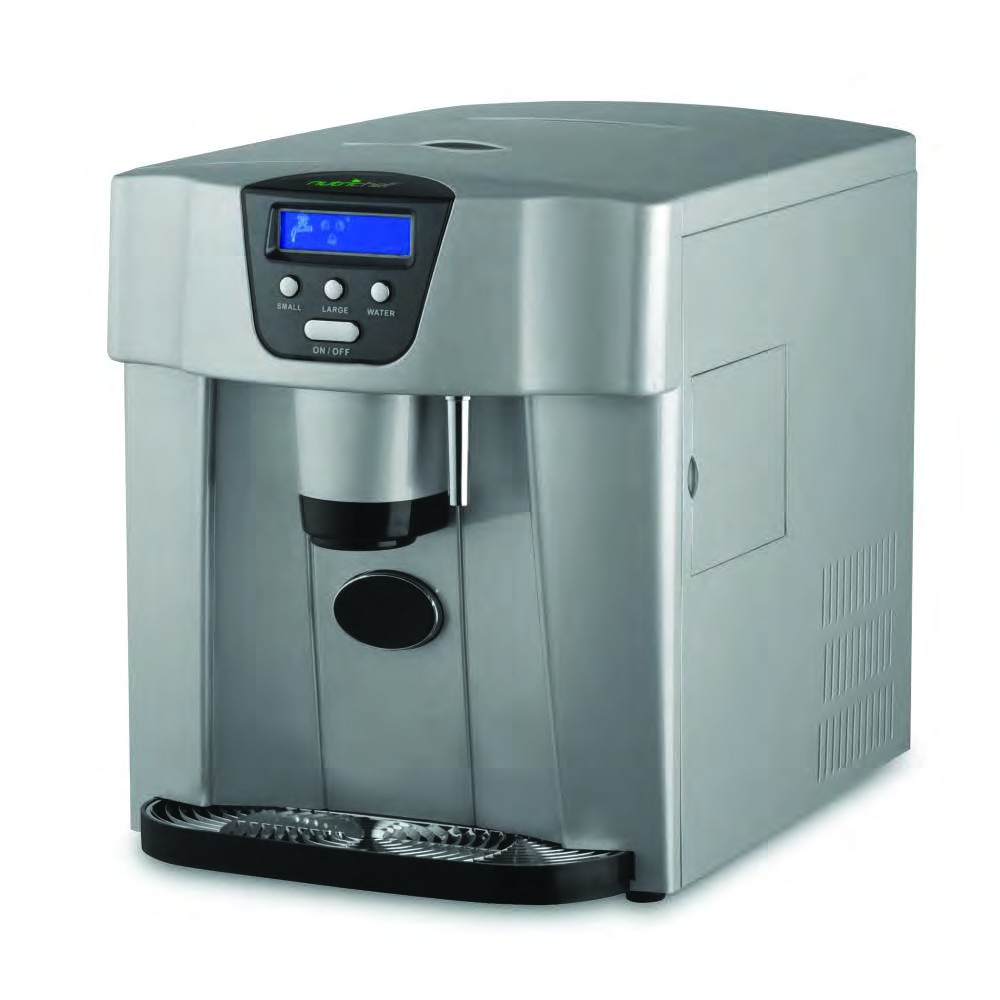
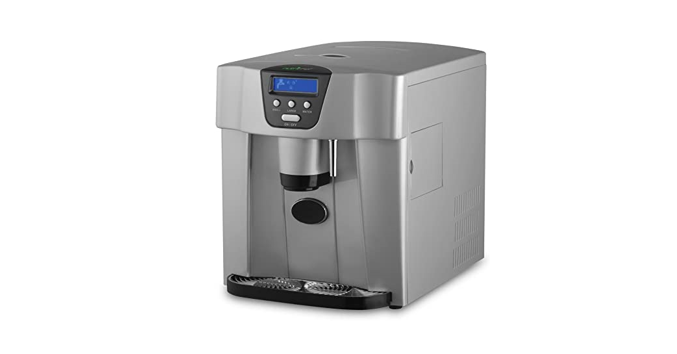
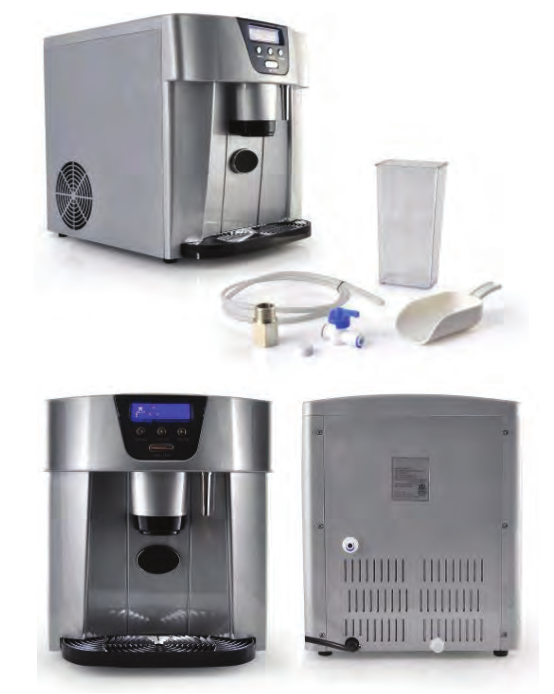
PICEM75Ice Maker & DispenserKitchen Countertop Ice Cube Making Machine& Water Dispenser (2 Sizes of Ice Cubes)
Description
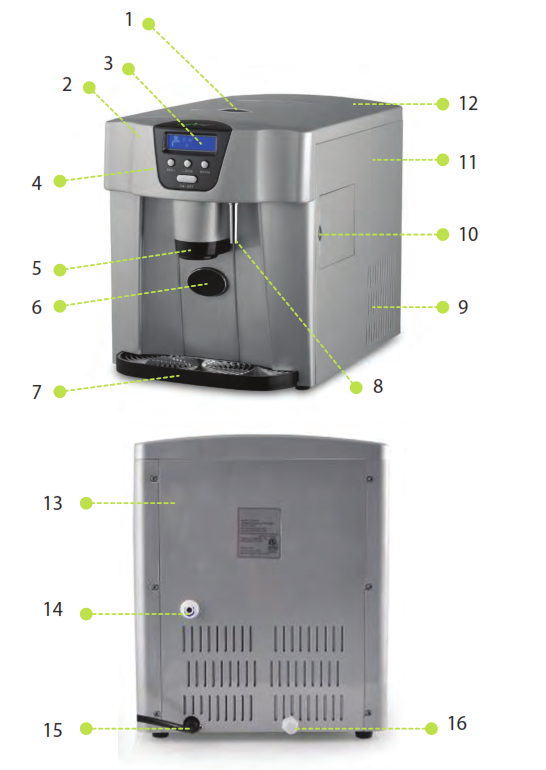
1 – Viewing Window2 – Front Cover3 – LCD Display4 – Control Panel5 – Ice Cube Dispenser Shoot6 – Ice Cube Dispenser Puncher7 – Water Drip Tray8 – Water Outlet9 – Fan Cover10 – Water Reservoir Access Door11 – Side Shell12 – Top Cover13 – Back Cover14 – Water Inlet Hole15 – Power Cord16 – Drain Pipe
Before/First Use of Your Ice Maker
- During transportation, the incline angle of the cabinet should not be over 45°. Do not turn the Ice Maker upside down, this may damage the compressor and sealed system.
- Remove all packing material and carefully check your ice maker to ensure it is in good condition and that there is no damage to the ice maker or power cord and plug.
- The Ice maker should be placed horizontally on a level surface. To ensure proper ventilation for your Ice maker allow 150mm of space at the top, the back, and on each side. Do not install the Ice maker near an oven, radiator, or any other heat source.
- Before using the Icemaker for the rst time, please wait 2 hours after positioning it, and keep the front lid open for at least 2hours.
- Ensure that the voltage indicated on the ice maker corresponds with the voltage in your home.
- Pure water is not allowed to be used on this unit, spring water is recommended.
- Always keep the viewing window close during ice making.
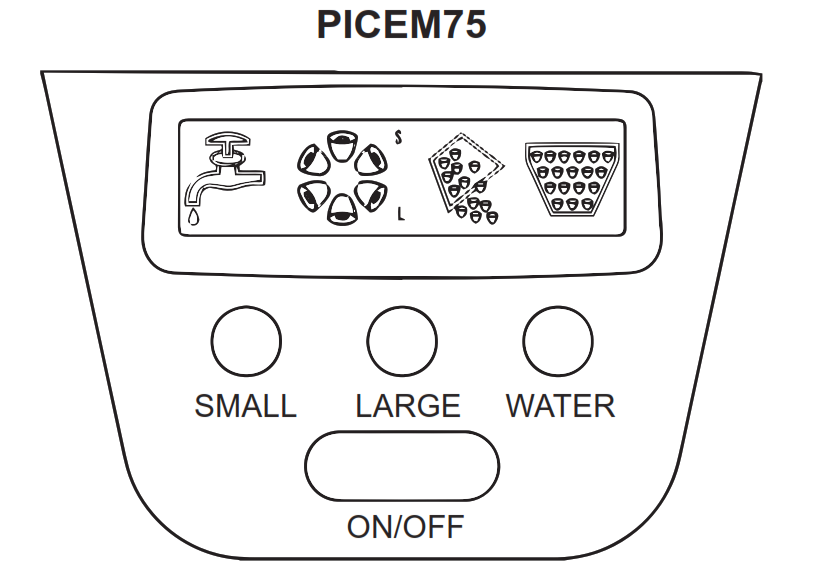
Control Panel Operation
|
Display |
Explanation |
 |
There is not enough water in the water reservoir, add more water. |
 |
Ice-making is in progress.If there is an “S” at the top right side of the symbol, the machine is making small ice. If there is an “L” at the bottom right side of the symbol, the machine is making large ice.
|
 |
The unit is dispensing ice. |
 |
The ice tray is full |
|
Button |
Operation |
| SMALL or S | Press to select small size ice |
| LARGE or L | Press to select large size ice |
| WATER | Press to dispense water |
| ON/OFF | Press to turn on or o‑ the unit |
Operating Instructions
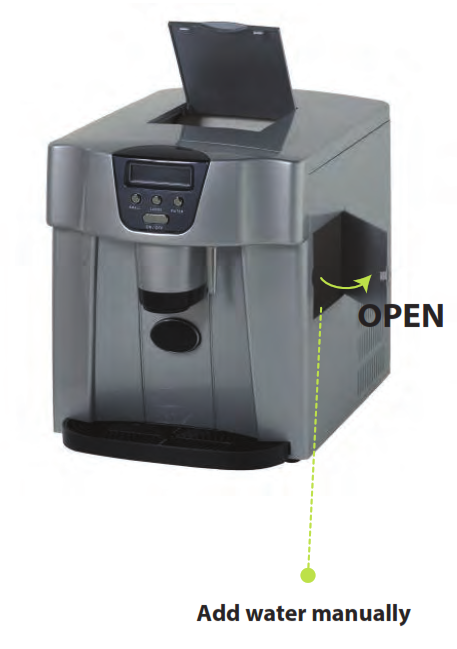
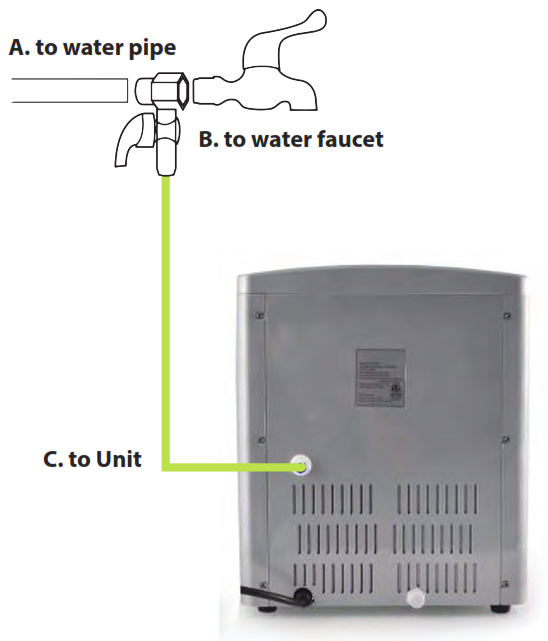
Step 1: Plug the machine into an outlet.Step 2: Open the water reservoir access door and add water as shown in sketch A. You can also add water automatically by connecting the unit to a water source as shown in sketch B.
|
Sketch AAdd Water Manually |
Sketch BConnect the Unit to a Water Faucet |
 |
 |
If the unit is on, and you see the![]() indicator, then you need to add water to the water reservoir.Step 3: Press the ON/OFF button to start the machine.Step 4: Water will be pumped into the water tray from the water reservoir automatically, this takes about 30 seconds.Note: If no water is pumped into the water tray for over two cycles, and there is enough water in the reservoir. Then you need to open the drain cap and let several drops of water run out, then replace the cap and press the ON/OFF button again to restart the unit.Step 5: Select the SMALL or LARGE button to choose the ice size you want.Step 6: The ice-making cycle begins, and the ice will be frozen onto the evaporator fingers.Note: The ice-making time depends on the ambient room temperature.Step 7: Once the ice-making cycle is finished, the water tray will tilt forward and the remaining water will flow back into the water reservoir, and then the ice cubes will drop from the fingers.Step 8 In about 15-35 seconds, the water tray will tilt backward and the ice produced in the previous cycle will be pushed to the ice reservoir directly. Then the unit will repeat steps 4 to 6 again until the ice tray is full or there is no water remaining in the water reservoir.Step 9: Push the ice cube dispenser puncher button (sketch 6) to dispense ice, the indicator will turn on.Note: Please put your cup below the ice cube dispenser shoot directly.Notice: If the ice is stored in the unit for a long time, the ice may freeze and stick together, which can prevent any ice from dispensing even if the ice tray is full. If this happens, break up the ice with the included ice scoop and then try again.Step 10: Press the ON/OFF button to stop the unitStep 11: When you push the WATER button, water will dispense from the water outlet.Note: Please make sure your cup is below the water outlet, or water will be splashed everywhere
indicator, then you need to add water to the water reservoir.Step 3: Press the ON/OFF button to start the machine.Step 4: Water will be pumped into the water tray from the water reservoir automatically, this takes about 30 seconds.Note: If no water is pumped into the water tray for over two cycles, and there is enough water in the reservoir. Then you need to open the drain cap and let several drops of water run out, then replace the cap and press the ON/OFF button again to restart the unit.Step 5: Select the SMALL or LARGE button to choose the ice size you want.Step 6: The ice-making cycle begins, and the ice will be frozen onto the evaporator fingers.Note: The ice-making time depends on the ambient room temperature.Step 7: Once the ice-making cycle is finished, the water tray will tilt forward and the remaining water will flow back into the water reservoir, and then the ice cubes will drop from the fingers.Step 8 In about 15-35 seconds, the water tray will tilt backward and the ice produced in the previous cycle will be pushed to the ice reservoir directly. Then the unit will repeat steps 4 to 6 again until the ice tray is full or there is no water remaining in the water reservoir.Step 9: Push the ice cube dispenser puncher button (sketch 6) to dispense ice, the indicator will turn on.Note: Please put your cup below the ice cube dispenser shoot directly.Notice: If the ice is stored in the unit for a long time, the ice may freeze and stick together, which can prevent any ice from dispensing even if the ice tray is full. If this happens, break up the ice with the included ice scoop and then try again.Step 10: Press the ON/OFF button to stop the unitStep 11: When you push the WATER button, water will dispense from the water outlet.Note: Please make sure your cup is below the water outlet, or water will be splashed everywhere
Caring
- Clean the inner liner, ice collecting tray, water box, ice shovel, and evaporator frequently. When cleaning, unplug the unit and remove the ice cubes. Use a diluted solution of water and vinegar to clean the inside and the outside surface of the Icemaker. Do not spray Ice maker with chemicals or diluted agents such as acids, gasoline, or oil. Rinse thoroughly before starting.
- Keep ventilation openings in the appliance enclosure and the built-in structure, clear of obstruction. Do not use mechanical devices or other means to accelerate the defrosting process, other than those recommended by the manufacturer.
- If the icemaker is reused after a long time, the water pump may not pump sufficient water due to an air block, the decient water indicator turns on in this case. To correct this press the START button again, then the ice maker will work normally.
- To ensure the cleanliness of the ice cubes, water in the water reservoir should be replaced every 24 hours.
- If the compressor stops for any reason such as water shortage, too much Ice, power off, etc… Do not start the system right away, wait 3 minutes, and then re-start the Icemaker.
- Always use fresh water before starting ice production either at initial installation or after a long shut-off period.
- This unit is for home use only, not for outdoor use, if it is necessary for use outside, please make sure the view window is closed.
Safety Notice
In order to avoid any accidents, please refer to the following:
- Disconnect power before servicing.
- Do not pull directly on the wire when plugging or unplugging the unit.
- If ice is abnormal, please call the seller.
- It is normal for the compressor and condenser surface to reach temperatures between 158°F and 194°F during operation and surrounding areas may be hot. Please don’t touch it.
- Due to fast freezing, ice cubes may appear “Cloudy”. This is trapped air in the water and it will not affect quality or taste of ice.
- When out of use, please open the drawer at least 2cm to allow for air circulation and avoid any metallic components becoming rusted.
- If the supply cord is damaged, it must be replaced by the manufacturer or its service agent or a similarlya qualified person in order to avoid a hazard.
- This appliance can be used by children ages 8 and above, and by people with reduced physical, sensory, or mental capabilities if they have been given supervision or instruction concerning the use of the appliance in a safe way and understand the hazards involved.
- Children shall not play with the appliance. Cleaning and user maintenance shall not be made by children without supervision
- WARNING: Fill with bottled or good quality tap water only. (Do not fill with fruit juices or other drink types).
- WARNING: Keep the air vents on the sides of the machine unblocked at all times.
- WARNING: Do not use mechanical devices or other means to accelerate the defrosting process, other than those recommended by the manufacturer.
- WARNING: Do not damage the refrigerant circuit.
- WARNING: Do not use electrical appliances inside the food storage compartments of the appliance, unless they are of the type recommended by the manufacturer.
Troubleshooting
1. Please note, if a power failure occurs due to disconnection of the power cord, or the off power button has been pushed of during an ice-making cycle, then small ice chips may form and lodge in the automatic shovel causing it to jam. If this occurs, the ice chips may be removed by disconnecting the power cord and gently pushing the shovel to the rear of the cabinet to remove the ice chips, then restarting.2. Please restart the ice maker by pressing Stop and then Start. If the Ice shovel does not push the Ice into the Ice collector after the formed Ice drops from the evaporator finger, then checks to see if the water tray is horizontal or balanced. If not then adjust by pressing the Ice shovel lightly with your finger. Then re-start the Icemaker.
| The compressor works abnormally with a Buzzing noise | REASONS | The voltage is lower than recommended. |
| SOLUTIONS | Stop the Ice maker and do not restart until the voltage is normal. | |
| Water shortage indicator light is ON | REASONS | 1. There is no water2. The pump is full of air |
| SOLUTIONS | 1. Fill with water, wait 3 minutes and press the ON/OFF button to restart.2. Open the drain cap, and let several drops water runs out. | |
| Conditions for Ice making cycle is right but no ice is made. | REASONS | Refrigerant leaks.The sealed system is blocked. |
| SOLUTIONS | Call for service | |
| Illuminates |
REASONS | 1. Ice block2. The motor is broken3. The viewing window is open while the light is strong |
| SOLUTIONS | 1. Clear the ice under the ice making tray, restart the unit by push the button ON/OFF2. Call for service3. Please always keep the viewing window close when ice making. |
Features:
- 2-in-1 Ice Maker & Water Dispenser
- Simple & Hassle-Free Ice Making
- Just Add Water & Press the Button
- Convenient Tabletop Ice Dispenser Design
- Quick Ice Making: Ready to Serve in 9 Minutes
- Ability to Connect Water Supply Pipe Line for Direct Water Tapping
- Choose (2) Diferent Sized Ice Cubes
- Creates Small or Large Ice Cubes
- Makes up to 33 lbs. of Ice Per Day
- High-Powered Freezing Element
- Front Panel Button Control Center
- Easy-to-Clean & Stain-Resistant Housing
- LED Digital Display Indication
- Ultra-Quiet Operation
- Perfect for Home or Ofice
What’s in the Box:
- Ice Maker Water Dispenser
- Water Tapping Installation Kit
- Ice Scoop
Technical Specs:
- Ice Storage Capacity: 600g
- Water Reservoir Capacity: 1.8L
- Housing Material Construction: Engineered ABS
- Power Cord Length: 4.6′ Ft.
- Power Supply: 120V
- Dimensions: 14.6” x 12.2” x 13.8” -inches
![]()
Questions? Issues?We are here to help!Phone: (1) 718-535-1800Email: [email protected]
References
[xyz-ips snippet=”download-snippet”]