Nutrichef Vacuum Sealer User Manual
In order to make the best use of this appliance and use it safely, please read these instructions carefully before use and keep this manual for future reference.
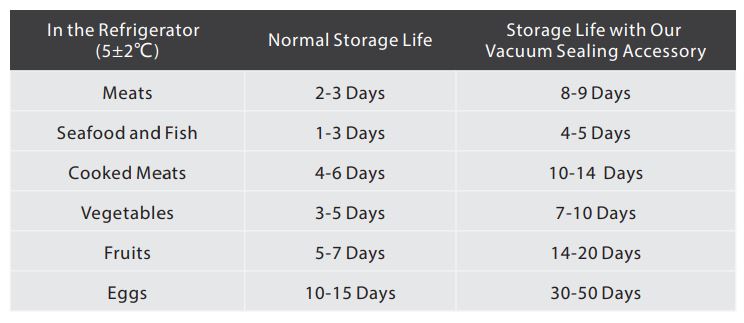
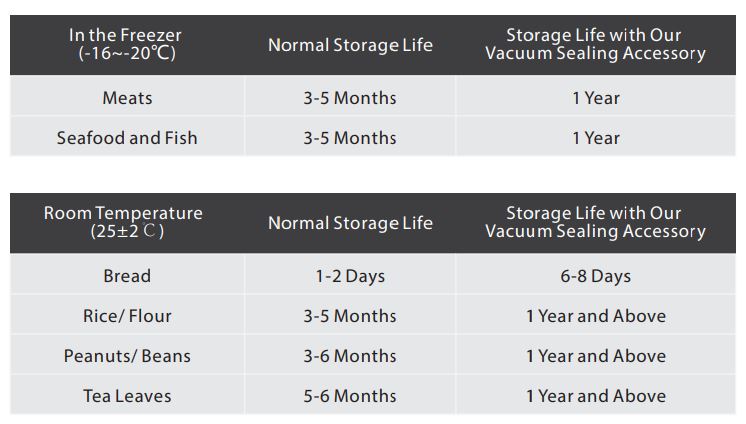
VACUUM PRESERVATION SYSTEMKEEPSFOOD FRESH UP TO FIVE TIMES LONGER
WELCOME
You are about to enjoy the freshness benefits of PKVS36STS. For years, our vacuum food sealers have helped millions of households keep food fresh longer in the refrigerator, freezer and pantry. With the innovative design, this appliance not only extends freshness up to 5 times longer than conventional storage methods, but it provides a scale for you to weigh your food. Keep this appliance on your countertop, you will soon discover its convenience and versatility. It will be your best kitchen assistant.
Why vacuum package?
With the conventional storage methods, exposure to air can cause food to lose flavor and nutrition. Food may spoil because of bacteria, mold and yeast. This vacuum sealer removes air and seals in flavor and quality. With this amazing product and its accessories, you can keep your food fresh for up to 5 times longer.
Save freshness, time and money
Spend less moneyWith our vacuum food sealer, you can buy in bulk when food is on sale and then vacuum package your food in your desired portions
Save more timePlan meals for the week ahead. Save them in the vacuum storage bags.
Enjoy seasonal or specialty foodsKeep highly perishable foods or infrequently used items fresh longer.
Control portions for dietingMake sensible portions of your food and write calories or fat contents on the bags.
Marinate in minutesDuring the process of vacuum packaging, it will open up the pores of food so you can get that great-marinated flavor in just 20 minutes instead of overnight.
Make entertaining easyMake your signature dish and holiday treats in advance so you can spend quality time with your guests.
Protect non-food itemsProtect polished silver from tarnishing by minimizing exposure to air. Keep camping and boating supplies dry and make them organized for outings.
IMPORTANT SAFEGUARDS
For your own safety, please read the user manual carefully before use and follow these basic precautions when using this appliance:
- Make sure the power supply corresponds to the rated voltage indicated on this appliance before plugging in.
- Do not operate this appliance with a damaged power cord or plug. Do not operate it if it malfunctions or is in anyway damaged. If the appliance or power cord is damaged, please contact the authorized customer service center.
- Unplug from the outlet when not in use and before cleaning. To disconnect, unplug the power cord from the electrical outlet first. Do not disconnect by pulling on the cord.
- If the provided power cord is damaged, it must be replaced by the manufacturer or its service agent to avoid a hazard.
- Do not use an extension cord with the appliance.
- Do not use the appliance on wet or hot surfaces or near high-power electric appliances.
- Do not immerse any part of the appliance, power cord and plug in water or other liquids.
- Use only accessories recommended by the manufacturer.
- This appliance is designed for household use only. Do not use it outdoors.
- Closely supervise children when using the appliance. Do not allow the appliance to be used as a toy.
- Capacity of the digital scale is 2kg.
- In order to ensure the precision of the scale, do not always place heavy items on the platform. Otherwise, the weighing sensor may be deformed because of pressure. If the scale will be idle for a long time, please remove the platform by rotating it. Then store it in the designated position at the bottom of the appliance.
PRODUCT FEATURES
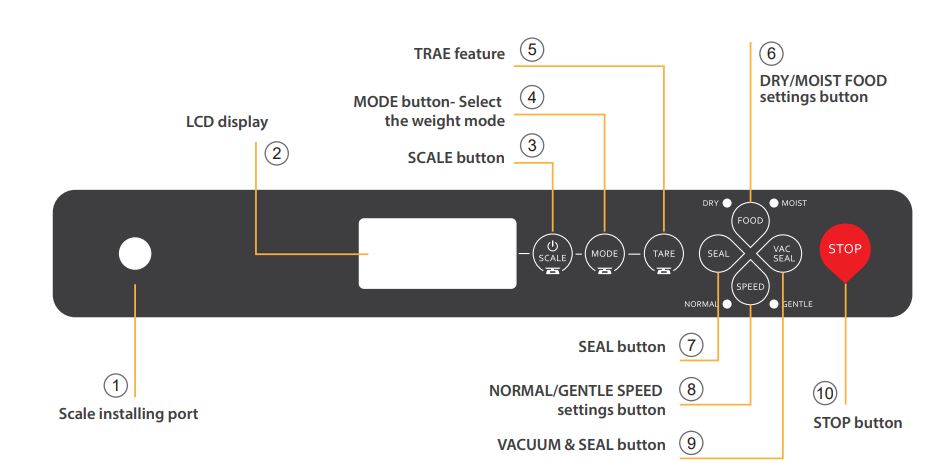
- Scale installing portRotate the platform clockwise/ anticlockwise to install/ remove it.
- LCD displayDisplay the weight of your food.
- SCALE buttonPress this button to turn the scale on/ off.
- MODE button- Select the weight modeWeight modes include g, kg, tl, CT, Oz and lb. You may switch to other weight modes by pushing this button.
- TARE featureTo obtain the exact weight of liquid or powder foods in a container, please remove the weight of the container first.1) Place the container without the food on the platform.2) Press the TARE button. The weight of the container will be removed. The display value will reset to “0”.3) Gently add the food to the container. The LCD display will show the weight of the food only. In addition, if the display value is not “0” when there is no item on the platform, press this button to reset the scale to zero weight.
- DRY/MOIST FOOD settings buttonFor the optimal vacuuming and sealing of foods, press this button to select the DRY/MOIST FOOD settings for different foods. The indicator light will become illuminated. Choose the MOIST FOOD setting for moist or juicy foods. Choose the DRY FOOD setting for foods without liquid. (Note: Appliance will default to DRY FOOD setting when power is interrupted.)
- SEAL buttonPress this button to create a seal on the bag. (Note: Wait at least 30 seconds after each use.)
- NORMAL/GENTLE SPEED settings buttonWhen vacuum sealing delicate foods, press this button to switch to GENTLE SPEED. The GENTLE SPEED indicator light will be illuminated. For more control you may press SEAL at any time to stop the vacuum process and begin sealing the bag.(Note: Appliance will default to NORMAL SPEED when power is interrupted.)

- VACUUM & SEAL buttonThis is the most common use button. Press this button to remove air from inside the bag and create a tight seal. (Note: Wait at least 30 seconds after each use.)
- STOP buttonPress this button to make the appliance immediately stop working.
- VAC / MARINATE buttonPress this button to achieve the best vacuum for the canisters or bottles (flashing light). Hold this button to activate MARINATE mode (constant light).
PRODUCT STRUCTURE
Vacuum channelPosition the open end of the bag inside the chamber. Draw air from the bag.
Vacuum nozzleThis is used for removing air from bags/ canisters/ bottles. Do not cover this nozzle when vacuuming a bag. Accessory hose is required when vacuuming a canister or bottle.
Sealing stripUsed together with the rubber bar, the sealing strip creates a seal on a bag with heat.
Rubber barHelp the sealing strip finish the sealing process.
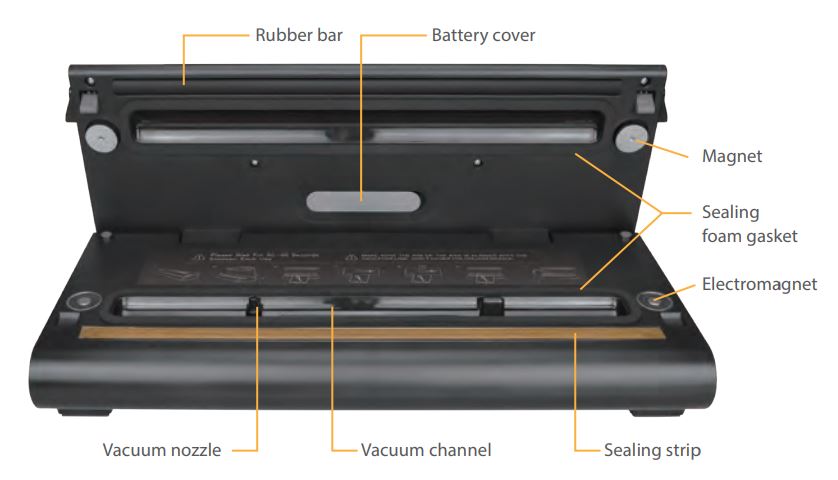
Sealing foam gasketPrevent air from escaping when vacuuming the bags.
Electromagnet latchUse electromagnet latch instead of conventional lock latch to ensure the vacuum channel is closed tightly. When the vacuum and seal process is complete, it will automatically release the electromagnets. It is easy for users to remove the bag.
Battery cover2pcs AAA batteries are required. When the batteries are installed, you can use the digital scale even though the power cord is not plugged in. (AAA batteries are sold separately)
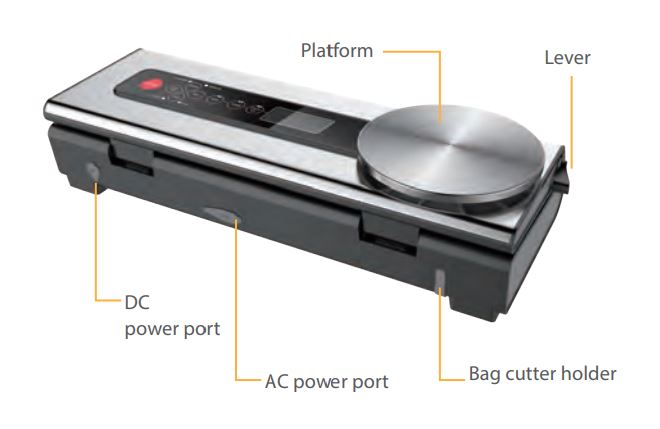 PlatformWeigh the food. Rotate to remove it when it is not in use.
LeverTo begin the vacuum sealing process, turn the lever to VAC. To use the digital scale or store the appliance, turn the lever to IDLE/ SCALE.
Bag cutter holderMake a custom sized bag from a roll with the bag cutter. Store the bag cutter in the bag cutter holder after use.
AC power portPlug in the power cord. Ensure the power supply corresponds to the rated voltage indicated on this appliance before plugging in.
DC power portThe input voltage is 12V. Use the DC power plug conforming to international safety standard.
How to access to the DC powerThis appliance provides a 12V DC power port. Use a standard DC power cord to connect the appliance to the car’s 12V DC cigarette lighter for power. It is convenient for users to keep food fresh during self-driving tours.
Plug one end of the power cord into the cigarette-lighter receptacle, then plug the other end into the DC power port on the appliance. Do not connect the appliance to cigarette lighter as soon as you start the engine of the car. Otherwise, it may damage the vacuum sealer.
Note: Do not connect the appliance to a 24V cigarette lighter of some trucks. You can only use the DC power cord provided by the manufacturer.(The DC power cord is sold separately )
OPERATING INSTRUCTIONS
Tips for vacuum sealing a bag

A. Take out the power cord from the packaging. Plug it into the AC power port. Then plug it into an electrical outlet. The indicator lights on control panel will become illuminated.

B. Gently turn the levers on both sides of the appliance to the VAC position.

C. Open the lid. Place the open end of the bag down into the vacuum channel, beneath the vacuum nozzle. The open end of the bag must be clean and flat. Do not cover the vacuum nozzle.

D. Close the lid. Press the VAC/SEAL button or SEAL button. The indicator light will become illuminated.

E. Immediately press on both sides of the lid with two hands. You will hear a clicking sound if the electromagnet latch is correctly locked.

F. When the SEAL indicator light turns off, the appliance will automatically release the electromagnets. Then open the lid to remove the bag.
Tips for operating the scale

Remove the platform from the bottom of the appliance by rotating anticlockwise. Then place it into the scale installing port and rotate clockwise. Do not rotate the platform too hard when installing. Otherwise, the weighing sensor may become inaccurate because it is damaged.

Plug in the appliance (see point A of “Tips for vacuum sealing a bag or sealing only”). The digital scale can also be powered by batteries when the appliance is not plugged in. Simply place 2pcs AAA batteries into the battery compartment.

Gently turn both levers to the IDLE/SCALE position. Only when it is in the IDLE/SCALE position can the platform be balanced. If the platform is not balanced, the reading is impossible to be accurate. Note: You cannot vacuum seal an item and use the scale at the same time.

Press the SCALE button to turn on the scale. Make sure “0” is displayed on the LCD screen. Press MODE to select the weight mode.

Place the food to be weighed on the platform. It will display its weight on the LCD screen. To weigh the liquid or powder foods with a container, you have to remove the weight of the container by pressing the TARE button. (See “TARE feature” of “PRODUCT FEATURES” )
Note:
Calibration feature:Successful calibration has been performed before shipping. Calibration is required only when the reading is inaccurate. You will need a 2000g calibration weight.
Calibrating method:
- Press the SCALE button to turn the scale on.
- When the display shows zero weight, press and hold the MODE button until “2000.0g” appears on the display.
- Press the MODE button again. It will display “CAL”- “2000.0g”.
- Place a 2000g calibration weight in the center of the platform. Wait for a few seconds. When it displays “PASS”, it indicates successful calibration.
Capacity:Capacity is 2kg. Do not place items beyond 2kg on the platform. To prevent the sensor from damaging and ensure the accuracy, place the item in the center of the platform and do not hit the platform.
Operating environment:To ensure the accuracy, wait at least 30 seconds after it is activated. Operating temperature is 50-86°F
Tips for vacuum sealing a canister
- Place the item to be packaged into the canister. Place the lid on top of the canister. Turn the knob to the SEAL position.
- Insert one end of the accessory hose into the center of the lid. Insert the other end into the vacuum nozzle.
- Plug in the appliance. Press the VAC/MARINATE button to remove air from inside the canister. You may press the STOP button at any time to stop the vacuum process.
- When vacuum process is complete, the appliance will automatically stop working. Remove the accessory hose from canister first. Then remove it from the appliance.
Note:Remove the lid from the canister before putting it in the microwave oven in order to avoid a hazard. To take the item out from the canister, press and hold the button on the canister lid or turn the knob to the OPEN position until you no long hear air escaping.
HELPFUL HINTS
- Do not overfill the bag. Always leave at least 3 inches of bag material between bag contents and top of bag.
- Make sure the open end of the bag is dry. It will be difficult to create a tight seal if moisture or liquid exists in the open end.
- Vacuum sealing is not a substitute for the heat process of canning. Perishables still need to be frozen or refrigerated.
- Make the open end of the bag clean and flat. Make sure there is no foreign objects and there is no wrinkles, or it will lead to a failed seal.
- When vacuum packaging a large item, to prevent wrinkles in the seal, gently stretch bag flat while placing it into the vacuum channel.
- When you are vacuum sealing items with sharp edges (such as dry spaghetti, silverware, etc.), protect the bag from punctures by wrapping the item in soft cushioning material, such as a paper towel. You may use a canister instead of a bag.
- When using canisters, always leave 2.5cm of space at the top of canister.
- For best results, pre-freeze fruits and blanch vegetables before vacuum sealing.
- It is better to allow the sealing strip to cool for 1 minute between uses.
- If you are not sure whether your bag was sealed properly, simply reseal the bag.
- For best results, use bags and canisters produced by our company.
- Do not reheat your food with a bag in a microwave oven. It is dangerous.
- The platform is limited in size. When weighing a large item, place a tray or container on the platform. Do not forget to press the TARE button to remove the weight of the tray or container before adding the item.
CARE AND CLEANING
- Unplug the appliance before cleaning.
- Do not immerse the appliance in water or other liquids. Prevent water or other liquids from entering the AC and DC power port on the appliance.
- Do not clean the appliance with abrasive cleaning agent to avoid damaging the surface.
- Wipe the outer surface with a soft soapy cloth.
- Wipe away any food or liquid on the vacuum channel with a paper towel.
- Dry the appliance thoroughly before using it again.
- The weighing sensor of scale is a precise part. Please gently wipe the platform when cleaning. Do not press it too hard. You can remove the platform for cleaning.
TROUBLESHOOTING
Nothing happens when the power cord is plugged into appliance Make sure the power cord is not damaged. Make sure both ends of the power cord are correctly plugged into the electrical outlet and appliance.
Appliance is plugged in, but it is failed to vacuum package Ensure the lid is closed and electromagnet latch is locked. Ensure the open end of the bag is correctly placed into the vacuum channel. Allow the appliance to cool for 30 seconds between uses.
Air was removed from the bag, but now air has reenteredCheck if there is a hole on the bag. It may be punctured by sharp foods. Use a new bag if this happens.
Check the seal. A wrinkle along the seal may cause air to reenter the bag. If there is a wrinkle along the seal, simply cut the sealed edge and reseal.
If there is moisture or liquid from foods present within the seal, cut open the bag and wipe away foods on the open end of the bag. Choose MOIST FOOD setting and reseal.
If the food has been stored for a long time and the bag is full of gases, the food may spoil. We recommend discarding the food.
Note:To prevent the appliance from overheating, allow it to cool for 30 seconds between uses. Keep the lid open before vacuum sealing. If the bag melts, the sealing strip may have been too hot during the sealing process. Allow the appliance to cool for 30 seconds before using it again. For best results, do not reuse the bags after storing raw meats, fish or greasy foods. Do not reuse bags after simmering or microwaving.
ACCESSORIES
Used together with bags, canisters, bottle stoppers and other accessories, the appliance will achieve the best vacuum.
Vacuum storage bags and rolls(sold separately) Textured design helps remove air from inside a bag. Multi-layer structure builds an effective barrier preventing oxygen, moisture and freezer burn. Various sizes are available.
Note: Do not reuse the bags after storing raw meats, fish or greasy foods. Do not reuse the bags after simmering or microwaving.
Bottle stoppers(sold separately)Vacuum package red wine, non-carbonated beverages or oil with our bottle stopper. Extend the life of liquid and preserve the flavor.
Note:Never use our bottle stopper on plastic bottles. Do not vacuum package carbonated or sparkling beverages. Because gas removal will cause the bottles to go flat during the vacuum sealing process.
Vacuum storage canisters (sold separately)Our vacuum storage canister is an ideal choice for fragile items, such as muffin, other baked foods, liquids and dry goods. The canisters come in various shapes and sizes. You can use it on the countertop, in the refrigerator or in the pantry. The marinate is a perfect way to marinate foods. It takes only a few minutes instead of hours. All of our canisters can be used for marinating foods. We recommend the square or triangle canisters because less marinade is needed. Do not use the canisters in the freezer. The lightweight stackable canisters are convenient for storing precooked meats, leftovers and snacks.
Note: Allow the hot foods to cool off before vacuum packaging. Otherwise, foods may bubble up out of the canister.
STORAGE GUIDE
Package Contents


SPECIFICATIONS
KITCHEN SCALE
Power supply: 2pcs AAA batteries / external power source
Units: g / kg / lb. / tl / oz. / CTCapacity: 2000g ±0.1g
Operating Environment: 0~104°FHumidity90%RH
Storage environment: -4~140°FHumidity90%RH
Air pressure: 80kPa~106kPaAir pressure: 80kPa~106kPa
VACUUM SEALER
Rated Voltage: 120VACSealing Time: 6~10 secondsDimensions: Length: 380mmRated Frequency: 60HZVic/Sealing Time: 10~20 secondsWidth: 150mmN.W.: 1.72kg
Rated Power: 120VVacuum Level: -60KPa~-85KPaHeight: 88mmG.W.: 2.35kg

References
[xyz-ips snippet=”download-snippet”]


