
![]()
3-in-1 Coffee Maker

OWNER’S MANUAL
REGISTER NOW!
As a special thank-you for registering your NuWave unit, you’ll automatically receive an additional 6 months added to your limited manufacturer’s warranty!* All you have to do is follow these simple steps.
- Using your smartphone or smart device, scan the QR code located on the unit label on the back of the unit.
- You will be directed to NuWave’s product registration page with your unit’s unique serial number automatically entered in the appropriate field.NOTE: If you do not have a web-enabled smart device, simply visit nuwavenow.com/QR and manually enter your unit’s serial number.
- Fill out the remaining information and complete the optional survey.
- Once you submit your information, you will receive a confirmation email containing your extended warranty details.
for an additional 6 months warranty!
DOWNLOAD THE QR CODE APP TO YOUR MOBILE DEVICE
- Open your mobile app store (App Store, Google Play).

- Search for “QR code readers.”
- Simply download the QR code reader to your phone, open it, scan the code and you are ready to go.NOTE: You may need to open your downloaded QR code reader each time you want to scan a QR code.

*Register your product within 1 year of the date of purchase for a free 6-month extension of your limited warranty.
IMPORTANT SAFEGUARDS HOUSEHOLD USE ONLY • READ ALL INSTRUCTIONS BEFORE USE
When using electrical appliances, basic safety precautions should always be followed including the following:
- Do not touch hot surfaces. Care must be taken as burns can occur from touching hot parts of the BruHub.
- To protect against electric shock, do not place the cord, plug, or base in water or other liquid.
- Close supervision is necessary when any appliance is used near children. This appliance is not intended for use by persons (including children) with reduced physical, sensory or mental capabilities, or lack of experience and knowledge unless they have been given supervision or instruction concerning the use of the appliance by a person responsible for their safety.
- Unplug from outlet when the BruHub is not in use and allow to cool before cleaning.
- Only operate the coffee maker on a flat surface, away from the edge of the counter.
- Do not operate the BruHub with a damaged cord or plug or after the appliance malfunctions or has been damaged in any manner. Return appliance to the nearest authorized servicefacility for examination, repair, or adjustment. Call Customer Service at 1-877-689-2838 or email [email protected] for information on repairs.
- The use of other accessories that are not intended to be used with the BruHub is not recommended. Doing so may damage the BruHub and can cause accidents.
- DO NOT USE OUTDOORS.
- Do not use appliances other than their intended use.
- Do not let the cord hang over the edge of the table or counter or touch hot surfaces, including a stovetop.
- Do not place the BruHub on or near a gas or electric burner or in an oven.
- To disconnect the coffee maker, press power off and then remove the plug from the wall outlet.
- WARNING! To reduce the risk of fire or electric shock, do not remove the Drip Tray Base when plugged in.
- Do not open the Lid of the BruHub during a brewing cycle.
- The Single Serve Insert contains sharp pieces! Use caution when assembling, disassembling, or cleaning parts.
ADDITIONAL SAFEGUARDS SEE ASSEMBLY GUIDE BEFORE USE
Electrical InformationA short power-supply cord is provided to reduce the risk resulting from becoming entangled in or tripping over a longer cord. Longer detachable power-supply cords or extension cords are available and may be used if care is exercised in their use. If a longer detachable power-supply cord or extension cord is used:
- The marked electrical rating of the extension cord should be at least as great as the electrical rating of the appliance.
- The longer cord should be arranged so that it will not drape over the countertop or tabletop where it could be pulled on or tripped over unintentionally. The BruHub should beoperated on a separate electrical outlet from other operating appliances due to wattage limitations. The appliance has a polarized plug (one blade is wider than the other). To reduce the risk of electric shock, this plug is intended to fit into a polarized outlet only one way. If the plug does not fit fully into the outlet, reverse the plug. If it still does not fit, contact a qualified electrician. Do not attempt to modify the plugin anyway.
- If the appliance is of the grounded type, the cord set or extension cord should be a grounding-type 3-wire cord.
SAVE THESE INSTRUCTIONSRead and understand the entire manual before using the BruHub®.DO NOT USE THE UNIT FOR OTHER THAN ITS INTENDED USENote: Put the BruHub on a surface that is horizontal, even, and stable. This appliance is intended for normal household use. It is not intended to be used in environments such as staff kitchens/cafeterias of shops, offices, farms, or other work environments, nor is it intended to be used by clients in hotels, motels, bed and breakfasts, and non-residential environments.
NOTICE: THE FAILURE TO FOLLOW ANY OF THE IMPORTANT SAFEGUARDS, ADDITIONAL SAFEGUARDS, OR THE INSTRUCTIONS FOR SAFE USE IS A MISUSE OF YOUR BRUHUB THAT CAN VOID YOUR WARRANTY AND CREATE THE RISK OF SERIOUS INJURY.
![]()
![]() WARNINGIn case of malfunction, immediately unplug and contact Customer Service Department. 1-877-689-2838 • [email protected]
WARNINGIn case of malfunction, immediately unplug and contact Customer Service Department. 1-877-689-2838 • [email protected]
PARTS & ACCESSORIES

- Tank LidPart #: 451215
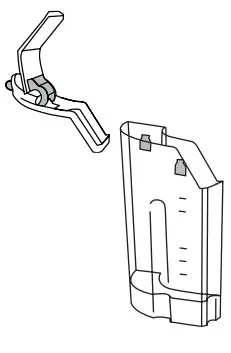
- Water TankPart #: 451201
- BruHub BasePart #: 45150
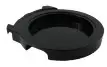
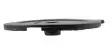
- Drip Tray BasePart #: 451213
- Insert ChamberPart #: 451207
- Mug TrayPart #: 451214
- ScreenPart #: 45126
- Charcoal Filter (4)Part #: 45116
- Charcoal Filter HolderPart #: 451205
- Stainless Steel CarafePart #: 45131
- Carafe BasePart #: 45131A
- Carafe LidPart #: 45131B
- Hot Water InsertPart #: 451204
- Hot Water CapPart #: 451204A
- a Single-Serve InsertPart #: 45120215b. BruCupPart #: 45133
- Coffee ScooperPart #: 45129
- Custom Brew Insert CapPart #: 451209
- Custom Brew Insert with Filter BasketPart #: 451203
- Custom Brew InsertPart #: 451210
- Custom Brew Filter BasketPart #: 451208
ASSEMBLY GUIDE
Before first useBefore the first use or when the appliance has not been used for an extended period of time, run a cleansing brew at least once with water only:
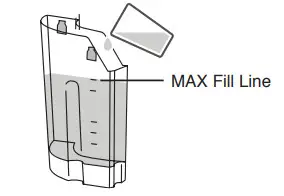
- Fill the Water Tank to the MAX Fill Line.• Water tanks can be filled while in the unit or detached.
- Place Hot Water Insert into the Insert Chamber.• See Hot Water Insert in Assembly Guide.
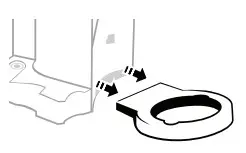
- Set a full-sized Carafe on the Drip Tray Base.
- Press Power to preheat.
- Select tea/hot water for the coffee selection.
- Select carafe for size selection.
- Select desired temperature.
- Press brew.• Repeat steps 1-8.

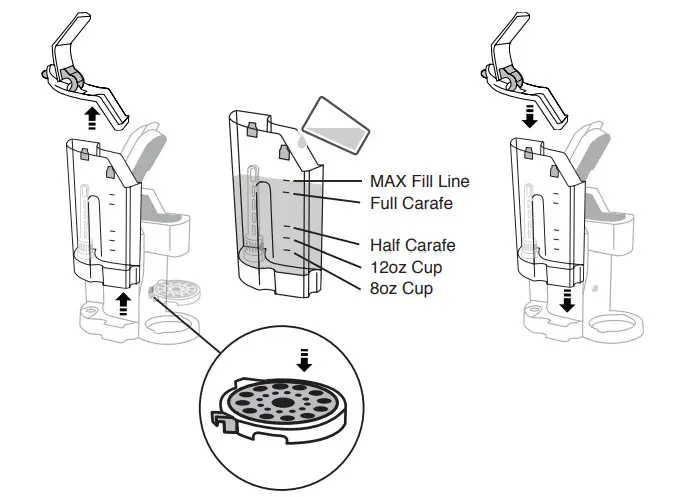
For additional water purification, use the supplied (optional) Charcoal Filter Holder with Filter.Note: The BruHub will still operate without Charcoal Filter Holder installed.
- Flush Filter by running under cold tap water for 1-3 minutes before initial use. After flushing, allow the Filter to drain completely.
- Carefully place Filter into the compartment and snap to close.• Flat side (base) of the cartridge must face down inside the Filter Holder compartment.
- Insert the Charcoal Filter Holder into the Water Tank. The Filter Holder’s base should sit firmly into the channel.• Charcoal Filter will last up to 3 months before changing is needed.
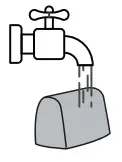
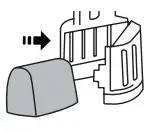

Fill water directly in the Water Tank when attached, or remove first. To fill directly in the Water Tank:
- Lift the Water Tank Lidup and pour in water toappropriate fill line.
- Close the Water Tank Lid.• Coffee maker will not operate when the tank is removed or when there is no water.
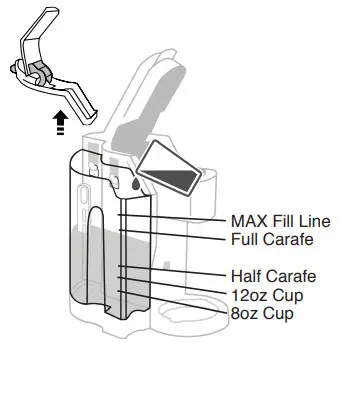
Fill water directly in the Water Tank when attached, or remove first.To fill directly in the Water Tank:
- Lift the Water Tank Lid up and pour in water to the appropriate fill line.
- Close the Water Tank Lid.• Coffee maker will not operate when the tank is removed or when there is no water.
With your NuWave BruHub 3-in-1 Coffee Maker, you can choose from three different inserts to customize your coffee-drinking experience and preference.
Custom Brew Insert
- Place Filter Basket inside Custom Brew Insert.
- Line up dots with each other and place Custom Brew Insert directly down into Insert Chamber.
- Fill with an appropriate amount of coffee grounds.
- Close lid.• Use 8, 12, half carafe, and carafe for Custom brew option.• Always use NuWave’s customized carafe when using the Custom Brew Insert.

Note:The Carafe Lid must always be used.DO NOT brew without Lid.For single-serve K-Cup®
- Insert the K-Cup® into the Single Serve Insert.
- Press firmly until you hear a click.
- Make sure lid is fully closed.
- Use Mug Tray on Drip Tray Base and Screen for smaller cups and mugs.
- Use 8 and 12 sizes for Single Serve Insert.
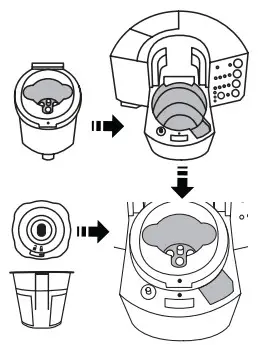
Single Serve Insert with BruCup
- Line up dots and place Single-Serve Insert into the Insert Chamber.
- Unlock the cap on the BruCup by turning to the unlock position and lifting up.• The cap on BruCup is detachable.
- Add ground coffee into the Brutus. Do not overfill past the Max line.
- Place the cap back onto BruCup and turn to lock position.
- Place BruCup into the Single Serve Insert by lining up the tabs in the front of the BruCup to the front of the Single Serve Insert.
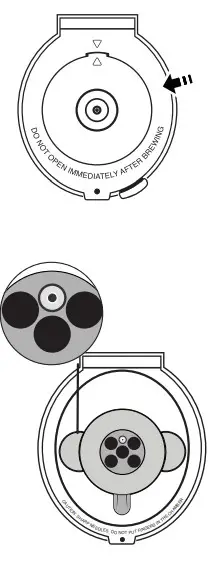
- Close down the lid.• Make sure the lid is fully closed.• Use Mug Tray on Drip Tray Base and Screen for smaller cups and mugs.• Use 8 and 12 sizes for Single Serve Insert.CAUTION: It May be hot. Do not open immediately after brewing.
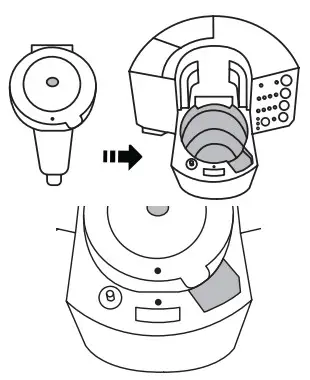
Hot Water InsertLine up dots with each other and place Hot Water Insert directly down into Insert Chamber. Close lid.• Use Mug Tray on Tray Base for smaller cups and mugs.• Use 8, 12, half carafe, and carafe for Hot Water Insert.
Carafe assembly
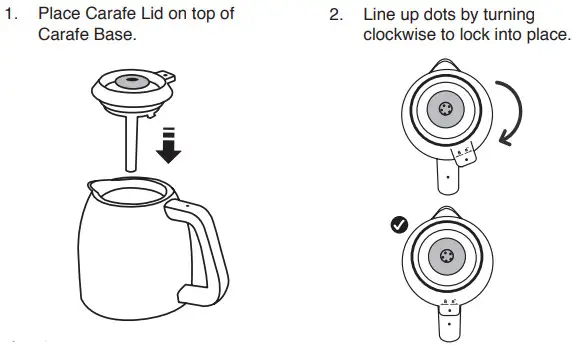
Note: The Carafe Lid must always be used. DO NOT brew without Lid.
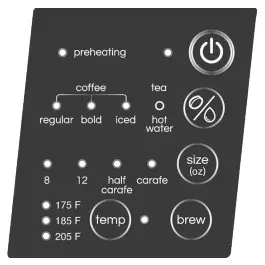
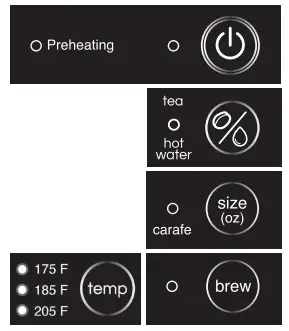
Power button:
- Press Power once to turn your BruHub on. There will be a blue light next to Power to indicate the unit is on.• When you press the Power, there will be a red light next to preheating. Once it has preheated, the red light will turn off, indicating the water is ready to brew. Once it has preheated,press brew. Press brew. Once preheated, the BruHub will begin to brew.• Your BruHub will maintain the correct brewing temperature. There is no need to preheat in between cups.• Unit will beep when your brew is complete.
- Press Power again to turn the unit off.• If nothing is pressed within 1 hour the BruHub will automatically shut off.
Temperature selection function:You can now have the perfect temperature for your favorite beverage.
- When you first turn your BruHub on, the default is set for 185°F. Depending on which brew function and size you chose, the recommended default temperature will be set.• 185°F is recommended when using single-serve pods.• 205°F is recommended when using grounds and the Custom Brew Insert.
- If you wish to adjust the temperature, press temp to change the selection to 205°F, 175°F, and back to 185°F. Refer to the Temperature Selection chart for more information.Note:After you customize any of the BruHub’s settings, the unit will retain that setting the next time you brew. If you remove the BruHub from the power source and later plug it back in the BruHub will
INSTRUCTIONS
automatically revert back to all default settings.Coffee/Hot Water selection function:This lets you select your favorite beverage with the push of a button.
- Default is set for regular.
- Press beverage selection once and the blue light next to bold will be lit.
- Press beverage selection again to change the selection to iced, hot water, or back to regular.• When iced is selected, half of the amount will be dispersed. For example, instead of 8oz, 4oz will be brewed, making the beverage more concentrated.• Refer to Insert & Beverage Selection Charts for more information.
Size selection function:This function lets you choose the amount of beverage you would like brewed.
- Default is set for 12, which is 12 ounces.
- Press the size selection once and the blue light next to half carafe will be lit.
- Press size selection again to change the selection to the carafe, 8, and back to 12.• Refer to Insert & Beverage Selection Charts for more.
Brew function:Once your BruHub is on and you have chosen your selection of beverage and size, you can now brew. After you customize any BruHub setting the unit will retain that setting next time you brew. If the BruHub is unplugged then later plugged back in the unit will automatically revert back to the default settings.
- Press brew.• There will be a red light next to preheating. Once a unit has preheated, the red light will turn off, indicating the water is ready to brew and the unit will start brewing.• Unit will beep when the brew is complete.• DO NOT lift the lid during the brewing cycle. You must wait until the brew cycle is finished.
- To stop the brewing function, press brew again or turn the BruHub off.Note:The BruHub will not preheat or brew if the lid is not fully closed.
INSERT SELECTION:
| 8oz | 12oz | Carafe
21oz |
Full Carafe
42oz |
|
Single Serve Insert |
x | x | ||
Custom Brew Insert* |
x | x | x | x |
Hot Water Insert |
x | x | x | x |
* You must use the Carafe with this insert.BEVERAGE SELECTION:Scooper holds 8 grams of coffee grounds when leveled. Adjust the strength of coffee by using more or fewer grounds.
| Size | Scoops |
| 8oz cup | 1 to 2 scoops |
| 12oz cup | 2 to 3 scoops |
| Half Carafe (21oz) | 3 to 4 scoops |
| Full Carafe (42oz) | 4 to 5 scoops |
| Default Temperature Selection regular | tea/hotwater | |||
| regular | bold | iced | ||
| 8oz | 185°F | 185°F | 185°F | 205°F |
| 12oz | 185°F | 185°F | 185°F | 205°F |
| half carafe | 205°F | 205°F | 205°F | 205°F |
| full carafe | 205°F | 205°F | 205°F | 205°F |
| Brew Temp (F) | |||
 |
175°F | 185°F | 205°F |
| Green Tea White Tea | Oolong Tea | Black Tea Herbal Tea |
CLEANING & MAINTENANCE
To clean Hot Water Insert, pull up Hot Water Cap to separate and clean insides of both parts.
- Hot Water Insert and Hot Water Cap are dishwashers safe, top rack only.
- Hot Water Cap snaps back on after it’s cleaned.
For Custom Brew Insert, lift up Custom Brew Lid to clean inside. Remove Custom Brew Insert Cap.
- Press in the tabs to remove Custom Brew Cap from Custom Brew Lid.
- Custom Brew Cap is dishwasher safe, top rack only.
- Remove Filter Basket to clean individually.

- After cleaning, place the inner Custom Brew Cap back in the lid by lining up the red arrows and pushing down on the lid until you hear a snap.
- Custom Brew Insert is dishwasher safe, top rack only.Tip: Cleaning Custom Brew Insert after each use is recommended.For Single Serve Insert and BruCupSingle Serve Insert and removable BruCup with cap are dishwasher safe, top rack only. Insert and BruCup can be hand-washed with running hot water.
- Remove Single-Serve Insert and remove the BruCup to clean inside. Flip-up Single-Serve Insert lid to clean inner portion.CAUTION: Sharp needle is located in Single Serve Insert. Use caution when cleaning.Tip: Cleaning Single-Serve Insert and BruCup after each use is recommended.
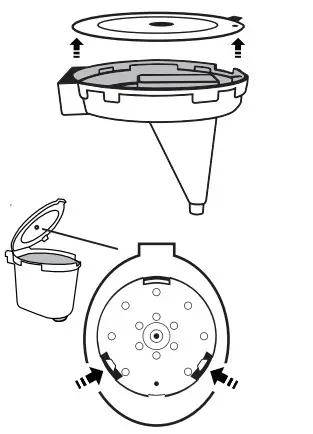
Cleaning needle under Lid:The needle is located under the Lid. To clean the needle, use a thin piece of metal or metal wire brush to free the part and area with any blockage.

The Mug Tray is detachable and can be removed and cleaned. The two layers can be separated.
- The Mug Tray is dishwasher safe, top rack only.

The Drip Tray Base is detachable and can be removed and cleaned.
- The Base is dishwasher safe, top rack only.
- Parts should be cleaned in the dishwasher set to a low-temperature-energy cycle.
Cleaning the Water Tank and Lid:To clean the Water Tank, hand-wash only.• Do not put Water Tank in the dishwasher. To clean the Water Tank Lid, hand-wash or wipe clean with a damp cloth.• Lid is dishwasher safe, top rack only. The Water Tank for the BruHub should be periodically cleaned.
- Put 1 tablespoon of white vinegar and 2 cups of water in the Water Tank.
- Choose 205F, 12, hot water, and press brew.
- Once complete, add fresh water and repeat the steps.
- Hand-wash the Water Tank with a damp, soapy, soft cloth, and rinse thoroughly.
- Let the Water Tank air-dry before returning it back to the BruHub Base.Note:Charcoal Filter will last up to 3 months before the change is needed.
Cleaning Carafe:To clean the Carafe, use warm soapy water and rinse thoroughly. Use a soft foam brush with a long handle to reach the bottom.
- The Carafe Lid is removable and is dishwasher safe, top rack only.

External cleaningClean the exterior of your BruHub using a damp, soapy, soft cloth.
DescalingScale is a buildup that can occur over time after multiple uses. Descaling should be performed every few months to keep your BruHub working effectively and efficiently. Parts that come into contact with water during brewing can have a calcium buildup. Also, the heating element may have deposits that need removal. To descale, use the Carafe, freshwater, a safe descaling solution, and perform tasks near a sink.
- Turn the unit off. Unplug. Remove Water Tank from the unit and empty.
- Pour descaling solution into the Removable Water Tank. Pour fresh water into the Water Tank. Place Water Tank back into BruHub. Plug back in and turn on.
- Place Carafe on the Drip Tray Base. Hit brew and use the largest amount of size and highest temperature for the cycle. When finished, pour all liquid contents into the sink.
- Turn the unit off. Remove Water Tank and rinse it in the sink thoroughly. Remove any excess liquid solution on the Lid above the Water Tank, detachable Drip Tray Base, and other areas.
- Place the Water Tank back into the unit and fill it with fresh water near the Max Fill Line. Turn unit back on.
- Run the largest brew size and highest temperature on the unit. Run multiple brew cycles on the unit. You may need to fill Water Tank more than once during the final rinsing process.
- Turn off the appliance and unplug. If there is any descaling solution leftover in Water Tank, repeat the steps above.
Water Drainage Release ValveAfter multiple brews or if BruHub has not been run for some time, any water that has backed up into the unit can be released from underneath.To release water from your unit:
- When turned off and unplugged, hold the BruHub over a sink and lift up the unit. Locate the Water Drainage Release Valve under the BruHub Base.
- Turn the Release Valve counterclockwise to the unlock position to release any water. After all, water is released, dry the underneath of the unit.
- Turn the Release Valve clockwise to the lock position before using your BruHub again.
TROUBLESHOOT GUIDE
When the unit is powered on and no water is in the unit:
- Unit will beep, and within 15 seconds it will shut off.
- If you press brew and there is no water, a continuous beep will sound for up to 15 seconds until you add water.
- If you do not add water within 15 seconds of the continuous beeping the unit will shut off and the beeping will stop.
If the unit is in the middle of brewing and there is not enough water:
- A continuous beep will sound for up to 15 seconds until you add more water.
- If you do not add water after 15 seconds of the continuous beeping, the unit will shut off.
If unit shuts off and you power up the unit again with no water:Unit will beep, and within 15 seconds it will shut off.
- If you press brew and there is no water, a continuous beep will sound for up to 15 seconds until you add water.
- If you do not add water within 15 seconds of the continuous beeping, the unit will shut off, and the beeping will stop.
- Press brew after the 15 seconds has passed.
Consistent beeping:
- Need to make sure enough water is in the Water Tank.
- The Water Tank has been removed from the coffee maker.
Not brewing right away:
- Appliance needs to preheat.
- Needs an appropriate amount of water.
- A unit may have automatically shut off. Press Power to turn back on.
In use unit not preheating or brewing:
- Check to see if the lid is open. Close the lid. The appliance will not preheat or brew if the lid is not closed.
Coffee grounds are going into the brewed coffee:
- Do not overfill the Filter Basket (do not exceed the MAX line in the filter).
- Recommended using drip coffee grounds or coarse grounds when using the Filter Basket.
Coffee maker Filter Basket clogs during brewing process:
- Recommended using drip coffee grounds or coarse grounds when using the Custom Brew Filter Basket.
- fusing the Custom Brew Insert, you need to use the Carafe.

![]() WARNINGIn case of malfunctions,immediately unplug and contactCustomer Service Department.1-877-689-2838 • [email protected]
WARNINGIn case of malfunctions,immediately unplug and contactCustomer Service Department.1-877-689-2838 • [email protected]
LIMITED WARRANTY
The BruHub® 3-in-1 Coffee MakerTHE MANUFACTURER WARRANTSThe NuWave BruHub 3-in-1 Coffee Maker, including the BruHub Base, Water Tank Lid, Water Tank, Drip Tray Base, Mug Tray, Screen, Charcoal Filter Holder, Stainless Steel Thermal Carafe, Hot Water Insert, Single Serve Insert, BruCup, and Custom Brew Insert with Filter Basket are to be free from manufacturer defects. All electrical components are warrantied, for 1 year from the date of purchase, under normal household use, and when operated in accordance with the Manufacturer’s written instructions. The Manufacturer will provide the necessary parts and labor to repair any part of the NuWave BruHub 3-in-1 Coffee Maker at NuWave LLC Service Department. After the expiration of the warranty, the cost of the labor and parts will be the responsibility of the owner.
THE WARRANTY DOES NOT COVERThe Limited Warranty is voided if repairs are made by an unauthorized dealer and/or the serial number data plate is removed and/or defaced. Normal deterioration of finish due to use or exposure is not covered by this Warranty. This Limited Warranty does not cover failure, damages, or inadequate performance due to accident, acts of God (such as lightning), fluctuations in electric power, alterations, abuse, misuse, misapplications, corrosive-type atmospheres, improper installation, failure to operate in accordance with the Manufacturer’s written instructions, abnormal use or commercial use. NuWave LLC reserves the right to void the Limited Warranty, where allowable by law, for products purchased from an unauthorized dealer.
TO OBTAIN SERVICEThe owner shall have the obligation and responsibility to pay for all services and parts not covered by the warranty; prepay the freight to and from Service Department for any part or system returned under this warranty, and carefully package the product using adequate padding material to prevent damage in transit. The original container is ideal for this purpose. Include in the package the owner’s name, address, daytime telephone number, a detailed description of the problem, and your “RGA number.” Call 1-877-689-2838or email [email protected] to obtain the RGA number (Return Goods Authorization Number). Provide the cooking system model & serial number and proof of date of purchase (a copy of the receipt) when making claims under this warranty.
MANUFACTURER’S OBLIGATIONThe Manufacturer’s obligation under this Limited Warranty is limited, to the extent allowable by law, to repairing or replacing any part covered by this Limited Warranty which upon examination is found to be defective under normal use. The Limited Warranty is applicable only within the continental United States and only to the original purchaser of the manufacturer’s authorized channels of distribution. THE LIMITED WARRANTY MAY NOT BE ALTERED, VARIED, OR EXTENDED EXCEPT BY A WRITTEN INSTRUMENT EXECUTED BY THE MANUFACTURER. THE REMEDY OF REPAIR OR REPLACEMENT AS PROVIDED UNDER THIS LIMITED WARRANTY IS EXCLUSIVE. IN NO EVENT SHALL THE MANUFACTURER BE LIABLE FOR ANY CONSEQUENTIAL OR INCIDENTAL DAMAGES TO ANY PERSON, WHETHER OR NOT OCCASIONED BY NEGLIGENCE OF THE MANUFACTURER, INCLUDING WITHOUT LIMITATION, DAMAGES FOR LOSS OF USE, COSTS OF SUBSTITUTION, PROPERTY DAMAGE, OR OTHER MONEY LOSS.
Some states do not allow the exclusion or limitation of incidental or consequential damages, so the above limitation exclusions may not apply. This Limited Warranty gives specific legal rights, and there may also be other rights that vary from state to state. EXCEPT AS OTHERWISE EXPRESSLY PROVIDED ABOVE, THE MANUFACTURER MAKES NO WARRANTIES EXPRESSED OR IMPLIED ARISING BY LAW OR OTHERWISE, INCLUDING WITHOUT LIMITATION, THE IMPLIED WARRANTIES OF MERCHANTABILITY AND FITNESS FOR A PARTICULAR PURPOSE TO ANY OTHER PERSON. READ YOUR OWNER’S MANUAL. IF YOU STILL HAVE ANY QUESTIONS ABOUT THE OPERATION OR WARRANTY OF THE PRODUCT, PLEASE CONTACT NUWAVE LLC.
READ YOUR OWNER’S MANUAL: If you still have any questions about the operation or warranty of the product, please contact NuWave LLC at 1-877-689-2838 or email [email protected].
REPLACEABLE PARTS
| To order replaceable parts head over to NuWaveNow.com | |
| Part Name | |
 |
Water Tank |
 |
Drip Tray Base |
 |
Mug Tray |
 |
Screen |
 |
Charcoal Filter |
| Charcoal Filter Holder | |
 |
Stainless Steel Carafe |
 |
Carafe Lid |
 |
Carafe Base |
| Part Description Part No. | |
| Holds water for brewing coffee. | 451201 |
| Holds Carafe and is connected to the main base of the BruHub | 451213 |
| Holds Screen. Used for mugs, cups, and is connected to the main base of the BruHub. | 451214 |
| Sits inside Mug Tray. Provides separation from the bottom of Mug Tray. | 45126 |
| Sits inside Charcoal Fitter Holder. Fitters water. | 45116 |
| Holds Charcoal Filter. Sits inside Water Tank at the base. | 451205 |
| Holds brewed coffee and keeps liquids warmer longer. | 45131 |
| Lid sits on top of the Carafe. | 45131B |
| Holds coffee and other liquids. | 45131A |
| To order replaceable parts head over to NuWaveNow.com | |
| Part Name | |
 |
Hot Water Insert |
 |
Hot Water Cap |
 |
Single Serve Insert |
 |
BruCup |
 |
Coffee Scooper |
 |
Custom Brew Insert with Filter Basket |
 |
Custom Brew Filter Basket |
| Part Description | Part No. |
| Insert used for hot water and tea. Sits inside Insert Chamber. | 451204 |
| Removable cap located on top of Hot Water Insert. | 451204A |
| Insert used for single-serve pods and BruCup. Sits inside Insert Chamber. | 451202 |
| Holds coffee grounds. Sits inside Single-Serve Insert. | 45133 |
| Scoops measured coffee. | 45129 |
| Insert used for regular and large brews of coffee. | 451203 |
| Sits inside Custom Brew Insert. Holds loose grounds or paper filters
with grounds. |
451208 |

![]()

 report this ad
FOR HOUSEHOLD USE ONLYModel: 45011120V, 60Hz, 1500WFor patent information please go to:www.nuwavenow.com/legal/patentDesigned & Developed in USA by NuWave LLC1795 N. Butterfield RoadLibertyville, IL 60048, U.S.A.Customer Service:1-877-689-2838 • [email protected]Made in China©2019 NuWave LLC • All Rights Reserved.
Item No: BM45011Rev. 13-BS07-11-19RB01 DV01
References
[xyz-ips snippet=”download-snippet”]