NUX MG-20 Guitar Modeling Processor

Thank you for purchasing the NUX MG-20 Guitar Modeling Processor!
MG-20 is one of the easiest guitar modeling processors. If you are familiar with traditional guitar rig, you may have known how to set tones in MG-20. It is also very convenient for live performance! From the panel, you can always see what effects are in the chain. To turn on and off effect modules or to assign functions to the CTRL switch and Expression pedal are quick and easy! We won’t let you lose a beat!
In MG-20, NUX has brought the original TSAC Technology to a new level! It is equipped with 32bit float point DSP. The new algorithm nails every detail of the classic amps and effects. More than 60 effect models, plus various output modes, no matter what style you play, you’ll have great tone on tap!
What is TSAC?
 TSAC (True Simulation of Analog Circuit) Since 1950’s, musicians have been using analog devices to create their works. Musicians love the tone of their vintage instruments! The audio signal goes through various electronic components, such as resistors, capacitors, transistors and tubes. All these components affect each other to create the result-TONE! TSAC Technology virtually re-constructs the real analog circuits by using DSP chips, and accurately emulates the tone and feel of the vintage instruments!
Features
- Large 2.4 Inches Color TFT LCD e CTRL Footswitch
- Drum Machine and Looper
- More than 60 Models
- Built-in Tuner
- 36 Factory Presets and 36 User Presets
- Effects Module Buttons for Quick Tone Editing
- Various Output Modes
- Expression Pedal
- USB for System Updating
CopyrightCopyright 2014 Cherub Technology Co. All rights reserved. NUX and MG-20 are trademarks of Cherub Technology Co. Other product names modeled in this product are trademarks of their respective companies that do not endorse and are not associated or affiliated with Cherub Technology Co.AccuracyWhilst every effort has been made to ensure the accuracy and content of this manual, Cherub Technology Co. makes no representations or warranties regarding the contents.
WARNING!-IMPORTANT SAFETY INSTRUCTIONS BEFORE CONNECTING, READ INSTRUCTIONS
| WARNING: To reduce the risk of fire or electric shock, do not expose this appliance to rain or moisture |
| CAUTION: To reduce the risk of fire or electric shock, do not remove screws. No user-serviceable parts inside. Refer servicing to qualified service personnel. |
| CAUTION: This equipment has been tested and found to comply with the limits for a Class B digital device pursuant to Part 15 of FCC Rules. Operation is subject to the following two conditions: (1) This device may not cause harmful interference, and (2) this device must accept any interference received, including interference that may cause undesired operation |
 The lightning symbol within a triangle means “electrical caution!” It indicates the presence of information about operating voltage and potential risks of electrical shock. The lightning symbol within a triangle means “electrical caution!” It indicates the presence of information about operating voltage and potential risks of electrical shock. |
 The exclamation point within a triangle means “caution!” Please read the information next to all caution signs. The exclamation point within a triangle means “caution!” Please read the information next to all caution signs. |
- Use only the supplied power supply or power cord. Using other power supply may cause noise or even damage!
- Do not place near heat sources, such as radiators, heat registers, or appliances which produce heat.
- Guard against objects or liquids entering the enclosure.
- Do not attempt to service this product yourself, as opening or removing covers may expose you to dangerous voltage points or other risks. Refer all servicing to qualified service personnel.
- Refer all servicing to qualified service personnel.Servicing is required when the apparatus has been damaged in any way, such as when the power supply cord or plug is damaged, liquid has been spilled or objects have fallen into the apparatus, the apparatus has been exposed to rain or moisture, does not operate normally or has been dropped.
- The power supply cord should be unplugged when the unit is to be unused for long periods of time.
- Protect the power cord from being walked on or pinched particularly at plugs, convenience receptacles and at the point where they exit from the apparatus.
- Prolonged listening at high volume levels may cause irreparable hearing loss and/or damage. Always be sure to practice “safe listening”.
Follow all instructions and heed all warningsKEEP THESE INSTRUCTIONS!
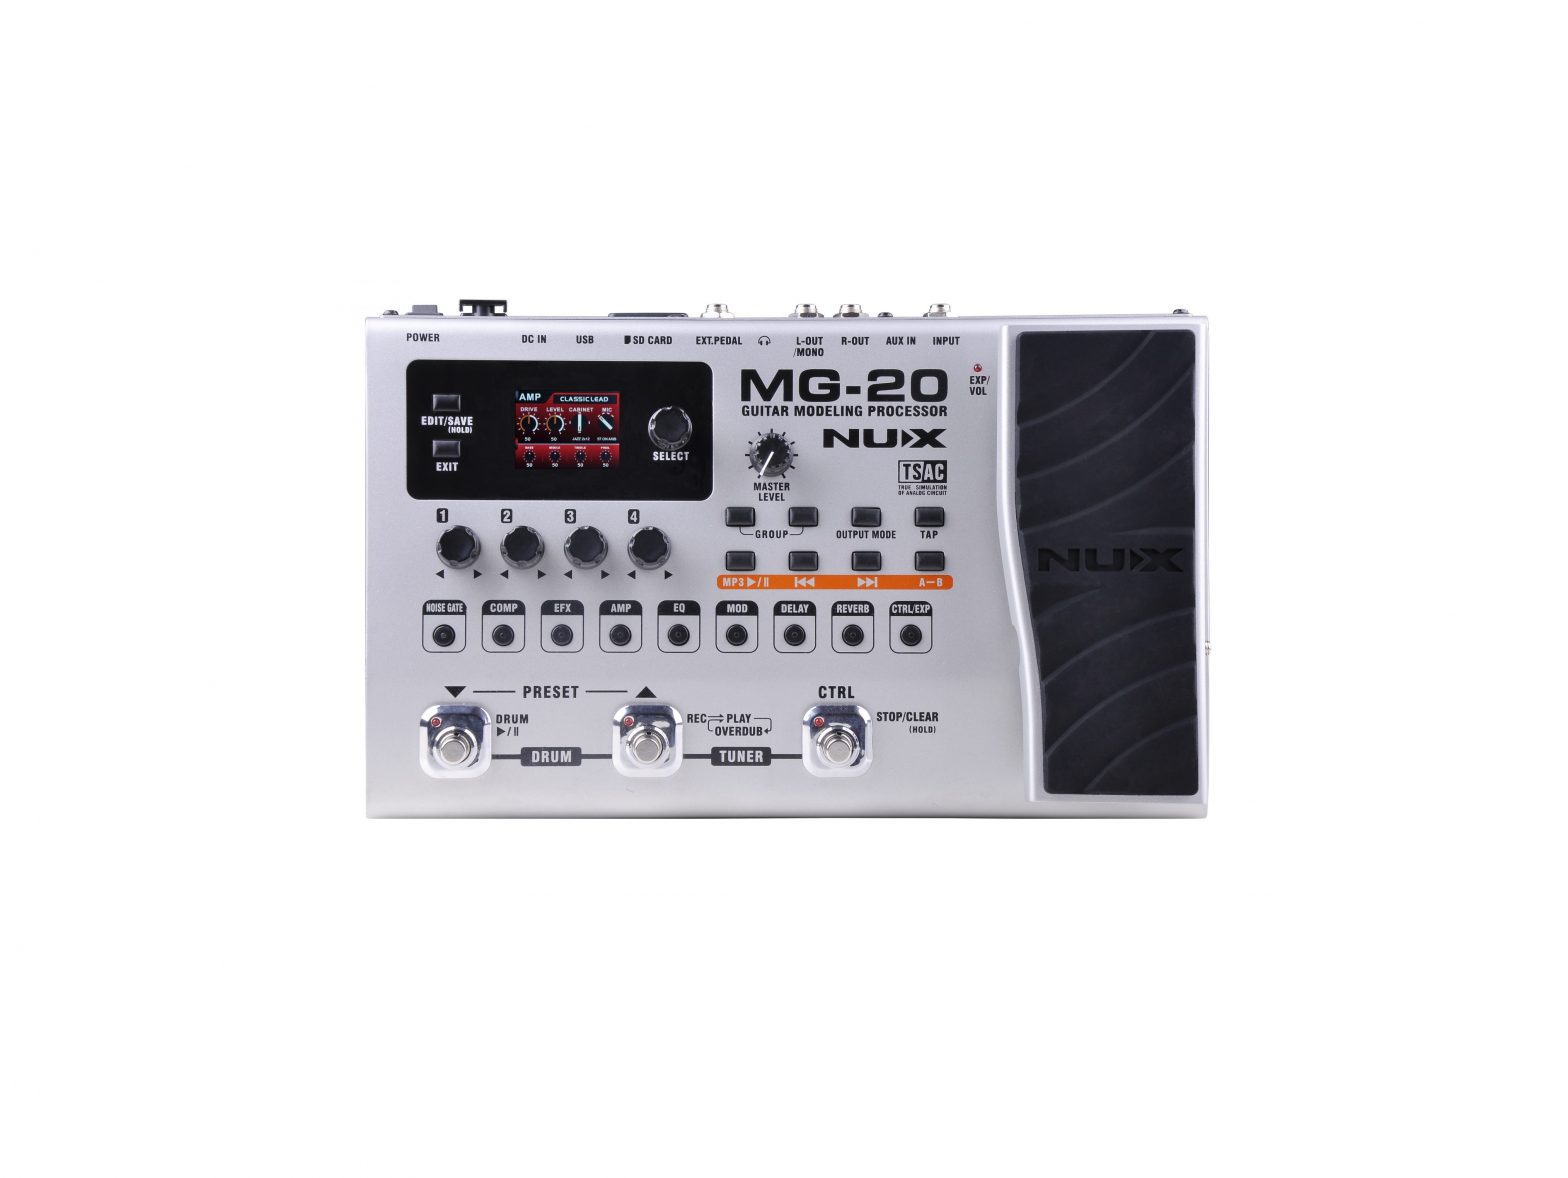
Front Panel Description
- SELECT knobSelect effects, pages of presets, etc.
- DISPLAYIt displays presets, effect control panels, drum & looper interface, and other setting pages.
- EDIT/SAVE buttonPress this button to enter Edit Mode and save presets.
- HOME buttonPress this button anytime to return to Preset Mode.
- PARAMETER knobsUse these knobs to set parameters of effects.
- EFFECTS MODULE BUTTONSThis series of buttons are designed as the real guitar effects signal chain. Under Edit Mode, press any of these buttons to enter an effect module
- PRESET footswitchesUse these two switches to switch presets. Press both switches simultaneously to enter DRUM & LOOP interface.
- CTRL footswitchThis is a control pedal that can be set as switch for effects On/Off, volume boost, MP3 Play/Stop or TAP tempo pedal.
- EXPNOL pedalThis pedal works as a Volume pedal or an Expression pedal to control other parameters. i.e. Wah, Whammy, Modulation Speed etc.
- MASTER LEVEL knobThis controls the master output volume of MG-20.
- GROUP buttonsUse these two buttons to quickly switch bank number under Preset Mode.
- OUTPUT MODE buttonPress this any time to choose the device that you want to output the sound of MG-20 to. Choosing the right output mode helps to get better tone.
- TAP buttonUse this button to tap in the speed of modulation effects, delay, and drum tempo.
- MP3 buttons


Connection Panel Description
- INPUTConnect your guitar here.
- AUXINPlug in your music player or drum machine here. The sound will be played through MG-20’s outputs.
- R-OUT & L-OUT/MONOThese are the main outputs that can be connected to amplifiers or mixer. Connect two amplifiers or for stereo effects. Use the L-OUT/MONO for mono effects.
- HEADPHONES jackThis is a stereo jack for headphones.
- EXT. PEDAL jackYou can plug an optional Cherub WTB-004 pedal to this jack to switch preset banks.
- SD CARD slotYou can insert an SD card and play the music from the SD card by the built-in MP3 Player of MG-20.
- USB jackThis is for system updating.
- DC jackPlug the supplied Power Adaptor in this jack.NOTE: Use ONLY the supplied adaptor or optional NUX ACD-008 Adaptor. Using other adaptor may cause noise or damage!
- POWER switchTurn on and off the power of MG-20 by this switch.

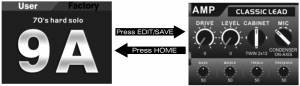
Preset Mode & Edit Mode
The default mode when you turn on the power of MG-20 is Preset Mode.Press EDIT/SAVE button enters Edit Mode. You can edit tones and save as user presets.
Press HOME button any time will return to Preset Mode.
To Create Tones
Editing tones on MG-20 is as easy as setting normal stomp-boxes!
Enter Edit Mode and Edit Effect Modules
Press EDIT/SAVE to enter Edit Mode.
MG-20 utilizes 9 Effects Module Buttons to show the guitar signal chain.Under Edit Mode, press any of these buttons once to enter corresponding effects module. Press this button again can switch this module on and the LED on the button is ON, the third press switches off this module and the LED on the button is OFF.

Effects Module Buttons


Modulation Effects Position
The default position of MOD module (modulation effects) is behind EQ module. You can change the position of MOD to be before EFX.Press and hold MOD button for 2 sec to change position. When MOD is positioned before EFX , The LED on the MOD button will be blinking when the MOD module is turned on.

NOTE: Stereo effects are not available when MOD is before EFX.MOD position will be saved to presets.
CTRL/EXP Pedal Function Setting
MG-20 has a CTRL control pedal and an EXPNOL pedal that give you superb control on stage!

| CTRL Functions List | |
| 1.SWITCH | Set the CTRL as a footswitch to switch On/Off one of these effect modules: COMP, EFX, AMP, EQ, MOD, DELAY, REVERS
|
| 2.TAP | Set the CTRL as a TAP Tempo pedal to set MOD Speed or Delay Time. |
| 3.SOLO BOOST | Set the CTRL as a solo boost switch. You can use Parameter 4 knob to set the amount you want to boost the master volume when you switch on the CTRL. |
| 4.DELAY + BOOST | Use the CTRL to switch on the delay effect and boost the master volume at the same time. Boost amount can be set. |
| 5.MP3 PLAY/STOP | Set the CTRL as a PLAY/STOP switch of the built-in MP3 Player. |
Press the toe position of the EXPNOL pedal down with a little force to switch it to be Volume pedal or Expression pedal. (The EXP LED lights up when it becomes Expression pedal)
| EXP Functions List | |
| 1.WAH STANDARD | Set the expression pedal to be a standard Wah pedal. |
| 2.WAHQ | Set the expression pedal to be a Wah pedal that you can set the Q value and sweeping range. Experience these settings to find your favorite Wah sound. |
| 3.WHAMMY | Set the expression pedal to have pitch bending effect. |
| 4.PARAMETER | Set the expression pedal to control these parameters: EFX DRIVE, AMP GAIN, MOD RATE, DELAY TIME |
| 5.MIN VOLUME | Set the minimum volume when you stomp the pedal to totally heel down position. |
NOTE: The function and On/Off status of the CTRL switch and EXPNOL pedal will be saved to presets.
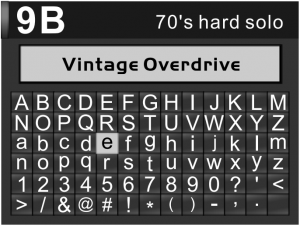
To Save User Presets
Once you find the tone you like, you can save it as a user preset.
- Press and hold EDIT/SAVE button to enter Name Editing page.
- Use SELECT knob or PRESET footswitches to choose the preset number where you want to save to. Or, use the GROUP buttons to quickly change group number.
- Use PARAMETER 1 and 2 to edit the preset name. Turn PARAMETER 1 knob clockwise to start editing the next letter (left -> right); turn it counterclockwise to delete the last letter.
- Turn PARAMETER 2 knob to choose the letters.
- Press EDIT/SAVE to confirm saving, or press HOME to abandon changes.
To Use Presets
Under Preset Mode, you can choose presets by stomping on the PRESET ![]() footswitches, or tweaking the SELECT knob. Press the GROUP buttons or use an optional extension pedal to change groups quickly.
footswitches, or tweaking the SELECT knob. Press the GROUP buttons or use an optional extension pedal to change groups quickly.
Under Preset Mode, you can still easily edit or switch On/Off any effect modules by press the Effects Module buttons, and change the functions of the CTRL pedal and EXP pedal. It is just like switching on or off stomp boxes on the pedal board.You can press and hold EDIT/SAVE button to save the changes, or switch to another preset to abandon changes.
Example:
 This means Compressor, Amp Simulator, and Delay are turned On and in the signal chain. Others are Off.
Output Mode
You can output the sound from MG-20 to a variety of devices by selecting output modes. Using the right output mode helps you get the best tone from MG-20.Press OUTPUT MODE button, and use SELECT knob to select the device you want to output the sound from MG-20.
| Stack Guitar In | Choose this one when you plug the MG-20 to the Guitar Input of a stack. |
| Stack Power | Choose this one when you plug the MG-20 to the power amp of a stack. (Normally the RETURN of the FX Loop) |
| Combo Guitar In | Choose this one when you plug the MG-20 to the Guitar Input of a combo. |
| Combo Power | Choose this one when you plug the MG-20 to the power amp of a combo. (Normally the RETURN of the FX Loop) |
| Mixer Out | Output the sound from MG-20 to a mixer or PA system. MG-20’s speaker simulator will be turned on. |
NOTE: Output modes can be changed at anytime. Selecting the output mode is a universal setting that is not saved in presets.
Drum & Looper
MG-20 has a built-in Drum Machine that has 81 rhythm patterns and a Looper with 60 sec recording time.

Drum Machine
|
Control |
Function | Control |
Function |
 |
To change drum patterns |
 |
To adjust drum volume |
 |
To change drum styles |
 |
Start and stop drum |
 |
To change tempo |
 |
Double-press to exit |
Looper
|
Control |
Function |
 |
Adjust the playback volume of a loop |
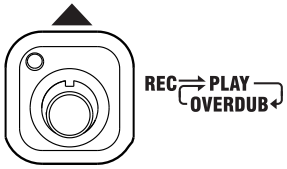 |
Press this to record, play, and overdub; Press and hold it for 2 sec to cancel the last recording (Undo), and press and hold it again for 2 sec to redo the recording that you just cancelled. (See picture) |
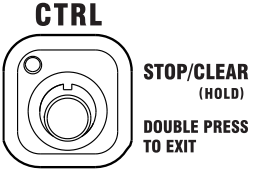 |
Press it once to stop the loop;Press and hold it to clear all recording;Double – press to exit (quickly press the CTRL switch twice within one second). |
During looping, you are free to exit to Preset Mode or Edit Mode by double-press the CTRL footswitch, change the guitar tone, and return to the Drum & Looper page to continue looping.
Mp3 Player
MG-20 has a built-in MP3 Player that allows you to play the music from the SD card. It supports MP3 music and most of the WAV and WMA music.
 |
Press this to enter the interface of MP3 Player. This is also the Play/Pause button. |
 |
Previous song. |
 |
Next song. |
 |
Use A-B button to repeat a phrase of music.Press once to set the start point, press the second time to set the end point, and press the third time to cancel repeating. |
The MP3 Player also allows you to change the speed of the music without changing the key. This is helpful when you want to slow down a fast lick for learning.

Tuner
Press the PRESET footswitch and CTRL footswitch at the same time to enter tuner page.

In Tuner page, press PRESET![]() footswitch for silent tuning. Press PRESET
footswitch for silent tuning. Press PRESET![]() to change tuning modes. Quickly press CTRL footswitch twice in 1 second to exit.
to change tuning modes. Quickly press CTRL footswitch twice in 1 second to exit.
Facto Restore
- Press EDIT/SAVE button and HOME button at the same time to enter SETUP page.
- Use SELECT knob to select FACTORY RESTORE, and press EDIT/SAVE button to enter.
- Press one of the GROUP buttons to toggle to YES.
- Press EDIT/SAVE to confirm restoring and exit.
NOTE: All user presets and settings will be restored to factory settings
EXP Pedal Calibration
- Press EDIT/SAVE button and HOME button at the same time to enter SETUP page.
- Use SELECT knob to select PEDAL CALIBRATION, and press EDIT/SAVE button to enter.
- Follow these steps:
- Set the EXP pedal to fully heel-down position, and press PRESET footswitch.
- Set the EXP pedal to fully toe-down position, and press PRESETT footswitch.
- Press the EXP pedal towards fully toe-down position with force, the LCD will show the threshold value.The harder you press the pedal, the higher the value. Higher threshold value means you need to press the pedal harder to switch between Expression and Volume function of this pedal.
- Press PRESET to confirm the adjustment.
- If you are not satisfied with the adjustment, you can start over from step 1.
- Press HOME button several times to return to Preset Mode
Language Setting, Version Information
- Press EDIT/SAVE button and HOME button at the same time to enter SETUP page.Use SELECT knob to select LANGUAGE SETTING, or VERSION INFORMATION.
- Press EDIT/SAVE button to enter.
- Follow the instruction on the screen.
- Press HOME several times to return to Preset Mode.
Specifications
- Sampling Frequency: 44.1 KHz
- A/D converter: 24bit
- Frequency response: 20Hz-20000Hz ± 1 dB
- THD+N: -93dBu(<0.003%)
- Dynamic Range: 110dB
- INPUT: -20dB
- OUTPUT: -10dB
- Power: DC 9V
- Dimensions: 330(L)x21 0(W)x83(H)mm
- Weight: 3.15Kg
Precautions
- Environment:
- Do NOT use MG-20 in high temperature, high humidity, or subzero environments.
- Do NOT use MG-20 in the direct sunlight.
- Please do NOT disassemble MG-20 by yourself.
- Please keep this manual for future reference.
Accessories
- Owner’s manual
- DC 9V
• Specifications may change without notice.
NUX MG-20 EFFECTS LIST
|
MODULE |
NAME | MODEL | KNOB 1 | KNOB2 | KNOB3 | KNOB4 | KNOBS | KNOBS | KNOB7 |
KNOBS |
|
NOISE GATE |
NOISE GATE | THRESHOLD |
DECAY |
|||||||
|
COMPRESSOR |
REDCOMP | MXR DYNA COMP | OUTPUT |
SENS ITIVITY |
||||||
|
EFX |
DISTORTION + |
MXR DISTORTION + | OUTPUT |
DIST |
||||||
|
DIST ONE |
BOSS DS-1 | LEVEL | TONE |
DRIVE |
||||||
|
S. CREAMER |
IBANEZTS9 | LEVEL | TONE |
DRIVE |
||||||
|
MODERN DIST |
PROCO RAT | LEVEL | FILTER |
DIST |
||||||
| HEAVY M ETAL | BOSS MT2 | LEVEL | HIGH | LOW | DIST | MIDDLE |
FREQ. |
|||
|
TUBE DRIVE |
CHAN DLER TUBE DRIVER | OUT | HI | LO |
DRIVE |
|||||
|
FUZZ |
DUNLOP FUZZFACE | VOLUME |
FUZZ |
|||||||
|
MUFF Pl |
EH MUFF Pl | VOLUME | TONE |
SUSTAIN |
||||||
|
PREAMP |
JAZZ CLEAN |
ROLAND JAZZ 120 | DRIVE | LEVEL | CABINE T | M IC | BASS | M IDDLE |
TREBLE |
|
|
BLACK FACE |
FENDER DELUXE REVERS | DRIVE | LEVEL | CABINET | MIC | BASS |
TREBLE |
|||
|
59’TWEED |
FENDER SASSMAN 59 | DRIVE | LEVEL | CABINET | MIC | BASS | MIDDLE |
TREBLE |
||
|
MINI TWEED |
FENDER TWEED DELUXE 5E3 | DRIVE | LEVEL | CABINE T | MIC |
TONE |
||||
|
DELUXE VIBE |
FENDER TWIN REVERS | DRIVE | LEVEL | CABINE T | MIC | BASS | MIDDLE |
TREBLE |
||
|
HIGH WATT |
HIWATT CUSTOM 100 | DRIVE | LEVEL | CABINET | MIC | BASS | MIDDLE | TREBLE |
PRESENCE |
|
|
CALI. CRUNC H |
MESA BOOGIE MARK I | DRIVE | LEVEL | CABINET | MIC | BASS | MIDDLE | TREBLE |
PRESENCE |
|
|
BRITISH |
VOX AC30 TOP BOOST | DRIVE | LEVEL | CABINE T | MIC | BASS | TREBLE |
CUT |
||
|
CLASSIC LEAD |
MARSHALL SUPER LEAD 1959 | DRIVE | LEVEL | CABINET | MIC | BASS | MIDDLE | TREBLE |
PRESENCE |
|
|
PLEXI 45 |
MARSHA LL JTM45 | DRIVE | LEVEL | CABINET | MIC | BASS | MIDDLE | TREBLE |
PRESENCE |
|
|
SO’S CLASSIC |
MARSHALL JC M800 | DRIVE | LEVEL | CABINET | MIC | BASS | MIDDLE | TREBLE |
PRESENCE |
|
|
SO’S TURBO |
M ARSHALL JCM800 | DRIVE | LEVEL | CABIN ET | MIC | BASS | M IDDLE | TREBLE |
PRESENCE |
|
|
MODERN HIGHGAIN |
SOLDANO SLO100 | DRIVE | LEVEL | CABINET | MIC | BASS | MIDDLE | TREBLE |
PRESENCE |
|
|
SUPER HEAVY |
PEAVEY 5150 11 | DRIVE | LEVEL | CABIN ET | M IC | BASS | M IDDLE | TREBLE |
PRESENCE |
|
|
90 ‘S TREAD PLATE |
MESA BOOGIE DUAL RECITIFIER | DRIVE | LEVEL | CABINET | MIC | BASS | MIDDLE | TREBLE |
PRESENCE |
|
|
NEW M ETAL |
DIEZEL HERBERT | DRIVE | LEVEL | CABINET | MIC | BASS | MIDDLE | TREBLE |
PRESENCE |
|
|
CABINET |
CALI 1X12 |
BOOGIE1X12 |
||||||||
|
TWEED 1X12 |
FENDER TWEED DELUXE |
|||||||||
|
BLACK 1X12 |
FENDER DELUXE REVERS |
|||||||||
|
JAZZ 2X12 |
ROLAND JC-120 |
|||||||||
|
BLACK 2X12 |
FENDER TWIN REVERS |
|||||||||
|
BLUE 2X1 2 |
VOXAC-30 |
|||||||||
|
TWEED4X10 |
FENDER SASSMAN |
|||||||||
|
TT54X12 |
MARSHALL WITHT-75 |
|||||||||
|
V30 4X12 |
MARSHALL W ITH V-30 |
|||||||||
|
GREEN 4X12 |
MARSHALL W ITH GREEN |
|||||||||
|
G12 4X12 |
MARSHALL WITH G12 |
|||||||||
|
RECT 4X12 |
MESA BOOGIE 4X12 |
|||||||||
|
BOTM 4X12 |
CUSTOM OVERSIZED 4X12 |
|||||||||
|
MICROPHONE |
57 ON AXIS |
|||||||||
|
57 OFFAXIS |
||||||||||
|
DYNAMIC |
||||||||||
|
CONDENSER |
||||||||||
|
EQ |
7-BAND EQ |
100 | 200 | 400 | 800 | 1.6k | 3.2k | 6.4k |
GAIN |
|
|
PARAMETRIC EQ |
LO GAIN | LM GAIN | HM GAIN | HIGAIN | LO FREQ | LM FREQ | HM FREQ |
HI FREQ |
||
|
MODULATION |
CHORUS |
BOSS CE-5 | E. LEVEL | DEPTH | RATE | M-S | LOW | HIGH | SUB. DIV. |
TAP TEM PO |
|
ST. CHORUS |
STEREO CHORUS | E. LEVEL | DEPTH | RATE | M -S | LOW | HIGH | SUB. DIV. |
TAP TEMPO |
|
|
FLANGER |
BOSS BF-3 | MANUAL | DEPTH | RATE | RESO. | SUB. DIV. |
TAP TEMPO |
|||
|
VINTAGE PHASER |
MXR PHASE 90 | RATE | DEPTH | SUB. DIV. |
TAP TEMPO |
|||||
|
U-VIBE |
DUNLOP UNI-VIBE | VOLUME | INTENS. | SPEED | CHO-V IB | SUB. DIV. |
TAP TEMPO |
|||
|
TREMOLO |
VOLUME | INTENS. | SPEED | SLOPE | SUB. DIV. |
TAP TEMPO |
||||
|
ROTARY SPK |
RATE | BALANCE | DIRECT |
EFFECT |
||||||
|
VIBRATO |
SPEED | DEPTH | SUB. DIV. |
TAP TEMPO |
||||||
|
HARMON IST |
MODE | KEY | HARMONY | BALANCE | ||||||
|
DETUNE |
SHIFT L. | SHIFT R. | MIX |
LE VEL |
||||||
|
DELAY |
ANA LO G DELAY |
TIME | F:B ACK | VO LU ME | SUB . DIV . |
TAP TEMPO |
||||
|
DIGITAL DELAY |
TIME | F.BACK | VOLUME | TONE | SUB. DIV. |
TAP TEMPO |
||||
|
MOD ULATE |
TIME | F.BACK | VOLUME | SUB. DIV. |
TAP TEMPO |
|||||
|
TAPE ECHO |
ROLAND RE-201 | TIME | F.BACK | VOLUME | HEAD | SUB. DIV. |
TAP TEMPO |
|||
|
REVERSE |
TIME | F.BACK | VOLUME | SUB. DIV. |
TAP TEMPO |
|||||
|
PAN DELAY |
TIME | F.BACK | VOLUME | SUB. DIV. |
TAP TEMPO |
|||||
|
REVERB |
ROOM |
P.DELAY | DECAY | LEVEL |
HI CUT |
|||||
|
HALL |
P.DELAY | DECAY | LEVEL |
HICUT |
||||||
|
PLATE |
P.DELAY | DECAY | LEVEL |
HICUT |
||||||
|
EXP. PEDAL |
WAH STANDARD |
|||||||||
|
WAH Q |
Q |
RANG E |
||||||||
|
WAHMMY |
OCTAVE |
|||||||||
|
PARAMETER |
MOD RATE |
|||||||||
|
THE FCC REGULATION WARNING (for U.S.A.) This equipment has been tested and found to comply with the limits for a Class B digital device, pursuant to Part 15 of the FCC Rules. These limits are designed to provide reasonable protection against harmful interference in a residential installation. This equipment generates, uses, and can radiate radio frequency energy and, if not installed and used in accordance with the instructions, may cause harmful interference to radio communications. However, there is no guarantee that interference will not occur in a particular installation. If this equipment does cause harmful interference to radio or television reception, which can be determined by turning the equipment off and on, the user is encouraged to try to correct the interference by one or more of the following measures:
|
|
CE mark for European Harmonized Standards CE Mark which is attached to our company’s products of Battery mains the product is in fully conformity with the harmonized standard(s) EN 61000-6-3:2007 +A1 :2011 & EN 61000-6-1 :2007 Under the Council Directive 2004/108/ EC on Electromagnetic Compatibility. |


[xyz-ips snippet=”download-snippet”]