
NXT NX50710 Adjustable Standing Desktop Riser Instruction Manual
EASY ASSEMBLY
We believe that simple is smart. So we provide logical, clear instructions with just the right amount of detail. That means you and your teams will be up and running in no time—with the tools you need to work better and smarter.
Our experts are always on hand to help—wherever and whenever you need.
Call our product support experts8.00am—8.00pm EST (Monday-Friday)1-800-270-9165
Call our in-home assembly experts9.00am—7.00pm EST (Monday-Friday)9.00am—5.00pm EST (Saturday)1-866-826-6622
PRODUCTS THAT EMPOWER
With the quality you demand and the rigorous performance testing you expect, NXT Technologies™ products are made to last and impress. Designed to be high-functioning and adaptable to your ever-changing environment, we always make sure every item meets our highest standards—and yours—before we put our name on the box.
We’ll continue to offer an ever-growing assortment of innovations to better meet your needs. From devices that improve ergonomics to tech accessories, we make products you can count on so you can stay focused on your next big idea.
TECHNICAL DATA
CAUTION
Please do not exceed the recommended weight capacity.
INCLUDED PARTS
ASSEMBLY INSTRUCTIONS – STEP 1
1. Please take the product out of the carton and place it on the table.

CAUTION
Please place the product properly based on the size of the unit.
ASSEMBLY INSTRUCTIONS – STEP 2
2.
a: Attach decorative cover to the connecting arm.b: Connect and fix the juntion plaste and keyboard tray using 8 screws.c,d: Hang the junction plate on the knob assembled and then tighten the knob.
ASSEMBLY INSTRUCTIONS – STEP 3
3. Based on the actual usage, press the handle grip on the right side simultaneously, and adjust the workstation to the proper height.
CAUTION
Please do not put hands near the supporting bars, as they change during adjusting.
ASSEMBLY INSTRUCTIONS – STEP 4
4. Please put the devices onto the top of the workstation.
CAUTION
Please make sure that all installed equipment is on the table and not sticking out over the edge.
ASSEMBLY INSTRUCTIONS – STEP 5
CAUTION
Cable management ties help make the cables tidy and clean. Please leave enough cable length for the height adjustment function.
SAFETY INSTRUCTIONS
Please adjust desktop to the highest position and then remove equipment to avoid harm or damage.
Please move unit with two people.
CAUTION
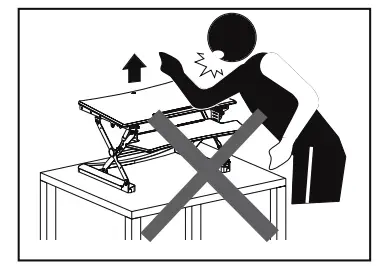
 Hands PinchingPlease do not place your hand near the scissor lift. The scissor lift angle will change when lifting or lowering the desktop and it may hurt your hands.
Please do not put your hands near the supporting bars as the angle will change during height adjustment and may hurt your hands.
Please make sure to install all equipment on a level surface.
Cable management tie helps to organize cables. Please leave enough cord length to adjust with the height of the desktop. Failure to do so may result in damage to corded device.
PRODUCT SUPPORT 1-800-270-9165
[xyz-ips snippet=”download-snippet”]