CD·10USER MMAANUA L
3YEARWARRANTY
Register your product online for a FREE 3 year extended warranty at: www.oakcastle.co.uk
 report this ad
BOX CONTENTS
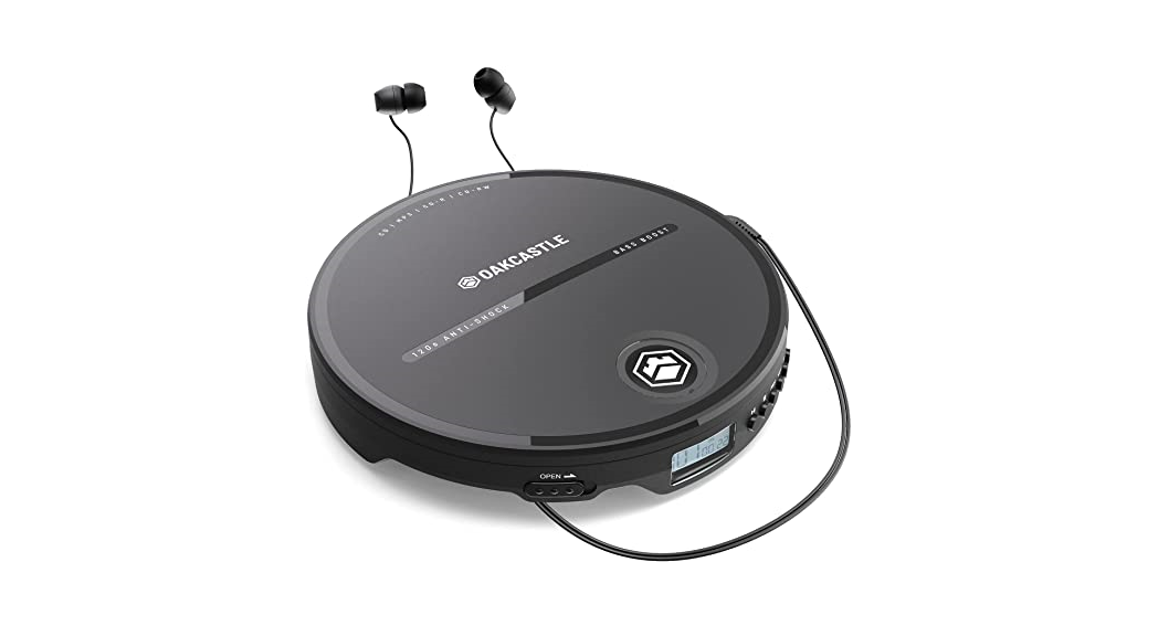
WHAT’S IN THE BOX
| A. Oakcastle CD10 Portable CD PlayerB. In-line control for headsetC. 3.5mm to 3.5mm AUX cable | D. USB to the DC5V charging cableE. EarphonesF. Instructions GuideG. 2 x AA Batteries |
CONTROLS & FUNCTIONS
| 1. Disc door2. Open3. Display screen4. Play/Pause/Power On5. Stop | 6. Program7. Mode8. Previous/Rewind9. Next/Fast forward |
| 10. Battery compartment11. Hold12. Volume13. DC 5V power port14. Headphone port15. BBS (Bass Boost System) switch | Headset Controls16. Stop17. Play/Pause18. Previous/Rewind19. Next/Fast forward |
BASIC OPERATIONS
Power on/offTo power on, press the ‘Play/Pause/Power On’ button (Ref.4). Press the ‘STOP’ button twice (Ref.5) to turn off the player. If the player will not be used for an extended period of time, ensure that it is switched off.HoldWhile the player is in use, you can switch the Hold button to the ‘Hold’ position (Ref.11). This will place the unit in ‘Hold’ mode. In ‘Hold’ mode, the buttons will be inactive. If any button is pressed while the unit is in ‘Hold’ mode, the screen will display a lock icon on the top right-hand side.Battery UseSlide open the battery cover (Ref.10) and insert 2 x AA batteries (included) into the battery compartment. Ensure that the polarities are correct and the negative (-) side is aligned with the smooth end of the battery, and the positive side (+) is aligned with the opposite end of the battery. 2 new AA batteries will provide for approximately 7 hours of battery life.AC Adapter UseTo use the CD10 connected to a wired power source, connect the USB charging cable (included) from any standard USB 2.0 connection (such as a laptop or mains USB adapter) to the charging port on the device (Ref.13).
Inserting a DiscSlide the ‘OPEN’ switch (Ref.2) to the ‘OPEN’ position to open the device door.Insert the disc into the CD player, label side up, pressing it gently until it snaps into place on the spindle.Close the disc door gently. Ensure that the disc door is completely closed, otherwise, the player will not read the disc.Compatible disc format support: CD, CD-R, CD-RW, MP3, WMA
Using headphones or external speakersListen to your audio CD through headphones by inserting wired headphones (with a standard 3.5mm connector) into the headphone socket of the player (Ref.14).Ensure that the headphone connector is fully inserted into the device.To listen to your audio CD through external speakers, connect a standard 3.5mm AUX cable from the CD player to your external speakers or output device. Control the playback using the controls on the CD player. You will now be able to hear audio through your external speakers or another output device.
My CD Player displays ‘ESP’ on the screen. What does this mean?ESP stands for ‘Electronic Shock Protection. When you see this on the display, it indicates that the ESP is functioning to prevent shocks or bumps to the unit causing the track you are playing to skip.
PLAYING CDS
Basic Controls and FunctionsPress Play/Pause (Ref.4)/(Ref. 17) to play or pause the CD.Press Previous (Ref.8)/(Ref. 18) to restart the current track or press repeatedly to skip to previous tracks. Press Next (Ref.9)/(Ref. 19) to skip to the next track. Press and hold Previous or Next (Ref.8)/(Ref. 18)/(Ref. 9)/(Ref. 19) to rewind or fast forward through a track.Press ‘Stop’ (Ref.5)/(Ref. 16) to stop the CD. Press ‘Stop’ twice to power off the unit.
Repeat ModesPress ‘Mode’ to switch the playback mode between ‘1’ (repeat current track), ‘ALL’ (play entire CD repeatedly), ‘RND’ (play tracks in random order), INTRO (play the first 10 seconds of each track) and repeat off (display will show blank at the top of the screen).
Program TracksPress the PROG button (Ref.6) to begin programming your disc to play in a selectedorder. For instructions on how to do this please see page 9.
Auto-resume FunctionIf the player is turned OFF while playing a track or while paused, the next time it is switched on, it will resume playing from that track position.
BBS (Bass Boost System)Switch the Bass Boost mode On/Off using the BBS switch (Ref.15).
PROGRAMMING YOUR DISC
Follow the steps below to program your CD to play tracks in a specific order other than the default order. To do this, it may help to refer to the album cover or tracklist. You can program up to a maximum of 20 tracks.Ensure the CD is stopped. Press PROG to enter program mode (Ref.6).Using the ‘Previous’ and ‘Next’ buttons (Ref.8)/(Ref. 18)/(Ref. 9)/(Ref. 19), select the first song you would like the disc to play. The display will show P01, P02, etc. on the right-hand side, to refer to each consecutive track slot – Programmed track 1, Programmed track 2, and so on.Press PROG again (Ref.6) to confirm. Repeat the above steps until you haveprogrammed each track slot.Press Play (Ref.4)/(Ref. 17) to begin playing the selected track order.Note: when playback stops, the programmed playback will be erased. To cancel the programmed playback, press the play button.
TROUBLESHOOTING
| Observation | Potential Cause/Solution |
| Cannot read discs | Make sure the label side of the disc is facing up. Ensure the disc is fully secured in place.Make sure the disc is not heavily scratched or damaged.Wipe the disc gently from the center out to the edge with a clean, dry, soft cloth.Try another new disc to check if the disc is faulty. Ensure the format of the disc is CD, CD-R, CD-MP3, or CD-RW.Wipe the laser gently with a degreasing cotton swab.Note: Please do not touch the laser with your hands. |
| No sound | Check volume is turned up.Check earphone jack is inserted fully into the headphone port. |
| No power | Ensure that the unit is turned on.Insert new batteries, or connect the unit to the mains or another power source. |
| Scratching sound from earphones or disc when playing | Wipe the disc gently from the center out to the edge with a clean, dry, soft cloth.Try another new disc to check if the disc is faulty. Ensure the format of the disc is CD, CD-R, CD-MP3, or CD-RW.If there is a scratching sound in your earphones when playing the disc, this may be caused by a scratched disc. Please change to another disc, and do not use the old one again in order to protect the unit from damage. |
SPECIFICATION & WARRANTY
| Power source | DC 5V/2 x M batteries (included) |
| Charging voltage | DC 5V/1A |
| Operating Voltage | 5V |
| Power consumption | approx. o.6W |
| Battery | 2 x AA batteries (included) |
| D/C conversion | 16Bit |
| Sampling frequency | 44.1KHZ |
| Frequency response | zo-zoKHZ |
| The power output of earphones | 16mW+16mW/16-320hm |
| Impedance of earphones | 32ohm/l6mW |
| Supported disc formats | CD, CDR, CD-RW, MP3, WMA |
| Shockproof time | CDs: up to 4o seconds, CD-R: 120 seconds |
| Size | 145 x145 x 25 mm |
| Weight | 32og |
WARRANTY
All products come with a standard 12-month warranty. All items must be registered on www.oakcastle.co.uk for the warranty to be valid. Once on the web page, use the menu to find “register your product”. You will also be given the chance to extend your warranty for an additional 24 months, free of charge.
SAFETY INFORMATION
- Read these instructions.
- Keep these instructions. Instructions are also available for download at www.oakcastle.co.uk
- Heed all Warnings
- Follow all instructions
- Do not clean the apparatus near or with water
- Do not block any ventilation openings. Install in accordance with the manufacturer’s instructions
- Do not install near any heat sources such as radiators, heat registers, stoves, or other apparatus (including amplifiers) that produce heat.
- Protect the power from being walked on or pinched particularly at plugs, convenience receptacles, and the point where they exit from the apparatus.
- Only use attachments/accessories specified by the manufacturer.
- Unplug this apparatus during light storms or when unused for long periods of time.
- Refer all servicing to qualified service personnel. Servicing is required when the apparatus has been damaged in a way, such as power-supply cord or the plug is damaged, liquid has been spilled or objects have fallen into the apparatus, the apparatus has been exposed to the rain or moisture, does not operate normally or has been dropped.
- No naked flame sources, such as lit candles, should be placed on the apparatus.
- Dispose of used electrical products and batteries safely according to your local authority and regulations.
ADDITIONAL WARNINGS
The apparatus shall not be exposed to dripping or splashing and no objects filled with liquid, such as vases, shall be placed on the apparatus.The mains plug is used to disconnect the device and it should remain readily operable during intended use. In order to disconnect the apparatus from the main mains completely, the mains plug should be disconnected from the main socket outlet completely.The battery shall not be exposed to excessive heat such as sunshine, fire, or the like.
 RECYCLING ELECTRICAL PRODUCTSYou should now recycle your waste electrical goods and in doing so help the environment.This symbol means an electrical product should not be disposed of with normal household waste.Please ensure it is taken to a suitable facility for disposal when finished with.
IMPORTANT: Please read all instructions carefully before use and keep them for future reference.
 Risk of electric shock.Do not open
![]() Read all instructions carefully before use and keep them for future reference
Read all instructions carefully before use and keep them for future reference
When servicing, use only identical replacement parts
![]() IMPORTANT: Please read all instructions carefully before use and keep them for future reference
IMPORTANT: Please read all instructions carefully before use and keep them for future reference
[xyz-ips snippet=”download-snippet”]