![]()
Instruction GuideF100 | Mobile Phone
3-year warranty
Register your product for a FREE 3-year warranty at www.oakcastle.co.uk
Box Contents
What’s in the Box?
Oakcastle F100 Mobile PhoneUSB CableInstructions GuideSim Card Adapters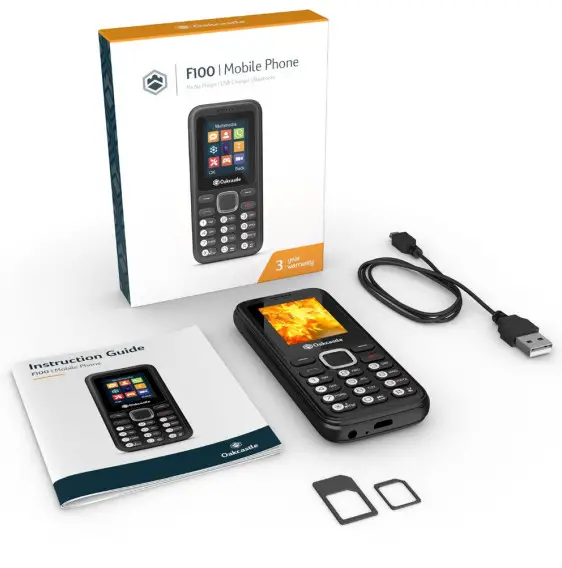
Controls & Functions
Control Buttons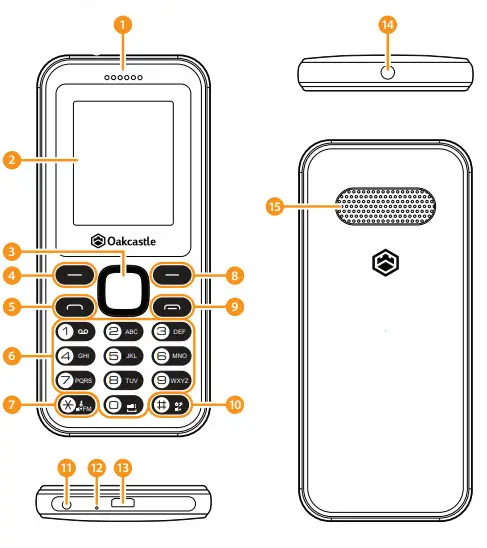
- Phone speaker
- Display
- Navigation/OK button
- Left softkey
- Pick up call
- Keypad
- * Key
- Right softkey
- On/off/end call
- # Key
- Headphone jack
- Microphone
- Charging/connection port
- Torch
- Speaker
How to Open the Phone
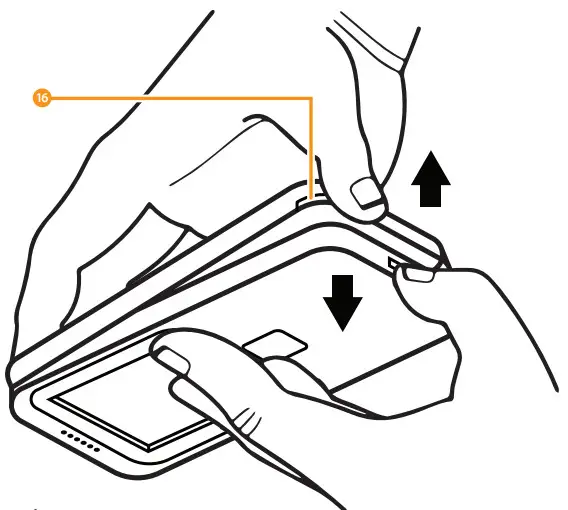
16. Phone case openingOpening the F100To open the F100 to remove or replace the battery or insert a SIM or SD card, place fingernails on either side of the small phone case opening (Ref.16) to prise open the back case from the phone. There is a small indent in the casing on the bottom right of the phone. When the phone is brand new, it will take a moderate amount of force to open, but this will become easier with time.
Basic operation
Power on/offTo switch on/off, press and hold the power button (Ref.9).ShortcutsAudio: Press up on the navigation key (Ref.3).Profiles: Press right on the navigation key (Ref.3).Alarm: Press down on the navigation key (Ref.3).New message: Press left on navigation key (Ref.3).Change profile (Normal/Silent/Meeting/Indoor/Outdoor): Press and hold # key (Ref.10).Torchon/off: Press and hold 0 (number 0 Ref.6).FM Radio: Press and hold * key (Ref.7).Voicemail: Press and hold 1 (number 1 Ref.6).Sleep: Press the End call key (Ref.9).
ChargeTo charge the phone, use the cable provided to insert the micro USB connector into the phone (Ref.13) and insert the USB connector into a USB power supply. When the phone is fully charged (1.5h maximum), the screen will display ‘Charging complete’.
Lock/UnlockTo lock/unlock the phone, press the left softkey (Ref.4) followed by the star key (Ref.7).
Emergency callsTo make an emergency call (999) (911) (112) it is not necessary to unlock the phone. Dial the number and press Send Call (Ref.5).Default Password: 1234
Instruction Guide
MessagingWrite a messageTo write a text message, either use the shortcut (press left of the navigation key Ref.3 from the main screen) or navigate to Messages from the main menu by selecting Menu (Press Ref.4 + select Messaging, then select 1 – ‘Write a message’ by pressing Ref.3). To select a contact from your Contacts list, with the cursor on the Contacts line, press Enter (Ref.3) and select your chosen contact. Once selected, the contact will display a ticked box. To confirm, press the left softkey (Ref.4) followed by confirming (Ref.3), then assign the contact to your message by pressing confirm (Ref.3) once again.
Using the keypadMobile Phone keys correspond to the following characters:1 – Punctuation , . ? ! ‘ “ – @ : ; / _0 – Insert space/number 0# – Input method settingsAbc/abc/ABC/123* – Other punctuationPress # (Ref.10) to see the next page of punctuationPress * (Ref.7) to see the previous page of punctuationTo send a message once complete, press the Enter button (Ref.3).Alternatively, press ‘options’ (Ref.4) followed by the Enter button (Ref.3).
Contacts and CallsAdd a new ContactMethod 1: Type in a phone number from the home screen, then press the Enter button (Ref.3) to select ‘Add to Contacts’.Method 2: To add a new contact, navigate to ‘Contacts’ from the main menu screen. Press the left softkey (Ref.4) to select ‘Options’, then select ‘New’ (Ref.3). You can choose whether to save the contact details to the Phone, the first SIM card, or the second SIM card. Once you have chosen between saving the contact details to the Phone, SIM1, or SIM2, you can edit the Contact’s Name, Mobile Number, and Contact group (Family, Friends, Business, Classmates).
Manage GroupsTo manage groups, navigate to ‘Groups’ from the Contacts menu (Press right of Navigation key (Ref.3) until the ‘Groups’ tab is highlighted). From here, you can add Groups, add Contacts to Groups, or delete Contacts from Groups.
Make a callTo make a call, begin dialing a number using the keypad (Ref.6) from the home screen, then press the ‘Send Call’ button (Ref.5) to call the number. Alternatively, select a Contact from your Contacts list and either press the ‘Send Call’ button (Ref.5), or highlight the number and press the Enter button (Ref.3).Emergency callsTo make an emergency call (999) (911) (112) it is not necessary to unlock the phone. Dial the number and press Send Call (Ref.5).
SettingsCall SettingsSet Dual-SIM settings, call divert, call waiting, call barring, hide ID, and other settings.Phone SettingsSet Date & time, Language settings, Shortcut settings, Auto power on/off, Power management, Restore factory settings.Please note that the default password to restore factory settings is 1234.DisplayChange wallpaper from memory card, Idle display settings, Contrast, Backlight, and Keypad backlight settings.SecurityChange PIN code settings, privacy settings, Auto keypad lock, Lock screen by end-key, Fixed dialing, and Blacklist settings.ConnectionsChange Network account, GPRS Service, Data connection settings, Network selection settings.
Multimedia and My filesImage, Video and Sound recordingsStore images, videos, and sound recordings using an external SD card. You can upload images to the SD card that you can use as Contact profile pictures or phone wallpapers (only PNG and JPG files can be used for wallpapers). To create a sound recording, an SD card with available storage space must be inserted into the phone.FM RadioTo use the FM Radio, navigate to FM radio from the home screen (select ‘Multimedia’ or ‘FM Radio’).Change volume: Press up/down on the navigation key (Ref.3)Scan to next radio station with good signal: Press left/right on the navigation key (Ref.3).Auto search and save: Select ‘Auto search and save’ from options. The phone will automatically scan for stations with a good signal and save them to the Channel list.Channel list: View a list of your saved stations.Save: Save a station to your Channel list.Manual search: Manually enter the frequency of the station you wish to listen to.Open speaker: Loudspeaker enabledBackground play: Set the radio to play in the background.Record: Make a recording of a broadcast.Scheduled Record: Set a recording to start at a particular time.Record file list: View a list of your recordings.Help: Advice on using headphones with the phone.
Tools and GamesToolsCalculator – Follow the diagram on the screen to use the functions. Use the Enter key (Ref.3) to use the + / – * and = functions. In Options, M+ /M- adds/subtracts the current value to memory register; MR recalls the current memory register value; MC clears the memory register.
Calendar – Set reminders or add events to the calendar.Alarm – Set up to 3 alarms and choose between Once, Daily, and Working days.Bluetooth – Use Bluetooth to transfer files to/from your computer or phone. SD card required. Please see page 9 for further details.Torch – Select to turn the torch on/off. Alternatively, press and hold 0 on the keypad (Ref.6).World clock – view, add or delete data and time information across the globe.Stopwatch – Start a timer. If you press back (Ref.8) without pressing Stop (Ref.4), the timer will continue.
GamesThe F100 has been pre-loaded with 4 games for your entertainment.Doodle Jump – 5 free games or buy for £2Crossy Road – 5 free games or buy for £2Bubble Party Mix – freeSUPER PET TWIST – free
Profiles, Audio and Bluetooth
ProfilesChoose from the preset profiles (Normal, Silent, Meeting, Indoor, or Outdoor) or create your own profile for either SIM1 or SIM2 and adjust the volume of the Caller ringtone, Message ringtone, Alarm & calendar ringtone, Call volume, Power ringtone (ringtone volume), and adjust the Ring-type (Ringtone, Vibrate, Silent, Vibrate then ring).
Please note that on Silent mode, games will still make a sound. To turn off the sound of a game, it must be switched to ‘off’ in Sound settings for each game separately.
AudioUse the F100’s built-in Audio app to listen to music on the go, create playlists, shuffle and repeat songs, change Equalizer settings, and set audio files as ringtones. This app requires a memory card with preloaded audio files.
BluetoothTo switch on Bluetooth, first, navigate to the ‘Tools’ option on the main menu screen. Scroll down to ‘Bluetooth’ and select by pressing the enter button (Ref.3). Ensure that Bluetooth is switched on and ‘Bluetooth visibility’ is ticked. To pair with an Android device, switch on Bluetooth on your Android device and connect to the ‘F100’ from the list of available devices. Once paired, you can select files from the list under ‘My files’ in Menu. Select a file, select ‘Options’, and then select ‘Send via Bluetooth’. Note: Compatible with Android devices only.
To send files from your computer to the F100 phone, first pair the devices. Then, under Bluetooth settings, follow the steps on your computer to transfer files via Bluetooth.
Specification
Specifications
| Screen | 1.77′ 128*160 display |
| Flash Memory | 32MB RAM + 32MB ROM |
| Bluetooth Version | Bluetooth 2.1 |
| Bluetooth Compatibility | Windows + Android devices |
| Audio Format | Midi/AAC/MP3/AVI |
| Battery | 600mAh |
| FM frequency | 87.5-1o8MHZ |
| Micro-SD card | Compatible with micro SD cards up to 32GB |
| Photo format | PNG/JPG/3GP |
| Charging time | 1.5 hours |
Warranty
All products come with a standard 12-month warranty. All items must be registered on www.oakcastle.co.uk for the warranty to be valid. Once on the web page, use the menu to find “register your product”. You will also be given the chance to extend your warranty for an additional 24 months, free of charge.
Safety Information
- Read these instructions.
- Keep these instructions. Instructions are also available for download at www.oakcastle.co.uk
- Heed all Warnings
- Follow all instructions
- Do not clean the apparatus near or with water
- Do not block any ventilation openings. Install in accordance with the manufacturer’s instructions
- Do not block any ventilation openings. Install in accordance with the manufacturer’s instructions.
- Do not install near any heat sources such as radiators, heat registers, stoves, or other apparatus (including amplifiers) that produce heat.
- Protect the power from being walked on or pinched particularly at plugs, convenience receptacles, and the point where they exit from the apparatus.
- Only use attachments/accessories specified by the manufacturer.
- Unplug this apparatus during light storms or when unused for long periods of time.
- Refer all servicing to qualified service personnel. Servicing is required when the apparatus has been damaged in a way, such as power-supply cord or plug is damaged, liquid has been spilled or objects have fallen into the apparatus, the apparatus has been exposed to the rain or moisture, does not operate normally, or has been dropped.
- No naked flame sources, such as lit candles, should be placed on the apparatus.
- Dispose of used electrical products and batteries safely according to your local authority and regulations.
ADDITIONAL WARNINGS
The apparatus shall not be exposed to dripping or splashing and no objects filled with liquid, such as vases, shall be placed on the apparatus. The mains plug is used to disconnect the device and it should remain readily operable during intended use. In order to disconnect the apparatus from the main mains completely, the mains plug should be disconnected from the main socket outlet completely. The battery shall not be exposed to excessive heat such as sunshine, fire, or the like.
RECYCLING ELECTRICAL PRODUCTS![]() You should now recycle your waste electrical goods and in doing so help the environment. This symbol means an electrical product should not be disposed of with normal household waste. Please ensure it is taken to a suitable facility for disposal when finished with.
You should now recycle your waste electrical goods and in doing so help the environment. This symbol means an electrical product should not be disposed of with normal household waste. Please ensure it is taken to a suitable facility for disposal when finished with.
IMPORTANT: Please read all instructions carefully before use and keep them for future reference.
![]() Risk of electric shock. Do not open
Risk of electric shock. Do not open
![]() Read all instructions carefully before use and keep them for future reference
Read all instructions carefully before use and keep them for future reference
![]() When servicing, use only identical replacement parts
When servicing, use only identical replacement parts
 |
CAUTION
|
 |
|
RISK OF ELECTRIC SHOCK DO NOT OPEN |
![]() IMPORTANT: Please read all instructions carefully before use and keep for future reference
IMPORTANT: Please read all instructions carefully before use and keep for future reference
 report this ad
![]()
[xyz-ips snippet=”download-snippet”]