![]() INSTRUCTION MANUAL
INSTRUCTION MANUAL
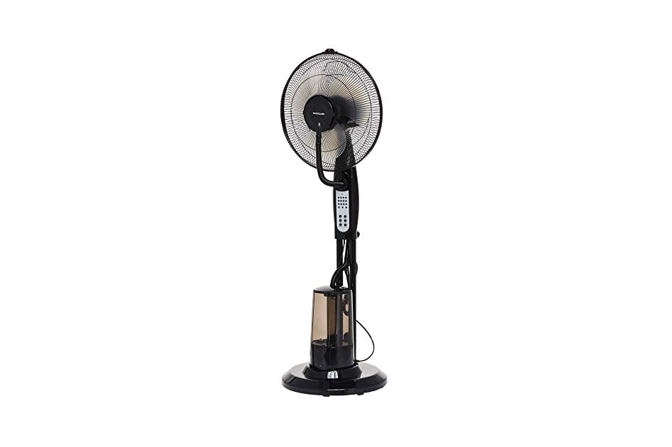
Model: CE134Mist Fan, 16 Inch110V, 60Hz, 90W
NOTE: Please read the manual carefully before using![]() PLEASE DO NOT RETURN BACK TO STORE, LET US TROUBLESHOOT FOR YOU FIRST.For any questions or concerns please email us at our parent company [email protected]. We will reply within less than 24 hours.
PLEASE DO NOT RETURN BACK TO STORE, LET US TROUBLESHOOT FOR YOU FIRST.For any questions or concerns please email us at our parent company [email protected]. We will reply within less than 24 hours.
WARNINGS
ATTENTION: Read this booklet carefully as it contains important instructions for a safe installation, use, and maintenance.
- This device must be used only for the purpose it was expressly designed; any use not complying with the instructions contained in the manual is considered inappropriate and dangerous. The manufacturer is not responsible for possible damages caused by the inappropriate and/or unreasonable use.
- This device is NOT suitable to use in an explosive environment (in the presence of flammable substances such as gas, vapor, or in an atmospheric condition when, after ignition, the combustion is spread in the air)
- The packing materials (plastic bags, expanded polystyrene, etc.) must be kept out of the reach of children or disabled people since they represent potential sources of danger.
- Place and use the device on a horizontal and stable surface.
- Before use check the integrity of the device and power cable. In case you are not sure contact a qualified person.
- Before powering the device make sure the rating (voltage and frequency) corresponds to the grid and the socket is suitable for the plug of the device.
- If possible, avoid the use of adapters and/or extension cables; if their use is necessary, use only materials in compliance with the current safety regulations and according to the electrical parameters of the adapters.
- The device must not be switched on using external timers and/or other remote-control devices which are not specified in this manual.
- DO NOT use or store the device near heat sources (heaters, stoves etc.).
- DO NOT dip the device in water or other liquids; in case of accidental fall in the water DO NOT try to take it out, but first unplug immediately the power cable from the socket.
- If you use the device for the first time, make sure to remove any label or protective sheet which blocks its proper functioning.
- Plug and unplug the power cable with dry hands and hold it firmly. Before plugging make sure the start button of the device is in the “OFF” position (turned off).
- Always unplug the power cable to avoid the overheating and avoid stretching it (do not pull it, tug it or use it to drag the device to which is connected).
- DO NOT obstruct totally nor partially the air vents or inserts objects inside.
- During the functioning do not touch the device with wet body parts.
- In case of malfunction or anomalies during the functioning, switch off the device immediately, turn off the power and check the cause of the anomalies, if possible, with the support of a qualified person.
- Avoid carrying out operations which are not specified in this manual (such as disassembling and/or altering).
- Always remember to unplug the power cable of the device if it is not used for a long period, before storing, cleaning or performing any maintenance operation.
- Store and use the device only indoors or in any case protected from weathering such as rain, direct radiation of the sun and dust. The device is not design for the external use or storage.
- The cleaning and maintenance of the device MUST NOT be done by children without the supervision of an adult.
- DO NOT use the device near curtains or textiles.
- DO NOT hang the fan on the wall or ceiling unless this type of installation is provided and explained in this manual.
- DO NOT cover the device during functioning.
- DO NOT insert objects or body parts inside the protection grille of the fan. DO NOT leave the device unsupervised for a long period during functioning.
- If the fan must be stored for a long period and is not used regularly, place the fan in its original packaging in a dry place. When you use it for the first time after a long period of inactivity, make sure the fan is clean and the motor blades turn feely (when the device not powered) without any restraint.
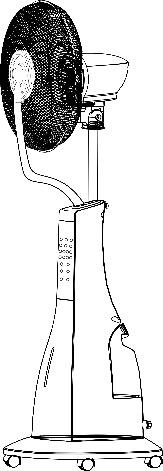
Technical Information

- Misting Board
- Front Grill
- Misting Board Lock Screws
- Blade Lock Nut
- Blades
- Grill Lock Nut
- Back Grill
- Motor Shaft
- Motor Cover
- Grill Lock Nut
- Grill Lock Screw
- Motor Holder
- Connection Holder
- Main Holder
- Holder Fixed Screw
- Main Body
- Water Tank
- Water Outlet Lock nut
- Base
- Control Panel
- Base Lock Nut
- Remote Control
- Wheels
- Decorate Panel
- Misting Tube
- Water Indicator
Instructions for Use
- Insert the main holder (14) into the main body (16), and tight up by the holder fixed screw (15).
- Insert the 5pcs wheels (21) into the base (19) and tighten up by the base lock nut (20).
- Put the back grill (7) on the motor shaft (8) and tighten up by the grill lock nut (6) to the motor cover (9)
- Insert the blades (5) on the motor shaft (8) and tighten up the blade lock nut (4).
- Fix the misting board (1) on the front grill (2), and tight up by misting board lock screws (3).
- Connect the front grill (2) and back grill (7) by grill lock screw (11) and tighten up by grill lock nut (10).
- Insert the misting tube (22), connection to the misting board (1)
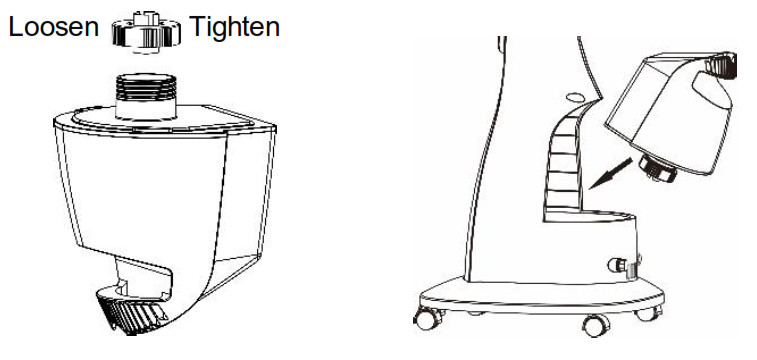
Fill the water tank:Unscrew the valve cover to open the tank turning it counter clockwise. Fill the tank with cold and clean water making sure not to overfill it. To close the tank, screw the valve cover back on securely turning it clockwise. Turn the tank over and place it back into its designated space at the back of the fan main body.
ATTENTION!
- Make sure the product is unplugged before filling or refilling the water tank.
- Only use water in the water tank. Do not add any chemicals, oils or other additives.
- Only use cold or lukewarm water in the water tank. The water must not be warmer than 40°C.
Place the fan on a dry and stable surface and insert the plug on the socket; the unit will emit a short “BIP” sound indicating that power is supplied. For your convenience the unit can be operated by using control panel in the main body or by using remote control included.
Control panel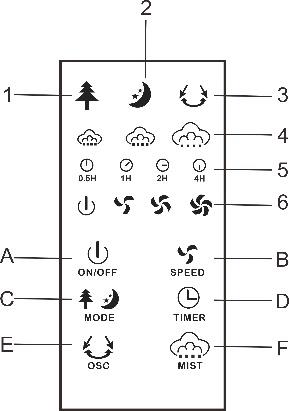 Remote Control
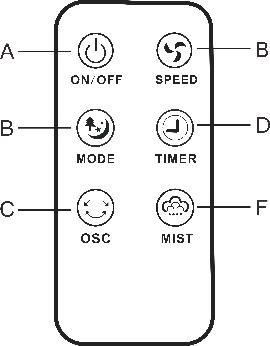 Indicator light:
- Natural mode indicator
- Sleeping mode indicator
- Oscillation
- Mist volume indicator: minimum-medium-maximum
- Timer
- Speed: low-medium-high
- Power on indicator
Buttons:A. On/OffB. SpeedC. ModeD. TimerE. OscillationF. Mist
Remote control is supplied with battery inside (remove the transparent sheet from the battery cover before use remote control. When the battery is over, it must be replaced with the same type following the drawing on the back of remote control.
ON/OFF Button (A):
- Press On/Off button one time to activate the fan. The indicator light will turn on the control panel. You can now press MIST (F) button to select the misting function without fan operation (mist only).
- Press On/Off button a second time to turn on the fan: the unit will operate at low speed and the related indicator light (4) will be on the control panel. You can now select other functions (speed, mode, timer, mist).
- Press On/Off button when the unit is on to turn off it.
SPEED Button (B):
- To start the fan at low speed, press On/Off button (A) twice (when unit is Off): the unit will operate at low speed and the related indicator light (6) will be on the control panel.
- Press speed button one time to select the medium speed: the related indicator light (6) will be on the control panel.
- Press speed button another time to select the high speed: the related indicator light (6) will be on the control panel.
MODE Button (C):
- When you press the On/Off button twice, the fan will operate in Normal mode (there isn’t any indicator light in the control panel that indicate this mode).
- Press mode button one time to change to Natural mode: the unit simulates a natural breeze mode and the related indicator light (1) will be on the control panel.
- Press mode button another time to change to Sleeping mode: the unit simulates a soft breeze suitable for night time use. The related indicator light (2) will illuminate on the control panel.
- Press again mode button to change to Normal mode (there isn’t any indicator light in the control panel that indicate this mode).
TIMER Button (D):
- When the unit is operating, you can set the timer to switch the fan off automatically after the set time. Press the timer button repeatedly to select the desired time in half hour increments.
OSCILLATION Button (E):
- Press the oscillation button to activate the automatic oscillation from right to left. The related indicator light (3) will illuminate in the control panel.
- Press again the oscillation button to deactivate the automatic oscillation; the indicator light (3) will off on the control panel.
MIST Button (F):
- The mist function can be selected on its own or together with the fan operation. When the mist function is selected the related indicator light (4) on the control panel will turn on according to the mist volume selected: low-medium-high. There is another indicator light to indicate that mist function is selected on the main body (26): it is blue when there is water in the tank and turns red when the water tank is empty.
- Press the mist button one time to turn on the function at low volume.
- Press the mist button another time to turn off the mist function. The indicator light (4) and the light on the main body (26) will off.
ATTENTION!
- Make sure the product is unplugged before filling or refilling the water tank.
- Only use water in the water tank. Do not add any chemicals, oils or other additives.
- Only use cold or lukewarm water in the water tank. The water must not be warmer than 40°C. Place the fan on a dry and stable surface and insert the plug on the socket; the unit will emit a short “BIP” sound indicating that power is supplied.
NOTED: Before cleaning the appliance always disconnect the power plug.
- DO NOT dip the device in water or splash it with any other liquids.
- DO NOT use solvents or any other chemical products for cleaning.
- When you have finished using the fan at the end of the season, wipe off any dust to maintain it in good working order for the next season; if necessary disassemble the grille and remove the fan; clean them with a soft damp cloth.
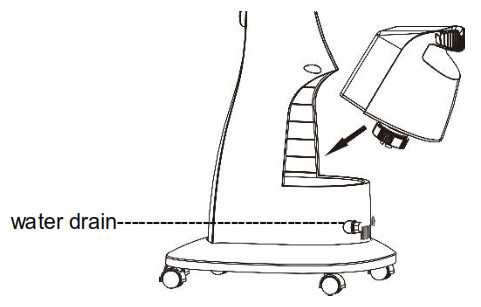
- Remove the water tank and clean it with lukewarm water; before replacing the water tank in the unit make sure it is completely dry. Draining the water out of the unit placing a container underneath the water drain (indicated with an arrow in below picture) and let any water remaining in the water reservoir drain out.
DISPOSAL
Used electric household devices
- If you do not want to use your electrical appliance any longer, return it free of charge to a recycling depot for used electric appliances.
- Used electric devices do not belong in the household garbage (see symbol)
Further disposal instructionsReturn the electrical appliance in such a condition that its later re-use or recycling is not adversely affected. Batteries must be removed in advance and the destruction of parts that contain fluids must be avoided.
SPECIFICATION
Product: Metal Stand FanModel: CE134Power: 90WVoltage: 110V / 60HzMade in China
References
[xyz-ips snippet=”download-snippet”]