 LONGHORN SMOKERMODEL NUMBER: 3201747-50
SERIAL NUMBER:
See rating label on grill for serial number.DATE PURCHASED:Tools needed for assembly:Two Adjustable Wrenches (Not Included)IMPORTANT: RETAIN FOR FUTURE REFERENCE. READ CAREFULLY. ©2020 Char-Broil, LLC. Columbus, GA, 31904.Printed in China.PN: 42805282 • 05/26/2020This instruction manual contains important information necessary for the proper assembly and safe use of the appliance.Follow all warnings and instructions when using the appliance.
INSTALLER
Leave this manual with the consumer.CONSUMER:Keep this manual for future reference.
Safety Symbols
The symbols and boxes are shown below explain what each heading means. Read and follow all of the messages found throughout the manual.![]() WARNINGWARNING: Indicates a potentially hazardous situation that, if not avoided, could result in death or serious injury.
WARNINGWARNING: Indicates a potentially hazardous situation that, if not avoided, could result in death or serious injury.![]()
![]()
![]()
![]()
![]()
![]()
![]()
![]()
![]()
![]()
![]()
![]()
![]()
![]()
![]()
![]()
![]()
![]()
![]()
![]()
![]()
![]()
![]()
![]()
![]()
![]()
![]()
![]()
![]()
![]()
THIS GRILL IS FOR OUTDOOR USE ONLY.![]()
![]()
![]()
![]()
![]()
![]()
![]()
![]()
![]()
![]()
![]()
![]()
![]()
![]()
![]()
![]()
![]()
![]()
![]()
![]()
![]()
![]()
![]()
![]()
![]()
![]()
![]()
![]()
![]()
![]()
![]()
![]()
![]()
![]()
![]()
![]()
![]()
![]()
![]()
![]()
![]()
![]()
![]()
![]()
![]()
![]()
![]()
![]()
![]()
![]()
![]()
![]()
![]()
![]()
![]()
![]()
![]()
![]()
![]()
![]()
![]()
![]()
![]()
![]()
![]()
![]()
![]()
![]()
![]()
![]()
![]()
![]()
![]()
![]()
![]()
![]()
![]()
![]()
![]()
![]()
![]()
![]()
![]()
![]()
![]()
![]()
![]()
![]()
![]()
![]()
![]()
![]()
![]()
![]()
![]()
![]()
![]()
![]()
![]()
![]()
![]()
![]()
![]()
![]()
![]()
![]()
![]()
![]()
![]()
![]()
![]()
![]()
![]()
![]()
![]()
![]()
![]()
![]()
![]()
![]()
![]()
![]()
![]()
![]()
![]()
![]()
![]()
![]()
![]()
![]()
![]()
![]()
![]()
![]()
![]()
![]()
![]()
![]()
![]()
![]()
![]()
![]()
![]()
![]()
![]()
![]()
![]()
![]()
![]()
![]()


PREPARING TO USE YOUR SMOKER
Before cooking with your smoker, the following steps should be closely followed to both cure the finish and season the interior steel. Failure to properly follow these steps may damage the finish and/or impart metallic flavors to your first foods.1. Brush all interior surfaces including grills and grates with vegetable cooking oil.2. Build a small fire on the fire grate or pan, being sure not to lay coals against the walls.3. Close the door. (Position damper and smokestack damper approximately at one-quarter open.) This burn should be sustained for at least two hours, the longer the better. Then, begin increasing temperature by opening the damper and smokestack the damper halfway, and adding more charcoal. Your smoker is now ready for use. Rust can appear on the inside of your smoker. Maintaining a light coat of vegetable oil on interior surfaces will aid in the protection of your unit. Exterior surfaces of smokers may need an occasional touch-up. We recommend the use of commercially available black high-temperature spray paint. NEVER PAINT THE INTERIOR OF THE UNIT!
SMOKER MAINTENANCE
The frequency of clean-up is determined by how often the grill is used. Make sure coals are completely extinguished before cleaning inside of the unit. Thoroughly rinse with water and allow to air dry before using again. Wipe out the interior of the unit with a cloth or paper towels. When finished cooking and the unit has adequately cooled, clean out all remaining ashes. Ashes collect moisture, which can lead to premature rusting and decay. Periodically coating the interior surfaces with vegetable oil will aid in the protection of your unit. Also, occasional touch up of the exterior paint will be required. Black, high-temperature spray paint is recommended. NEVER PAINT THE INTERIOR OF THEUNIT.Cooking Surface: If a bristle brush is used to clean any of the grill cooking surfaces, ensure no loose bristles remain on cooking surfaces prior to grilling. It is not recommended to clean cooking surfaces while the grill is hot.COOKING TIPSBuilding Your Fire
- Stack charcoal briquettes or wood into a pyramid-shaped pile on top of the charcoal grate. We recommend using 3 pounds (approximately 45 briquettes) to start your fire, adding more as needed.
- If using lighter fluid, saturate the charcoal briquettes with lighter fluid and let it soak in for approximately 5 minutes. If using a chimney starter, electric starter, or another type of fire starter, light your fire according to the manufacturer’s instructions.
- Always light the fire with the cooking chamber and firebox lids open. Leave lid open until briquettes are fully lit. Failure to do this could trap fumes from charcoal lighter fluid in grill and may result in a flash fire when lid is opened.
- Never add charcoal lighter fluid to hot or warm coals as flashbacks may occur causing injury.
- You are ready to begin cooking when the pile of briquettes ashes over and produces a red glow (approximately 12 – 15 minutes).
- Depending on your cooking method, either leave the briquettes in a pile or spread evenly across the charcoal grate using a long-handled poker.
- Avoid laying coals on smoker walls.
SMOKING AND SLOW COOKING
Remove the cooking grill from the firebox and build your fire on top of the fire grate in the firebox. Either charcoal or wood may be used, but wood is the recommended fuel for its rate of burn and the flavor it imparts to the food being cooked. Most seasoned hardwoods are good for smoking such as hickory, mesquite, pecan, oak, and many other fruitwoods. The bark should be avoided or burned off first as it contains a high acid content and imparts an acrid flavor.After allowing the fire to burn down, close the doors and control the temperature and smoke with the dampers located on the firebox and atop the smokestack. Smoke is contained within the chambers, which will reduce burn while imparting more smoke flavor. Do not operate the Smoker with temperatures exceeding 450 degrees in the smoker chamber. Place the food in the smoker chamber and monitor the temperature. Cooking and smoking are taking place using indirect heat. There is no need to worry about a grease fire flare-up ruining the food. A general rule of thumb for cooking is about 1 hour per pound for smoking large cuts of meat. Refer to a cookbook for specific cuts of meat. Limit the number of times you open the smoker chamber door as this will allow heat to escape and extend the cooking time.
SMOKING WITH WOOD CHIPS/WOOD CHUNKS
For a more robust smoke flavor while using charcoal briquettes or lump charcoal, try adding wood chips or several wood chunks to the fire. Wood chunks are available in a variety of natural flavors and can be used alone or in addition to charcoal. As a general rule, any hardwood that bears fruit or nut is suitable for cooking. However, different woods have very different tastes. Experiment with different woods to determine your personal favorite, and always use well-seasoned wood. Green or fresh-cut wood can turn food black and tastes bitter.
Our Recommendations:Chicken – Alder, Apple, Hickory, MesquiteBeef – Hickory, Mesquite, OakPork – Fruitwoods, Hickory, OakLamb – Fruitwoods, MesquiteVeal – Fruitwoods, GrapevinesSeafood – Alder, MesquiteVegetables – Mesquite
GRILLINGSuccessful charcoal grilling depends on a good fire. The general rule for knowing when your coals are ready for grilling is to make sure that 80 percent or more of the coals are ashy gray. Using caution, arrange the hot coals on your charcoal grate based on your desired method of cooking. Here are a few steps you can take to adjust the temperature of your fire:
- If it is too hot, spread the coals out a bit more, which makes the fireless intense.
- Avoid laying the coals on the walls of the smoker.
- Partially close the vents in the grill, which reduces the amount of oxygen that feeds the fire.
- In the event of a severe flare-up, spray the flames with water from a squirt bottle. Be careful, spraying with water tends to blow ashes around and make a mess.
- Add briquettes 2 or 3 at a time to increase the burn time. Allow 10 minutes for coals to ash over before adding more.
Food Safety
Food safety is a very important part of enjoying the outdoor cooking experience. To keep food safe from harmful bacteria, follow these four basic steps:Clean: Wash hands, utensils, and surfaces with hot soapy water before and after handling raw meat.Separate: Separate raw meats from ready-to-eat foods to avoid cross-contamination. Use a clean platter and utensils when removing cooked foods.Cook: Cook meat and poultry thoroughly to kill bacteria. Use a thermometer to ensure proper internal food temperatures.Chill: Refrigerate prepared foods and leftovers promptly.
Cooking on your new grill is a hands-on experience, and it is recommended to remain outside with your grill while cooking. Grilling can be affected by many external conditions. In cold weather, you will need more heat to reach an ideal cooking temperature, and grilling may take longer. The meat’s internal temperature and thickness can also affect cooking times. Cold and thicker meats will take longer to cook.Internal Meat Temperatures Meat cooked on a grill often browns very fast on the outside. Therefore, use a meat thermometer to ensure it has reached safe internal temperatures.
| USDA Recommended Safe Minimum Internal Temperatures | |
| Beef, Veal, Lamb, Steak, Roasts, & Whole Pork (with a 3 minute rest time) | 145° F |
| Fish | 145° F |
| Beef, Veal, Lamb, and Pork – Ground | 160° F |
| Egg Dishes | 160° F |
| Turkey, Chicken & Duck Whole, Pieces & Ground | 165° F |
Please refer to the USDA for complete, up-to-date information.Our internal temperature chart is based on USDA standards for meat doneness. Check it out at www.isitdoneyet.gov
LIMITED WARRANTY
This warranty only applies to units purchased from an authorized retailer. The manufacturer warrants to the original consumer purchaser only that this product shall be free from defects in workmanship and materials after correct assembly and under normal and reasonable home use for the periods indicated below beginning on the date of purchase. The manufacturer reserves the right to require that defective parts be returned, postage, and or freight pre-paid by the consumer for review and examination.
Note: A dated sales receipt WILL be required for warranty service.The original consumer-purchaser will be responsible for all shipping charges for parts replaced under the terms of this limited warranty.This limited warranty is applicable in the United States and Canada only is only available to the original owner of the product and is not transferable. The manufacturer requiresproof of your date of purchase. Therefore, you should retain your sales slip or invoice. Registering your product is not a substitute for proof of purchase and the manufacturer is not responsible for or required to retain the proof of purchase records. This limited warranty applies to the functionality of the product ONLY and does not cover cosmetic issues such as scratches, dents, corrosions or discoloring by heat, abrasive and chemical cleaners or any tools used in the assembly or installation of the appliance, surface rust, or the discoloration of stainless steel surfaces. Paint is not warranted and will require a touch-up. RUST is not considered a manufacturing or materials defect.This limited warranty will not reimburse you for the cost of any inconvenience, food, personal injury, or property damage.
ITEMS MANUFACTURER WILL NOT PAY FOR:
- Shipping cost, standard or expedited, for warranty and replacement parts.
- Service calls to your home.
- Repairs when your product is used for other than normal, single-family household or residential use.
- Damage, failures, or operating difficulties resulting from accident, alteration, careless handling, misuse, abuse, fire, flood, acts of God, improper installation or maintenance,installation not in accordance with electrical or plumbing codes, or use of products not approved by the manufacturer.
- Any food loss due to product failures or operating difficulties.
- Replacement parts or repair labor costs for units operated outside the United States or Canada.
- Pick up and deliver your product.
- Repairs to parts or systems resulting from unauthorized modifications made to the product.
- The removal and/or reinstallation of your product.
DISCLAIMER OF IMPLIED WARRANTIES and LIMITATION OF REMEDIES
Repair or replacement of defective parts is your exclusive remedy under the terms of this limited warranty. In the event of parts availability issues, the manufacturer reservesthe right to substitute like or similar parts that are equally functional. The manufacturer will not be responsible for any consequential or incidental damages arising from the breach of either this limited warranty or any applicable implied warranty, or for failure or damage resulting from acts of God, improper care and maintenance, grease fire, accident, alteration, replacement of parts by anyone other than Manufacturer, misuse, transportation, commercial use, abuse, hostile environments (inclement weather, acts of nature, animal tampering), improper installation or installation not in accordance with local codes or printed manufacturer instructions.THIS LIMITED WARRANTY IS THE SOLE EXPRESS WARRANTY GIVEN BY THE MANUFACTURER. NO PRODUCT PERFORMANCE SPECIFICATION OR DESCRIPTION WHEREVER APPEARING IS WARRANTED BY THE MANUFACTURER EXCEPT TO THE EXTENT SET FORTH IN THIS LIMITED WARRANTY. ANY IMPLIED WARRANTY PROTECTION ARISING UNDER THE LAWS OF ANY STATE, INCLUDING IMPLIED WARRANTY OF MERCHANTABILITY OR FITNESS FOR A PARTICULAR PURPOSE OR USE, IS HEREBY LIMITED IN DURATION TO THE DURATION OF THIS LIMITED WARRANTY.Neither dealers nor the retail establishment selling this product has any authority to make any additional warranties or to promise remedies in addition to or inconsistent with those stated above. The manufacturer’s maximum liability, in any event, shall not exceed the purchase price of the product paid by the original consumer. NOTE: Some states donot allow an exclusion or limitation of incidental or consequential damages, so some of the above limitations or exclusions may not apply to you. This limited warranty gives youspecific legal rights as set forth herein. You may also have other rights which vary from state to state. In the state of California only, if refinishing or replacement of the productis not commercially practicable, the retailer selling this product or the Manufacturer will refund the purchase price paid for the product, less the amount directly attributable to use by the original consumer purchaser prior to the discovery of the nonconformity. In addition, in the state of California only, you may take the product to the retail establishment selling this product in order to obtain performance under this limited warranty. If you wish to obtain performance of any obligation under this limited warranty, you should write to:
Consumer RelationsP. O. Box 1240Columbus, GA 31902-1240
Consumer returns will not be accepted unless a valid Return Authorization is first acquired. Authorized returns are clearly marked on the outside of the package with an RA number and the package is shipped freight/postage pre-paid. Consumer returns that do not meet these standards will be refused.
HARDWARE


PARTS LIST
| Key | Qty | Description |
| A | 1 | SMOKER CHAMBER W/ LID |
| B | 1 | FIREBOX LID |
| C | 1 | FIREBOX CHAMBER |
| D | 1 | TEMPERATURE GAUGE |
| E | 1 | TEMPERATURE GAUGE HOLE PLUG |
| F | 2 | LID HANDLE |
| G | 1 | WARMING SURFACE PLATE, F/ FIREBOX |
| H | 1 | DAMPER ASSEMBLY |
| I | 1 | DOOR LATCH |
| J | 3 | FIRE GRATE |
| K | 1 | COOKING GRATE. 23″X19″ |
| L | 1 | COOKING GRATE. 17.1″X19″ |
| M | 1 | COOKING GRATE. 14.2″X18.2″ |
| Key | Qty | Description |
| N | 1 | FRONT SHELF |
| 0 | 1 | PULL HANDLE |
| P | 2 | WHEEL |
| Q | 2 | LONG LEG |
| R | 2 | SHORT LEG |
| S | 1 | BOTTOM SHELF ASSEMBLY |
| T | 1 | SMOKESTACK |
| U | 1 | DAMPER, F/ SMOKESTACK |
| V | 1 | CAP, F/ SMOKESTACK |
| W | 1 | SPRING, F/DAMPER |
| X | 1 | LOGO PLATE |
Not Pictured
| … | 1 | HARDWARE PACK |
| … | 1 | SSEMBLY MANUAL, ENGLISH |


ASSEMBLY
- FIRST, GET A HELPER! This unit is heavy and requires a second person for lifting and moving. NEXT, pick a suitable location to work. Open the carton and slit the corners so that the carton lays flat. This will give you a protective surface during assembly. Remove the carton packing material and the parts from inside the firebox and smoke chamber.
- On each short leg, slide one 12mm flat washer onto the axle, followed by a wheel, then another 12mm flat washer. Slide a hitch pin into the hole at the end of the axle.


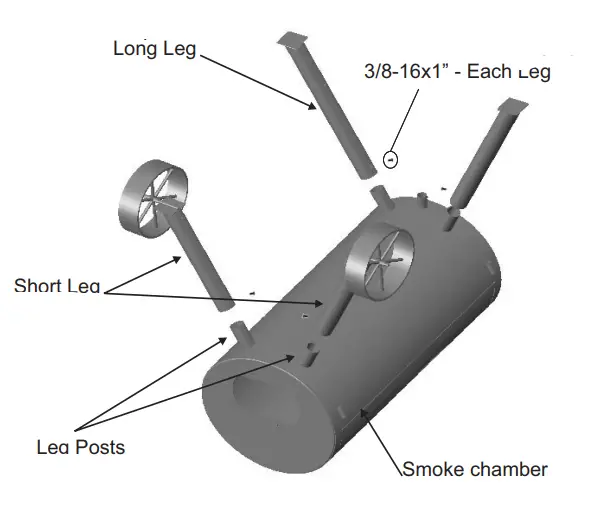
- With one person on the smoke chamber end, roll the unit onto cardboard that was placed on the ground next to the unit.• Slide short legs onto posts at the right side, with wheels facing outward.• Slide long legs onto posts at the opposite end.• Secure each leg to a leg post by screwing one 3/816×1” hex-head bolt through the leg until it reaches the leg post.Do not fully tighten the bolts at this time!

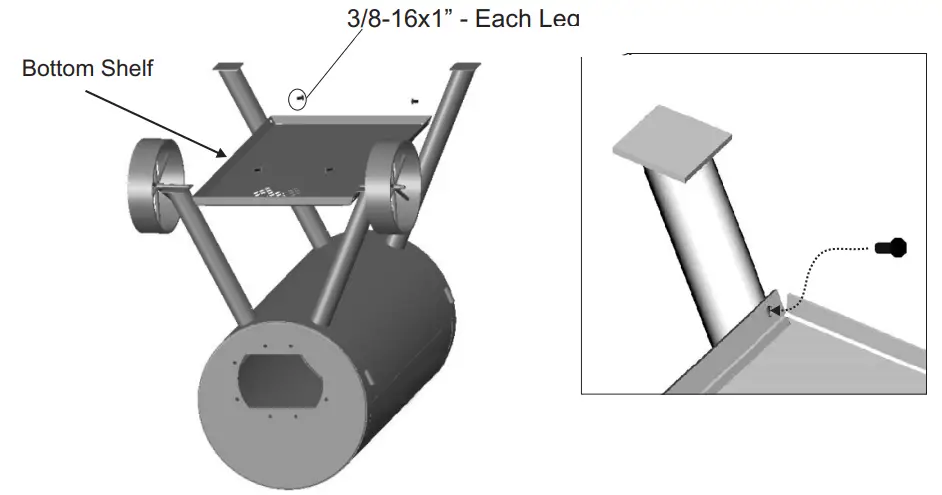
- Have one person hold the bottom shelf in the position shown while another attaches the shelf to legs using four 3/8-16×1″ hex-head bolts. Fully tighten these four bolts.

-
Make sure that leg bolts are tight enough so that legs won’t slip off of posts. With the assistance of a helper, roll the unit over and stand it up onto its legs. Once standing, fully tighten the four-leg bolts against leg post walls.


- Use four 1/4-20×½” screws and four 1/4-20 flange nuts to attach the warming plate to the lid of the firebox. Tighten securely.


- Connect firebox lid and firebox bottom using four 1/420×½” hex head bolts and four 1/4-20 flange nuts. Tighten securely.


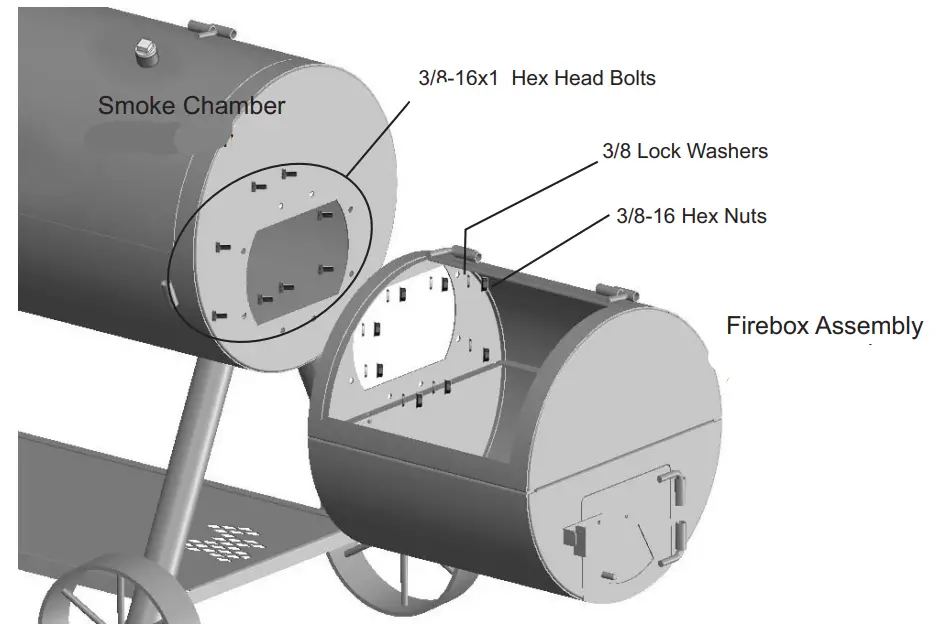
- With the help of an assistant, connect the firebox and smoke chamber using eight 3/8-16×1″ hex head bolts, 3/8 lock washer, and 3/8-16 hex nut, and tighten.

- Attach handle to smoke chamber lid and firebox lid using eight 1/4-20×½” screws and 1/4-20 flange nuts. Tighten securely.


-
Attach smokestack to the end of the smoke chamber by sliding stack into smokestack mounting bracket. While holding the smokestack in a vertical position, tighten the 3/8- 16×1″ hex-head bolt. Then slide the pull handle into the brackets welded to the smoke chamber. Install two 1/4-20×1/2” Hex Washer Head bolts into the ends of the handle as shown. TIGHTEN THE BOLTS SECURELY!


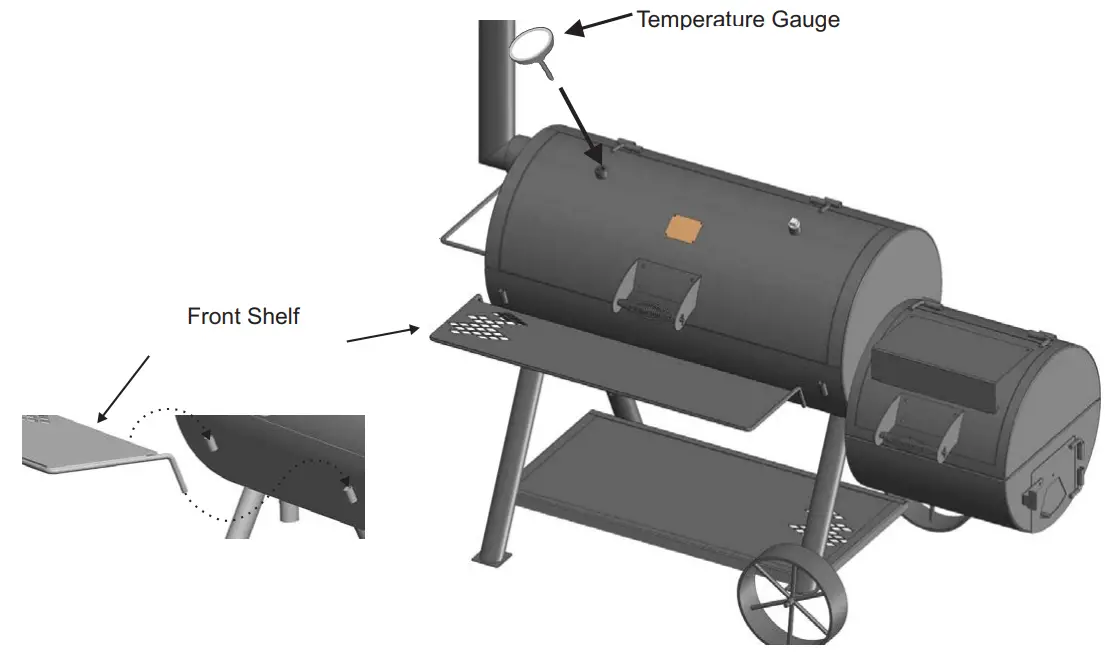
- Attach the front shelf to the smoke chamber by sliding ends of the shelf frame into the bushing in front of the smoke chamber.Next, install the Temperature Gauge into the bushing located on the Smoker Chamber Lid. Align gauge and then secure with jamb nut.

-
Place two of the fire grates in the bottom of the smoke chamber and one in the bottom of the firebox. Then place the large 23”x19” porcelain grate and the medium size 17.1”x19” porcelain grate into the smoke chamber. The small 14.2”x18.2” porcelain grate fits into the firebox.


Congratulations! You have completed the assembly of your smoker. Please follow the instructions on page 3 to season your smoker.
PRODUCT REGISTRATION
- Online @ https://www.oklahomajoes.com/product-registration/
- By Mail
Please fill out this card and attach a copy of your sales receipt. Return it within 10 days of purchase for warranty service. Proof of purchase will be required. The warranty is not transferable.
- First Name Last NameAddress Apt. NoCity State Zip Code
- E-mail Address
- Phone Number
- Model NumberSerial Number
- Attach a copy of your sales receipt here.
- Date of Purchase
- Store Name
- Purchase Price
- Your Gender Male Female
We respect your privacyIf you prefer not to receive special offers and promotions from Char-Broil, please check here:Mail to:Oklahoma Joe’s Warranty RegistrationP.O. Box 1240Columbus, Ga 31902-1240Thank you for completing this questionnaire.


![]()
![]()
![]()
![]()
![]()
![]()
![]()
![]()
![]()
![]()
![]()
![]()
![]()
![]()
![]()
- Combustion byproducts produced when using this product contain chemicals known to the State of California to cause cancer, and birth defects, or other reproductive harm.
- This product can expose you to lead, which is known to the State of California to cause cancer and birth defects, or other reproductive harm. For more information go to www.P65Warnings.ca.gov.
WORTH TRE WHILE
So, how did it go?Share your awesome cooking experience with everyone! We are live on all the social media sites! Join the community!



© 2020 Char-Broil, LLC. Columbus, GA, 31904.Printed in China. Imprimé en China. Impreso en China.
References
[xyz-ips snippet=”download-snippet”]

