![]()
USER MANUAL
![]()
Thank you for purchasing this Olight Product. Please read this manual carefully before use and keep it for future reference!
HOW TO OPERATE SIDE SWITCHON/OFF: Single click the side switch to turn the lightON/OFF. When the light is turned on again, it will return to the previously memorized mode.
CHANGE BRIGHTNESS LEVEL: When the flashlight is on, press and hold the side switch and it will start from the present brightness level, automatically cycle through Low, Medium, and High mode. The mode is selected when the side switch has been released. ( Please note: moonlight and turbo are not in the automatic cycle ).
MOONLIGHT MODE: When the flashlight is off, press and hold the side switch for over one second to access the moonlight mode. If the memorized mode is moonlight, simply click the switch to access it.
TURBO AND RETURN fast double click on the side switch to enter into Turbo, double click again to return. If memory mode were High or Medium, the output is Medium; if memory mode were Low or Moonlight, the output is memory mode.
STROBE: Quickly triple-click the side switch to enter the strobe mode. To quit this mode, single click or press and hold the side switch.
LOCKOUT/UNLOCK: When the flashlight is off, press and hold the side switch ( for about 2 seconds ) to access the button lockout mode ( the flashlight willenter the moonlight mode first and will then switch off to signal the lockout mode ). Under the lockout mode, press and hold the side switch for less thanone second. The red indicator below the side switch will be on for two seconds to signal that the light is still in lockout mode. To unlock it, keep holding theside switch for over one second until the moonlight mode is on again.
TAIL SWITCHThe flashlight produces different output settings by pressing lightly or hard on the tail switch (please refer to the following program configurations).
TWO DIFFERENT PROGRAM CONFIGURATIONS CONFIGURATION 1 (FACTORY DEFAULT SETTING): Half-press for Medium, hard press for Turbo; Single press the tail switch (press and release quickly) to turn the flashlight on or off; Press and hold the tail switch for momentary-on. Release to turn off.
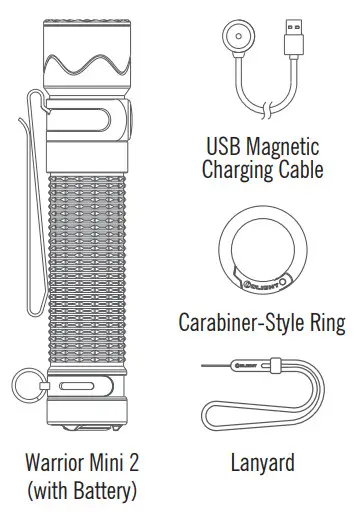
IN THE BOX
SPECIFICATIONS
| TURBO 1750lumens |  |
| HIGH 500lumens |  |
| MED 120lumens
LOW 15lumens MOON 1lumen
|
 |
| TURBO | HIGH | MED | LOW | MOON | |
| 220m | 117m | 57m | 19m | – | |
 |
 |
||||
| 1.5m | 12,300cd | IPX8 | |||
 |
|||||
| (L)4.65* (D)0.98in(L)118 *(D)25mm | 122g /4.3 oz(Including Battery) |
- All above specifications are test results based on ANSI/NEMA FL1-2009 Standard. The tests are performed using the battery included in the flashlight.
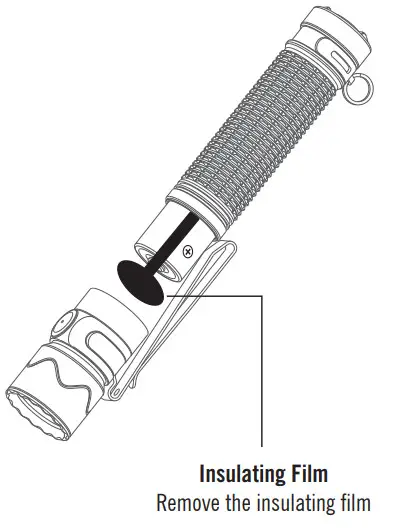
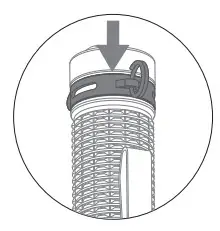
BATTERY INSTALLATION
Before first use, please unscrew the body and remove the insulating film. If the battery needs to be replaced, make sure that the positive end of the new battery faces the flashlight head when you put it in.
AVAILABLE BATTERIES
- 1 x customized 3500mAh 18650 rechargeable lithium battery
BATTERY LEVEL INDICATOR
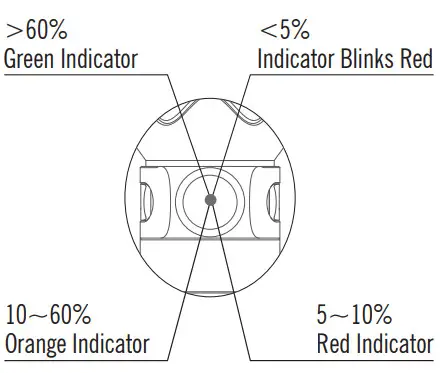
NOTE: If using moonlight mode, the battery indicator will only display when the battery level is below 5%.
USB MAGNETIC CHARGING CABLE — MCC3
| Parameter | Specication |
| Charging cable | USB type-A – magnetic charging connector, length: 0.5m |
| Input | USB A – Type DC 5V 2A |
| Charging pattern | CC&CV |
| Maximum charging current | 1.5A |
| Voltage of fully charged battery | 4.2V±0.05V |
| Time to fully charge | 3.5 hours (For reference only. When the USB the power source is insufficient to provide 5V 1.5A power capacity, the charging time will be longer) |
| Charge indication | Red: chargingGreen: full (over 95%) ordisconnected with flashlight |
CHARGING

- Before the first use please fully charge the product.
- Connect the USB end of the magnetic charging cable to an external USB power source, then attach the other end of the cable to the charging port of the light (best charging efficiency with a 7.5W (5V 1.5A) USB power source). The red indicator means charging, while the green indicator means charging completed (battery level>95%).
- Only charge with standard MCC3, not compatible with other MCC.
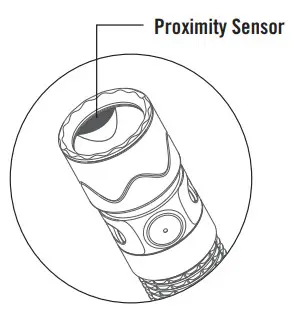
PROXIMITY PROTECTION FUNCTION
When the front lens proximity sensor detects an obstruction nearby, the brightness will automatically reduce. While in this state, the side switch can only turn the light off. The light will turn off directly if the blockage continues for more than 60 seconds.
ATTENTION
- Please keep the surface of the lens clean. Stains or water mist will affect the performance of the built-in sensor located in the black area, resulting in the failure of high and above modes, please erase in time.
- Pay attention to protecting the lens from scratches. Scratches on the surface of the lens will reduce the luminous flux. In severe cases, it will affect the internal sensor performance, resulting in the failure of high and above modes.

DANGER
- DO NOT throw the light directly into human eyes. This may cause temporary blindness or permanent damage to the eyes.
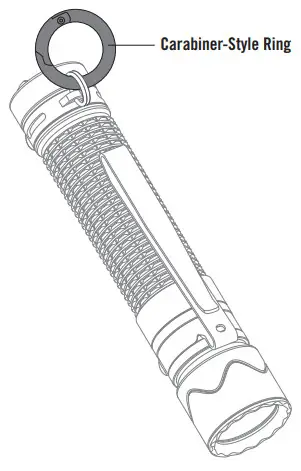
- The max load of the Carabiner-Style Ring is 5kg, and please DO NOT use it for climbing.
WARNING
- DO NOT activate turbo mode repeatedly under high temperature to prevent the flashlight body from overheating and hurting the user’s hand.
- The tail switch may not work while immersed in seawater or other conductive media. Please try to keep it clean and dry.
- DO NOT use non-protected rechargeable batteries.
- DO NOT use the battery if the wrapper is broken, or in any other compromised state.
- DO NOT take the battery out of the flashlight for charging.
- Take good care of the battery; if the battery needs to be replaced, please keep the removed battery in a safe place. DO NOT mix it with the conductive metals.
- If the product is left unused or carried and transported, please lock the button to avoid accidentally activating the flashlight.
NOTICE
- When the flashlight is turned off, moonlight, low, medium, or high mode will be memorized and become the default mode when the light is turned on again (high mode will only be memorized for 10 minutes. After that, the memorized mode will revert to the medium setting).
- The turbo mode will slowly step down to high mode in 4 minutes at normal temperature.
- DO NOT short-circuit the tail switch cap with the surrounding ring. A short circuit in this case will result in a weak electric discharge between them and may lead to a complete battery drain if it is in this state for too long.
- The magnetic tail is easy to attract iron debris. Please keep the tail switch cap and the ring surrounding it clean.
- NOTICE: The lanyard clip can only be installed in the rear clip slot as shown below.
EXCLUSION CLAUSE
Olight is not liable for damages or injuries sustained resulting from the usage of the product inconsistent with the warnings in the manual, including but not limited to using the product inconsistent with the recommended lockout mode.
WARRANTY
Within 30 days of purchase: Contact the original seller for repair or replacement.Within 5 years of purchase: Contact Olight for repair or replacement.Battery warranty: Olight offers a one-year warranty for all rechargeable batteries.MCC magnetic USB charging cable: One year.
For any of the fragile or low-value fittings not covered above, like lanyard and clip, you can contact the post-sale in 30 days after the purchase, if it has any quality drawback or damage under normal use conditions. If such drawback or damage occurs 30 days after the purchase or under abnormal use conditions, we will only offer conditional quality assurance as appropriate.
USA Customer Support[email protected]Global Customer Support[email protected]Visit www.olightworld.com to seeour complete product line ofportable illumination tools.
EU-DECLARATION OF CONFORMITY

EU-Declaration of Conformity can be found here:https://olightworld.com/ec-declaration

 report this ad
![]()
Dongguan Olight E-Commerce Technology Co., Ltd4th Floor, Building 4, Kegu Industrial Park, No 6Zhongnan Road, Changan Town, Dongguan City,Guangdong, China.B. 28, 5, 2021Made in China3.0334.6010.9002
THANK YOU!
References
[xyz-ips snippet=”download-snippet”]