
omega OC64TB 60cm Ceramic Cooktop
Thank you for purchasing an Omega applianceTailored for the modern aesthetic and lifestyle of busy people, your new Omega Appliance will make a welcome addition to the family.
Omega caters to style-savvy customers who look for balance between stunning form and clever function. This means a combination of sleek, chic, sophisticated design yet effortless functionality. And we source from the best. The best craftsmanship. The best innovation. From the best international design-houses.
All brought together under an appliance that stands for design-led balance.Please take the time to read through the following instruction manual to familiarise yourself with the installation, operation requirements and maintenance to ensure optimum performance.
Important Safety Warnings
Please comply with these instructions. If you do not, any damage resulting from improper, incorrect or negligent use or improper connection or installation is not covered by the warranty.
- This appliance should be used only for normal domestic use.
- This appliance is not intended for use by persons (including children) with reduced physical, sensory or mental capabilities, or lack of experience or knowledge, unless they have been given supervision or instruction concerning the use of the appliance by a person responsible for their safety. Children should be supervised to ensure that they do not play with the appliance.
- This appliance must only be used for the purpose of heating or cooking food, any other use, for example heating rooms, working surface or storage surface, is dangerous.
- Additions or modifications to the appliance are not permitted.
- Do not place or store flammable liquids, highly inflammable materials or fusible objects on or near the appliance.
- Small children must be kept away from the appliance.
- The appliance may only be installed and connected by an authorised service personal.
- The electrical safety of this hob is guaranteed only if it is connected to a properly earthed system, which complies with the electrical safety standards.
- Built-in appliances may only be used after they have been built in to suitable built-in units and work surfaces that meet the standards.
- Do not put pressure on the power supply cable while fitting the hob.
- Power supply cable length should not exceed 2m for isolation safety.
- WARNING: In the event of faults with the appliance or damage to the glass ceramic (cracks, scratches or splits), the appliance must be switched off and disconnected from the electrical supply to prevent the possibility of an electric shock.
- Repairs to the appliance must only be carried out by authorised service personal.
- Make sure all the packaging has been removed before you use the appliance.
- Cables from electrical appliances must not touch the hot surface of the appliance or hot cookware.
- Do not cut any food on the glass of the vitro-ceramic hob. Glass panels should not be used as working surfaces.
- Be careful when using small household appliances, such as irons, near the elements.
- Do not use the cooking zones with empty cookware or without cookware.
- Make sure all the controls are in the off position when not in use.
- For cleaning, the appliance must be switched off and cooled down.
- For safety reasons, the cleaning of the appliance with steam jet or high- pressure cleaning equipment is not permitted.
- Use only stable flat-based pans
- Metallic objects such as knives, forks, spoons and lids should not be placed on the hob surface since they can get hot.
- Danger of fire: Do not store items on the cooking surfaces.
- CAUTION: The cooking process has to be supervised. A short term cooking process has to be supervised continuously.
- WARNING: Unattended cooking on a hob with fat or oil can be dangerous and may result in a fire.
- A means for disconnection must be incorporated in the fixed wiring in accordance with the wiring rules.
- If the supply cord is damaged, it must be replaced by the authorised Omega service center in order to avoid a hazard.
- WARNING: If the surface is cracked, switch off the appliance to avoid the possibility of electric shock.
- The appliance is not intended to be operated by means of an external timer or separate remote control system.
Installation
WARNING: This appliance must be installed by an authorised service person or qualified technician, according to the instructions in this guide and in compliance with the current local regulations.
- Incorrect installation may cause harm and damage, for which the manufacturer accepts no responsibility and the warranty will not be valid.
- Prior to installation, ensure that the local distribution conditions (electricity voltage and frequency and/or nature of the gas and gas pressure) and the adjustments of the appliance are compatible.
- The adjustment conditions for this appliance are stated on the label.
- The laws, ordinances, directives and standards in force in the country of use are to be followed (safety regulations, proper recycling in accordance with the regulations, etc.).
General Instructions
- After removing the packaging material from the appliance and its accessories, ensure that the appliance is not damaged. If you suspect any damage, do not use it and contact an authorised service person or qualified technician immediately.
- Make sure that there are no flammable or combustible materials in the close vicinity, such as curtains, oil, cloth etc. which may catch fire.
- The worktop and furniture surrounding the appliance must be made of materials resistant to temperatures above 100°C.
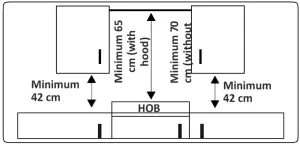
- If a cooker hood or cupboard is to be installed above the appliance, the safety distance between cooktop and any cupboard/cooker hood should be as shown below.

- The appliance should not be installed directly above a dishwasher, fridge, freezer, washing machine or clothes dryer.
- If the base of the appliance is accessible by hand, a barrier made from a suitable material must be fitted below the base of the appliance, ensuring that there is no access to the base of the appliance.
Installation of the Hob
The appliance is supplied with an installation kit including adhesive sealing material, fixing brackets and screws.
- Cut the aperture dimensions as indicated in the figure. Locate the aperture on the worktop so that, after the hob is installed, the following requirements are followed.
B (mm)
590 min. A (mm) 50
T (mm)
520 min. C (mm) 50 H (mm) 41-47.5 min. E (mm) 500
C1 (mm)
560 min. F (mm) 10 C2 (mm) 490 G (mm) 20
D (mm)
50 I (mm) 25 J (mm) 5
- Apply the supplied one-sided self- adhesive sealing tape all the way around the lower edge of the cooktop. Do not stretch the tape.
- Screw the 4 worktop mounting brackets on to the side walls of the appliance.
- Insert the appliance into the aperture.
Electrical Connection
![]() WARNING: The electrical connection of this appliance should be carried out by an authorised service person or qualified electrician, according to the instructions in this guide and in compliance with the current local regulations.WARNING: THE APPLIANCE MUST BE EARTHED.
WARNING: The electrical connection of this appliance should be carried out by an authorised service person or qualified electrician, according to the instructions in this guide and in compliance with the current local regulations.WARNING: THE APPLIANCE MUST BE EARTHED.
- Before connecting the appliance to the power supply, the voltage rating of the appliance (stamped on the appliance identification plate) must be checked for correspondence to the available mains supply voltage, and the mains electric wiring should be capable of handling the appliance’s power rating (also indicated on the identification plate).
- During installation, please ensure that isolated cables are used. An incorrect connection could damage your appliance. If the mains cable is damaged and needs to be replaced this should be done by a qualified person.
- Do not use adaptors, multiple sockets and/or extension leads.
- The supply cord should be kept away from hot parts of the appliance and must not be bent or compressed. Otherwise the cord may be damaged, causing a short circuit.
- If the appliance is not connected to the mains with a plug, an all-pole disconnector switch (with at least 3 mm contact spacing) must be used in order to meet the safety regulations.
- The fused switch must be easily accessible once the appliance has been installed.
- Ensure all connections are adequately tightened.
- Fix the supply cable in the cable clamp and then close the cover.
- The terminal box connection is placed on the terminal box.

IMPORTANT: The figure shows the connection details and minimum diameters of supply cables that must be used for both single and three phase connections.
- The oven is to be connected to a 220-240Vac 50Hz supply or 3 phase 380-415Vac 50Hz supply.It is earthed via the supply cord. The earthing cable must be connected via the screw with the earthing mark.
- For the touch controlled vitro-ceramic hob, the cable must be H05VV-F 3X2.5 mm2 / 60227 IEC 53. You will find the connection diagram shown on the back of your appliance.
- During installation, please insure that isolated cables are used. An incorrect connection might damage your appliance. The guarantee will not cover such damages.
- All repairs must be carried out by an authorised service personal or a qualified electrician.
- Unplug your appliance before performing maintenance. For reconnection, follow the connection diagrams strictly.
Operation Instructions
The hob is controlled by pressing the appropriate electronic button. Each button pressed is followed by a buzzer sound.
- Heater display
- Activate/Deactivate heater
- Heat setting decrease
- Heat setting increase
- Decimal point
- Key lock indicator
- Key lock
- On/Off
Mode Descriptions
Stand-By- Mode S-Mode Mains supply is applied to the hob control and all heater displays are off or a residual heat display is active. Operating- Mode B-Mode At least one heater display shows a heat setting between ´0` and ´9`. Lock Mode VR-Mode The hob control is locked.
Switching the Appliance On and Off
- • If the appliance is in Stand-By mode, it is put in Operating mode by pressing the On/Off button for at least 1 second. A buzzer will sound to indicate the successful operation.
- A “0” will appear on all heater displays and all decimal points corresponding to the heaters will flash (1 second on, 1 second off).
- If there is no operation within 10 seconds, all heater displays will switch off.
- If the displays do switch off, the heater will be sent into Stand-By mode.
- • If is pressed for more than 2 seconds (in Operating mode), the appliance will switch off and will enter S-Mode again. The appliance can be switched off by pressing at any time; even if other buttons are pressed simultaneously.
- If there is any residual heat from a heater, this will be indicated in the corresponding heater display.
Selecting a Heater
If a single heater is chosen with the corresponding Activate/Deactivate Heater Button ![]() , the decimal point of the heater display will flash. For the selected heater, you can set the heat level between 1 and 9 by pressing the Heat Setting Buttons
, the decimal point of the heater display will flash. For the selected heater, you can set the heat level between 1 and 9 by pressing the Heat Setting Buttons ![]() or
or ![]() .The buttons must be pressed within 3 seconds of selecting a heater, otherwise the heater selection will be erased and the heat setting decimal point will disappear. If there is no further operation within 10 seconds, the heater reverts back to S-Mode. The heat setting can always be changed by pressing
.The buttons must be pressed within 3 seconds of selecting a heater, otherwise the heater selection will be erased and the heat setting decimal point will disappear. If there is no further operation within 10 seconds, the heater reverts back to S-Mode. The heat setting can always be changed by pressing ![]() or
or ![]() . The available settings are between 1 and 9. Each button operation or each display change is accompanied by a buzzer sound.
. The available settings are between 1 and 9. Each button operation or each display change is accompanied by a buzzer sound.
Set Cooking Level with and without Heat Boost
- All heaters are equipped with the heat boost function.
- If the heat boost is required, set the heat from the current level to level 9 by pressing the button only. Once level 9 has been reached, press to activate the heat boost. The display will flash “A” alternating with the heat setting value “9” to show the heat boost is active.
- If the heat boost is active, the heater will operate with maximum power for a period of time dependent on the heat setting selected before the heat boost was activated.
- Once the heat boost time has ended, only the heat setting will be indicated on the heater display.
- The heat boost can be deactivated by pressing until the heat setting “0” is displayed.
Switching Off Individual Heaters
A heater can be switched off in 3 different ways:
- Simultaneous pressing of and buttons.
- Reduction of the heat setting to ´0` by pressing the button.
- Use of the timer switch-off function for the corresponding heater.
Simultaneous Operation of and Buttons
- The corresponding heater must be chosen with the Activate/Deactivate Heater Button , the Decimal Point of the related Heater Display will then flash. To switch off the heater, and must be pressed simultaneously. A buzzer will sound and “0” will appear in the heat setting display when this is successful.
- If the timer is active for the selected heater, then “0” will appear in the heater and timer displays, and the related Cooking Zone Indicator and the Timer Function will both switch off.
- If there is any residual heat for the heater, this will be indicated by an “H” in the heat setting display.
Reduction of the heat setting to “0” by operating button
- The heater can also be switched off by reducing the heat setting to “0”.This will cause the associated Decimal Point of the heater, the related Cooking Zone Indicator and the Timer Display to all switch off, also.
- If there is any residual heat for the heater, this will be indicated by an “H” in the heat setting display.
Use of the timer switch-off function for the corresponding heater (if available)
- After counting down to zero, the timer will stop, the corresponding Heater Display will show “0” and the Timer Display will read ’00’. The corresponding Cooking Zone Indicator will disappear.
- An assigned Dual/Triple Zone Selection Indicator will also disappear if it is active.
- Additionally, the buzzer will sound when the timer stops. Pressing any button will silence the timer.
Key Lock
The key lock function is used to set `safe mode’ on the appliance and can only be used in Operating Mode (B-Mode). The lock function becomes active when the key Lock button ![]() is pressed for at least 2 seconds. This operation is acknowledged by a buzzer and the Key Lock Indicator will flash to indicate the heater is locked.If the heater is locked, it will only be possible to switch the appliance off by pressing
is pressed for at least 2 seconds. This operation is acknowledged by a buzzer and the Key Lock Indicator will flash to indicate the heater is locked.If the heater is locked, it will only be possible to switch the appliance off by pressing ![]() , all other buttons are blocked and it will not be possible to make any adjustments by pressing the buttons. If any other button is pressed in the lock mode, the buzzer will sound and the Key Lock Indicator will flash. Only the switch-off operation by pressing
, all other buttons are blocked and it will not be possible to make any adjustments by pressing the buttons. If any other button is pressed in the lock mode, the buzzer will sound and the Key Lock Indicator will flash. Only the switch-off operation by pressing ![]() is possible. However, if the appliance is switched off, it cannot be restarted again without being unlocked.
is possible. However, if the appliance is switched off, it cannot be restarted again without being unlocked.
Child Lock
The child lock function is used to lock the appliance in a complicated, multi-step process. Child lock (and unlocking) is only available in S-Mode.First, ![]() must be pressed until the buzzer sounds, then
must be pressed until the buzzer sounds, then ![]() and
and ![]() must be pressed simultaneously for at least 0.5 seconds, but no longer than 1 second. Following this, touch
must be pressed simultaneously for at least 0.5 seconds, but no longer than 1 second. Following this, touch ![]() to activate the child lock. All four heater displays will show “L” as confirmation.If the minute minder timer is still running, it will proceed until “00” is reached and the timer will beep. After confirmation of timer completion, the appliance will be fully locked. None of the buttons can be used as long as the appliance is locked.Child lock can be deactivated in the same way that it is activated. After pressing
to activate the child lock. All four heater displays will show “L” as confirmation.If the minute minder timer is still running, it will proceed until “00” is reached and the timer will beep. After confirmation of timer completion, the appliance will be fully locked. None of the buttons can be used as long as the appliance is locked.Child lock can be deactivated in the same way that it is activated. After pressing ![]() , a beep is heard. Press
, a beep is heard. Press ![]() and
and ![]() simultaneously for at least 0.5 seconds, followed by pressing
simultaneously for at least 0.5 seconds, followed by pressing ![]() only. As confirmation for successful unlocking, “L” will no longer be displayed.
only. As confirmation for successful unlocking, “L” will no longer be displayed.
Touch Control Safety Functions
The following safety functions are available to avoid unintended operations.
Sensor Safety Cut-Off
Button monitoring is included to prevent the appliance from unwanted button operation. In cases where one or more buttons are pressed for longer than 12 seconds, the buzzer will sound for ten minutes to indicate an incorrect operation. For example, an object may be placed on a button, or there could be a sensor failure and so on.The safety switch-off will cause the hob to go into S-mode and all heater displays will flash “F“. If there is no incorrect operation present, both the visual and audible signals will disappear. If residual heat is present, “H” will be displayed on all other heater displays.
Over Temperature Switch-Off
Due to the controls being very close to the heater in the middle of the front of the hob, it can occur that an incorrectly placed pot is not sensed by the sensor safety cut-off therefore heating up the hob to a very high temperature. This makes the glass and the buttons dangerous to touch.To prevent the hob control unit from damage, the controls constantly monitor the temperature and switch off if overheating occurs.This will be indicated by the letter “t” in the heater display until the temperature decreases.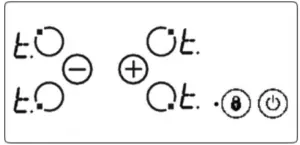
Once the temperature has dropped, the “t” in the heater display will disappear and the hob control unit will revert back into S-Mode. This means that the user can reactivate the appliance by pressing ![]() .
.
Operating Time Limitations
The hob control unit has a limitation on the operating time. If the heat setting for a heater has not been changed for a certain time, the heater will switch off automatically. A “0” will be displayed for 10 seconds; however there may be some residual heat present. The limit of the operating time depends on the selected heat setting.After a heater automatically switches off, as described above, the heater can be used and the maximum operating time for this heat setting is applied.
Residual Heat Functions
After all cooking processes, some heat will be stored in the vitro-ceramic glass called residual heat. The appliance can calculate roughly how hot this glass is. If the calculated temperature is higher than + 60°C, then this will be indicated in the corresponding heater display for as long as the calculated temperature remains above + 60°C, even after the appliance has been switched off.The residual heat indicator has the lowest priority and is overwritten by every other display value, including during safety switch-off and the displaying of an error code. When voltage is supplied to the hob after a power interruption, the residual heat display indicator will flash. If a heater had a residual heat of greater than + 60°C before the power interruption occurred, the display will flash while the residual heat remains or until the heater is selected for another cooking operation.
Hints and Tips
Important: When ceramic heaters are operated in higher heat settings, the heated areas may be seen switching on and off. This is due to a safety device, which prevents the glass from overheating. This is normal at high temperatures, causing no damage to the hob and little delay in cooking times.
Warning:
- Never operate the hob without pans on the cooking zone.
- Use only flat saucepans with a sufficiently thick base.
- Make sure the bottom of the pan is dry before placing it on the hob.
- While the cooking zone is in operation, it is important to ensure that the pan is centred correctly above the zone.
- In order to conserve energy, never use a pan with a different diameter to the hotplate being used.
- Do not use saucepans with rough bottoms since these can scratch the glass ceramic surface.
- If possible, always place lids on the pans to avoid heat loss.
- The temperature of accessible parts may become high while the appliance is operating. Keep children and animals well away from the hob during operation and until it has fully cooled after operation.
- If you notice a crack on the cooktop, it must be switched off immediately and replaced by authorised service personnel.
Cleaning and Maintenance
![]() WARNING: Switch off the appliance and allow it to cool before cleaning is to be carried out.
WARNING: Switch off the appliance and allow it to cool before cleaning is to be carried out.
- Check whether the cleaning materials are appropriate and recommended by the manufacturer before use on your appliance.
- Use cream cleaners or liquid cleaners which do not contain particles. Do not use caustic (corrosive) creams, abrasive cleaning powders, rough wire wool or hard tools as they may damage the cooker surfaces.
- Do not use cleaners that contain particles, as they may scratch the glass, enameled and/or painted parts of your appliance.
- Should any liquids overflow, clean them immediately to avoid parts becoming damaged.
- Do not use steam cleaners for cleaning any part of the appliance.
- Cleaning the Ceramic Glass
- Ceramic glass can hold heavy utensils but may be broken if it is hit with a sharp object.
- WARNING: Ceramic Cooktops – if the surface is cracked, to avoid the possibility of an electric shock, switch off the appliance and call for service.
- Use a cream or liquid cleaner to clean the vitro-ceramic glass. Then, rinse and dry them thoroughly with a dry cloth.
- Do not use cleaning materials meant for steel as they may damage the glass.
- If substances with a low melting point are used in the cookware’s base or coatings, they can damage the glass- ceramic cooktop. If plastic, tin foil, sugar or sugary foods have fallen on the hot glass-ceramic cooktop, please scrape it off the hot surface as quickly and as safely as possible. If these substances melt, they can damage the glass- ceramic cooktop. When you cook very sugary items like jam, apply a layer of a suitable protective agent beforehand if it is possible.
- Dust on the surface must be cleaned with a wet cloth.
- Any changes in colour to the ceramic glass will not affect the structure or durability of the ceramic and is not due to a change in the material.
- Colour changes to the ceramic glass may be for a number of reasons:1. Spilt food has not been cleaned off the surface.2. Using incorrect dishes on the hob will erode the surface.3. Using the wrong cleaning materials.
- Cleaning the Stainless Steel Parts (if available)
- Clean the stainless steel parts of your appliance on a regular basis.
- Wipe the stainless steel parts with a soft cloth soaked in only water. Then, dry them thoroughly with a dry cloth.
- Do not clean the stainless steel parts while they are still hot from cooking.
- Do not leave vinegar, coffee, milk, salt, water, lemon or tomato juice on the stainless steel for a long time.
Troubleshooting
If you still have a problem with your appliance after checking these basic troubleshooting steps, please contact an authorised service person or qualified technician.
| Problem | Possible Cause | Solution |
| Hob control card’s display is blacked out. The hob or cooking zones cannot be switched on. | There is no power supply. | Check the household fuse for the appliance. whether there is a power cut by trying other electronic appliances. |
| The hob switches off while it is in use and an ‘F’ flashes on each display. | The controls are damp or an object is resting on them. | Dry the controls or remove the object. |
| The hob switches off while it is use. | One of the cooking zones has been on for too long. | use the cooking zone again by switching it back on. |
| The hob controls are not working and the child lock LED is on. | The child lock is active. | Switch off the child lock. |
Australian & New Zealand Product Warranty Statements of Standard Warranty Conditions
Australian CustomersOur goods come with guarantees that cannot be excluded under the Australian Consumer Law. You are entitled to a replacement or refund for a major failure and for compensation for any other reasonably foreseeable loss or damage. You are also entitled to have the goods repaired or replaced if the goods fail to be of acceptable quality and the failure does not amount to a major failure.
New Zealand CustomersNothing herein contained shall be construed in any way as excluding or limiting your rights under the Consumer Guarantee Act 1993.
Our WarrantyThis product is also covered by the manufacturer’s warranty set out in this document (Our Warranty). Our Warranty is for a period of twenty four (24) months from the date of purchase and for refrigeration appliances will have an additional thirty six (36) months after the first twenty four (24) months on the Sealed System (PARTS only) Compressor & condenser etc. The labour cost to replace these parts is the responsibility of the customer. This is in addition to (and does not exclude, restrict or modify) any rights or remedies to which you may already be entitled under the Australian Consumer Law or the New Zealand Consumer Guarantee Act 1993 relating to this product. Our Warranty (which is subject to the conditions below) covers rectification free of charge of any fault arising from defective materials or components, or faulty workmanship. The product will be repaired or replaced at the option of Omega, and all costs of installation, removal, cartage, freight travelling expenses and insurance are to be paid by the customer. Our Warranty is subject to the following conditions:
- That the purchaser contact Omega prior to any product repair.
- That the purchaser carefully follows all instructions provided with the product and complies with all relevant electrical & plumbing regulations in their State when installing the product.
- That the purchaser carefully follows the instructions provided in the owner’s handbook relating to the proper use and care of the product and does not use the product for any purpose other than the DOMESTIC use for which it has been designed. If the appliance is used in commercial applications or for rental purposes, Our Warranty is limited to a warranty of Twelve (12) months covering all parts with Three (3) months on any labour cost of service or repair.
Service AreaThe provision of service under Our Warranty is limited by the boundary / territory area of the nearest service centre. Travelling cost incurred for service outside this area is not covered by Our Warranty and service will incur commercial cost to be paid by the customer regulated by the number of kilometers travelled beyond the service area. These costs will be disclosed to you for acceptance by you prior to your claim being processed. Microwave ovens must be returned to your nearest Authorised Service Centre for repair as they are a carry in serviceable appliance.
What is Covered by our WarrantyDuring the warranty period, Omega or its authorised Service Centre will, at no extra charge, if your appliance is readily accessible without the need of special equipment and subject to the terms and conditions of this warranty, repair or replace any parts which it considers defective.
What is not Covered by our Warranty
- Products installed damaged or incomplete or not in compliance with the relevant electrical & plumbing regulations in their State.
- Normal wear and tear e.g. cleaning, light globes, filters etc.
- Failure resulting from power surges and electrical storms.
- Insect or vermin infestation.
- Unauthorized repairs or use of non-genuine Omega parts.
- Any failure caused by the product not being used in accordance with the instruction and the installation manual provided with the product.
- Misuse or abuse, including failure to properly maintain or service.
- The clearing of blockages in pumps and hoses.
- Damage which occurs during delivery or installation.
- Claims to product surface coating due to liquid or solid spill-overs, accidental damage or damage caused from cleaning products not recommended by Omega.
How to Claim Our WarrantyWhile registering your warranty is not a requirement, for peace of mind you can register your warranty at omegaappliances.com.au. To make a claim under Warranty you will need to contact Omega in Australia or New Zealand by using the contact details below. If you are contacting Omega regarding any warranty claims and spare parts inquiries, please make sure you have the following information on hand:
- Product Name/Model Number
- Serial Number/s
- Purchase Date (as per invoice or proof of purchase)
- Purchased From
- Warranty Registration Number (if registered)
Further Information
For important information about your Omega Appliance such as warranty registration, manuals, features, and specifications please visit omegaappliances.com.au (if you are in Australia) and omegaappliances.co.nz (if you are in New Zealand) or contact our Customer Care team on the below email or phone numbers.
Registering Your WarrantyFor peace of mind you can register your warranty at omegaappliances.com.au. Further information on the Warranty can be found at the end of this manual.
Contact Us
Our customer service team is here to help you with any question or concern. Both teams are on call Monday to Friday 8.30am to 5.00pm and of course you can always send an email at your convenience.
Australia Contact Details Monday to Friday 8.30am 5.00pm Email: [email protected] Phone: 1300 739 033
New Zealand Contact Details Monday to Friday 8.30am 5.00pm Email: [email protected] Phone: 09 415 6000
To stay up to date and find simple and easy recipes, follow us on our socials:facebook.com/omegaappliancesinstagram.com/omegaappliances_aus
READ THE INSTRUCTION BOOKLET BEFORE INSTALLING AND USING THE APPLIANCE.
It is important that you retain these instructions, proof of purchase as well as other important documents about this product for future reference.The manufacturer will not be responsible for any damage to property or to persons caused by incorrect installation or improper use of the appliance.
Due to continual product development, Omega reserves the right to alter specifications and appearances without notice.
Disposal Information
- Most of the packaging materials are recyclable. Please dispose of these materials through your local recycling depot or by placing them into appropriate collection containers.
- If you wish to discard this product, please contact your local authorities and ask for the correct method of disposal.
Contact Us AustraliaOmega is a division of Shriro Australia Pty LtdPhone: 1300 739 033Email: [email protected]
Contact Us New ZealandOmega is a division of Monaco Corporation (member of Shriro)Phone: 09 415 6000Email: [email protected]
omegaappliances.com.auomegaappliances.co.nz
 report this ad
References
[xyz-ips snippet=”download-snippet”]