omega ORC97G 90cm Curved Glass Canopy Rangehood Instruction Manual
Disposal Information
- Most of the packaging materials are recyclable. Please dispose of these materials through your local recycling depot or by placing them into appropriate collection containers.
- If you wish to discard this product, please contact your local authorities and ask for the correct method of disposal.
Important Safety Warnings
IMPORTANT: Read the assembly instruction section and safety precautions of this booklet carefully before removing the contents of this carton.
- In certain circumstances electrical appliances may be a safety hazard.
- This appliance is not intended for use by persons (including children) with reduced physical, sensory or mental capabilities, or lack of experience or knowledge, unless they have been given supervision or instruction concerning the use of the appliance by a person responsible for their safety. Young children should be supervised to ensure that they do not play with the appliance.
- Do not check the status of the filters whilst the cooker hood is operating.
- Do not touch the light bulbs after use.
- Do not disconnect the appliance with wet hands.
- Do not disconnect the power supply by pulling on the cable.
- Do not flambé underneath the range hood.
- Avoid free flame, as it may cause damage to the filters and can be a fire hazard.
- Unplug the appliance before carrying out maintenance, cleaning or replacing lamps.
- If the power cord is damaged, it must be replaced by the manufacturer, an authorised service centre or similarly qualified persons to avoid a hazard.
- For indoor use only.
- It is recommended to operate the range hood prior to cooking.
- It is recommended to leave the range hood in operation for 15 minutes after cooking is terminated in order to completely eliminate cooking vapours and odours.
- Turn off the range hood when not in use.
- Do not use the range hood if it is damaged, especially the supply cord and the case.
- Do not immerse the range hood in liquid.
- The exhaust air must not be discharged into a flue which is used for exhausting fumes from an appliance burning gas or other fuels (not applicable to appliances that only discharge the air back into the room).
- Regulations concerning the discharge of air have to be fulfilled.
- There shall be adequate ventilation of the room when the range hood is used at the same time as appliances burning gas of other fuels (not applicable to appliances that only discharge the air back into the room).
- Clean the surface of the cooker hood regularly using a cloth moistened with denatured alcohol or a non-abrasive liquid detergent.
- There is a fire risk if cleaning is not carried out in accordance with the instructions.
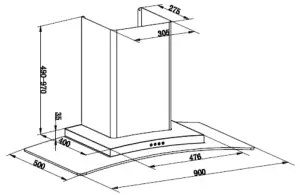
- The 600mm units are intended for use above hobs that are 600mm wide and the 900mm units are intended for use above hobs that are 900mm wide.
- The range hood must be mounted at a minimum distance of 65cm above the cooking surface.
- CAUTION: Accessible parts may become hot when used with cooking appliances.
- Warning: Failure to install the screws or fixing device in accordance with these instructions may result in electrical hazards.
Specifications
| Model
Rated Input Rated Power |
ORC97G
220V – 240V ~50Hz 268W |
| Lighting Power
Air tube diameter |
2 x 1.5W LED
150MM |
| Air output | 852m3/h Net |
| Model
Rated Input |
ORC98G
220V – 240V ~50Hz |
| Rated Power | 268W |
| Lighting Power
Air tube diameter |
2 x 1.5W LED
150MM |
| Air output | 852m3/h Net |
Installation Instructions
Before installation, please ensure the area is clean, to avoid suction of the remaining bits of broken wood and dust.The canopy hood cannot share the same air ventilation ducting as other appliances, such as gas and electric heaters.The bending of the ventilation ducting should be ≥ 120°, parallel or above the exit vent, and should be connected through the external wall.After installation, make sure that the extractor is level to avoid grease collection at one end.
NOTE: Remove all protective plastic coatings from the stainless-steel surfaces before use.
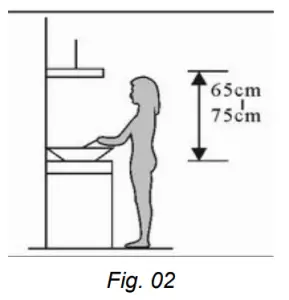
- The rangehood should be placed at a distance of 65-75cm (26-30inch) from the cooking surface for the best effect (Fig. 02).

- Install the hook on a suitable place once the installation height is fixed, and keep it in line. The fixed position of the inside chimney bracket is the place of chimney (Fig. 03).
- Fix the extensible pipe according to the lead direction and way, and then put the cooker hood on the hook (Fig. 04 and Fig. 05).
- Lead the extensible pipe outside of the room, meanwhile adjust the height of the inside chimney to the position of the inside chimney bracket and fix on it by screw, here should be sure the inside chimney can be flexed freely (Fig. 06).
- Put the two chimneys together onto the cooker hood body, meanwhile adjust the height of the inside chimney into the suitable height, and fix the inside chimney to the inside chimney bracket by screw. Finally, fix the body with safety screw (Fig. 07).
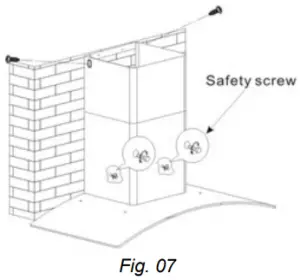
Note: Fix the Canopy with safety screws. See Pic 5. The two safety screw holes are positioned on the back casing, with a diameter of 6mm.Warning: Failure to install the screws or fixing device in accordance with these instructions may result in electrical hazards.
Operating Instructions
The re-usable aluminium grease filters supplied with this rangehood should be cleaned every month or so to avoid grease build-up.To remove the grease filter, release the locking mechanism at the front of the filter, and lower the filter slightly to unhook it at the back. Whilst the filter is removed, clean off any residual grease from the housing to avoid fire risk.When replacing the grease filters, ensure that the locking mechanism is facing down. If the rangehood is used in re-circulation mode, the activated charcoal filter must be in place. These charcoal filters are designed to absorb cooking odours and are located in the canopy above the grease filters. Before fitting or replacing charcoal filters, the grease filters must first be removed.
CONTROLS
- Push the ‘Power’ button to turn the unit on and off.
- Push the ‘Low’ button to set the extraction fan to low speed.
- Push the ‘Mid’ button to set the extraction fan to medium speed.
- Push the ‘High’ button to set the extraction fan to high speed.
- Push the ‘Light’ button to turn the light on and off.
Maintenance
CLEAINING THE GREASE FILTER MESH
The filter mesh is made of high-density stainless steel. Please do not use corrosive detergent on it. Keeping this filter clean will keep the appliance running correctly. Please follow the guidelines below.Place the mesh in 40 – 50°C clean water, add in a small amount of detergent, and soak for 2 – 3 minutes. Wear gloves, and clean with a soft brush. Do not apply too much pressure, as the mesh is delicate and will damage easily.The grease filters can also be put into a dishwasher. To do so, set the temperature at around 60 degrees.
CLEANING THE RANGEHOOD
- To protect the main body from corrosion over a long period of time, the cooker hood should be cleaned with hot water and a non-corrosive detergent every two months.
- Do not use abrasive detergent as it will damage the body.
- Keep the motor and other spare parts free from water, as this will cause damage to the appliance.
- Before cleaning, unplug the appliance.
- If fitted with active charcoal filters, the charcoal filter should not be exposed to heat.
- Do not tear open the fixed bar around the active charcoal filter.
- If the supply cord is damaged, it must be replaced by the manufacturer, its service agent or a similarly qualified person in order to avoid hazards.
Replacing the Lights
Warning: Before attempting to change the lights, ensure that the appliance isswitched off and unplugged from the wall socket.
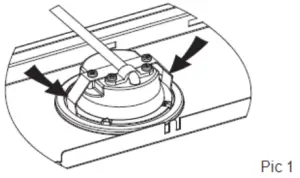
- Remove the grease filter.
- Press the spring on both sides of the LED light until the light falls out (Pic. 1).Gently pull the light wire out and disconnect the terminal (Pic. 2).
- Reverse the procedure to replace the light. Use an identical light:
- LED modules – round lamp.
- Max Wattage: 2 x 1.5W
- Voltage Range: 12V DC
- ILCOS D Code: DSR-1.5/65-S-64
- Replace the grease filter.
 Gently pull the light wire out and disconnect the terminal (Pic. 2).
Troubleshooting
| Fault | Cause | Solution |
|
Light on, but motor does not work |
The fan is blocked | Contact service |
| The capacitor is damaged | Contact service | |
| The motor jammed and bearing damaged | Contact service | |
| A smell coming from the motor | Contact service | |
|
Light does not work; motor does not work |
Besides the above mentioned, check the following: | |
| Light damaged | Replace lights | |
| Power cord loose | Contact service | |
|
Shake of the body |
The fan is damaged and causes shaking | Contact service |
| The motor is not tightly mounted | Contact service | |
| The body is not tightly hung on wall | Contact service | |
|
Insufficient suction |
The distance between the body and the gas top too long | Readjust the distance |
|
Too much ventilation or breeze from open doors or windows |
Choose a better location and re-assemble the machine |
|
|
The machine inclines |
The fixing screw not tight enough |
Tighten the hanging screw and make it horizontal |
| The hanging screw not tight enough | Tighten the hanging screw and make it horizontal |
Australian & New Zealand Product Warranty Statements of Standard Warranty Conditions
Australian CustomersOur goods come with guarantees that cannot be excluded under the Australian Consumer Law. You are entitled to a replacement or refund for a major failure and for compensation for any other reasonably foreseeable loss or damage. You are also entitled to have the goods repaired or replaced if the goods fail to be of acceptable quality and the failure does not amount to a major failure.
New Zealand CustomersNothing herein contained shall be construed in any way as excluding or limiting your rights under the Consumer Guarantee Act 1993
Our Warranty
This product is also covered by the manufacturer’s warranty set out in this document (Our Warranty). Our Warranty is for a period of twenty four (24) months from the date of purchase and for refrigeration appliances will have an additional thirty six (36) months after the first twenty four (24) months on the Sealed System (PARTS only) Compressor & condenser etc. The labour cost to replace these parts is the responsibility of the customer. This is in addition to (and does not exclude, restrict or modify) any rights or remedies to which you may already be entitled under the Australian Consumer Law or the New Zealand Consumer Guarantee Act 1993 relating to this product. Our Warranty (which is subject to the conditions below) covers rectification free of charge of any fault arising from defective materials or components, or faulty workmanship. The product will be repaired or replaced at the option of Omega, and all costs of installation, removal, cartage, freight travelling expenses and insurance are to be paid by the customer. Our Warranty is subject to the following conditions:
- That the purchaser contact Omega prior to any product repair.
- That the purchaser carefully follows all instructions provided with the product and complies with all relevant electrical & plumbing regulations in their State when installing the product.
- That the purchaser carefully follows the instructions provided in the owner’s handbook relating to the proper use and care of the product and does not use the product for any purpose other than the DOMESTIC use for which it has been designed. If the appliance is used in commercial applications or for rental purposes, Our Warranty is limited to a warranty of Twelve (12) months covering all parts with Three (3) months on any labour cost of service or repair.
Service Area
The provision of service under Our Warranty is limited by the boundary / territory area of the nearest service centre. Travelling cost incurred for service outside this area is not covered by Our Warranty and service will incur commercial cost to be paid by the customer regulated by the number of kilometres travelled beyond the service area. These costs will be disclosed to you for acceptance by you prior to your claim being processed. Microwave ovens must be returned to your nearest Authorised Service Centre for repair as they are a carry in serviceable appliance.
What is Covered by our WarrantyDuring the warranty period, Omega or its authorised Service Centre will, at no extra charge, if your appliance is readily accessible without the need of special equipment and subject to the terms and conditions of this warranty, repair or replace any parts which it considers defective.
What is not Covered by our Warranty
- Products installed damaged or incomplete or not in compliance with the relevant electrical & plumbing regulations in their State.
- Normal wear and tear e.g. cleaning, light globes, filters etc.
- Failure resulting from power surges and electrical storms.
- Insect or vermin infestation.
- Unauthorised repairs or use of non-genuine Omega parts.
- Any failure caused by the product not being used in accordance with the instruction and the installation manual provided with the product.
- Misuse or abuse, including failure to properly maintain or service.
- The clearing of blockages in pumps and hoses.
- Damage which occurs during delivery or installation.
- Claims to product surface coating due to liquid or solid spill-overs, accidental damage or damage caused from cleaning products not recommended by Omega.
How to Claim Our Warranty
While registering your warranty is not a requirement, for peace of mind you can register your warranty at omegaappliances.com.au.To make a claim under Warranty you will need to contact Omega in Australia or New Zealand by using the contact details below.If you are contacting Omega regarding any warranty claims and spare parts inquiries, please make sure you have the following information on hand:
- Product Name/Model Number
- Serial Number/s
- Purchase Date (as per invoice or proof of purchase)
- Purchased From
- Warranty Registration Number (if registered)
Contact Us Australia
Omega is a division of Shriro Australia Pty LtdPhone: 1300 739 033Email: [email protected]
Contact Us New Zealand
 report this ad
Omega is a division of Monaco Corporation (member of Shriro)Phone: 09 415 6000Email: [email protected]
References
[xyz-ips snippet=”download-snippet”]