omegon 55768 Push+ Go Standalone system Instruction Manual
The Omegon® Push+ G o Standalone encoder system
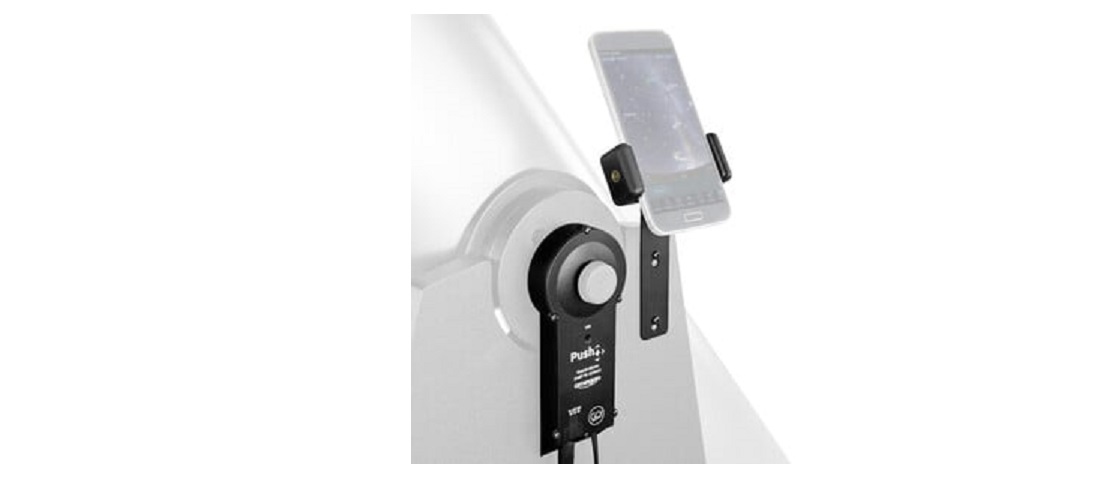
Congratulations on the purchase of the Omegon® Push+ Go Standalone encoder system. Have you ever wanted to locate deep-sky objects with your Dobson telescope but found star-hopping a daunting task? The new Push+ Go is the ideal companion for the beginner, intermediate and advanced amateur who is looking for a compact solution for object location with a Smartphone. It’s simple design and mechanical quality allows to use it in a variety of dobsonian telescopes.
What is included?
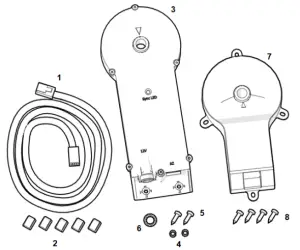
Packing ListBag 1
- Cable;
- Cable holders (5x);
- Altitude Encoder and Bluetooth® Box;
- Spacers (2x);
- Screws (2x);
- Washer;
- Azimuth Encoder;
- Screws (4x)
 Bag 2
Bag 2 - Smartphone Holder;
- Screws (2x);
- Hex Key;Add-on for Orion® SkyQuest™ dobsonians (see separate Addendum)
- M8 Screw;
- Nut adapter;
- Screws (3x);
- USB to 5V cable (not shown);
- Power bank (not shown);
 Bag 2
Bag 2How to fix the Push+ Go to a Dobsonian telescope*?Push+ Go is indicated for the following Dobsonian telescope models:
- Omegon Advanced X (from 8” to 12”) and other OEM versions.
- SO Classic Dobsonians (6” to 12”) (see separate Addendum)
Remove tension system from the baseRelease the central hand knob from the telescope’s base along with the washers and the small tube in the centre. Keep the hand knob at hand, you will need it later. The washers and tube should be kept safely stored.
Installing the Azimuth Encoder.Locate the Azimuth Encoder (part #7) and the supplied screws (4 units – part #8) and fix it to the base with a screw driver (not included) as shown. Make sure the metal taxis on the Azimuth Encoder slides all the way through and that the Azimuth Encoder is flush to the wood base. Use the screw driver to push the screws and pierce through the wood and fix the screws to the wood base. Make sure the Azimuth Encoder is placed a shown, parallel to the sides and the connection socket to the opening side.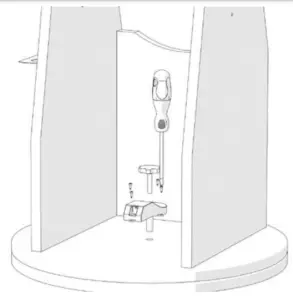
Insert the original hand knob, supplied with the telescope, through thehole and tighten it firmly.
Confirm that the Azimuth Encoder is correctly fix to its axis by rotatingthe base.
When the base is rotated in one direction (for example to the right), the hand knob should also rotate to same direction (right).
Installing the Altitude Encoder and Bluetooth® Box.Now that you have fixed the Azimuth Encoder install the Altitude Encoder and Bluetooth® Box to the base.
Start by releasing the spring friction system on the left-side panel of the telescope as shown. Use a screw driver (not included) to remove it. This exposes and frees the side bearing and the base side plate. This is needed to install the Altitude Encoder and Bluetooth® Box (part #3).
Keep the telescope’s hand knob aside, it will be needed later. The spring and the other components should be carefully added to the other stored items.
Install the Altitude Encoder and Bluetooth® BoxAlign it to the side panel so that the hand knob slides and aligns with the side bearing. Keep the Altitude Encoder and Bluetooth® Box in the up-right position and place the two spacers (part #4) aligned to the two holes on the bottom so that they are sandwiched between the side plate and the Box. Use the two supplied screws (part #5) and the screw driver (not included) to fix it to the side panel. Apply some pressure to the screws so that pierce through the wood panel.
Tighten the hand knob firmly. Test it like done previously with the Azimuth Encoder before. Place the tube horizontally and then bring it to the vertical position. Verify if the hand knob also rotates.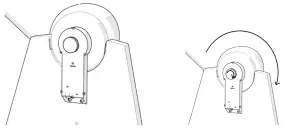
Connecting the two boxes.Now that both the Azimuth Encoder and the Altitude Encoder and Bluetooth® Box have been installed to both axes and tested (rotation) it is time to connect both with the supplier cable (part #1).
Connect using the supplied cable. If you hear a “click” usually means a good connection!
Laying the cableLay-dow the cable along the telescope panels as shown. Cable holders (clips) are supplied (5 units part #2). Remove the protective paper to expose the adhesive and stick it to the side panel and base circle as required. Using the clips insures the cable is not hanging loose which may be important for transportation.
Installing the Smartphone Holder.The smartphone is an important part of the setup and a smartphone holder was included. Use the Smartphone holder (part #9) and fix it with the two supplied screws (part #10) using a screw driver (not included). Apply some pressure to the screws so it pierces through the wood. Note that the screws should not push against the metal but allow to slide if necessary. Remove it whenever required (transportation).
Adjusting the position of the smartphone.Adjust the Smartphone’s position if necessary (vertical or horizontal position) and fix it using the supplied hex screw (part #11) as shown.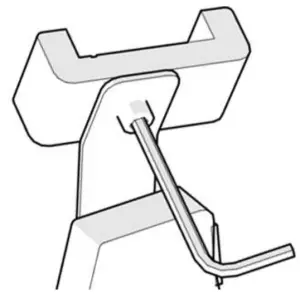
Power bank and 5V USB to 12V power cable. We have included a power bank and power cable with Push+ Go kit. Make sure the power bank is fully charged before using it, please refer to the dedicated instruction manual.
Starting the Push+ Go. Before powering make sure, the tube is in the horizontal position as shown.
Then plug-in the power cable jack to the Altitude Encoder and Bluetooth® Box. The Red LED will starts blinking.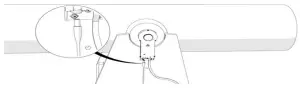
Push+ compatibility. Push+ is compatible with devices that useAndroid® or with computers that use Windows® operating system.The devices must also be Bluetooth® 2.0 (or higher) compatible. Thefollowing logos apply.Android® logos and symbols are trademarks of Google Inc.Microsoft ® and Windows ® are registered trademarks of Microsoft Corporation.Bluetooth ® is a trademark of Bluetooth SIG Inc.
How to pair Push+ to a device or computer?
Pairing is done as you would do with a smartphone or other device. First power the Push+ by using the supplied power cable. As soon as Push+ is powered the red LED will start to blink. There are two options: you can pair Push+ to an Android® device (phone or tablet) or to a Window™ based Computer.
Pairing Push+ to a device like an Android® phone. Make sure you phone is compatible with Bluetooth 2.0 (or higher).
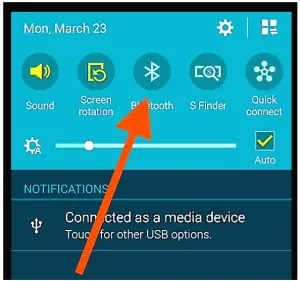
Step 1Enable the Bluetooth® option in your device. Do this by going to the Settings Tab or directly by pressing the Bluetooth® symbol as shown in figure 26.
Step 2A window with a list of the available devices will be visible. If you had a previously paired device, it will show up on the list. If Push+ is powered it will also show either as Unknown Device or as Push+.
Step 3Select Push+ from the list and pair it by inserting the 4-digit pairing code. Each Push+ has its own signature and when pairing it will “remember” to which device it is paired. This avoids problems when several Push+ are working close to one another. Remember the maximum recommended Bluetooth® pairing distance is 10m. Make sure you are within this distance. Your Push+ is now be paired to your Android® device.
Pairing Push+ to a laptop or computer. Make sure your computer or laptop is compatible with Bluetooth®
2.0 (or higher). There are several ways to pair your Push+ to a computer.We will describe in the following steps a simple and effective way to do it.
Step 1Select from Windows™ initial menu the arrow pointing up (show hidden icons) – red circle (right bottom corner on the screen).
Step 2Click on the Bluetooth® icon. Select “Add Bluetooth device”.
Step 3Look for Push+, sometimes it may show up as “unknow device” Click pair.
Step 4Insert pairing code “1234” Your Push+ is now paired with your computer.
Which software and apps to use?
SkySafari® from Simulation Curriculum is one of the most popular existing planetarium app is SkySafari® from Simulation Curriculum®. This planetarium app shows the sky on a device screen (they have both Android® and iOS versions) and allows telescope control. It has a huge database with its constellations, deep-sky objects, stars, asterisms and many other objects. To know more visit www.simulationcurriculum.com. SkySafari® is available in several versions from entry level to the most advanced ones. We recommend using the SkySafari® Plus 4 for Android®. It can be downloaded from the Google Play® app centre. Please notice, this is not a free app. The free version does not allow to control telescopes or Push+. SkySafari® is has a quite intuitive interface and is easy to use.
Important Push+ Feature
Electronics
Encoder resolution:36000 ticks/pulses per axis
Protocol:Intelliscope
Bluetooth®:2.0
Pairing range:10m (although when unobstructed can reach up to 30m)
Power Characteristics
Power:12Volt DC
Power consumption:150mA/h
Power consumption (idle):100mA/h
Connection type:Jack 2.1mm with positive centre
Maximum carrying weight:14kg
Accessories:Smartphone adapter
Pointing AccuracyUsually between 0.3deg and 0.5deg, should be in the FOV for a 25mm eyepiece with a 8” Newton OTA.
How to configure the settings to SkySafari®. SkySafari® has many features that are not covered by the existing instruction manual. To configure SkySafari® to be used with Push+ please follow these steps.– Tap on the SkySafari® icon on your device to start the app.– Now from the menu bellow tap “Settings” this will open the settings menu.
Tap Date and Time insert current date and time. It is important to getthis data the most accurate as possible as the pointing accuracy will relyon this given data.
Tap Location insert your location, please do not forget to chooseyour hemisphere N/S and meridian position W/E. Most West European countries are GMT +1 exceptions are UK, IRL and PT, which are GMT.
Tap Setup a scope setup settings tab will show.
Equipment SelectionScope Type — Orion IntelliScopeMount Type — Alt-Az. Push-To
Communication Settings Connect via BluetoothConnect via WIFI
Common SettingsSet Time & LocationSave Log File
Please make sure that when inserting the Mount Type — Alt-Az. Push-To you select and insert the following parameters.
Mount TypeEquatorial Push-ToEquatorial GoTo (Fork)Equatorial GoTo (German)Alt-Az. Push-To on Equ. PlatformAlt-Az. Push-ToAlt-Az. GoTo
Connecting SkySafari® App to Push+. Make sure you followed all the steps mentioned above. This is really important as without this information SkySafari® will not be able to work with Push+. It is very important at the point to exit the app and re-start it.
Important!After the settings in 11. are done please exit the App and re-start it so that SkySafari® assumes the recent changes to the settings!
Connect. Tap “Connect” to connect the telescope to Push+. Connection may take some seconds. When connection is established the red LED stops blinking and remains powered ON.
Cross hair. As soon as connection is established a cross hair will randomly appear on the screen. If you move the telescope on both axes, you will see this cross hair moving accordingly. This is a good sign; it means both encoders are working. When calibrated, the cross hair will point to a certain region in the sky. This region will match the field of view as seen through the telescope eyepiece.
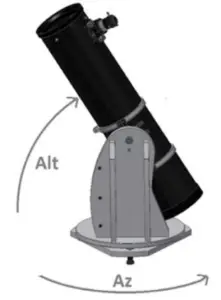
Choosing calibration stars. Alignment is done with one-star or two-stars. We recommend the two-star alignment as it provide a much better pointing accuracy. The two-star separation should be no more than 30 degrees but no less than 10 degrees – both in Altitude (Alt) and Azimuth (Az). Avoid using alignment stars close.
Rule. Always Up and Left- for consistent results we recommend that the final fine adjustments to the object centring in the telescope’s eyepiece to be made Up – in Alt and Left – in Az.
Step 1Centre a bright star – a star that you know or recognize from a constellation – in the centre of eyepiece field of view. Follow the rule mentioned above – final movements always Up and Left. It is important to centre the star in the eyepiece field of view with some accuracy, we recommend using a cross hair eyepiece for this procedure.
Step 2Match the star to the one shown on the device’s screen. Just swipe the screen so that the sky rotates and zoom in our out to look for that particular object. Make sure you know the object matches the one looked through the eyepiece – a common mistake is aligning the wrong object. Tap on the star. A small cross will show on top of the star.
Step 3Tap “Align” to use that star.
“Align Telescope?”For a one-alignment star, this is enough. Tap “Align”. The selected star also named “First Target” or “First Alignment Star” was used for calibration. You will now see the cross hair moving across the screen pointing approximately to the same direction as the telescope.
For additional pointing accuracy, we recommend using a second alignment star.
Select a second star and align, make sure it is not more than 30 degrees apart from the “First Target”. Alignment should be successful. You are now ready to point to objects using your Push+.
Troubleshooting with SkySafari®. The most common problems as described bellow.
| Problem | Solution |
|
If the connection cable is not properly installed the encoder position will not read. Please check cable connection. Make sure the hand knobs (both the Azimuth and Altitude are tighten) and rotate solidary. |
|
There is a big difference between the position read by the encoders and the object’s database coordinates. Please make sure you use the right-hand rule (up-left). If the problem persists make sure you are not using a star too close first one. |
|
Make sure the two alignment-stars are not separated more than 30 degrees. |
|
Wrong star used for alignment. |
Step by step – use procedure. To use Push+ please make sure you always follow this procedure completing each step before moving to the next one.
Make the telescope tube horizontal
Power Push+ Go
Pair Push+ via Bluetooth (this only needs to be done once)
Adjust app settings (SkySafari® or other app)follow the instructions mentioned in 10.
Connect device to Appfollow the instructions mentioned in 11.
Align/Calibratefollow the instructions mentioned in 11.
Locate objects and observefollow the instruction mentioned in 11.
 report this ad
References
[xyz-ips snippet=”download-snippet”]