omegon Full Tube Ritchey Chretien Telescopes Instruction Manual
Omegon® Pro Ritchey Chretien Full Tube
Congratulations on the purchase of your new Omegon® Pro Ritchey Chretien telescope! Among the Cassegrainian systems the Ritchey-Chretien is the unrivalled champion: it is the two-mirror telescope with the highest correction level available. In contrast to other variants, like Pressman Carmichael, Dall-Kirkham or the classical Cassegrainian, the Ritchey-Chretien reflector shows you a completely coma-free field full of round stars even without an additional corrector. The difference to other types of design is so significant, that almost all large telescopes used for scientific purposes are of the Ritchey-Chretien design.
Due to the high production costs for the mirrors, real Ritchey-Chretien telescopes were, until recently, unaffordable for amateur astronomers. Now we are glad to be able to present fully matured, real Ritchey-Chretien reflectors for a reasonable price.
The Omegon® Pro Ritchey Chretien reflectors can be used for visual observations and photography without limitations, but reach their full strength, above all, when used for Deep-Sky observation and photography. When visually panning across the Milky Way they show innumerable small stars right to the edge of a well-corrected eyepiece. From an aperture of 250mm a camera with APS-C format chip will produce dot shaped stars right to the edge without the use of an additional corrector with smaller telescopes the remaining blurring can be completely corrected by using a field flattener.
Ritchey-Chretien units compromise of pieces of equipment for professionals, the superior image quality requires a certain amount of adjustment work. The generously dimensioned focusing range gives the expert the opportunity to use field flatteners for large chips, focal length reducers and focal length extension optics. There remains nothing to be desired. The included eyepiece holder is able to carry a conventional DSLR without any problems and the size of its diameter ensures vignette free exposure of almost all cameras. Special heavy-duty eyepiece holders are available for extra heavy cooled cameras.
1. Included accessories
For easy use the product is delivered with several accessory parts: Please have a look at the parts list for later recognition.53809 Omegon® Pro Ritchey-Chrétien 154/1370
Optical tube with 1 x fastening rail 44mm Vixen standard, 2″ Crawford focuser and reducing sleeve 2″/1.25″, Vixen/Sky watcher finder base. Focuser extension sleeves: 2x 25mm, 1x 50mm
53810 Omegon® Pro Ritchey-Chrétien 203/1624Optical tube with 1x 3″ Ormandy fastening rail and 1x combination fastening rail 3″ Losmandy/44mm Vixen, 2″ Crawford focuser with reducing sleeve 2″/1.25″, Vixen/Sky watcher finder base Focuser extension sleeves: 2x 25mm, 1x 50mm 53811 Omegon® Pro Ritchey-Chrétien 254/2000 Optical tube with 1x 3″ Losmandy fastening rail and 1x combination fastening rail 3″ Losmandy/44mm Vixen, 3″ Crawford focuser with reducer M74x0.75 to 2″ plug-in and reducing sleeve 2″/1.25″, Vixen/Sky watcher finder base Focuser extension sleeves: 2x 25mm, 1x 50mm Battery holder for tube ventilator
2. Preparation
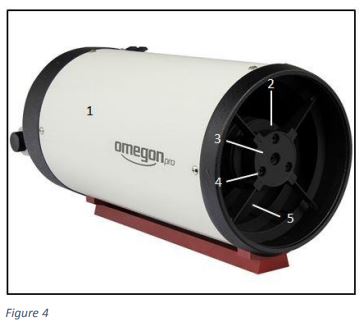
Before you start using the equipment it is important to know the main control elements. There are two groups of control elements, as shown (Fig. 1 – 6).
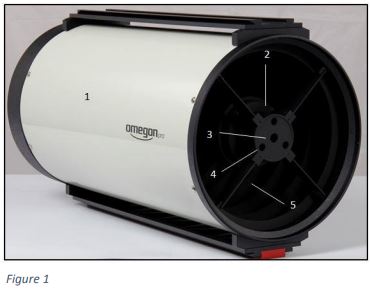
1) Optical tube2) Secondary mirror3) Secondary mirror holding screw4) 3x secondary mirror adjustment screws5) Secondary mirror cell with lens shade
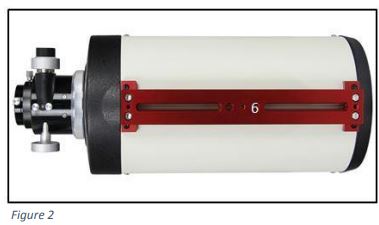
6) Lower dovetail rails (3″ Losmandy standard and 44mm Vixen standard combination rails)
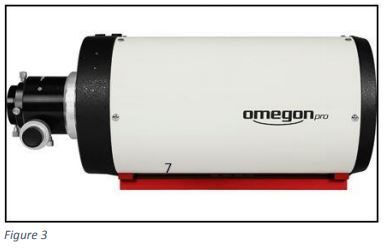
7) Dovetail rail top (3″ Losmandy standard), only applies for 8” and 10” models
8) Finder base, Vixen standard9) Cap nut to fasten the focuser10) Focuser
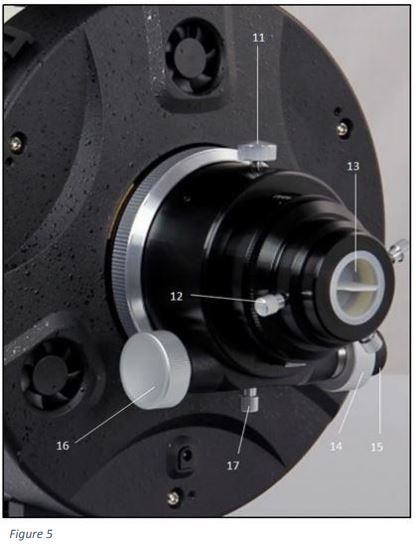
11) Eyepiece clamping12) Thumbscrew for 2″ connection13) Reducing adapter 2″/ 1,25″ with protection ring and thumbscrew14) Coarse focusing right15) Fine focusing16) Coarse focusing left17) Focuser clamping screw
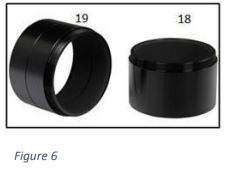
18) 50mm focuser extension sleeve19) 2x25mm focuser extension sleeve
3. Commissioning
a) Mounting the tubeThe telescope is equipped with a rail (8″ and 10″ versions with two rails), which enable secure fastening of the telescope tube on a mount. In order to do so, open the dovetail clamp on your mount so far that the rail can be inserted into the receptacle. Make sure that the rail is properly seated in the receptacle with larger tubes you will have no direct view to the receptacle of the mount, because the tube is in the way. In such a case, it may happen that one assumes that the tube is correctly clamped, even though it is tilted in the receptacle. If this is the case, the tube will most certainly fall out at some time and hit the ground. Depending on the size of the tube, not only the tube will be destroyed, but it could cause further damage or injuries. Once you have made sure that the rail is perfectly seated in the receptacle, just clamp the rail down with the fastening screws on the mount. If you intend to balance the tube, just slacken the clamping so that the tube can be moved but will not fall out. If you perform this step for the first time, you should ask a second person for assistance and to check whether everything is fitted correctly. Practice this tube installation a few times later you must be able to do this work in the dark and without any help.
b) Using focuser and spacer sleevesYour Ritchey-Chretien telescope is equipped with a focuser for sharpening the image. Several spacer rings for installation between focuser and tube are also included. This design gives you the benefit of being flexible when it comes to usable accessories. Depending on the aperture, your Omegon Ritchey-Chretien telescope is either fitted with a 2″ or a 3″ focuser and the matching spacer sleeves. At the first glance spacer sleeves appear to be very impractical wouldn’t it be much easier to simply make the tube of the eyepiece holder longer and do without spacer sleeves? However, this would be a disadvantage, because the longer eyepiece holder tube would bend more extremely under load this is why we decided on a short eyepiece holder tube with approx. 50mm draw tube travel and the use of several spacer sleeves. The fact that the large diameter of the spacer sleeves prevents igniting is an additional advantage. The rear end of the tube features a large thread. This thread carries the focuser, and the spacer sleeves also use this thread. When working in the dark please make sure not to cant the spacer sleeves this would damage the thread. The focuser has a big adjusting wheel for coarse focusing on either side and a smaller black adjustment wheel for finetuning on one side. Apart from this there is an additional knurled screw under the adjusting unit to affix the eyepiece holder and a pressing screw for the adjusting unit. This pressing screw should never be loosened completely to avoid slipping of the eyepiece holder. Do not apply force to turn to a certain position, if something blocks the eyepiece holder. Over the course of time the feed shaft would damage the running surface and the eyepiece holder would no longer work correctly. Should the eyepiece holder be blocked, do not continue to turn to the same direction, but check, whether the eyepiece holder is blocked or has reached its end position. Or may be it’s only a tightened eyepiece holder thumbscrew. In order to rule out any operating faults when working in the dark, you should become familiar with the eyepiece holder and its control elements during the daytime. The focuser can be removed from the tube by simply unscrewing the silver, fastening ring on the tube side end of the focuser. At this point, one can install one or several spacer rings between the focuser and tube in order to match the position of the focuser to your own accessories. Depending on whether to use a diagonal mirror for visual observations or directly attach a camera for astrophotography, just use an appropriate spacer sleeve to achieve a convenient focal position and the best possible stability. When photographing with a DSLR without any additional accessories, one will most certainly use all spacer rings, when photographing with a focal reducer and a camera with additional filter wheel, spacer rings may not be necessary at all for focusing.
c) Adjustment of opticsYou can generally adjust the telescope by using a star. However, we highly recommend the purchase of adjusting accessories for this telescope type.
What does adjustment mean and why does a reflector need to be adjusted from time to time?The light gathering system of you telescope consists of two mirrors: The large mirror at the bottom end of the telescope, which collects the light and the smaller secondary mirror, which directs the light to the eyepiece, where it is then available for watching. The tilt and the distance of both mirrors to each other and to the eyepiece holder thereby is a decisive factor for the performance of your telescope. However, a telescope with precision ground mirror will still produce a very poor image, if it is misaligned. Each of the two mirrors is therefore movably mounted and can be precisely tilted and displaced. While the distance between the main mirror and secondary mirror is of almost no importance in some telescope types, such as e.g. the spherical Schmidt-Cassegrainian telescope or the very popular Newton telescopes, with the Ritchey-Chretien telescope you must take care not to change the distance between the two mirrors when you make any adjustments.
What needs to be adjusted?The adjustment aims at the alignment of both telescope mirrors and the eyepiece holder, so that the centers and focal points of the mirrors are on one common axis that runs through the middle of the tube, the so called optical axis. Apart from that, the center of the eyepiece holder tube must also match the optical axis.
What needs to be accounted for?In principle there are three components, which can be tilted to two directions and displaced along an axis. The correct order of adjustment processes is of utmost importance; otherwise one will never be able to finish. Pre-adjustment work usually takes place in a brightly lit room; the final fine-tuning is then made on a star via photo, or observation with high magnification.
What tools are needed?A Ritchey-Chretien telescope responds more sensitively to any de-adjustment than any other telescope type, but achieves a better image quality when correctly adjusted. We therefore highly recommend acquiring a laser pointer and a collimation eyepiece. The following description explains the adjustment using these tools. These tools are generally not required but without these, a simple adjustment may take several nights, even for experienced users.
For the following procedure we will use:33141 Omegon Collimation Eyepiece4577 Omegon Newton Laser Pointer 1.25” with sight glass
Procedure:
A) Adjustment with laser pointerThe baffle, that carries the main mirror, connects the eyepiece holder of the RC with the main mirror. We will now adjust the eyepiece holder in such a way, that it points “straight” to the secondary mirror. Take the front lid off the telescope and look on the main mirror under an oblique angle. Apart from the main mirror and the baffle, you can also see the reflection of the secondary mirror with its holder in the main mirror. You see a small circle in the middle of the secondary mirror. This is the center marking of the secondary mirror. Now insert the 4577 Omegon laser pointer into the eyepiece holder and switch it on. Under ideal conditions you will now see the laser reflex in the center marking of the secondary mirror, and the laser point will also be visible in the sight glass of the laser pointer. The laser point will not perform a considerable movement when turning the focuser forth or back or when turning the laser. And now step by step.
1. Checking the adjustment of the laserJust like any other piece of optical equipment, the laser pointer will also get de-adjusted. This is generally no problem. Simply readjust the laser. However, it would be problematic to use a de-adjusted laser to adjust a telescope. This is why the laser is always checked first. Insert the laser into the eyepiece holder to do so. For the following procedure make sure that the laser sits level on the eyepiece holder without any slant. Now rotate the laser if the laser is correctly adjusted, the reflected laser in the sight glass will not move. If it moves, adjust the laser as described in the operating instructions for the laser.
2. Adjusting the eyepiece holder using the laserMake sure that the pressing screw of the eyepiece holder is slightly tightened, so that the eyepiece holder moves neatly without skewing or slipping. Now move the eyepiece holder to approx. the middle of its adjustment range (25 on the scale). Insert the laser and then focus forward and back. Watch the laser reflex on the secondary mirror by looking into the telescope from the front. The laser reflex should not move and be exactly in the middle of the secondary mirror mark. Should the reflex on the secondary mirror move, you must increase the adjustment of the eyepiece holder, in order to make sure that the laser point will stay in place when focusing. Now adjust the unit consisting of eyepiece holder and main mirror to the secondary mirror, so that the laser points exactly into the center mark of the secondary mirror. On the 6″ and 8″ Ritchey-Chretien the associated adjustment screws are located directly on the bottom of the eyepiece holder and are slightly difficult to reach. On the 10″ model the adjustment screws are located on the outside of the tube and are very easy to reach. The procedure is the same for all models: Turn the small grub screws to press the mirror slightly forward, then turn then round head socket head cap screws to fix this setting. Now move the laser beam into the middle of the secondary mirror center marking.
3. Adjusting the secondary mirrorNow use the socket head cap screws on the secondary mirror holder to guide the laser beam back into the sight glass of the laser pointer. Here are no pairs of adjusting and counter screws each screw is countered by the two other screws. If you want to slight tighten one screw, you must first slightly loosen the other two screws. Do not loosen the central Philips head screw in the holder! At the end of the adjustment process the reflected laser should be in the middle of the secondary mirror center marking, as well as in the middle of the sight glass of the laser pointer and should not excessively move when focusing. The coarse adjustment is thus finished fine-tuning can now take place on a star, but is normally not required.
B) Adjustment with collimation eyepieceProceed iteratively. The aim is to achieve concentric circles around middle of the field of view identified by the reticule of the collimation eyepiece.
Figure 7: View through the collimation eyepiece
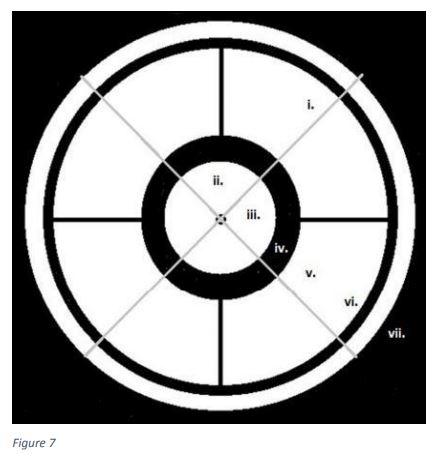
This is what you should see when looking through a well adjusted Ritchey-Chretien telescope with the 33141 Omegon Collimation Eyepiece. You will see the following pieces:
i. The grey slanted cross is the reticule of the collimation eyepiece.ii. The small quarter circles at the intersection of the reticule are parts of the small circle that marks the center of the secondary mirror.iii. The bright area in the middle around the small circle is the image of the bright area in the collimation eyepieceiv. The black border around the bright area is the secondary mirror holder with lens shade.v. The bright area around the black border is the image of the main mirror, which is separated into four segments by the 4 black secondary mirror spider vanes.vi. The thin black border around the main mirror is the main mirror holder.vii. Right at the outside the stray light in the bright room shows the distance between main mirror and tube.
The adjustment of the telescope generally follows the same sequence as with the laser pointer. You must therefore always make sure to loosen one or two counter screws, before tightening any other screw. Once the adjustment process is finished, all counter screws must be tightened. Please make sure that the screws are only tightened hand-tight! They are adjustment screws for high precision equipment brutal force is strictly prohibited.
C) Fine tuning on a star
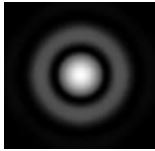
The last few fractions of a millimeter that still separate you from the perfect adjustment by following the procedure described above, can be adjusted by using an artificial or real star. The extremely enlarged picture at the left shows the ideal star, as it should be visible in the center of the field of vision in the telescope a round bright circle, the so-called Airy disc, with one or several concentric, round diffraction rings. Please note, that this picture will normally not be visible, even with a perfectly adjusted optical system the star disc will dance and drift because of air turbulence. It is therefore necessary to keep looking through the eyepiece in order to be able to judge whether one sees a round, symmetric image with air turbulence, or a one or two side distorted image.
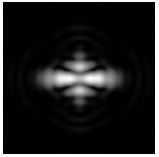
A readjusted star will most likely appear as shown in the picture at the left a squeezed ellipse that will turn by 90° during focusing. During fine tuning one will use photos or look through the eyepiece to adjust the equipment so that the star in the middle of the image looks like the one in the upper picture.
Appendix A: Technical Data
53809 Omegon Pro Ritchey-Chrétien 154/1370Aperture — 154mmFocal length — 1.370mmAperture ratio — f/9Tube construction — Full tube typeOptics type — Ritchey-Chretien Cassegrainian with two hyperbolic mirrorsMirror substrate — BK-7/H-K9LObstruction caused by secondary mirror holder — 72mmLens shades — 7 pieces internalTube diameter — 191mmTube length without focuser — 410mmTube length with standard focuser — 490mmTube weight without focuser — 4.600gTube weight with focuser — 5.400gFocuser — 2” Crawford focuser with 10:1 gear reduction and reducer from 2” t0 1.25”, fully rotatingFocuser connection thread — M90x1mmFocuser adjustment travel — 34mmFocuser extension sleeves — 2x 25mm; 1x 50mmFinder scope — OptionalFinder base — Vixen/Sky watcherFocal distance from end of tube — 240mmFocal distance above the retracted focuser — 237mmVentilator — No ventilator
53810 Omegon Pro Ritchey-Chrétien 203/1624
Aperture — 203mmFocal length — 1.625mmAperture ratio — f/8Tube construction — Full tube typeTube material — Full tube typeOptics type — Ritchey-Chretien Cassegrainian with two hyperbolic mirrorsMirror substrate — Quartz crystal with extremely low thermal length extensionObstruction caused by secondary mirror holder — 95 mm(47% of diameter, 22% of area)Lens shades — 10 pieces internallyTube diameter — 229mmTube length without focuser — 470mmTube length with standard focuser — 560mmTube weight without focuser — 6.730gTube weight with focuser — 7.450gFastening — One attachment dovetail rail 3” Losmandy format, one fastening rail combination for 3” Losmandy and 44mm Vixen universal dovetail receptaclesFocuser — Detachable Cray ford focuser with linear guidance with 10:1 gear reduction and reducer from 2” t0 1.25”, fully rotatableFocuser connection thread — M90x1mmFocuser adjustment travel — 50mmFocuser extension sleeves — 2x 25mm; 1x 50mmFinder scope — OptionalFocal distance from end of tube — 237mmFocal distance above the retracted focuser — 140mmVentilator — No ventilator
53811 Omegon Pro Ritchey-Chrétien 254/2000
Aperture — 254mmFocal length — 2.000mmAperture ratio — f/8Tube construction — Full tube typeTube material — SteelOptics type — Ritchey-Chretien Cassegrainian with two hyperbolic mirrorsMirror substrate — Quartz crystal with extremely low thermal length extensionObstruction caused by secondary mirror holder — 110mm(43% of diameter, 18.75% of area)Lens shades — 7 pieces internallyTube diameter — 299mmTube length without focuser — 625mmTube length with standard focuser — 722mmTube weight without focuser — 14.610gTube weight with focuser — 15.600gFastening — One attachment dovetail rail 3“ Losmandy format, one fastening rail combination for 3” Losmandy and 44mm Vixen universal dovetail receptaclesFocuser — Detachable 3” Crawford focuser with linear guidance with 10:1 gear reduction and reducer to 2” and from 2” t0 1.25”, eyepiece side thread M74x0.75mm, fully rotatingFocuser connection thread — M117x1mmFocuser adjustment travel — 50mmFocuser extension sleeves — 2x 25mm; 1x 50mmFinder scope — OptionalFocal distance from end of tube — 242mmFocal distance above the retracted focuser — 138mmVentilator — 3 pieces installed, 12V
Appendix B: Recommended accessories
33141 Omegon Collimation Eyepiece4577 Omegon Newton Laser Pointer 1.25″ with sight glass51284 Astro Physics 0.67x Reducer 2″32974 Omegon red dot finder Deluxe47014 Omegon LED finder
Appendix C: Practical hint: Cleaning the optical system
After some time at the latest any stargazer will notice that pollution has spread over the optical surfaces of his telescope.
The following is generally valid: small dust particles and other minor contamination has no significant effect on the performance of an optical system and may thus remain on optical surfaces!
Any cleaning is work and bears risks and should therefore and should therefore be carried out at rarely as possible! In addition to the certainty that regular cleaning will leave scratches in the optical system, there is also the risk of the optics dropping down, especially when wet cleaning!
The most frequent types of pollution on telescopes are dust and pollen, on eyepieces grease and residues from lacrimal fluid. When using a strong lamp, pollution will practically always be visible, even on completely new optics.
When should a telescope be cleaned?The optics should be cleaned if the picture negatively affected when looking through. With extremely polluted optics bright objects, such as planets, show a light ring, similar to a light dew deposit. Only then optics needs to be cleaned not if dust or small dirt particles can be seen on the mirror.There are only a few exceptions from this rule:
- Contamination by pollen. Pollen contains sugar and is degraded by bacteria, which settle on the optics. These organisms exude acid containing substances, which could attack the optical system. If a yellowy deposit is detected on the optics after a star gazing session in spring, the optical system should be cleaned.
- Large area contamination. If beverages or other fluids have accidently come into contact with the optical system, the optics must be cleaned Even if these fluids were clear, components in these fluids or there degradation products may attack the coating of optical components.
- Eyepiece lenses since the optical components in eyepieces are near focus, bigger dust particles will become visible, e.g. dirt on eyelashes will disturb the image. Eyepieces must therefore be cleaned more frequently.
Cleaning should be performed as follows:
- Brush off coarse dirt particles with a soft brush
- If possible spray-clean the optics with distilled water, e.g. with plant sprayer. Make sure that no water enters into the optical system, use e.g. a kitchen towel to wipe it off the outer border of the optics. Eyepieces are cleaned with the eye lens pointing down, so that the cleaning fluid cannot enter into the space between the lenses.
- Do not wipe off the few drops that will still be on the optics after cleaning, suck them off with a soft cloth.
- Only wipe if it is absolutely necessary do not apply pressure! Always make sure that the cloth is clean and suitable for this purpose, e.g. the 21290 Omegon® cleaning cloth or the 47315 Omegon® SPUDZ micro-fiber cleaning cloth.
- Only use cleaning fluid if distilled water is not able to remove the dirt. Ideal for this purpose are special fluids, e.g. the fluid contained in the 5551 Omegon® 5 in 1 cleaning set. If you want to mix your own cleaning fluid you must always make sure, to solely use clean components from a chemist shop. As an example, a solution with isopropyl alcohol and/or Ethanol is suitable for cleaning the optics, but the use of spirit instead of the higher quality Ethanol will sustainably ruin the coating of the optics. Re-coating such a single item will normally cost you a four digit sum of money one should therefore always try to avoid such damage. The use of fragrances as frequently used in commercial glass cleaners is strictly prohibited. These any many other substances will leave a film on the surface, which is not or hardly visible when just examining the object. However, when looking through the optics, the image will be heavily affected. The same applies for the use of the more reasonably priced demineralized water from a DIY-shop instead of the real distilled water from a chemist. One should in any case try and test the fluids and methods on an e.g. glass table to find out if any residues will remain after drying.
© nimax GmbH 2019
Any form of reproduction of the entire contents of this document or parts thereof beyond the private use is strictly prohibited. Subject to alterations and errors. All texts, illustrations and symbols are the property of nimax GmbH.
53809_EN_Instructions_Manual_REV_C
[xyz-ips snippet=”download-snippet”]