![]()
Omegon Pole Finder EQ-500X User Manual
Thank you for choosing the EQ-500X pole finder. Using this product, you can quickly and easily align your mount with the north celestial pole – the foundations for successful astrophotography. The pole finder can also be used for mounting the Celestron AVX and CGEM, and the Skywatcher NEQ-5 and EQ-6.
1. Getting to know your pole finder
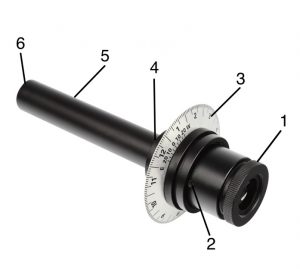
Figure 1: Polarscope
- Eyepiece with adjustable viewfinder unit
- Three adjusting screws at 120 degree intervals
- Date scale
- Mounting thread
- Polarscope
- Pole finder lens
2. Mounting
- Remove the pole finder cover and remove the pre-installed pole finder bracket if necessary.
- Insert the lens end of the polarscope into the shaft and turn it clockwise in the mount thread. The pole finder should now be securely held.
3. Aligning the pole finder on the mount
You can complete the next steps during the day once you have installed the pole finder on themount.
- Remove the lens tube, counterweight and the counterweight shaft and align the mount vertically with the horizon. It is easier to use an earthbound object as an alignment guide.
- Point the mounted polarscope towards a distant object, such as a church tower, chimney orpylon.
- Look through the pole finder optics and adjust the viewfinder until the object is in focus.
- Centre the object in the middle of the pole finder and rotate the RA axis 180 degrees.
- Observe how far the object has moved from the crosshair. This drift occurs because the pole finder is not yet exactly aligned with the mount’s rotational axis.
- Use the hex key and move the object half way towards the middle of the crosshair using thethree adjusting screws.
- Centre the object in the middle of the crosshair using the azimuth and vertical screws and turn the pole finder another 180 degrees. Has the object moved from the centre again? If so, repeat steps 3.6 and 3.7 until the object no longer drifts from the centre.
4. Aligning the mount with the north celestial pole
Note: There are different methods for aligning the mount with the pole. We are describing themethod which uses the images on the reticule.
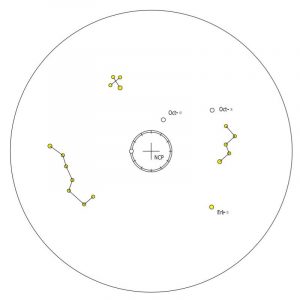
Figure 2: Reticule plate with images
- Point the mount northwards and set the vertical scale to the geographic width of yourobservation area. Rotate the mount’s declination axis through 90 degrees. Ensure that the Pole Star can be seen in the pole finder’s visual field. Adjust the focus using the viewfinder if necessary.
- When looking through the polarscope, you will see images of the constellations Cassiopeia and the Plough for the Northern hemisphere, and the Southern Cross and Achernar for the Southern hemisphere.
- Using the naked eye, pinpoint the appropriate constellations for your hemisphere and memorise their current positions.
- Look through the polarscope, open the RA axis clamps and rotate this until the positions of the images in the pole finder correspond with the current position of the constellations. Note: As you are looking through a miniature telescope, you are not seeing the real constellations in the sky, simply their images on the transparent reticule plate and a restricted visual field around the polar region. You, therefore, need to compare the actual view of the constellations with the pole finder’s position.
- Look through the polarscope again and use the azimuth and vertical screws until the Pole Star is located within the circle at the centre of the crosshair. Your mount is now aligned with the northern celestial pole. In the Southern hemisphere, Sigma and Chi Octantis should be aligned with their images. Note: An equatorial mount can also be aligned using a smartphone pole finder app. A selection of apps can be found in the Play Store or App Store.
The complete or partial reproduction of the content of this document for anything other than personal use is expressly prohibited. Subject to changes and errors. All text, images and diagrams are the property of nimax GmbH.
[xyz-ips snippet=”download-snippet”]