
![]()
 HaloLightPro10” LED Ring Light & Media Station
![]() USB POWEREDUser Manual
USB POWEREDUser Manual![]() PodCastSeries
PodCastSeries
INTRODUCTION & FEATURES
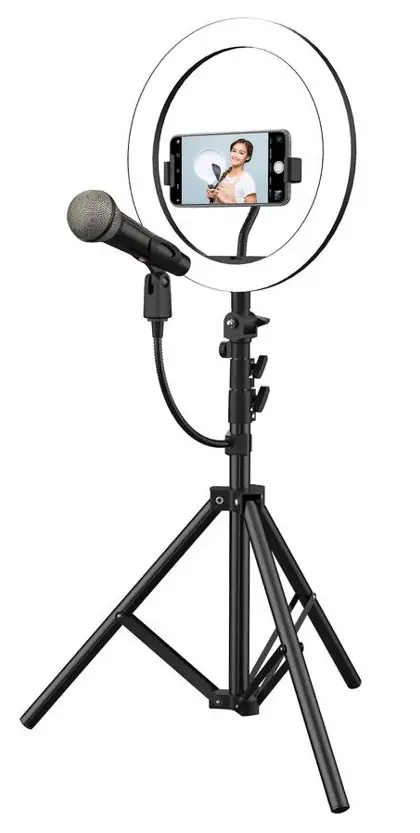
Boost the production quality of your video projects and obtain a flawless glow with the On-Air 10-inch HaloLight LED Ring Light. This large filler light provides multiple brightness options and 3 LED colors, powered by standard USB and an inline remote that makes setup easy. The tripod floor stand comes equipped with holsters for a smartphone and microphone, making it perfect for live-streaming, podcasts, and any other type of broadcasting project.
PACKAGE CONTENTS:
1 x 10-inch LED Tube Light1 x Floor Tripod Stand1 x Expanding Smartphone Holster1 x Microphone Mount User Manual
PRODUCT OVERVIEW & FUNCTIONS
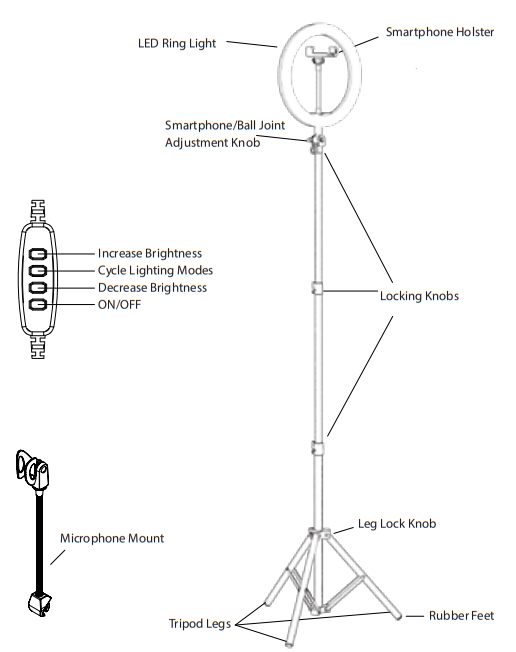
- 3 LED Modes (Warm Light, Cool White, and Daylight) with 10 Brightness Levels
- Powered by any USB Power Source (Including PCs, Wall Adapters, Power Banks, etc.)
- Universal-Fit, Spring-Loaded Smartphone Holster
- Easy Height Adjustment & Sturdy Build for Stability
- Microphone Mount with Easy-to-Adjust Gooseneck Design
PRODUCT SPECIFICATIONS
| Ring Light Diameter: | 10 in. |
| LED Bulb Total: | 120 |
| Color Temperature: | 3000K (Warm Light); 4500K (Cool White); 6000K (Daylight) |
| Color Rendering Index (CRI): | 85 Ra |
| Luminous Flux: | 2300 lm |
| Wattage: | 24W |
| Power Supply: | USB 5V (1-4 A) |
| Tripod Expanded Height: | 1.5 m (5 ft) |
USING YOUR LED RING LIGHT
STEP 1: EXPAND THE TRIPOD AND SET.
- If the unit is in the folded/closed position, you’ll first need to turn the leg lock knob counterclockwise to loosen.
- Gently pull the tripod legs apart to open them. When you have reached a suitable position, place the stand on the floor or ground and turn the leg lock knob clockwise to tighten.
- Make sure the stand is stable and unmoving before making further adjustments or attaching any additional parts to the unit.
STEP 2: ADJUST TO THE RIGHT HEIGHT.
- To adjust the tripod height, loosen the adjustment knob located in the center of the center column by turning it counterclockwise.
- Pull the center column upward until the unit reaches your desired height.
- Tighten the adjustment knob by turning it clockwise. Do so until it feels secure and unmoving. Do not over-tighten.
STEP 3: ATTACH THE SMARTPHONE HOLSTER TO THE RING LIGHT.
- Locate the gooseneck smartphone mount.
- Connect the spring-loaded smartphone holster to the ball joint; press downward until you feel a “click”.
- Locate the screw hole on the base of the LED ring light.
- Insert the gooseneck stand into the LED ring light hole and screw the unit clockwise to secure it.
- When tightly secured into the ring light, the gooseneck stand can be bent and adjusted as needed.
- Gently expand the holster clip and insert your smartphone. Release the clip and it will automatically close around your smartphone, securing it in place.
STEP 4: CONNECT THE RING LIGHT TO THE TRIPOD STAND.
- Locate the ball joint fixture and connect it to the ring light by rotating clockwise until a tight grip is formed.
- Carefully holding the ring light, insert the ball joint figure it into the opening located on the center column top. Ensure that the ball joint itself can move freely.
- Rotate the ball joint locking knob clockwise to secure. It will gradually tighten around the center column.
 report this ad
STEP 5: ATTACH THE MICROPHONE MOUNT TO THE UNIT.
- Determine where on the center column you’d like to attach the microphone mount.
- Loosen the flip lock by rotating it counterclockwise until the clamp is wide enough to fit around the center column.
- Hold the microphone mount in place and tighten the lock around the center column by rotating it clockwise until it feels secure and unmoving. Flip the lock to secure it in place.
- Insert the microphone by carefully sliding it downwards. The holster will expand slightly to form a tight grip.
- The mount’s gooseneck design allows you to bend freely and obtain a comfortable position.
STEP 6: CONNECT TO POWER.
- Locate a USB-compatible power source such as a laptop or computer, AC wall adapter, or power bank.
- Connect the USB power cable (attached to the ring light) to the power source.
STEP 7: SELECT YOUR LED MODE & BRIGHTNESS.
- Press the ON/OFF button on the attached inline remote to turn the light on. Use the remote to adjust your brightness and LED mode.
- The Mode button allows you to switch between 3 LED settings: white only (cool white), yellow only (warm light), and white/yellow mixed (daylight).
- Press the dimmer button (labeled -) to decrease the brightness of the LED bulbs.
- Press the brightness increase button (labeled +) to increase the brightness of the LED bulbs.
- When finished, turn the unit off by pressing the ON/OFF button again. You may then disconnect from power.
TIPS FOR PLACEMENT & USE
- It’s widely recommended to extend all tripod legs to their maximum length rather than obtaining height only using the center column. Only extend the center column if you need to.
- When placing the tripod in position, keep one leg pointing in the direction that the smartphone/camera will be pointed once attached to the unit. The remaining two legs should be positioned so you can stand between them. This position ensures the firmest balance and decreases the likelihood of bumping into the tripod while taking a shot.
CARE & IMPORTANT SAFEGUARDS
- To clean, wipe down with a soft dry, or damp cloth. Do not use with cleaning agents or other chemical solutions.
- This unit is not waterproof. Do not expose to water, moisture, extreme temperatures, or high levels of humidity.
- This product contains LED bulbs. Keep away from flammable objects and excessive heat.
- Never attempt to disassemble or modify your On-Air LED Ring Light in any way. Doing so violates any warranty in place and may cause permanent damage to the unit.
- Contact the Customer Support team at tzumi.com/support for assistance.
tzumi® Distributed by Izumi inc. NY, NY, 10016.©Copyright 2019 Izumi. All Rights Reserved.Made In China.All pictures shown are for illustration purposes only.Actual products may vary due to product enhancement.Other trademarks and trade names on this package are those of their respective owners.
References
[xyz-ips snippet=”download-snippet”]