
ONEPLUS Nord N200 5G Smartphone
ONEPLUS Nord N200 5G Smartphone
Welcome Start Guide
Introduction
SupportThis guide provides you with the information you need to get started.Note: Some content and illustrations may differ from your device depending on the region, service provider, software version, or OS version, and are subject to change without prior notice.
Note: This device is not suitable for people who have a visual impairment due to the touchscreen keyboard.
Device Layout
Front View
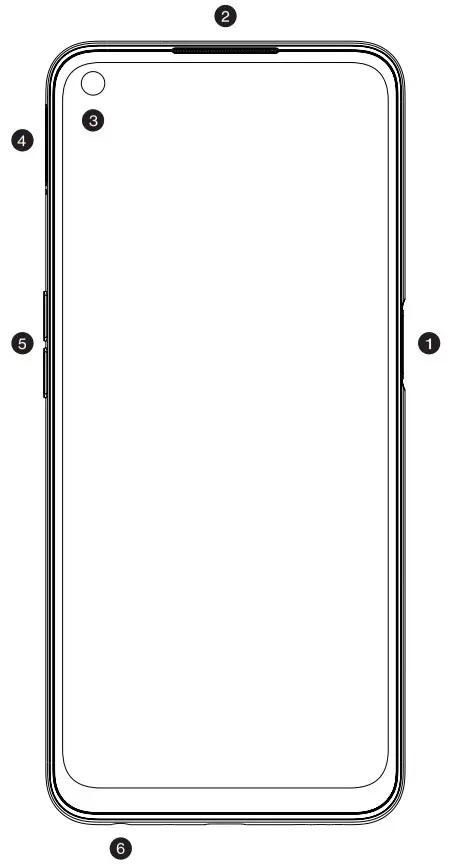
- Fingerprint sensor & Power button
- Receiver
- Front Camera
- Nano SIM Tray
- Volume buttons
- Headphone Jack
Back View
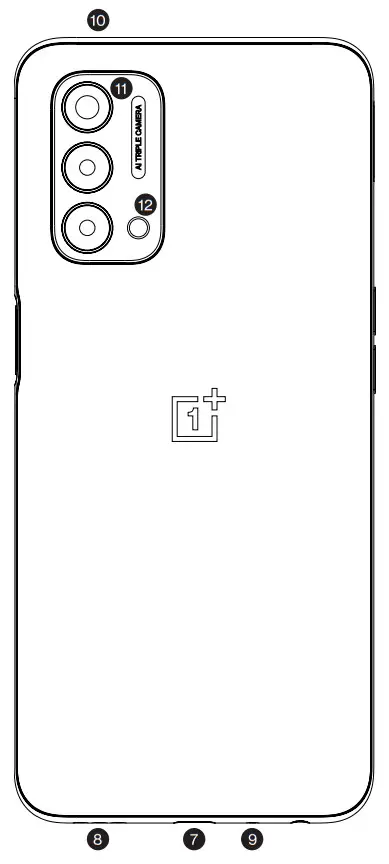
- USB Type-C port
- Speaker
- Microphone
- Microphone
- Rear Camera
- Flash
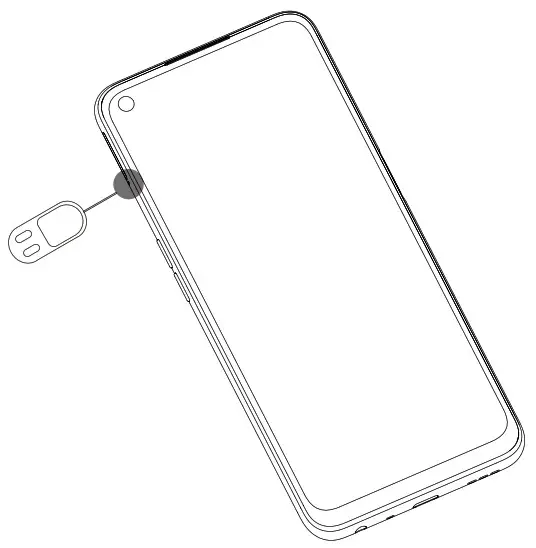
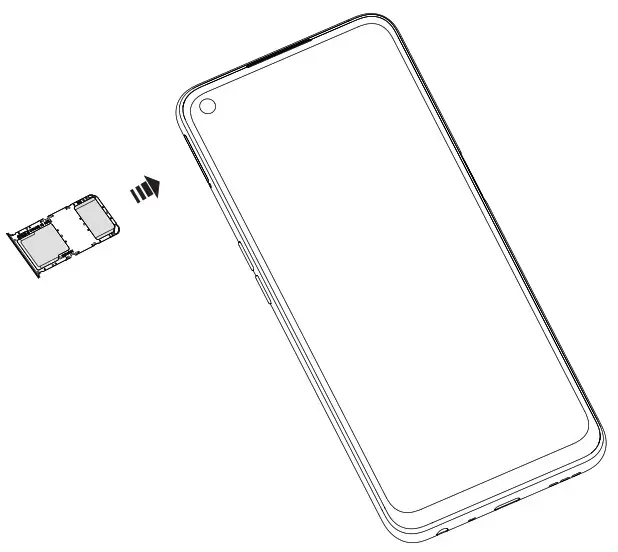
Installing the SIM Card
Insert the SIM (Subscriber Identity Module) card provided to start using the device.
- Insert the ejection pin into the hole beside the card tray.

- Pull out the card tray.
- Put the Nano SIM card on the card tray with the gold-colored contacts facing down.
- Please use the SIM Tray Ejector (found in the box) to remove the SIM tray from the device and insert Nano-SIM cards in the tray.

 Please use the SIM Tray Ejector (found in the box) to remove the SIM tray from the device and insert Nano-SIM cards in the tray.
![]() This device supports only Nano-SIM cards.
This device supports only Nano-SIM cards.

For problem-free performance, it is recommended to use the device with the correct type of SIM card. Always use a factory-made SIM card supplied by the service provider.
Do not lose your SIM card. Your wireless provider is not responsible for damage and other issues caused by the loss or transfer of a SIM card.
Be careful not to damage the SIM card when you insert or remove it.
Charging the Battery
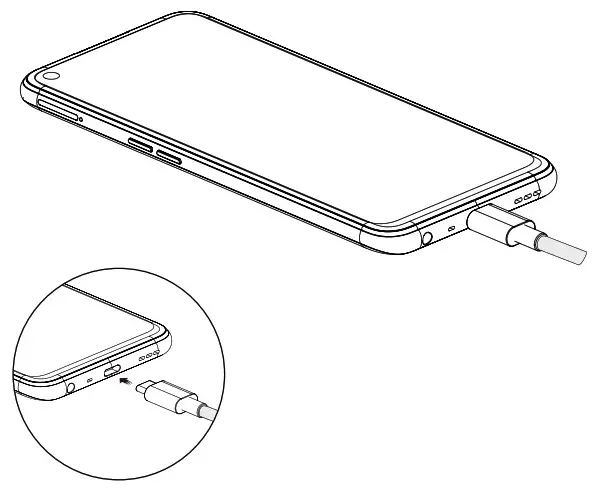
Connect the USB Type-C cable to the USB port on your device, which is located at the lower center of your phone.
Note: Fast charging can only be achieved by using the OnePlus® original product USB cable and travel adaptor.
Power on & off / Reboot
Press and hold the Power key to power on your phone. Press and hold the Power Key and Volume Up buttons together, then follow the prompts to Power off or Reboot your phone. To change the long-press power button to trigger the shutdown menu: Settings (![]() ) > Buttons & gestures (
) > Buttons & gestures (![]() ) > Press and hold the power button > Power menu.
) > Press and hold the power button > Power menu.
Setup Your Phone
If you power on your phone for the first time, by following OnePlus Setup Wizard, you can personalize your OnePlus Nord N200 5G, including setting up your Google account & sync, setup Fingerprint Unlock/Face Unlock, and more.
Screen View
The OnePlus Nord N200 5G uses a 20: 9 aspect ratio display, providing an immersive viewing experience.This is a 6.49-inch screen with a fine and smooth effect.The resolution of the screen is 2400 x 1080 and the refresh rate is up to 90Hz.
Home Screen
- Swipe up to open the apps panel.
- Swipe down from the top of the screen to open the status & notification bar.
- Swipe right to enter the Google® feed.
- Long touch the blank space on the screen to customize your screen.
- Long press the app icon to open the shortcut menu.
Notifications & Status BarNotifications alert you to the arrival of new messages, calendar events, and alarms. The Two-Step-Status-Bar can easily get to frequently used settings.
OnePlus Switch
OnePlus Switch can quickly migrate all your data including contacts, messages and photos, as well as some application data stored on your old ndroid® device ( OnePlus older devices or other devices with Android 5.0 & above ) to your new OnePlus device.• To use OnePlus Switch, tap the OnePlus Switch app in Launcher and follow the prompts.
Lock and Unlock Settings
To lock your device and ensure security, set a PIN code first.For unlocking, both fingerprint and face recognition are available.• To set the pin code, enter Settings (![]() ) > Security & Lock Screen (
) > Security & Lock Screen (![]() ) > Lockscreen passcode.
) > Lockscreen passcode.
Fingerprint
The fingerprint sensor unlocks your OnePlus Nord N200 5G.As the sensor learns and improves, your scans get even more precise over time.
- To register your fingerprint, enter Settings () > Security & Lock Screen () > Fingerprint Unlock.
- Then tap NEXT and follow the on-screen instructions.
- Once your fingerprint is registered, you can touch and hold the fingerprint icon on the screen to unlock it.
Face Unlock
You can set the OnePlus Nord N200 5G to unlock the screen by recognizing your face.
- To set up Face Unlock, go to enter Settings () > Security & Lock Screen () >Face Unlock.
- Follow the instructions on your screen to complete the setup.
- Press the power button to light up the phone screen and trigger Face Unlock automatically.
Note: Face Unlock is less secure than fingerprint or password.
Wireless Settings
Connecting to a Wi-Fi network
- Enter the Settings () , choose Wi-Fi & Network () > WiFi to turn Wi-Fi on/off.
- Tap the name of the desired network to connect, entering the password if necessary.
Connecting to Bluetooth device
- Enter the Settings (), choose Bluetooth & Device Connection ().
- Tap the Pair new device and choose the name of a device to connect, entering the pairing code if necessary.
Internet
Access the internet with web browser.Tap the (![]() ) to open the browser. Enter the URL of the website you want to open.
) to open the browser. Enter the URL of the website you want to open.
Phone
Tap (![]() ).
).
- To make a call, tap () > (), enter a number, then tap (), or tap any contact card from the Speed Dial list to quickly dial that contact.
- To answer a call, swipe () up.
- To reject a call, swipe () down.
Message
Tap (![]() ).
).
- To send an SMS, tap , enter a name or phone number, then type a message and tap
- To send an MMS, tap ( ) to add the media, type your message, and tap
ContactsTap![]()
- To create a new contact, tap, enter the information and tapto save.
- To search a contact, tap , and enter the keywords.
Camera
Tap ![]()
- To take a picture, tap
- To switch cameras, tap
- To zoom in, tap the dot icon beside 1x to switch to 2x zoom or 5x zoom. Long press the button and manually adjust the zoom slider to zoom in up to 6x.
- You can use the top settings bar to set the photo timer, aspect ratio, and flash.
- Swipe left to switch to portrait mode and take a picture with depth effect.
- Swipe right to record a video, with options ranging from 720P 30FPS to 1080P 30FPS.
Gallery
Tap ![]()
• To view photos, tap a photo and swipe to switch.• You can tap ![]() to edit your photo, tap
to edit your photo, tap![]() to share it, or tap
to share it, or tap ![]() to delete it.
to delete it.
Ambient Display
Time, date, battery, display a message, and notifications are displayed when you lift up your phone without lighting up the screen.• Tap Settings ![]() > Display
> Display ![]() > Ambient display to enable display for new notifications, display a message based on specific scenes.
> Ambient display to enable display for new notifications, display a message based on specific scenes.
Gestures
You can personalize OnePlus Nord N200 5G’s gestures control settings. The navigation bar can be configured to hide or replace by navigation gestures. Off-screen gestures can be assigned to different apps and features for quick and easy access.
- Enter Settings > Buttons & Gestures > Navigation Bar & Gestures to personalize the navigation bar.
- Enter the Settings > Buttons & Gestures > Quick Gestures to discover all of OxygenOS’ customization options of Screen-off gestures.
Game Space
Game Space brings all your games together and provides relevant gaming optimization features. Games opened from Game Space will be automatically launched in gaming mode. But you can also switch to Pro Gaming mode for an immersive gaming experience.
Reading Mode
Reading mode works by filtering out blue light, gray-scale mapping, and using ambient information to adjust the sharpness and brightness of the display, Reading mode simulates the reading experience of a real book. It also provides an option of simulating the chromatic printing effect.• Tap Settings ![]() > Display
> Display ![]() > Reading Mode to turn on Reading mode manually or add apps for Reading mode.
> Reading Mode to turn on Reading mode manually or add apps for Reading mode.
File Manager
File Manager has been enhanced with new features such as FileDash, LockBox and so on, you can hide private documents, photos and files in LockBox. You can also categorize and label files so they are easier to find.Tap ![]()
- Tap to rapidly share files via FileDash.
- Long press the file, tap > Move to Lockbox. You may assign a password or fingerprint to files in Lockbox.
Apps
Find new apps to download and install on your device from the Google Play Store ![]() , visit play.google.com/store/apps to learn more.
, visit play.google.com/store/apps to learn more.
Wi-Fi Calling
Wi-Fi Calling can improve your coverage by allowing you to make phone calls over a Wi-Fi network (when a Wi-Fi network is available).To use Wi-Fi Calling, please use the SIM card shipped with your device. A different SIM card may not work with the Wi-Fi Calling feature.
Important!You must also have a 9-1-1 emergency address registered with your account. Check periodically to ensure your address is always up to date.
Note: Corporate accounts may require administrator assistance for 9-1-1 Address registration.
To enable/disable Wi-Fi CallingSwipe up Settings![]() > Wi-Fi & network >
> Wi-Fi & network >![]() > Wi-Fi Calling , then tap the switch to turn it on.
> Wi-Fi Calling , then tap the switch to turn it on.
To change the calling preference for Wi-Fi Calling
- Swipe up > Settings> Wi-Fi & network > Wi-Fi Calling
- Tap Calling preference and choose the preferred mode.
Trademarks and Copyrights
and ” ONEPLUS “are trademarks or registered trademarks of OnePlus Technology(Shenzhen) Co., Ltd. Google and Android are trademarks of Google LLC.LTE is a trademark of ETSI.The Bluetooth® word mark and logos are registered trademarks owned by Blue tooth SIG, Inc. is under license.The N-Mark is a trademark or registered trademark of NFCForum, Inc. in the United States and in other countries. Wi-Fi®, the Wi-Fi CERTIFIED logo, and the Wi-Fi logo are trademarks of Wi-Fi Alliance. Other trademarks and trade names are those of their respective owners. Qualcomm Snapdragon is a product of Qualcomm Technologies, Inc.©2021 OnePlus. All rights reserved.
Approved Firmware VersionsThis device will only operate with firmware versions that have been approved for use by your wireless carrier and the device manufacturer. If unauthorized firmware is placed on the device it will not function.
Information About Safeguarding HandsetsWe encourage customers to take appropriate measures to secure their handsets and invites them to take advantage of the features available on this handset to help secure it from theft and/or other unauthorized access and use. This handset has a locking function (e.g., user-defined codes or patterns) that can serve as the first line of defense against unauthorized use or access to stored information. Preloaded security applications that allow customers to track or locate misplaced devices can be found on several devices. Lost or stolen devices should be immediately reported to your wireless carrier so that proper measures can be taken to protect accounts. For additional information, visit your wireless carrier’s Privacy Policy.
Emergency Dialing
If your phone has network coverage, dial the emergency number and touch it to make an emergency call. This works even without aSIM card and without typing the PIN code.Although all phones are equipped with 9-1-1 emergency calls, this phone may or may not permit its location to be approximated during a 9-1-1 call.*
* Availability of this feature depends on upgrades to the (a) wireless network and (b) 9-1-1 calling system that is required to be installed by the local 9-1-1 response agency or public safety answering point (PSAP); these upgrades may not be available everywhere within our wireless coverage area or your roaming area. This approximation of the phone’s location and the transmittal of location information are subject to emergency situations, transmission limits, network problems/limitations, interconnecting carrier problems, your phone, buildings/tunnels, signal strength, and atmospheric/topographical conditions, and may be curtailed, interrupted, dropped or refused. The phone’s approximate location is transmitted to the local 9-1-1 response agency or PSAP while the call is in progress; this approximation is intended solely to aid the PSAP in dispatching emergency assistance or to limit the search area for emergency services personnel. You should not rely solely on a phone for essential communications (such as a medical or another emergency). Please see your wireless carrier’s Terms and Conditions and Privacy Policy for additional service restrictions and details.
Additional Information
Use of some content or features may require qualifying service or access to a Wi-Fi connection. 5G: Devices operating on a nationwide 5G network currently use multi-band dual connectivity, and receive service via both 4G LTE network and 5G network to support their connectivity. Dual connectivity could result in instances where the phone’s network indicator shows “5G” in a 5G coverage area, but the device is connected to the 4G LTE.
Wi-Fi: Device will not transition between Wi-Fi and the cellular network. Devices using wireless connections may be vulnerable to unauthorized attempts to access data and software stored on the device. Plan data allotment applies to use by connected devices sharing Wi-Fi. Use of connected devices subject to your wireless carrier’s Terms and Conditions.
Wi-Fi Calling: Wi-Fi connection required; may decrement plan minutes. Most devices will not transition between Wi-Fi and the cellular network. See your selected service for details. Devices and screen images are simulated. Coverage not available in some areas. See your wireless carrier’s Terms and Conditions (including arbitration provision), for rate plan information, charges for features and services, and restrictions and details, including important limitations on availability and reliability of 9-1-1 emergency service when using Wi-Fi calling.
Health / Safety / Warranty Guide
FCC Regulations:This device complies with part 15 of the FCC Rules. Operation is subject to the following two conditions: (1) This device may not cause harmful interference, and (2) This device must accept any interference received, including interference that may cause undesired operations.This device has been tested and found to comply with the limits for a Class B digital device, pursuant to Part 15 of the FCC Rules. These limits are designed to provide reasonable protection against harmful interference in a residential installation.
This equipment generates, uses, and can radiate radio frequency energy and, if not installed and used in accordance with the instructions, may cause harmful interference to radio communications. However, there is no guarantee that interference will not occur in a particular installation. If thisequipment does cause harmful interference to radio or television reception, which can be determined by turning the equipment off and on, the user is encouraged to try to correct the interference by using one or more of the following measures:
- Reorient or relocate the receiving antenna.
- Increase the separation between the equipment and receiver.
- Connect the equipment into an outlet on a circuit different not from that to which the receiver is connected.
- Consult the dealer or an experienced radio/TV technician for help.
FCC Note:Caution: Changes or modifications not expressly approved by the party responsible for compliance could void the user‘s authority to operate the equipment. RF Exposure Information (SAR) This device is designed and manufactured not to exceed the emission limits for exposure to radiofrequency (RF) energy set by the Federal Communications Commission of the United States.
During SAR testing, this device was set to transmit at its highest certified power level in all tested frequency bands and placed in positions that simulate RF exposure in usage against the head with no separation, and near the body with the distance of 15 mm. Although the SAR is determined at the highest certified power level, the actual SAR level of the device while operating can be well below the maximum value. This is because the device is designed to operate at multiple power levels so as to use only the power required to reach the network. In general, the closer you are to a wireless base station antenna, the lower the power output.
The exposure standard for wireless devices employing a unit of measurement is known as the Specific Absorption Rate, or SAR. The SAR limit set by the FCC is 1.6 W/kg.
This device is complies with SAR for general population /uncontrolled exposure limits in ANSI/IEEE C95.1-1992 and has been tested in accordance with the measurement methods and procedures specified in IEEE1528.
The FCC has granted an Equipment Authorization for this model device with all reported SAR levels evaluated as in compliance with the FCC RF exposure guidelines. SAR information on this model device is on file with the FCC and can be found under the Display Grant section of www.fcc.gov/oet/ea/fccid after searching on FCC ID: 2ABZ2-EF000 For this device, the highest reported SAR value for usage againstthe head is 1.09 W/kg, for usage near the body is 1.19 W/kg.
While there may be differences between the SAR levels of various phones and at various positions, they all meet the government requirements.
SAR compliance for body-worn operation is based on a separation distance of 15 mm between the unit and the human body. Carry this device at least 15 mm away from your body to ensure RF exposure level compliance or lower to the reported level. To support body-worn operations, choose a belt clip or case that does not contain metallic components, to maintain a separation of 15 mm between this device and your body. RF exposure compliance with any body-worn accessory, which contains metal, was not tested and certified, and use of such bodyworn accessory should be avoided.
Hearing Aid Compatibility (HAC) regulations for Mobile phones Your phone is compliant with the FCC Hearing Aid Compatibility requirements.The FCC has adopted HAC rules for digital wireless phones.These rules require the certain phones to be tested and rated under the American National Standard Institute (ANSI) C63.19-2011 hearing aid compatibility standards. The ANSI standard for hearing aid compatibility contains two types of ratings: M-Ratings: Rating for less radio frequency interference to enable acoustic coupling with hearing aids. T-Ratings: Rating for inductive coupling with hearing aids in telecoil mode.
Not all phones have been rated. A phone is considered hearing aid compatible under FCC rules if it is rated M3 or M4 for acoustic coupling and T3 or T4 for inductive coupling. These ratings are given on a scale from one to four, where four is the most compatible. Your phone meets the M3/T3 level rating. However, hearing aid compatibility ratings don’t guarantee that interference to your hearing aids won’t happen. Results will vary, depending on the level of immunity of your hearing device and the degree of your hearing loss. If your hearing device happens to be vulnerable to interference, you may not be able to use a rated phone successfully. Trying out the phone with your hearing device is the best way to evaluate it for your personal needs. This phone has been tested and rated for use with hearing aids for some of the wireless technologies that it uses. However, there may be some newer wireless technologies used in this phone that have not been tested yet for use with hearing aids. It is important to try the different features of this phone thoroughly and in different locations, using your hearing aid or cochlear implant, to determine if you hear any interfering noise. Consult your service provider or the manufacturer of this phone for information on hearing aid compatibility. If you have questions about return or exchange policies, consult your service provider or phone retailer.
Hearing devices may also be rated. Your hearing device manufacturer or hearing health professional may help you find this rating. For more information about FCC Hearing Aid Compatibility, please go to http://www.fcc.gov/cgb/dro.
RegulatorySettings —About phone— Regulatory labels
Important Legal Information
Please read this information before using your mobile device. You can find such legal information on a mobile device. The full End User License Agreement ( EULA ) and Health & Safety Information are available on the device, in the (Legal information) section of Settings. The location depends on the device, and is usually in the ( System ) or ( About phone ) section, for example:
- Settings > ( About phone ) > ( Legal information ).
- Or, use the ( Search settings ) function to search for ( Legal information ).
 report this ad
Due to software updates, your experience of the software interface (including but not limited to software features, user interfaces, and interaction experiences) may differ from the interface presented in this guide at the time of purchase. The software interface is subject to change.
FAQ’S
Please visit http://oneplus.net/support and select your device and then click the link for the latest software update.
Go to Settings > About Phone > System Updates. If an update is available, tap Download and Install.
Go to Settings > About Phone, then tap Status. If it shows “Network Lock” with a lock icon, your device is locked. To unlock it, contact your service provider.
Go to Settings > Fingerprint ID and follow the on-screen instructions. Then you can use your fingerprint instead of a password or PIN code to unlock your phone or make purchases in Google Play.
Go to Play Store > My Apps & Games > Settings > Fingerprint Authentication and turn on Purchase authentication. Then you can use your fingerprint instead of a password or PIN code to make purchases in Google Play. Please note that this feature is only available in some countries/regions. For more information, please visit http://support.google.com/googleplay/answer/7018481?hl=en&ref_topic=6037409 .
Apart from the single major Android update, OnePlus will be providing three years of maintenance updates to the Nord N200 5G smartphone. These minor updates for the phone will also include Android security patches for the upcoming years.
Swipe up.Scroll to and select Settings.Scroll to and select System.Select System updates.Wait for the search to finish.If your phone is up to date, you will see the following screen. If your phone is not up to date, follow the instructions on the screen.
The OnePlus Nord N200 isn’t waterproof and has no IP rating
This update to the Nord N100 adds 5G and NFC while upgrading the display and and front camera. Other features of OnePlus’ most affordable phone include a huge 5,000 mAh battery, fast charging, fingerprint reader, memory card slot, and headset jack.
To do this from your OnePlus Nord click on the chat icon located in the upper right of the screen and open a conversation with the person you want to talk to. Then press the video camera icon in the upper right to start the video call.
Fortunately, you can solve this with your device by inserting a microSD card. Your device has space for two SIM cards at the same time, as well as a microSD card. This way you can be reached on both SIM cards and you don’t have to worry about the storage space of your phone.
Press and hold the power button and the volume down button simultaneously. You will hear a sound or see a flash that confirms that a screenshot has been made. Release the keys. If this screen appears, choose Got it.
4GB RAM + 64GB built-in storage (expandable up to 256GB) – The OnePlus Nord N200 5G packs all the performance power and storage you’ll need to run and store your favorite content.
VIDEO
References
[xyz-ips snippet=”download-snippet”]