![]() ULTRASONIC CLEANERUSER MANUAL
ULTRASONIC CLEANERUSER MANUAL
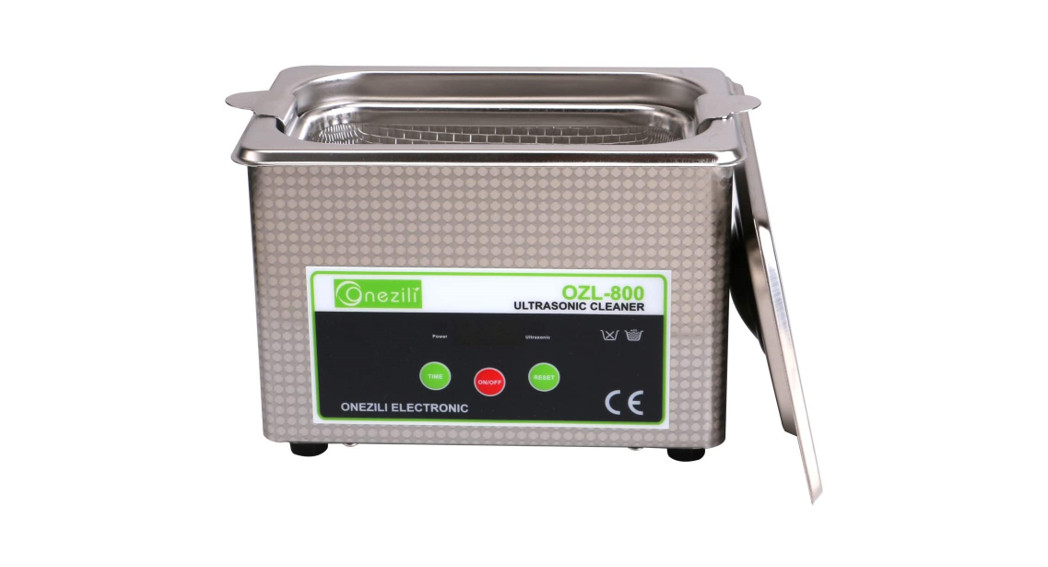
FEATURES
- Stainless steel housing, tank, and lid
- Stamp tank without welding gap for better waterproof
- Cooling fan
- Moisture-proofed PCB
- Industrial grade IC & ultrasonic transducer
ULTRASONIC PRINCIPLE
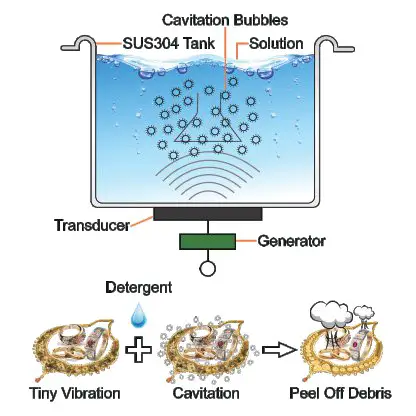
Ultrasonic cleaning is based on the cavitation effect caused by high-frequency ultrasonic wave vibration signal in the fluid. Microscopic bubbles are formed, and they implode violently causing cavitation which creates an intense scrubbing action on the surface of the item being cleaned. The bubbles are small enough to penetrate microscopic crevices, cleaning them thoroughly and consistently.Ultrasonic cleaning is extremely effective at removing dirt and grime which would normally require tedious manual cleaning by hand. It has been used to clean a wide variety of instruments and mechanical parts such as carburetors, returning them to almost “like new” condition without damage to delicate parts.
PREPARATION
- Carefully unpack the cleaner and remove all traces of packing materials from it. Visually inspect the cleaner for any parts that may have become loose or damaged during transit.Contents:a: Main machineb: Soundproof lid.c: Power leadd: Mesh basket (Optional)e: Manual
- Place the cleaner on a flat, clean surface where the cooling fans will receive adequate ventilation and ensure all controls are set off. Also, ensure the drain tap is in the closed position.
- Ensure the power lead is securely plugged into the cleaner and that no part of the lead is likely to come into contact with moisture.
- Carefully fill at least 1/2 of the tank with a solvent solution. For demanding cleaning we recommend a small amount of washing up liquid, this will help increase the cleaning performance. The cleaner is now ready for use.
SAFETY PRECAUTIONS
![]() Keep it away from children!This device is not intended to use by individuals with restricted physical sensory or mental capacities or those with a lack of experience or knowledge, including children unless they are supervised by an individual who is responsible for their safety or has received training in operating the device
Keep it away from children!This device is not intended to use by individuals with restricted physical sensory or mental capacities or those with a lack of experience or knowledge, including children unless they are supervised by an individual who is responsible for their safety or has received training in operating the device![]() Please read the following very carefully as failure to comply may invalidate your guarantee
Please read the following very carefully as failure to comply may invalidate your guarantee
- DO NOT run the cleaner continuously for more than one hour at a time, as doing so can damage the internal components.
- DO NOT operate the unit without fluid in the tank. Always ensure the fluid is no higher than the max mark, Always ensure there is a minimum depth of 7cm.
- DO NOT drop any item into the tank as this may cause damage to the transducer. Always place the items gently into the tank and use the basket whenever possible.
- The more items that you place in your cleaning bath the less efficient it will clean. It is not advised to overlap items. Always allow plenty of clear space between the items.
- Do keep the lid on during use. This will prevent splashes and reduce evaporation of the fluid.
- Never immerse the machine or power cord in water or other liquid.
- DO NOT touch the power plug with wet hands, especially when inserting or removing the plug.
- DO NOT touch the unit if the machine has fallen into the water during operation.Remove the power plug from the socket first.
- DO NOT disassemble the machine, except by professionals.
- UNPLUG the power source while filling or emptying the tank.
- DO NOT spray water or liquid over the device and the control panel
- DO NOT operate the cleaner without proper grounding.
- DO NOT place the device on a soft surface, where the vents could be blocked.
- Always turn the heater off after using as leaving it on can cause the fluid to evaporate and damage the internal components.
- Upon completion of the cleaning cycle, turn the heater button off and isolate the machine from the electrical supply.
- Take care when adding or removing items from the cleaning tank as the fluid is likely to be hot and displaced fluid can damage the internal components. Any displaced fluid must be dried up immediately.
- In the event of failure/emergency, disconnect the mains supply by removing the plug from the mains socket.
APPLICATIONS
This list is almost endless. Provided the product is nonporous and can normally be immersed in water almost anything can be thoroughly cleaned. Here are some examples:
| ● Watchstraps● Tattoo needles● PCB Boards etc● Engine/Model parts● Toothbrushes & Dentures● Electrical components● Make-up cases● Diesel injection pumps | ● Turbochargers● Motorcycle radiators● Vehicle differentials● Surgical equipment● Engine cylinder heads● Bicycle derailleurs● Coins and other collectibles● Milking parlor equipment | ● Golf clubs&grips&golf balls● Printer heads and toner cartridges● Horse bits&stirrups &horse brasses● Motorcycle engine crankcases● Knives, bayonets, and other militaria● Gun and gun components● Jewelry especially gold,silver & platinum |
Ultrasonic cleaning is not recommended for the following gemstones: Opal, Pearl, Emerald, Tanzanite, Malachite, Turquoise, Lapis, and Coral.
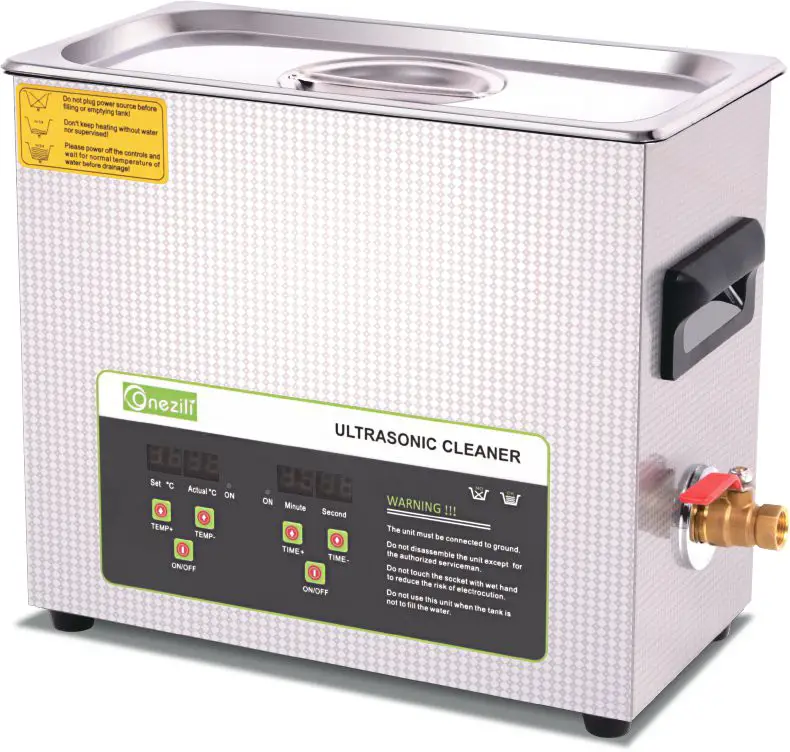
OPERATION
- Fill stainless steel tank with liquid; Plug the cleaner into a grounded outlet; After powering on, The temperature displays the actual environment temperature, LED displays 3 minutes, which is default time.
- Time setting:
- Press the “TIME-/TIME+ ”shortly at a time means time increase/reduce 1min at a time, press and hold means time will increase/reduce by 1mins continuously. 2). The cleaning stops when the timer counts down to 00:00. If the unit needs to be stopped before the timer runs up, press the ON/OFF button.
- Set temperature: Press “temperature-/temperature+” shortly at a time means time increase/reduce 1 ℃ at a time, press and hold there means time will increase/reduce by 1℃. Usually, the best results are within 40℃ to 60℃.
- After time and heat setting, press the ON/OFF key to start both functions. Press the “Heating” button “OFF”, the heating function will stop. The same for Ultrasonic function.
- Empty the tank and clean both the outside and inside of the cleaner with a clean and dry cloth for next use.
NOTE:
- Do not run the cleaner continuously for more than one hour.
- Do not pour water out until it’s cooling, Hot water will hurt you and damage the machine itself.
DIFFERENT WAYS OF CLEANING
General Cleaning—use only tap water. Use warm temperature about 50℃.Enhanced Cleaning—add a few drops of standard washing up liquid,liquid soap, or detergent into the water, other non-acidic cleaning agents can also be used.Extensive Cleaning—removing tarnish, carbon & rust from non-plated metals, it is recommended to use specialist cleaning solution in associated using an ultrasonic cleaner.WARNING: Strong acid or alkaline cleaning solution will cause corrosion, rust, and even puncture of the tank or machine body. To overcome this problem, dilute to mild PH solution or request for a tank made of a specific grade of stainless steel like SUS304.The cleaning solution will deteriorate in effectiveness over time and use. It is important to regularly change the fluid and carefully wash the inside of the cleaning tank in order to preserve the effectiveness and longevity of the cleaner. Do not use corrosive or abrasive cleaning products on the tank, which must be wiped down and dried before it can be re-connected to the electrical supply.NOTE: If the machine starts to spark, smoke, the smell of burnt electrics or display any other fault the operator must immediately stop the machine, isolate the electrical supply and contact the supplier. Continued use is dangerous.
ADVANTAGE
Ultrasonic is widely used throughout industries to remove difficult contaminants from the parts during or after the manufacturing process which might require a stage of clearing before the next process. In general, if an item can be cleaned with liquid, it can be cleaned much faster and more thoroughly with an ultrasonic cleaner, Compared to traditional solvent/scrubbing meth- ods of cleaning in a parts washer, our ultrasonic cleaners:
- Produce less mess during use
- Less chemistry
- Reproducible result
- Are more effective at removing contamination
- Are quicker to achieve the results you want
- Are heated to allow cleaning solvents to work more effectively
- Use mechanical timers for simplicity, precision, and longevity
- Save employee time (and consequently money) by enabling ‘switch on and leave’ cleaning
FOR BETTER CLEANING EFFECT
- The item should be immersed well into the water.(do not exceed the “MAX” mark)
- Warm water( never hot or boiling) and a small amount of washing-up liquid will help increase the cleaning performance.
- Make sure there is good space around each part you put in the tank, The more items that you place in the tank the less efficiently it will clean. It is not advised to overlap items, If you lay items one on top of the other the system doesn’t work the way it’s supposed to.
- Basket use. Do not put items directly into the bottom of the tank, better cleaning effect with a suitable basket. A metal basket absorbs less ultrasonic energy at about 8%.
- Temperature: The higher temperature the better the cleaning effect. However, when the temperature exceeds 70 ℃~80 ℃, the cleaning effect will be affected. The best temperature we suggest is 40 ℃~60 ℃.
SPECIFICATIONS
| Model | Tank Size | Overall Size | Volume | Power | Frequency | HeatingPower | Timesetting | Temperature |
| (L*I*1Om m | (L*841 Om m | L | W | KHz | W | Min | ‘C | |
| OZL-1300 | 150x 140×65 | 100x 170x 150 | 1. | 60 | 40 | 100 | 1-99 | 0-80 |
| 021-4000 | 150x 140x 100 | 190x 170×220 | 2 | 60 | 100 | 1-99 | 0-80 | |
| 0.21–3A | 240x 140x 100 | 270x 160×220 | 3 | 120 | 100 | 1-99 | 0-80 | |
| OZIAA | 300x 1 55x 150 | 330x 180×280 | 6 | 180 | 300 | 1-99 | 0-80 | |
| 07-1-10A | 300x240x 150 | 330x270x280 | 10 | 240 | 300 | 1-99 | 0-80 | |
| 07-1-15A | 330x300x 150 | 360x330x280 | 15 | 360 | 400 | 1-99 | 0-80 | |
| OZL-20A | 500x300x 150 | 530x330x280 | 20 | 480 | 500 | 1-99 | 0-80 | |
| OZL-30A | 500x300x200 | 530x330x330 | 30 | 600 | 500 | 1-99 | 0-80 |
H: 1-99 mins can be adjustableT : 0-80 ℃ temperature can be adjustableD: Digital display
 report this ad
[xyz-ips snippet=”download-snippet”]